Why Is My CHKDSK Taking So Long?
CHKDSK (also known as Check Disk) is a Windows system tool that can verify the integrity of the file system, list and correct the errors on the disk. This tool can start during the system startup. If it launches every time the system boots up and stalls for an incredibly long time, there might be some problems with the disk or system.
CHKDSK taking forever might occur when:
- You don’t shut down your computer properly.
- Remove the USB flash drive without clicking on Safely Remove.
- There are too many disk fragmented files on the disk.
- Some system files are missing or corrupted.
- The disk itself has bad sectors.
Running the CHKDSK scan might take a few hours, so you had better leave it to run overnight and wait for the issue to resolve itself first. Even though you may see no progress in the scanning bar, the scan will continue. Then, you can try the following methods to fix CHKDSK taking forever.
How to Fix CHKDSK Taking Forever?
# Preparation: Back up Your Files on the Hard Drive Beforehand
Before taking any actions, it is highly recommended to back up the important files to the target drive. Speaking of Windows file backup, most people tend to choose a free backup software – MiniTool ShadowMaker. This hand tool simplifies the backup process and it is easy to follow. Here’s how to create a file backup on Windows machine:
Step 1. Download & install MiniTool ShadowMaker Trial and then launch it.
MiniTool ShadowMaker TrialClick to Download100%Clean & Safe

Step 2. In the Backup page, go to SOURCE > Folders and Files to choose the files/folders you want to protect. In DESTINATION, choose an external hard drive or USB flash drive as the storage path for the backup task.
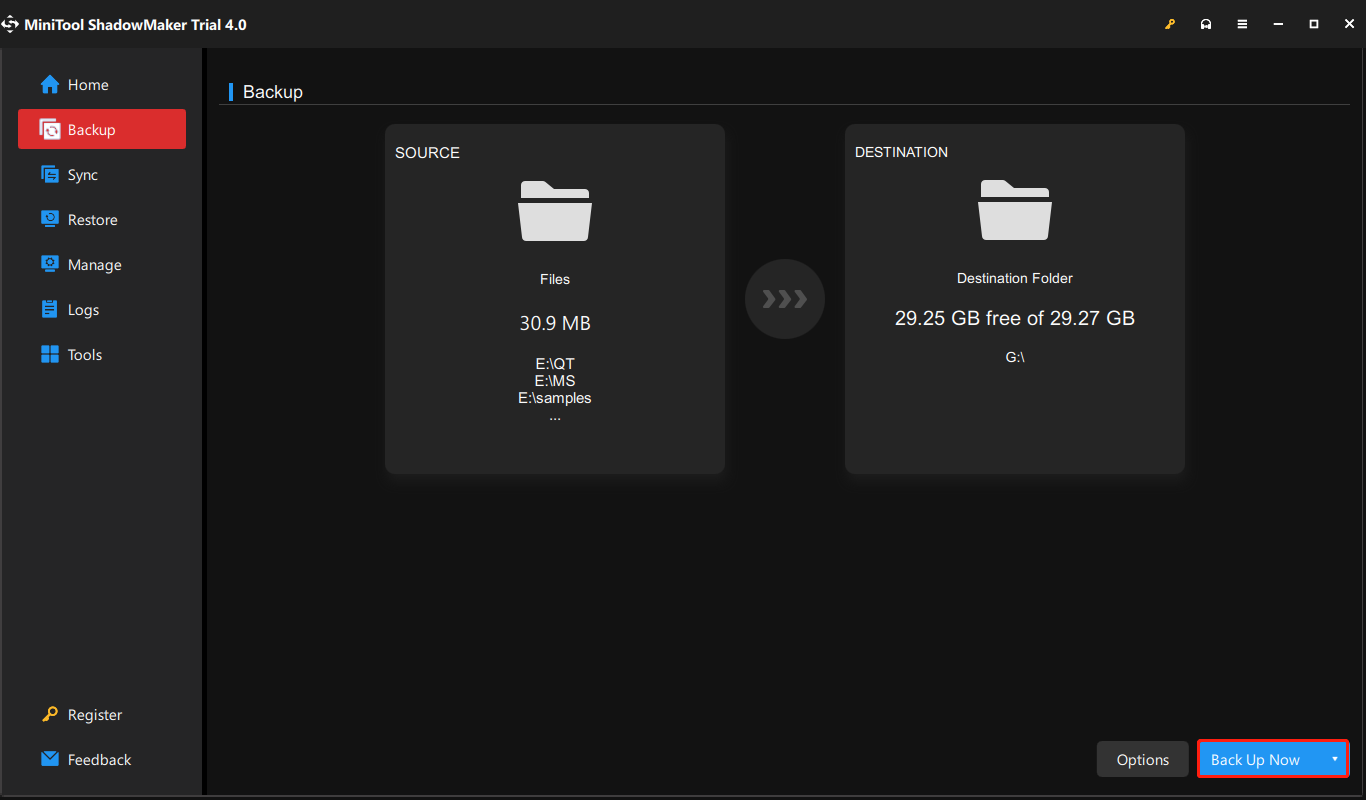
Step 3. Click on Back Up Now to start the process at once.
Fix 1: Perform a Clean Boot
It is reported that performing a clean boot can fix CHKDSK taking forever. Here’s how to do it:
Step 1. Press Win + S altogether to open the search bar.
Step 2. Type system configuration and hit Enter.
Step 3. Under the Services tab, tick Hide all Microsoft services and hit Disable all.
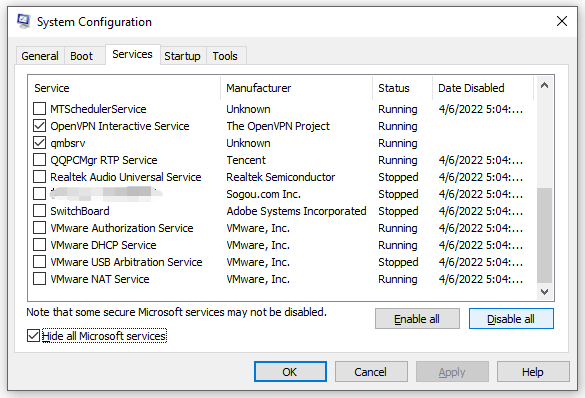
Step 4. Under the Startup tab, click on Open Task Manager.
Step 5. In the Startup tab, right-click on all the items one by one and choose Disable.
Step 6. Return to the Startup tab of System Configuration > click on OK > reboot your system.
Fix 2: Defragment Hard Drive
Another potential cause of CHKDSK taking forever is the presence of fragment files. If there are too many fragment files on the hard drive, you can spend a few minutes defragmenting it. To do so:
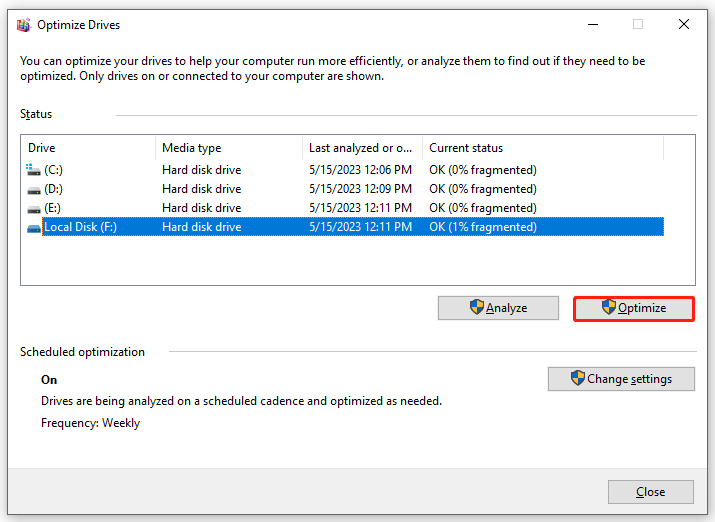
Step 1. Type defrag to locate Defragment and Optimize Drive and hit it.
Step 2. Select the drive you want to defrag and hit Optimize to start the process.
Fix 3: Run Disk Cleanup
If CHKDSK taking forever still exists, the temporary files stored in Windows might be the cause. In this case, you can use the Disk Cleanup utility to remove these files. Here’s how to do it:
Step 1. Type disk clean in the search box to locate Disk Cleanup and hit it.
Step 2. In the popping up menu, choose the drive you want to clean and press OK.
Step 3. Check the files like Temporary Files, Temporary Internet Files and others that you want to get rid of.
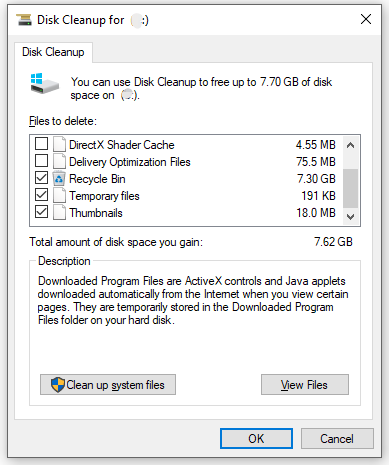
Step 4. Click on OK and then the selected files will be deleted.
Fix 4: Perform SFC & DISM Scan
Any corruption in the system files can also lead to CHKDSK taking forever. To fix this problem, you can run the SFC (System File Checker) scan to repair the corrupted system files. If SFC fails to solve CHKDSK taking forever Windows 10, you need to try the DISM (Deployment Image Servicing and Management) command to fix the core computer file corruption. Follow these instructions:
Step 1. Run Command Prompt with administrative rights.
Step 2. When the command window opens, type sfc /scannow and hit Enter.
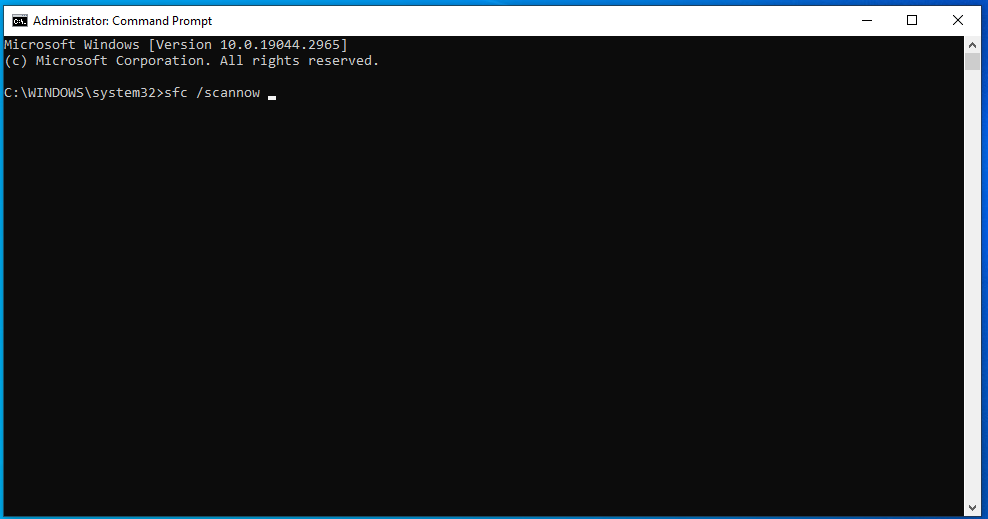
Step 3. Once the SFC scan is finished, reboot your computer and run Command Prompt as an administrator again.
Step 4. Execute the following command one after another and don’t forget to hit Enter. This process might take quite a while, so please wait patiently.
DISM.exe /Online /cleanup-image /scanhealth
DISM.exe /Online /cleanup-image /restorehealth
DISM /Online /cleanup-Image /startcomponentcleanup
Step 5. After the DISM scan is complete, check if CHKDSK taking forever is gone.
Fix 5: Run Startup Repair
If CHKDSK taking forever still persists and you cannot boot into Windows, you can use Startup/Automatic Repair to fix boot issues like this.
Step 1. Press and hold the power button to shut down your computer.
Step 2. After a while, reboot your computer and press the power icon again when you see the Windows logo.
Step 3. Repeat these steps two or three times until the Startup/Automatic Repair screen appears.
Step 4. Click on Advanced options > Troubleshoot > Advanced options > Startup/Automatic Repair.
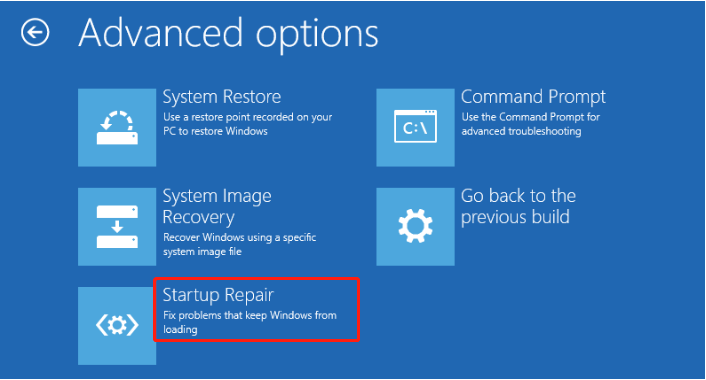
Step 5. Choose your account, enter the password and hit Continue to start the process.
We Need Your Voice
That’s all causes and solutions about CHKDSK taking forever on Windows 10/11. For any questions regarding our product, welcome to share them with us by sending an email via [email protected]. Have a nice day!
CHKDSK Taking Forever FAQ
Can I stop CHKDSK in progress? The answer is definitely no! Any sudden interruption during the CHKDSK scanning process might lead to file system corruption, so you had better not stop it.
The CHKDSK scan can take from 20 minutes to 6 hours. It will depend on the size of the drive, the number of damaged files and bad sectors.
