ChronoSync is a piece of all-in-one backup and sync software for Mac. If you are a Windows user, you might hope to find a ChronoSync alternative. This guide from MiniTool will help you to find ChronoSync equivalent for Windows. Without further ado, let’s dive into it!
Overview of ChronoSync
Developed by Econ Technology, ChronoSync is a powerful backup and sync tool that supports both one-way sync and two-way sync for MacOS. One-way sync transfers data from the source to the destination, which prevents accidental modification to the original data. Two-way sync provides more flexibility because it ensures any changes on one device are reflected on the other.
In terms of features, ChronoSync outperforms Apple’s free Time Machine (the inbuilt ChronoSync alternative on Mac) because it offers a ton of choices for file choice, scheduling, and management. Meanwhile, as a Mac backup software, ChronoSync is designed to sync and back up almost anything connected to your Mac including other Macs, MacBooks, iPads, iPhones, cloud services and so forth. Here, we list the most common scenarios in which you need to sync the data on your Mac:
Mac to Mac
With the bi-directional syncing feature, ChronoSync enables you to access your latest documents and files, regardless of which device you are in front of. If you need to deal with thousands of files on more than one Mac, you can sync the files from a central Mac to multiple Macs.
Mac to Cloud
In addition to the local backup, ChronoSync also supports syncing or backing up your files from a Mac to any supported cloud service like iCloud, Dropbox, Google Drive, Microsoft OneDrive, Amazon S3, and so forth. In this way, changes to one file can be shared with all the users rapidly.
Mac to iPhone or iPad
If you need to sync files or folders from a Mac to your iPhone or iPad, ChronoSync can also satisfy your needs. All you need to do is to download and install InterConneX from App Store. Then, select the target files on your Mac and select the iPhone or iPad as the destination path.
Mac to Other Items
For sync destinations like Windows PCs, Network Attached Storage (NAS), central file server, or drives you can mount as a volume on your Mac desktop or laptop, ChronoSync can also sync files to them effortlessly.
How to Sync Files or Folders with ChronoSync?
After having a basic grasp on ChronoSync, we will dive into how this tool works on your Mac. Now, let’s see how to sync your files for folders with it step by step.
Step 1. Launch Chronosync on your Mac to enter its main interface.
Step 2. When you run this program for the first time, you will be prompted by Chronosync Organizer. Since here we are about to sync files, click on Create a new synchronizer task.
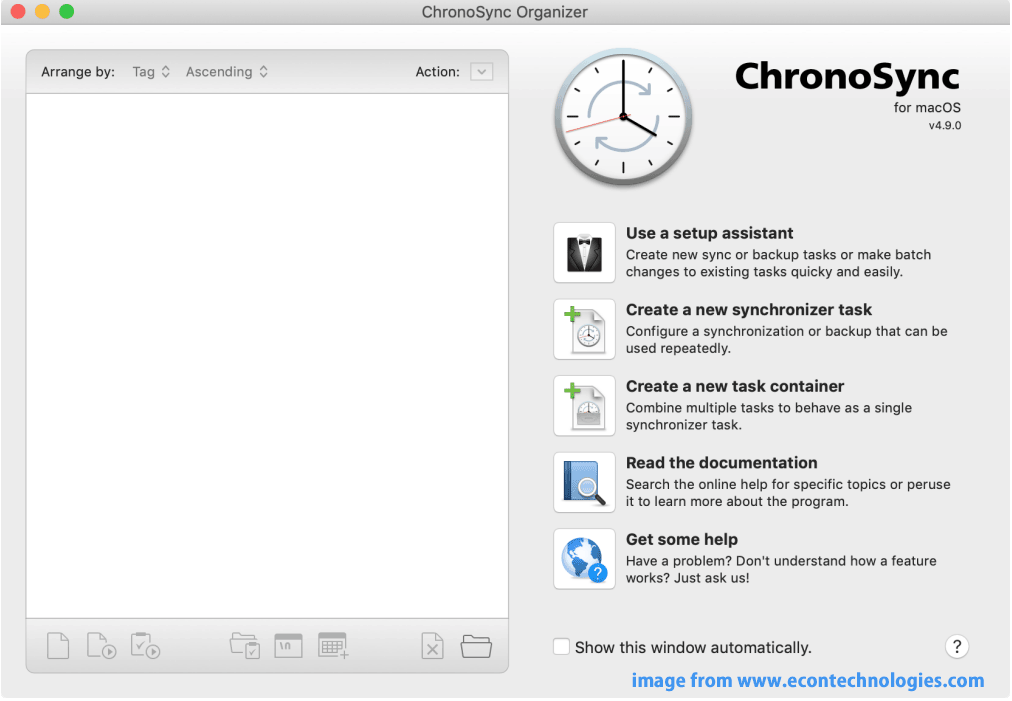
Step 3. Under CREATE A NEW SYNCHORNIC TASK, there are the following 6 core modules and you can pick one of them as per your needs:
- Home Folder Backup – creates a backup copy of your home folder to another volume.
- Bootable Backup – clones your system drive to another drive.
- Backup to a Disk Image – creates a folder backup to a mounted disk image.
- Synchronize Two Folders – syncs two folders that are identical in every way.
- Folder Backup – backs up any folder to another volume.
- Multiple Folder Backup – creates a backup copy of several folders to the same destination path.
Step 4. Give your sync task a meaningful name and then tap on the Create Task button at the lower right corner.
Step 5. Now, you can in the Task Editor window. You can specify what files you need to sync on the left and where they should be placed on the right.
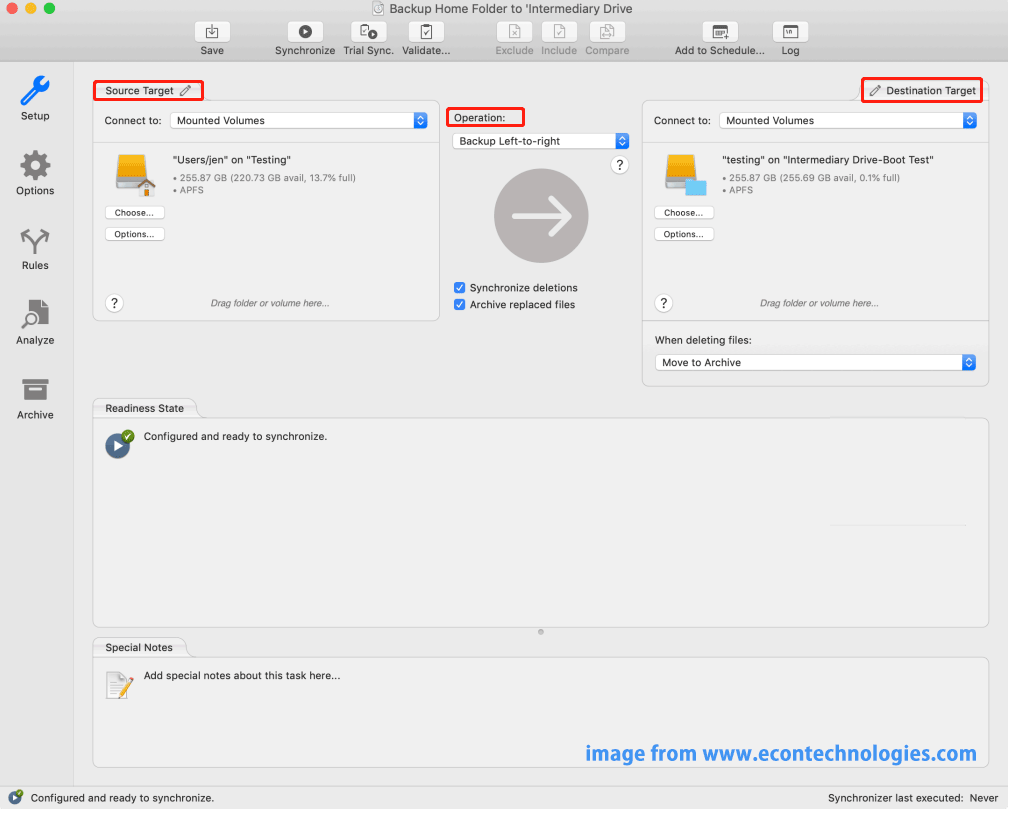
2. To preview your task, you can click on Trial Sync in the tool bar.
Step 6. After specifying the sync source and destination, click on the big arrow icon in the middle of this page to run this task at once.
# Create an Automatic Sync Task with ChronoSync
Once your sync tasks are created, you can see and manage them in the ChronoSync Organizer window. There are 2 ways to schedule your tasks:
Option 1: Simple Scheduling
Most of the time, Simple Scheduling can meet all your needs when creating a backup schedule. Follow these steps:
Step 1. In the ChronoSync Organizer page, select Use a setup assistant from the right pane. Next, click on Simple Scheduling under MODIFY EXISTING SYNCHRONIZER TASKS.
Step 2. Then, it will list all the sync and backup tasks you’ve created. Choose the task you need to specify a desired interval, check the box beside Backup Home Folder to intermediary Drive and then hit Next Step.
Step 3. Select the frequency as your preferences.
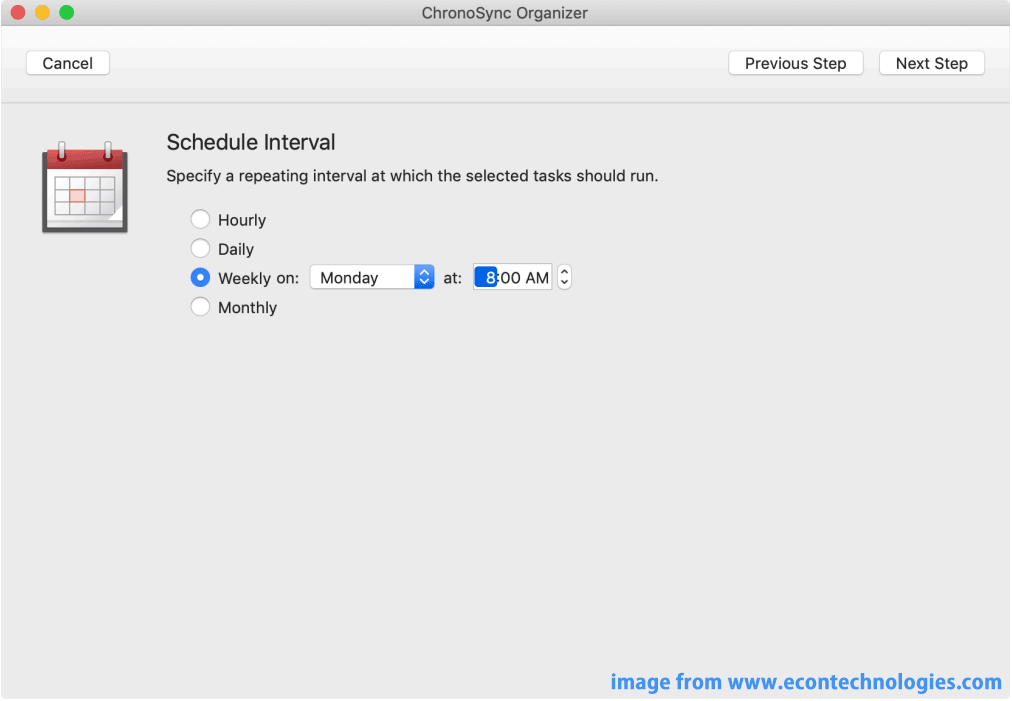
Option 2: Advanced Scheduling
If you prefer greater control and more flexibility for scheduling the task, Advanced Scheduling might be a good choice. Here’s how to create a scheduled task with it:
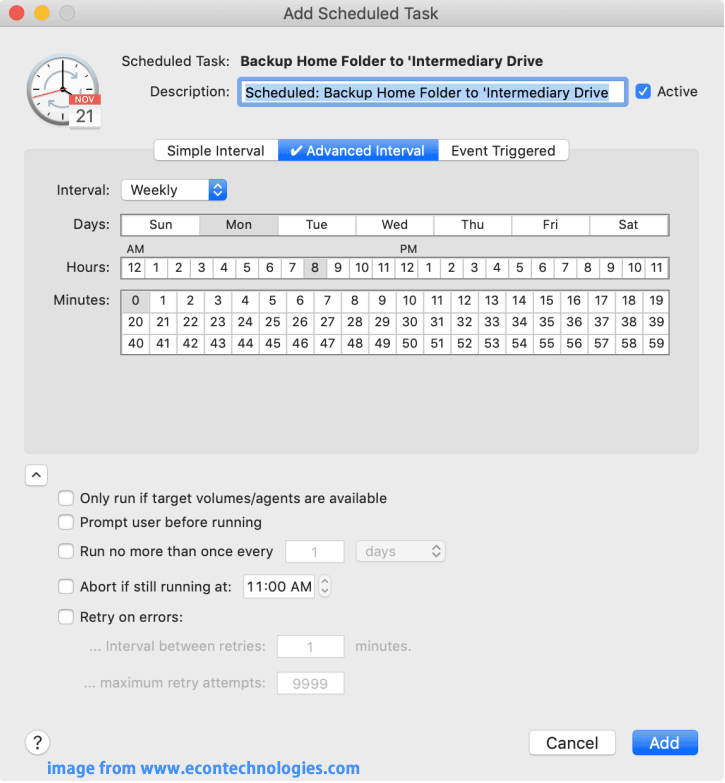
Step 1. In the ChronoSync Organizer window, select the task that you need to set a schedule. Then, click on the Schedule icon at the bottom of the list to invoke Scheduled Task Editor.
Step 2. Now, you are in the Add Scheduled Task window. As you can see, there are more options to schedule your task. You can choose a specific time point or define certain events to trigger the task to run.
ChronoSync Alternative for Windows
Since ChronoSync brings so many benefits in everyday life, some of you might be looking for a ChronoSync for Windows PCs. When it comes to Windows backup software, MiniTool ShadowMaker stands out because it has similar features that ChronoSync embedded. Like ChronoSync, this freeware provides all-in-one data protection and disaster recovery solutions for PCs.
Different from ChronoSync slightly, MiniTool ShadowMaker can only sync and back up files locally, that is, transfer your files to a local device such as a hard disk drive, solid-state drive, USB flash drive, external hard drive, SD cards, NAS, etc. It’s a pity that this freeware only supports one-way sync because it puts more emphasis on maintaining the integrity of the original data.
Here’s how to sync your data with this ChronoSync alternative:
Step 1. Run This Software
1. Download and install the 30-day free trial of this ChronoSync equivalent for Windows.
MiniTool ShadowMaker TrialClick to Download100%Clean & Safe
2. Click on its desktop shortcut and hit Keep Trial to enter the main interface.
Step 2. Select the Sync Source and Destination
1. Navigate to the Sync page.
2. Select what to sync from SOURCE and where to store them in DESTINATION.
Sync source – click on SOURCE and then you can pick the files and folders you want to sync.
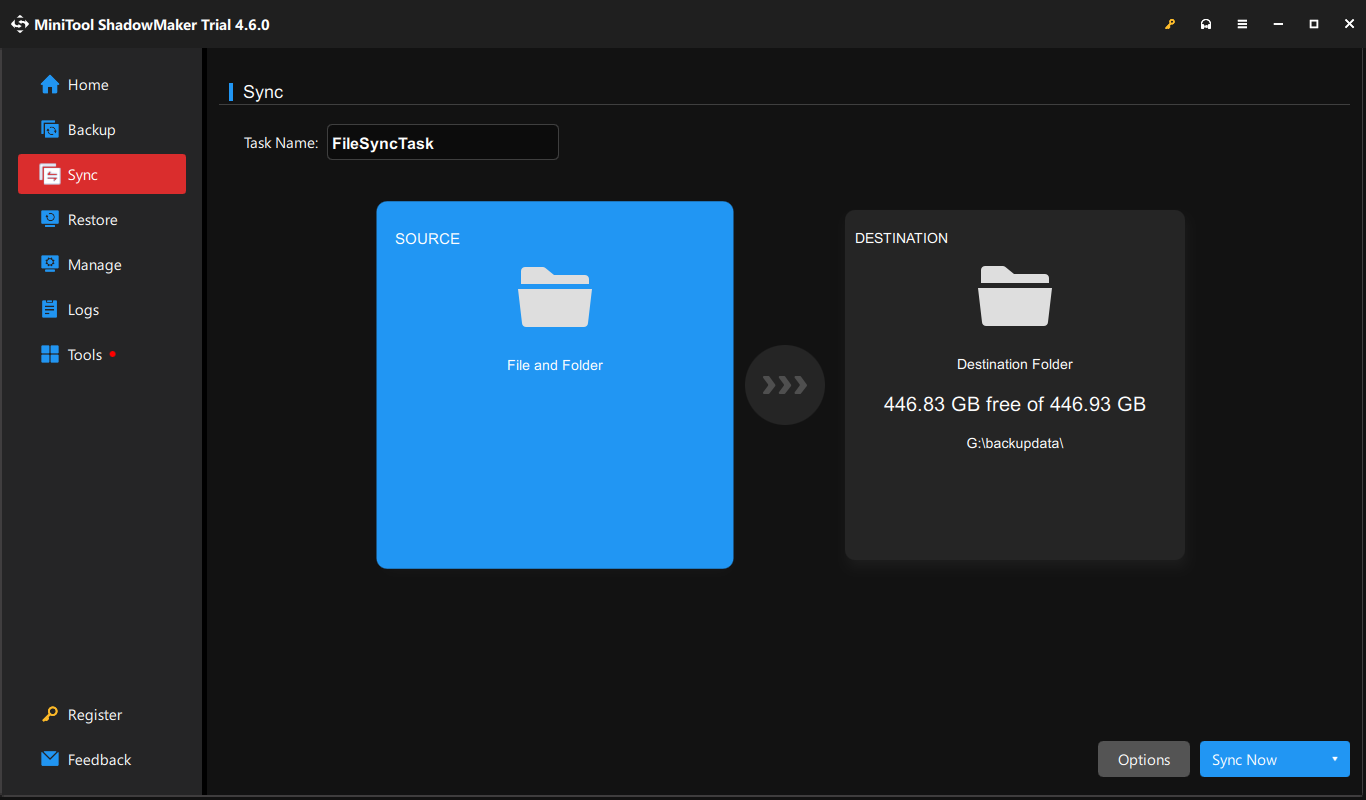
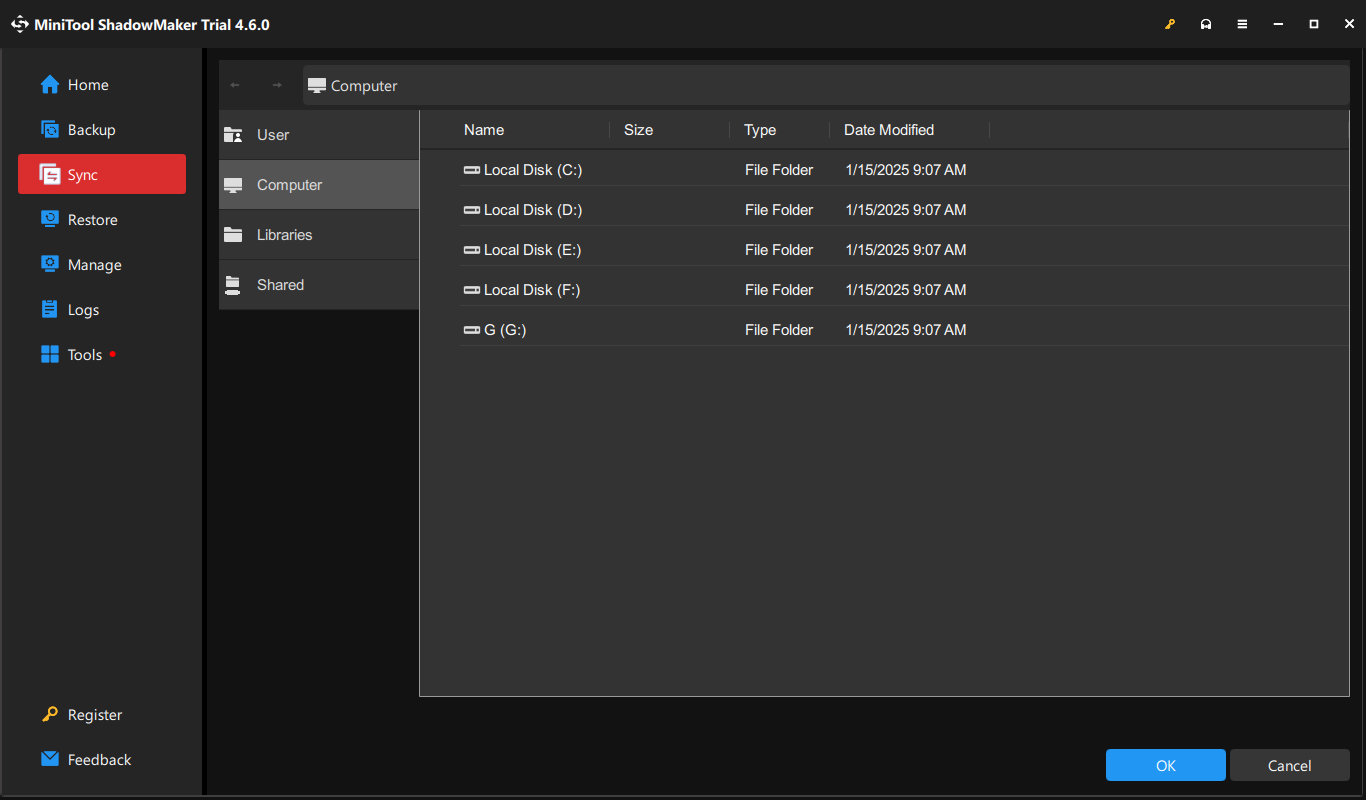
Sync destination – go to DESTINATION to select a storage path for the sync task. There are 4 types of sync destination options available for you:
- User – refers to all folders inside C:\Users\username.
- Computer – lists all the drives that Windows can detect.
- Libraries – represents all the folders in C:\Users\Public.
- Shared – syncs a shared folder from another Windows PC in the same LAN.
Step 3. Edit the Task Name
In the top left corner of the Sync page, you can modify the task name to make it easier to identify.
Step 4. Perform the Task
After checking all the details, you can click on Sync Now to start the process at once or delay the task by selecting Sync Later.
MiniTool ShadowMaker also provides the easiest and smartest way to sync or backup data on your Windows PCs. It offers 3 types of backup schemes: full backup, incremental backup, and differential backup. Meanwhile, its clone feature is also stunning. No matter you need to clone HDD to SSD or clone SSD to larger SSD, MiniTool ShadowMaker has got you covered without more requirements for computer knowledge.
MiniTool ShadowMaker TrialClick to Download100%Clean & Safe
# Create an Automatic Sync Task with MiniTool ShadowMaker
Like ChronoSync, MiniTool ShadowMaker also supports creating a scheduled sync or backup task. Follow these instructions to create an automatic sync task with it:
Step 1. Go back to the Sync page and hit Options in the lower right corner.
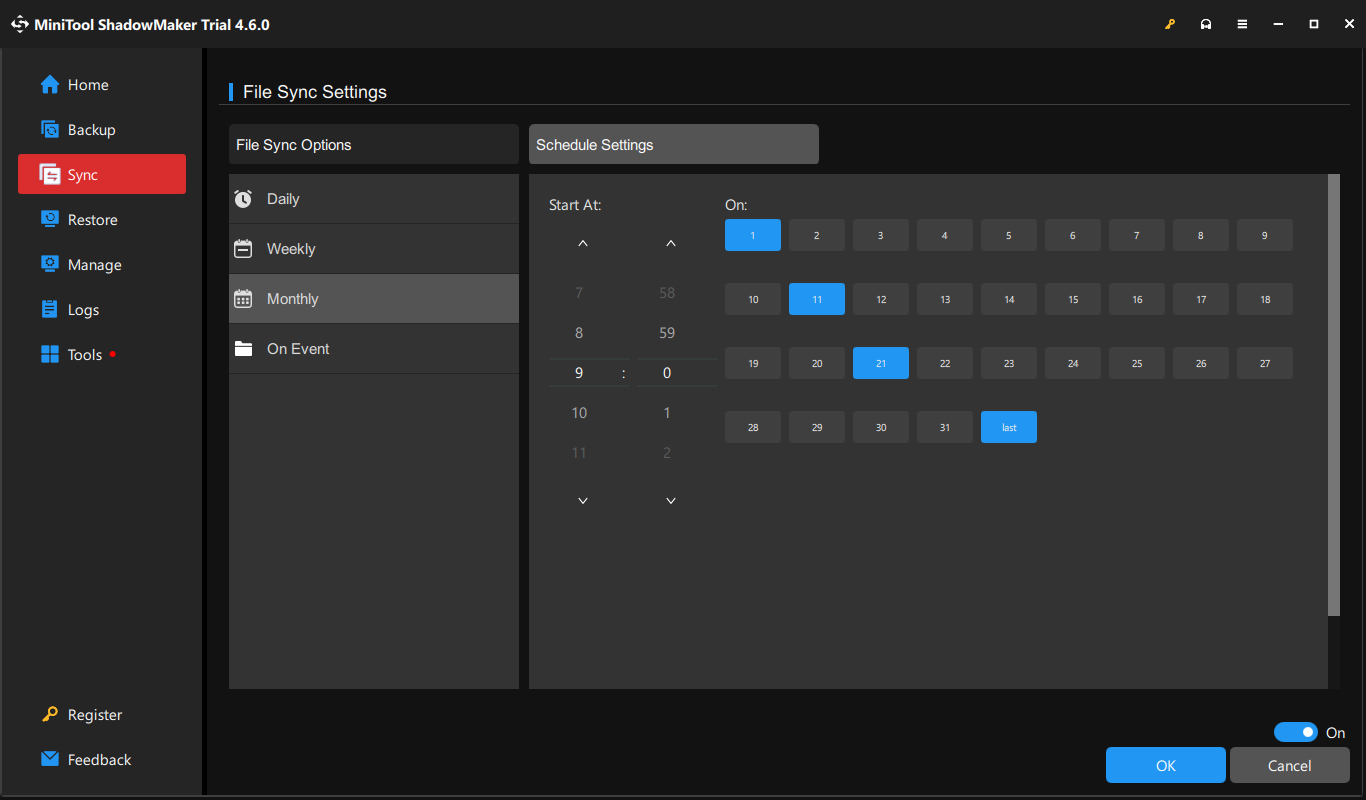
Step 2. Toggle on Schedule Settings manually.
Step 3. Pick a specific time point of a day(s), week, or month and then hit OK to save the changes. Once a sync schedule is created, your tasks will be scheduled to run automatically at the time point that you set.
ChronoSync vs MiniTool ShadowMaker
What are the differences between ChronoSync and MiniTool ShadowMaker? Now, please take a look at the table below which compares the 2 products from several aspects simply.
| ChronoSync | MiniTool ShadowMaker | |
| Supported OS | MacOS | Windows 11/10/8.1/8/7 |
| Sync destination | local or cloud | local |
| Types of Sync | one-way sync & two-way sync | one-way sync only |
| Automatic Sync | supported | supported |
| Filter Sync Files | supported | supported |
| Cost | 15-day free trial | 30-day free trial |
Final Words
What is Chronosync? How does Chronosync work? Is there a ChronoSync for Windows? By now, you must be aware of all the answers for them. This guide introduces Chronosync and its alternative – MiniTool ShadowMaker for you. The former makes Mac backup a breeze, while the latter simplifies Windows PC backup and sync.
MiniTool ShadowMaker TrialClick to Download100%Clean & Safe
Do you meet any problems while using the Chronosync alternative mentioned above? Welcome to share them with us via [email protected]. We will try our best to help you out!
