Many users choose Crucial SSD to replace their original HDD and they clone the HDD using Acronis True Image for Crucial. However, they find that Crucial SSD not booting after cloning. This post from MiniTool offers reasons and solutions.
You may have tried replacing your old HDD with an SSD since SSD has better performance and greater stability. However, it’s common to encounter the “cloned SSD fails to start” issue on Windows 11/10/8/7. Here, let’s talk about the specific SSD brand cloning issue – Crucial SSD not booting after cloning.
I recently cloned my crucial MX500 1TB SSD from my hard drive successfully on a Dell XPS 8700 4th generation computer. When I removed the hard drive and installed the SSD into the same SATA slot and restarted the desktop I received an error code of 0xc0000225 indicating a required device isn't connected or can't be accessed.Microsoft
The following are the possible reasons for the “Cloned Crucial MX500 SSD won’t boot” issue:
1. Boot configuration error: The system may not recognize the new SSD as the primary boot device, which is usually caused by incorrect BIOS or UEFI settings.
2. Hidden system partition: The basic system partition (such as UEFI system partition or recovery partition) may not be cloned properly.
3. Partition scheme mismatch: Your new SSD may have a different partition scheme (MBR or GPT) than the original drive.
4. Driver issues: The new SSD may require different drivers that were not transferred during the cloning process.
5. Cloning issues: Other errors occur during the cloning process. These errors may include corrupted files or incomplete data transfers.
Now, let’s move to the next part to find some effective workarounds.
How to Fix Crucial SSD Not Booting After Cloning
Fix 1: Use an Alternative SATA cable
Before trying to boot the cloned Crucial SSD, it’s crucial to make sure the SSD is properly connected to your computer. Sometimes, incorrect connections or faulty cables can cause the system to not recognize the Crucial SSD properly. It’s recommended to use a reliable SATA cable instead of a USB cable.
Fix 2: Change the Boot Order in BIOS
BIOS setup may not automatically recognize the cloned Crucial SSD as the primary boot device. Thus, to fix the “Crucial SSD not booting after cloning” issue, you can change the boot priority. Follow the below steps to set the Crucial SSD as the first preference.
1. Restart the PC. When the startup screen appears, press the BIOS key constantly to enter BIOS. The key is different depending on your device brand and model, which can be Del/F1/F2/F8/F10/F12.
2. Next, go to the BIOS tab. Under the Boot Option Priorities part, use the arrow key to select the cloned Crucial SSD as the first boot option.
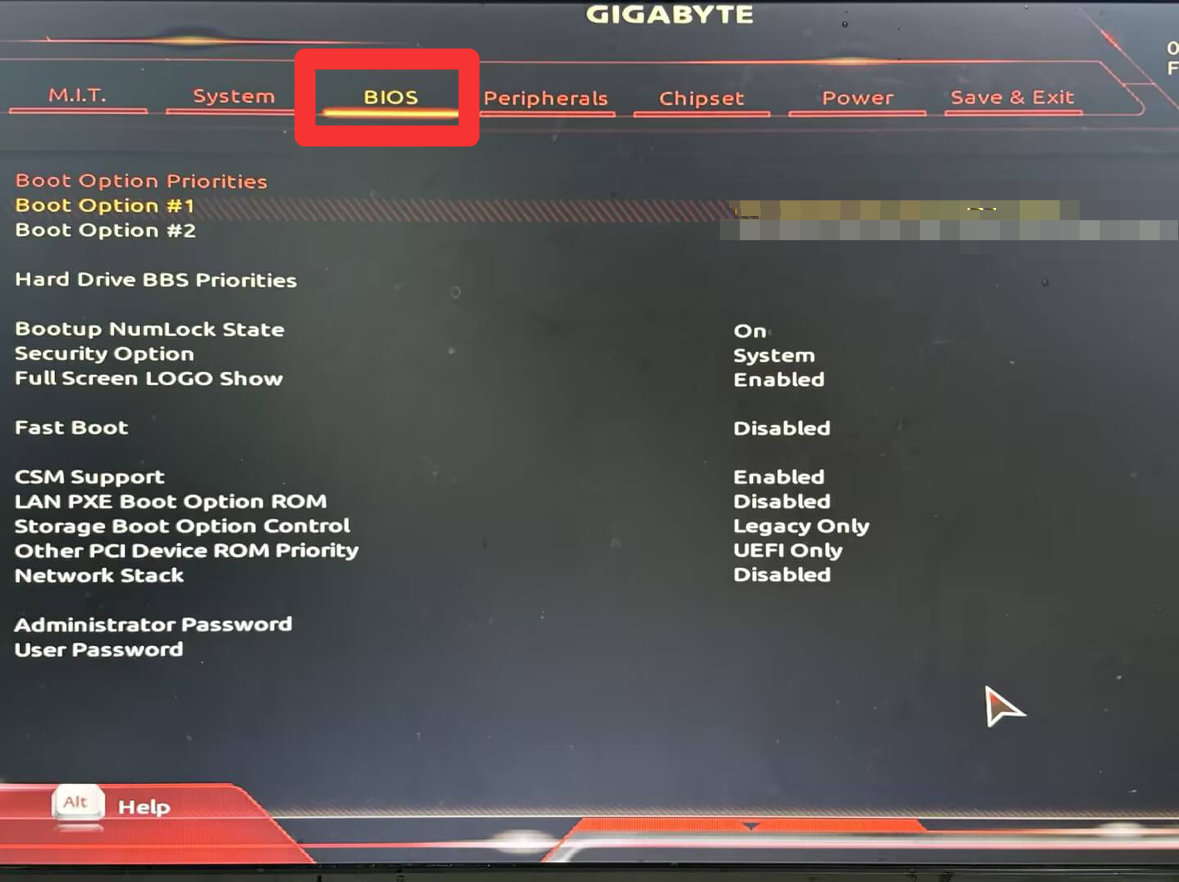
3. Press F10 to save and exit BIOS. Then, restart your computer.
Fix 3: Change the BIOS Boot Mode to Legacy or UEFI
MBR disks are for Legacy BIOS, while GPT disks are for UEFI. So, if you are cloning from MBR HDD to GPT Crucial SSD or vice versa, you need to switch the boot mode accordingly. Using the wrong boot mode may cause the “crucial MX500 SSD not booting after cloning” issue. Here is how to change it.
1. Enter BIOS via the steps in fix 2.
2. Go to the Storage Boot Option Control part. Change the boot option to UEFI Only or Legacy Only and press Enter.
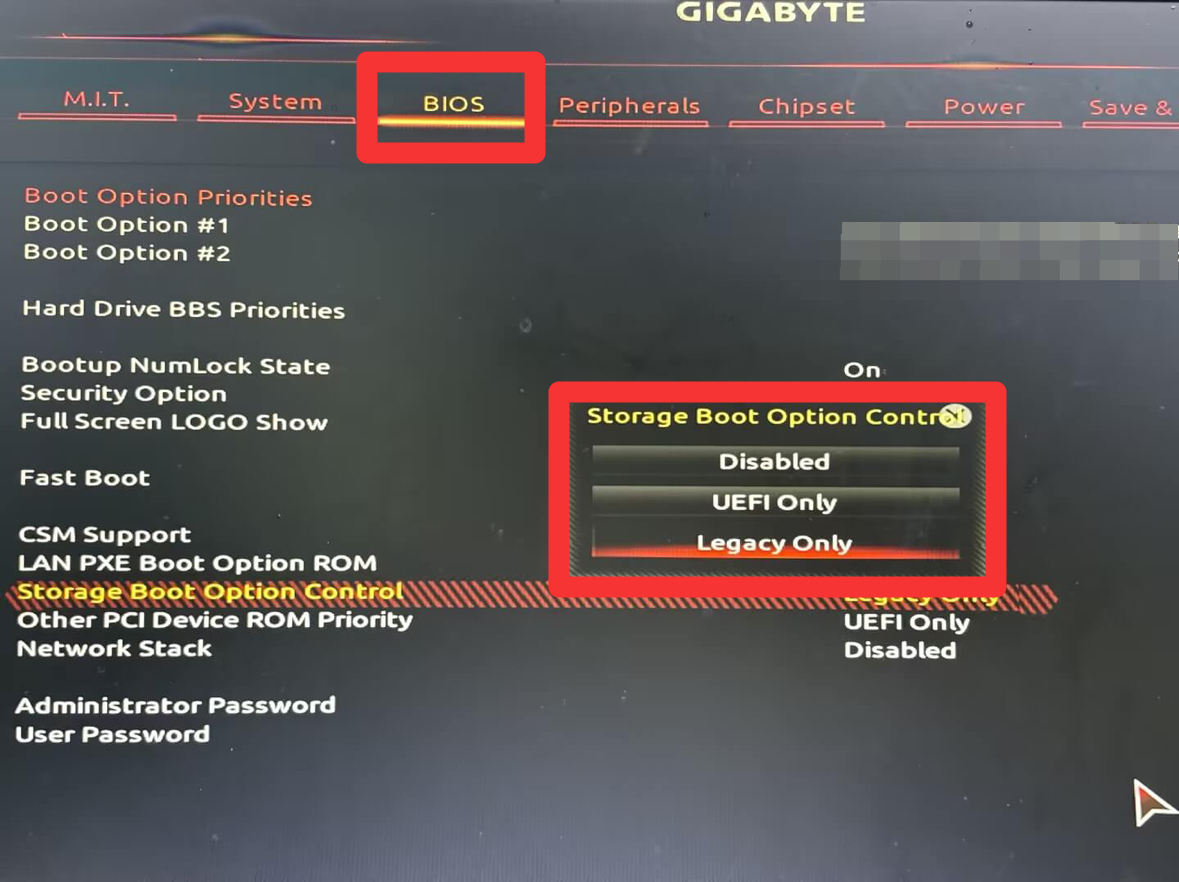
3. Press F10 to save and exit BIOS. Then, restart your computer.
Fix 4: Set the System Partition as the Active Partition
The active partition on the disk contains the boot loader and other necessary boot files. If the system partition of the cloned SSD is not set as the active partition, the system may not boot from that partition. To fix the “Crucial SSD not booting after cloning” issue, you need to set the cloned SSD’s system partition as the active partition. Here is how to do that:
1. You can start the computer using the original hard drive, or create a new bootable disk.
2. Type cmd in the Search box and choose Run as administrator.
3. Then, type the following commands and press Enter after each one.
- diskpart
- list disk
- select disk * (* is the number of the cloned SSD and you should replace it accordingly)
- list partition
- select partition # (# is the number of the cloned SSD’s system-reserved partition and you should replace it accordingly)
- active
MiniTool Partition Wizard DemoClick to Download100%Clean & Safe
Fix 5: Perform the Startup Repair
Windows Startup Repair Tool is designed to automatically diagnose and fix common startup problems. Thus, you can try to perform a Windows Startup repair to fix the “crucial MX500 SSD not booting after cloning” issue.
1. Prepare a bootable USB installation ready. Then, you need to boot the PC from the USB drive to enter the Windows Recovery Environment.
2. Press any key when the Press any key to boot from CD or DVD message appears on the screen.
3. Select your language preferences and click the Next button to continue.
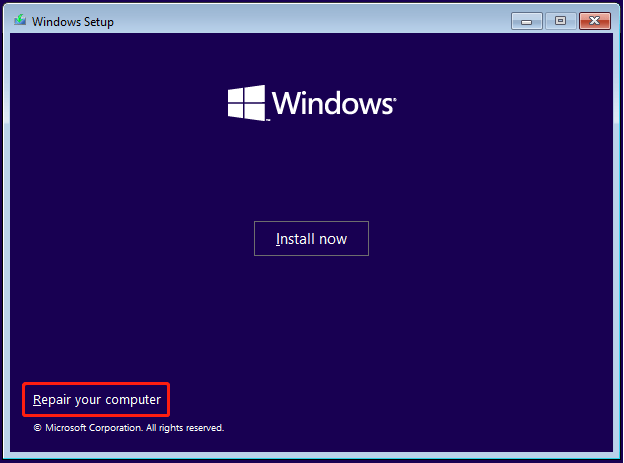
4. Choose Repair your computer instead of clicking the Install now button.
5. Click Troubleshoot > Advanced options > Startup Repair.
Fix 6: Fix the Corrupted BCD
If the cloned Crucial drive fails to boot due to BCD (boot configuration data) corruption, you fix the issue by rebuilding BCD.
1. Enter the Windows Recovery Environment.
2. Then, go to Troubleshoot > Advanced Options. Now, select the Command Prompt option and run the following commands one by one:
- bootrec /fixmbr
- bootrec /fixboot
- bootrec /scanos
- bootrec /rebuildbcd
Fix 7: Contact to the Crucial Support
If you are using the Acronis True Image for Crucial OEM version, it’s recommended to contact Acronis support. They have expertise in understanding specific OEM applications and the complex relationship between Acronis software and its products.
Fix 8: Reclone the Crucial SSD
If all the above methods are not working for the “Crucial SSD not booting after cloning” issue, the problem may be caused by a failed cloning process. Recloning the Crucial SSD is the least effective method you can try.
Way 1: Via MiniTool ShadowMaker
When it comes to easily upgrading storage or protecting critical data, a reliable cloning tool is essential – MiniTool ShadowMaker. It supports cloning HDD to SSD and allows you to clone SSD to larger SSD. It not only supports Crucial SSDs such as Crucial MX500, Crucial BX500, Crucial P5 Plus, etc. but also supports Samsung 870 EVO, WD Black SN750, SanDisk Ultra, and so on.
There are two cloning modes available in MiniTool ShadowMaker – used sector cloning and sector by sector cloning. Download a free MiniTool ShadowMaker Trial Edition for 30 days.
MiniTool ShadowMaker TrialClick to Download100%Clean & Safe
1. Connect the Crucial SSD to the PC. Launch the software and click Keep Trial to continue.
2. After entering its main interface, you need to click Tools in the toolbar and click Clone Disk.
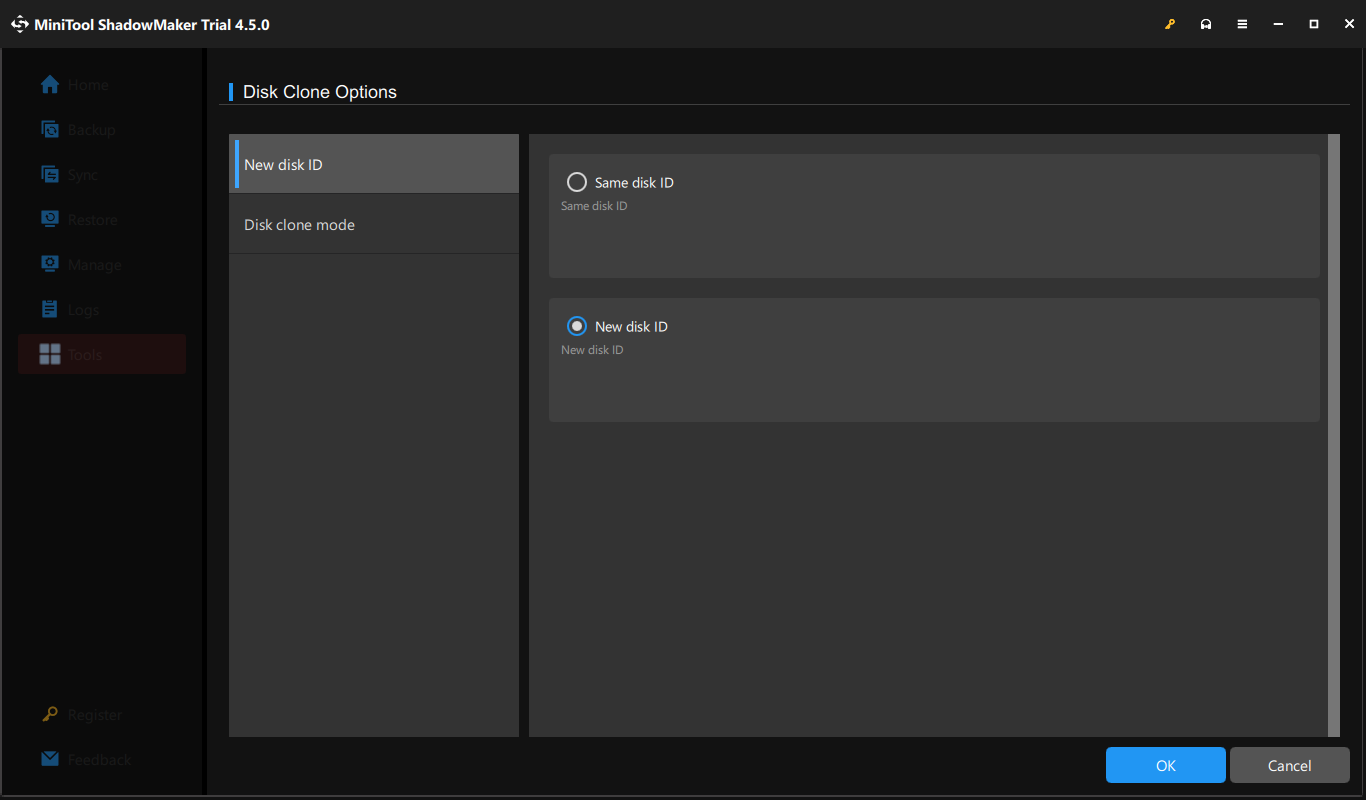
3. MiniTool ShadowMaker enables you to set some options for the cloning and you can click Options to check them. By default, it uses a new disk ID for the target disk, which can ensure the boot from a cloned disk. If you choose the Same disk ID option, one of the disks will be offline. So, don’t change the disk ID mode.
4. You are required to choose the source disk and target disk to begin cloning.
Since you are cloning a system disk, a popup will appear to ask you to register the Trial Edition of MiniTool ShadowMaker after completing the selection of disks and hitting the Start button. Just do it and then the cloning process will start without restarting Windows.
Way 2: Via MiniTool Partition Wizard
To reclone Crucial SSD, you can also try another MiniTool product – MiniTool Partition Wizard, which is the excellent disk partition software for Windows 11/10/8/7. It has many other popular features such as converting MBR to GPT, recovering data from external hard drive, formatting USB to FAT32, and so on.
It offers two cloning features: Copy Disk or Migrate OS to SSD/HD. If you want to back up, upgrade, or replace your hard drive, we recommend you use the Copy Disk feature of MiniTool Partition Wizard to clone the entire hard drive to another disk. Download and install MiniTool Partition Wizard on your computer.
MiniTool Partition Wizard DemoClick to Download100%Clean & Safe
If there are bad sectors on the source disk, the cloning may not succeed. You can perform a disk test using MiniTool Partition Wizard’s Surface Test to check if some bad areas exist. Here is how to check it:
1. Launch it to enter its main interface. Then right-click the disk that you want to check and choose the Surface Test feature from the context menu to continue.
2. Then, click the Start Now button to check the hard drive for errors. After the process is completed, the scanning result will be displayed.
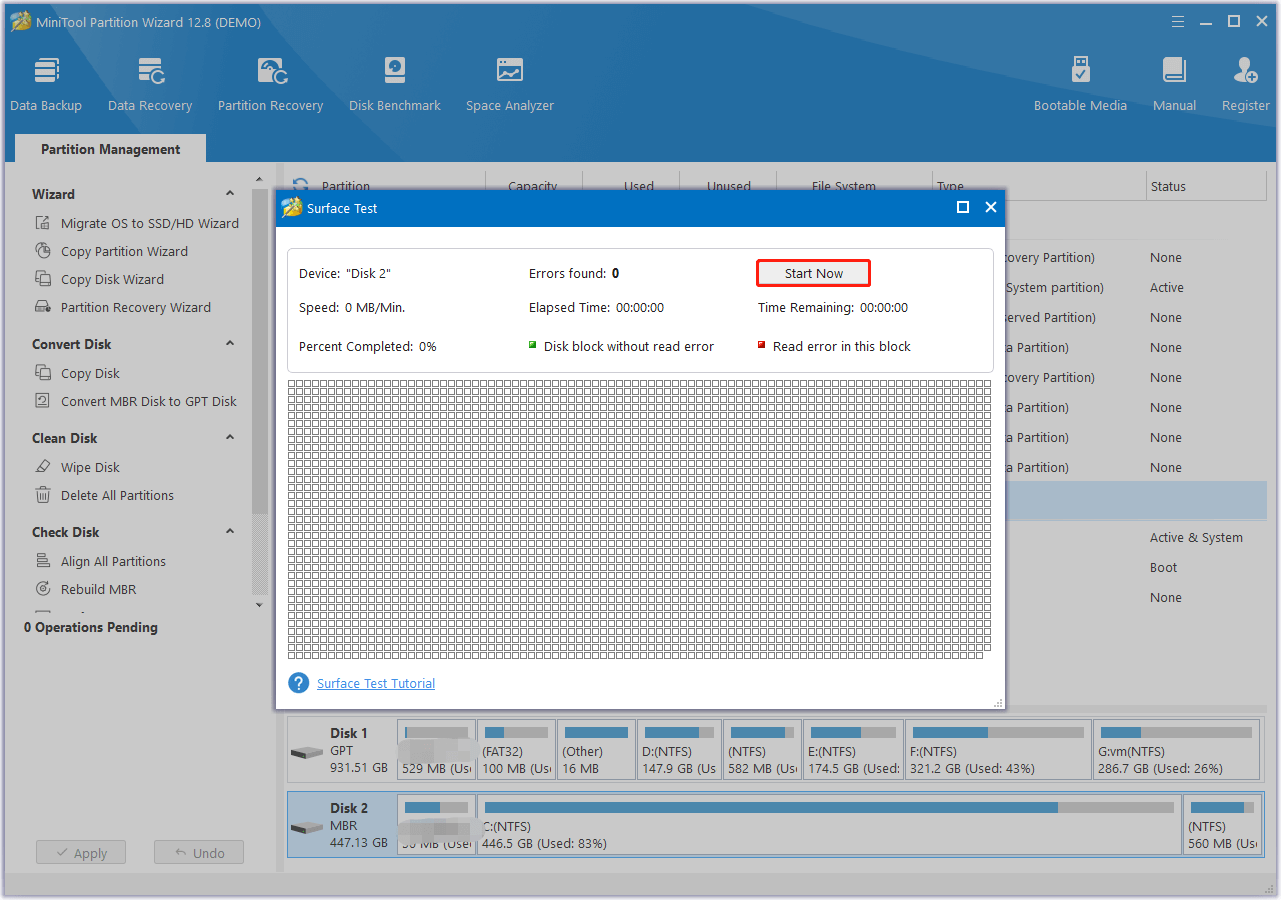
3. If there are no red blocks or only a few red blocks, it means that your SSD health is good or normal. If there are many red blocks, it means that your SSD health is bad. Then, run chkdsk /r to locate bad sectors and recover readable information.
Now, start cloning again.
1. Run the software to enter its main interface.
2. Click Copy Disk in the left panel and then click Next to move on.
3. Choose the disk you want to copy and click Next.
4. Select the destination disk for the copied disk and click Next. After ensuring that there are no important data on the target disk, click Yes to confirm the operation.
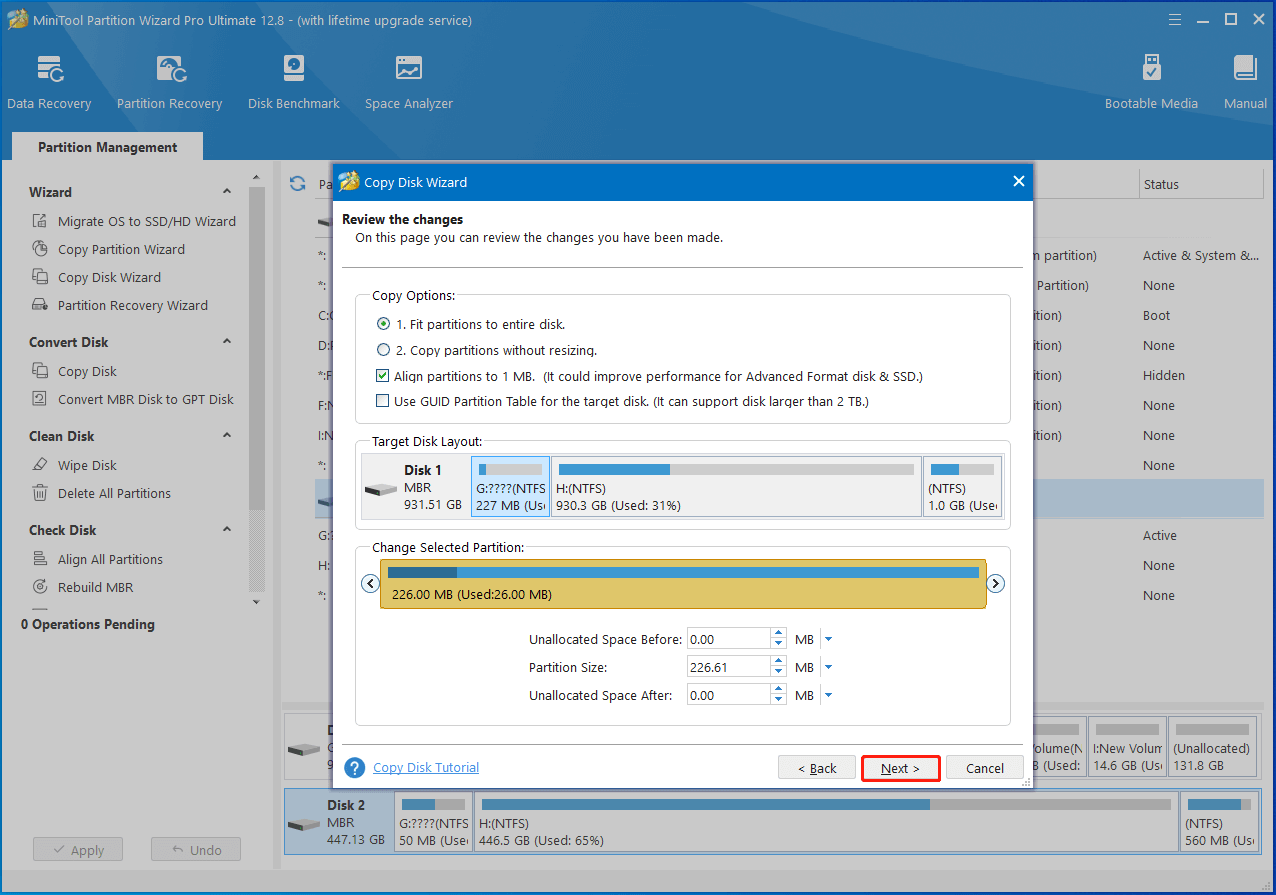
5. Select copy options based on your need and click Next. Click Finish > Apply to execute the operation.
- Select whether to Fit partitions to entire disk(the target disk partition size will be adjusted automatically to fit the entire disk) or Copy partitions without resizing (the size of the source disk partitions will be used), according to your needs. In this example, we will use Fit partitions to entire disk.
- To improve the performance of your SSD, check align your partitions to 1MB.
- To clone your system disk to the GPT disk, check Use GUID Partition Table for the target disk.
Bottom Line
The above content introduces how to get rid of the “Crucial SSD not booting after cloning” issue. You can try the mentioned solutions one by one until the issue gets fixed. If you have any suggestions about MiniTool software, please share your ideas via [email protected]. Thanks for your support!
