Both SAN and NAS provide network storage solutions. Some users want to know the difference between SAN and NAS and which one to choose. Now, read this post from MiniTool to get the details about SAN vs NAS.
Overview of SAN and NAS
What Is SAN
What is SAN? SAN is the abbreviation of storage area network. It is a way to provide you with high-performance, low-latency storage shared access. SAN can provide shared storage for you in demanding applications such as video editing or multiple application servers.
SAN consists of servers and storage, allowing direct Fibre Channel connections from clients to storage volumes to provide the fastest possible performance. SAN also requires a separate dedicated Ethernet network between the server and the client to keep file request traffic outside the Fibre Channel network for higher performance.
What Is NAS
What is NAS? NAS is the abbreviation of network attached storage. NAS is a device connected to the network, which provides file-based data storage services for other devices on the network. The NAS volume is shown to you as a network-mounted volume. The files to be provided are usually contained on one or more hard drives in the system, usually arranged in a RAID array.
Generally, the more drive bays available in a NAS, the larger and more flexible storage options you have. The NAS device itself is a network node. It is much like computers and other TCP/IP devices and they all maintain their IP addresses. NAS uses Ethernet to send and receive files.
SAN vs NAS
We have introduced basic information about SAN and NAS. Then, what is the difference between SAN and NAS? Here is a quick guide on NAS vs SAN.
| SAN | NAS | |
| Fabric | Runs on high-speed Fibre Channel networks | Use TCP/IP network, the most common is Ethernet |
| Data processing | Processes block data | Processes file-based data |
| Performance | Higher performance for environments requiring high-speed traffic | Due to its slower file system layer, it usually has lower throughput and higher latency |
| Price | More expensive | Less expensive |
| I/O protocols | SCSI, iSCSI, FCoE | NFS, SMB/CIFS, HTTP |
| Management | Needs more management time than NAS | Easier to manage – devices can be easily plugged into the LAN and provide a simplified management interface |
| Applicability | Often used in professional and enterprise environments | Often used in homes and small to medium-sized businesses. |
Then, let’s get more detailed information about SAN vs NAS. The differences between them are outlined below.
SAN vs NAS: Fabric
The first aspect of SAN vs NAS is fabric. Traditional SANs usually run on high-speed Fibre Channel networks, but more SANs are adopting IP-based structures due to the cost and complexity of Fibre Channel. High performance is still a requirement of the SAN, and the flash-based structured protocol can help narrow the gap between Fibre Channel speed and slower IP. NAS uses a TCP/IP network, the most common being Ethernet.
SAN vs NAS: Data Processing
Then, let’s see SAN vs NAS for data processing. The two storage architectures handle data differently: SAN handles block data, while NAS handles file-based data.
SAN can access a dedicated SAN file system, while NAS can operate using a global namespace. In the SAN architecture, each server maintains a dedicated, non-shared LUN (Logical Unit Number). The SAN file system allows servers to share data securely by providing file-level access to servers on the same LUN. The global namespace aggregates multiple NAS file systems to present a unified view. The SAN file system enables servers to share files.
SAN vs NAS: Protocol
On the SAN side, the server uses the SCSI protocol to communicate with the SAN disk drive devices. The network uses the SAS/SATA structure or layer mapping to other protocols (such as Fibre Channel Protocol that maps SCSI through Fibre Channel or iSCSI that maps SCSI through TCP/IP) to form a network.
The NAS is directly connected to the Ethernet network through a cable connected to the Ethernet switch. NAS can use multiple protocols to connect to the server, including NFS, SMB/CIFS, and HTTP.
SAN vs NAS: Performance
This section is about SAN vs NAS: performance.
For environments that require high-speed traffic (such as high transaction databases and e-commerce websites), SAN performance is higher. NAS usually has lower throughput and higher latency due to its slower file system layer, but a high-speed network can make up for the performance loss inside the NAS.
SAN vs NAS: Price
Although the cost of high-end NAS will be higher than that of entry-level SAN, in general, the purchase and maintenance cost of NAS is lower than the SAN. NAS devices are considered devices and have fewer hardware and software management components than SAN.
SAN vs NAS: Scalability
The scalability of entry-level NAS devices is not high, but high-end NAS systems use clusters or scale-out nodes to scale. In contrast, scalability is the main driver for purchasing a SAN. Its network architecture enables administrators to expand performance and capacity in a scale-up or scale-out configuration.
SAN vs NAS: Management
The NAS can be easily plugged into the LAN and provides a simplified management interface. SAN requires more management time than NAS devices. Deployment usually requires physical changes to the data center, while ongoing management usually requires dedicated administrators. Yet, NAS is complex to manage in one aspect is that multiple NAS devices do not share a common management console.
SAN vs NAS: Pros & Cons
SAN
Pros:
- High performance: SAN means that other devices in your network do not need to use local storage, making them run more smoothly
- Disaster recovery: It is easy to replicate data from the main location to an off-site SAN. You can quickly copy and get your environment up and running quickly.
- Better redundancy: Since the servers in the SAN operate as a cluster, you don’t have to access a specific device. If one of the servers fails, other devices in the same network will return to normal.
Cons:
- High complexity
- Expensive
NAS
Pros:
- Integrated security: As a single system for file storage and distribution, NAS integrates and centralizes data protection.
- Cheap: NAS is an economical storage solution.
- Simplified architecture: NAS is built like a desktop or server. Simpler architecture means simplified management. Fewer moving parts equals fewer potential points of failure.
Cons:
- Limited scalability
- Minimal speed
SAN vs NAS: Which One to Choose
NAS and SAN serve different needs and you may wonder when to use them.
SAN: When you need to accelerate, expand, and protect.
- SAN is very suitable for enterprise databases and high-traffic e-commerce websites.
- If you want a fast backup, SAN is suitable. The server operating system treats the SAN as additional storage so that it can be quickly backed up to the SAN.
- Video editing applications require very low latency and very high data transfer rates and SAN can satisfy this kind of need.
NAS: When you need to integrate, centralize and share.
- File storage and sharing are the main use cases of NAS in medium-sized, SMB, and enterprise remote offices.
- Scale-out NAS is suitable for processing large files and other intelligent data services and analysis.
- Both VMware and Hyper-V support their data storage on NAS.
- NAS is a good choice for searchable and accessible active archives. High-capacity NAS can replace large tape libraries for archives.
In conclusion, SAN is a high-performance, complex system, ideal for mission-critical tools and companies looking for top storage performance and reliability. NAS is reliable and inexpensive, making it for SMB seeking easy-to-implement storage solutions.
How to Back up Data to NAS
If you choose NAS and want to back up your important data to NAS, this section introduces 2 tools for you to do that – MiniTool ShadowMaker and Windows built-in tool.
Option 1: Back up to NAS with MiniTool ShadowMaker
Option 1 for you is to use the professional backup software – MiniTool ShadowMaler to back up files to NAS. It is a professional backup program that can be used to back up the operating system, disk, partition, file, and folder. In addition, it is a user-friendly program to protect your computer and data.
MiniTool ShadowMaker supports almost all storage devices that can be recognized by Windows, such as HDD, SSD, USB external disks, Hardware RAID, NAS, Home file server, workstation, and so on.
Now, let’s see how to back up files to NAS:
Step 1: Download and Install MiniTool ShadowMaker
MiniTool ShadowMaker TrialClick to Download100%Clean & Safe
- Download and install MiniTool ShadowMaker.
- Launch MiniTool ShadowMaker and click Keep Trial to continue.
Step 2: Select Backup Source
- Go to the Backup page after you enter its main interface.
- Then click the Source module to choose the backup source.
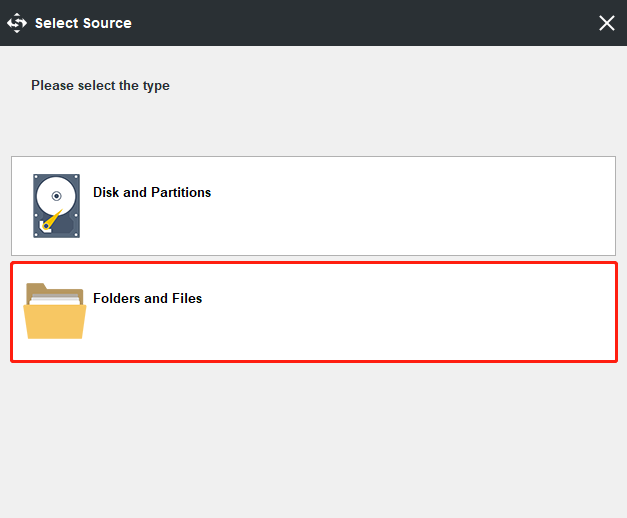
- Choose Folders and Files and choose the files you want to back up and click OK to save your selection.
Step 3: Select the Backup Destination
- Click the Destination module to continue.
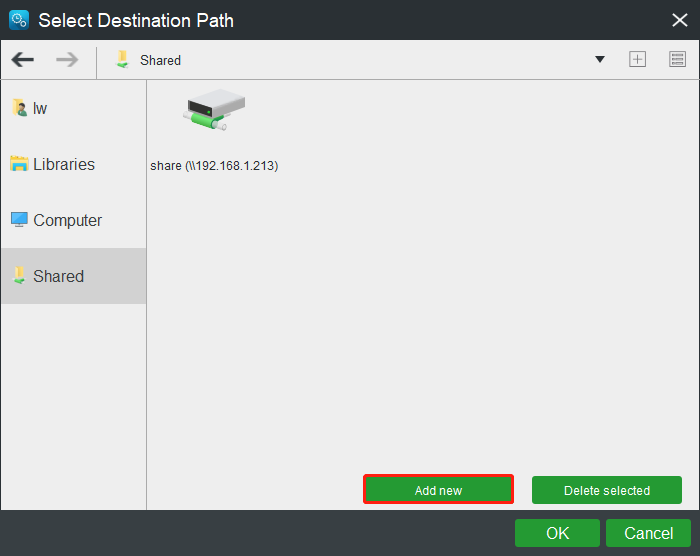
- MiniTool ShadowMaker provides four destination paths to be chosen. You can choose anyone based on your own needs like your NAS device. Here, you need to click the Shared tab. Click the Add new button, and type the path, user name, and password to connect your NAS device. Then, click OK to save your selection
Step 4: Start to Back up
After selecting the backup source and destination, you can click Back up Now to perform the backup task immediately. Or you can click Back up Later to delay the process.
After all of the steps are finished, you have successfully backed up your files to the NAS device. With MiniTool ShadowMaker, you can provide better protection for your computer and keep it safe.
Option 2: Back up to NAS with the Windows Built-in Tool
Option 2 is to use the Windows built-in tool to back up data to the NAS device. You can follow the instructions below:
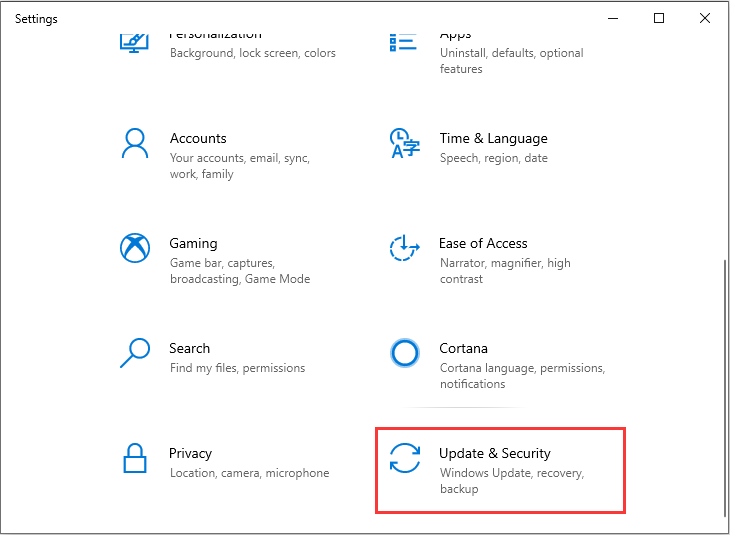
Step 1: Type settings in the Search box to open to the Settings application. Then scroll down to find the Update & Security section and click it.
Step 2: Click the Backup section and click More options. In the Backup options window, you should click See advanced settings. Then click Select drive.
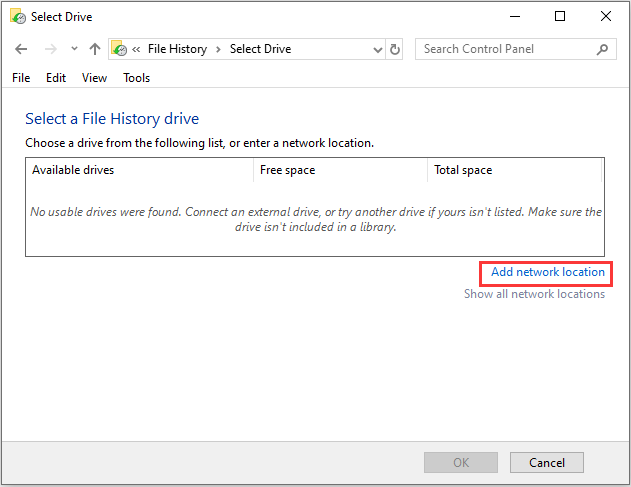
Step 3: In the Select a File History drive part, you can continue to choose Add network location.
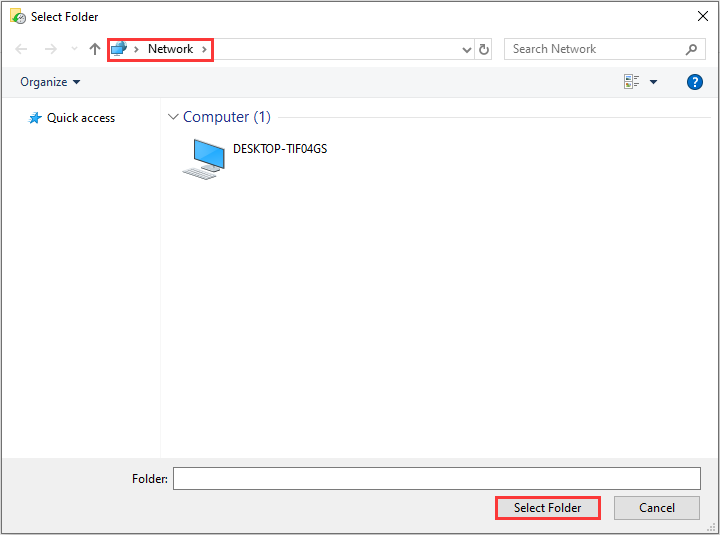
Step 4: Enter the network address. You can also provide the name for the NAS device as well and click Select Folder.
Step 5: Select the backup folder, select the backup path, and click OK and Enable. Then, click Back up now.
Bottom Line
To sum up, this post has introduced information about SAN vs NAS. If you do not know the differences between them and do not know which one is better, the above content may help you.
In addition, if you have any different ideas of NAS vs SAN, you can share them in the comment zone, or please feel free to contact us via email [email protected] and we will reply to you as soon as possible.
