If you want to upgrade your Sony VAIO laptop for better performance, you had better upgrade the hard drive to SSD or replace the original SSD with a larger one. During this process, you need to choose a suitable SSD drive and make sure no data will get lost during the upgrading process. For more details, you can read this post from MiniTool.
Why You Need to Upgrade Sony VAIO Laptop?
What is a laptop upgrade? It is normally a process to offer better capabilities for enhanced PC performance. This process includes exchanging outdated components in your laptop for more up-to-date versions and more advanced devices with experienced features and capabilities. In this way, you can get the most from your machine and maximize its potential.
To upgrade a Sony VAIO laptop, you can change any component inside your laptop if necessary, including hard drives, RAM, graphics cards, wireless network cards, and processors, depending on the type of laptop you have.
Some components may be forbidden to exchange for Sony VAIO laptops because of compatibility issues. You need to do some research and check the guidelines to ensure proper compatibility between different components. Furthermore, you can consider upgrading your RAM to improve your computer’s multitasking and speed.
To prevent some unexpected problems, what we recommend is to upgrade the Sony VAIO laptop hard drive to SSD. This move is also useful to greatly speed up the Sony VAIO laptop. Meanwhile, upgrading your graphics card is also a good choice to deal with graphic-intensive programs. At last, remember to clean out your laptop to improve airflow and performance.
Now, let’s see how to upgrade a Sony VAIO laptop for better performance.
Related post: Operating System Not Found Sony Vaio? Fix It Now
How to Upgrade Sony VAIO Laptop for Better Performance?
Normally, we would like to choose a Sony VAIO SSD upgrade as the first step to improve your PC performance, especially when you are using HDDs. Compared to HDDs, SSDs, with the help of newer and advanced technology, are faster, quieter, smaller, more durable, and consume less energy.
HDDs are easier to get torn over time and if you want to perform an SSD upgrade Sony VAIO laptop, here is a good way to finish that. The main concern about this process is data loss because you need to replace the old drive with the new one and transfer all your data to it. So, how to upgrade a Sony VAIO laptop easily and safely?
Related post: How to Fix It If Your VAIO Failed to Start Windows? [8 Ways]
Preparations for SSD Upgrade
Before you start the upgrading process, here are some preparations you need to finish:
1. Choose a suitable SSD based on the PC’s model to avoid compatibility issues and make sure the SSD has enough disk space to save the disk data on the original hard drive.
2. Make sure no data is saved in the SSD drive because the cloning process can overwrite all the disk space. You had better have transferred all the data to another location or have prepared a data backup.
3. Prepare the right cable for your laptop. Some users’ laptops may just have one hard drive slot and you can choose a USB adapter based on the SSD factor to connect the new hard drive to your PC.
4. Choose a reliable disk cloning software to perform the cloning process in case some errors or accidents cause data loss during the process. We would like to recommend MiniTool ShadowMaker to perform the upgrading task.
How to Perform an SSD Upgrade?
MiniTool ShadowMaker is a comprehensive PC backup software that allows various types of data backups and supports more tools for a better user experience, such as Clone Disk, Media Builder, Universal Restore, Sync, etc. This utility has been dedicated to this data security field for many years so you can offer 100% trust for it.
If you need to upgrade the disk to a larger one without reinstalling the OS, cloning is recommended. MiniTool ShadowMaker also supports cloning dynamic disks which only contain simple volumes to basic disks. Besides, sector-by-sector cloning is available.
MiniTool ShadowMaker is suitable for all the editions of Windows 11/10/8.1/8/7 and various storage media are included. You can download and install this software by clicking the following button and you will get a 30-day free trial version.
If the drive you want to clone is a system drive, please upgrade MiniTool ShadowMaker to the Pro or a more advanced edition. Now, let’s see how to clone a hard drive.
MiniTool ShadowMaker TrialClick to Download100%Clean & Safe
Step 1: Insert the new SSD drive into the device and launch MiniTool ShadowMaker.
Step 2: Enter the license key to activate the software if you need to clone a system drive.
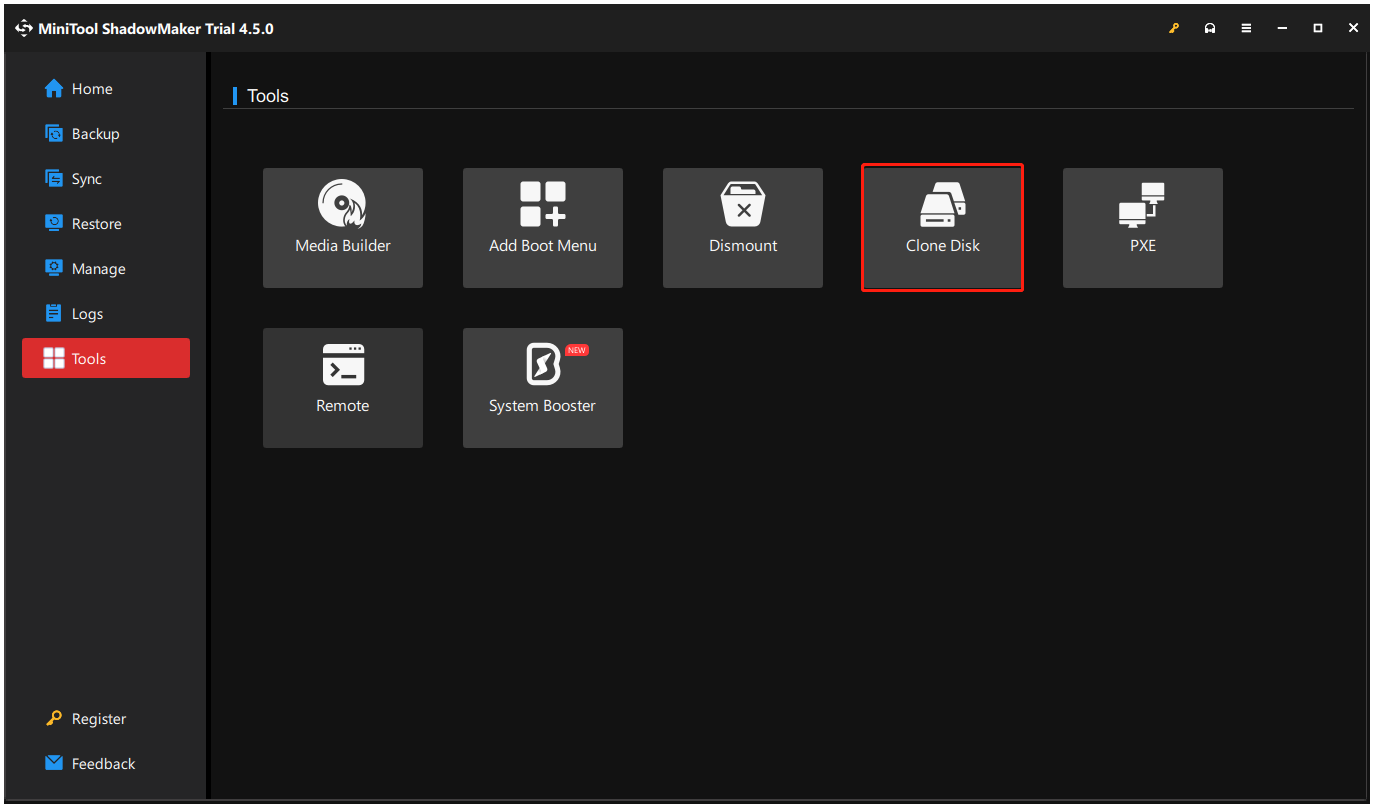
Step 3: Then go to the Tools tab and click Clone Disk.
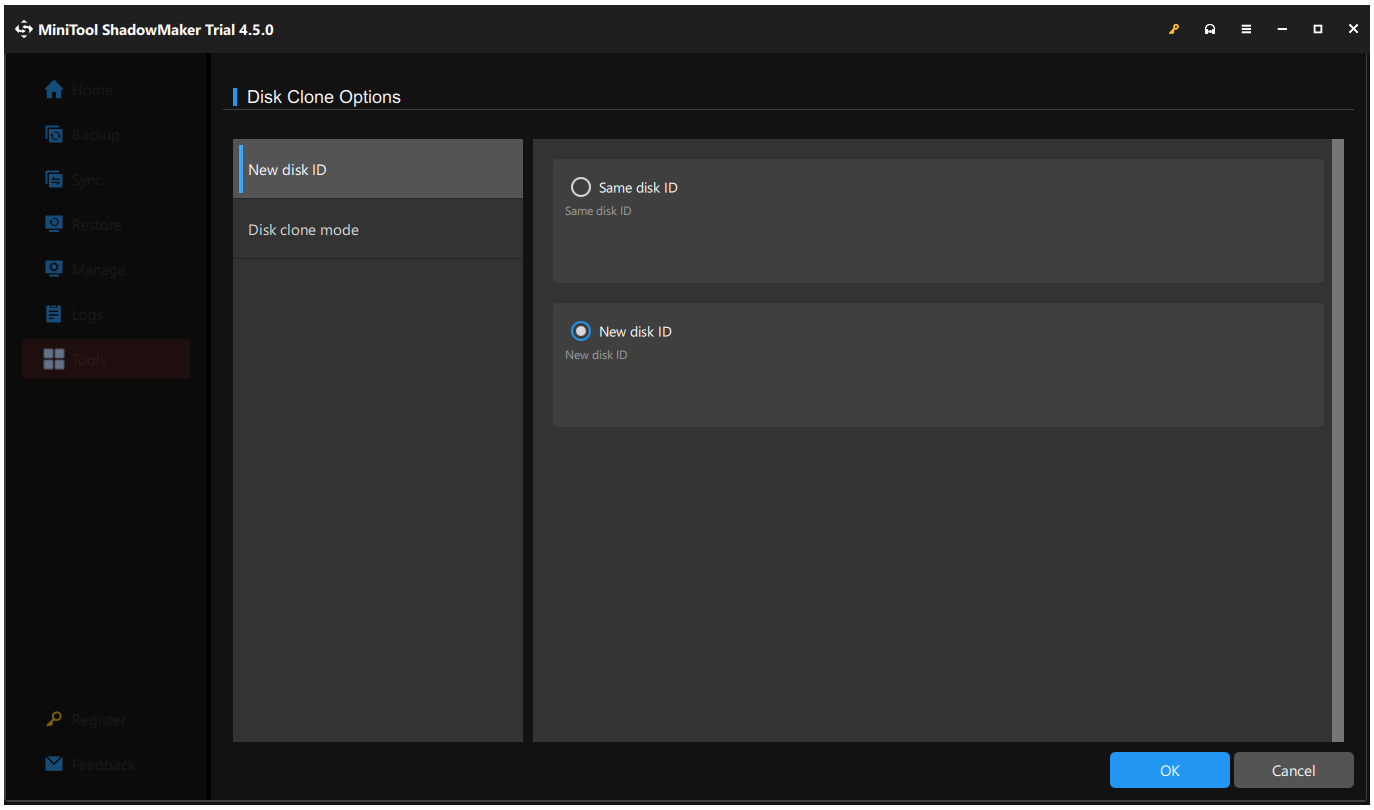
Step 4: Please choose a source disk to clone in the new window and then you can click the Options feature from the left bottom corner to choose your disk clone mode or new disk ID. Then click OK to save the changes.
Step 5: Then you can click Next to go to the next page where you can select your target disk, and click Start to begin the process. You may receive a warning message and click OK to confirm that you want to start the task.
As for this cloning process, it could take several minutes and you can check the remaining time from the interface. Alternatively, you can check the box next to Shut down the computer when the operation is completed so that the computer will shut down automatically.
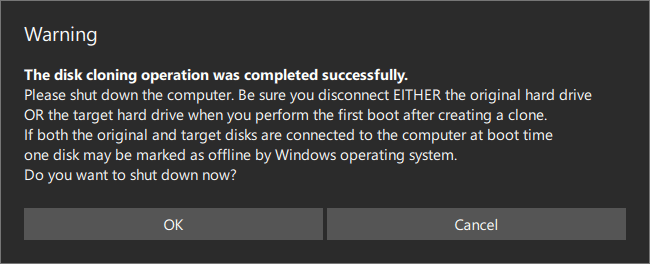
There is another notification you may need to notice, normally, the Disk Clone Option will set New disk ID by default but if you switch it to Same disk ID, you will receive a warning message like the picture shows after the disk cloning. This means that both disks share the same signature and one of them has been marked as offline.
Apart from disk cloning, you can consider disk backup but this method is more complicated. You can first create a disk image backup, in which everything on the hard drive has been compressed into an image file, and restore it to the new drive.
If you prefer this way, MiniTool ShadowMaker, as free backup software, can also satisfy your demands. It allows users to back up system, partitions, disks, and files & folders, and supports password protection for a higher level of security.
It is worth mentioning that the Universal Restore feature is an excellent feature that can help you resolve compatibility issues when you attempt to restore the system to a computer with dissimilar hardware.
How to Install an SSD?
After you have cloned the old hard drive to SSD, you should start with the next move – replacing the laptop hard drive and installing the SSD. Then here is the way to install your new SSD.
First of all, you can access and check your SSD to make sure all the disk data of the original disk is cloned. Then you can press the power button on the laptop to remove any residual charge, and at the same time, make sure the laptop is unplugged and the battery is removed.
Now, open the laptop’s case and ground yourself by touching an unpainted metal surface. This move can protect your drive and components from static damage during the installation process.
Then locate the storage bay and remove the old storage drive. During this process, you need to be careful of any brackets, adapters, support frames, braces, pull tabs, or screws that might be attached to the old storage drive.
When you have removed the drive, you can plug the new SSD into the device in the same manner. You should gently place every component and make sure they fit snugly. Then reassemble your laptop and power on the computer to check if everything works well.
Some of you may fail to find the hard disk even after following the above guide. Designers may change the location to suit the whole layout and performance of the computer. Some are mounted under the laptop, some are installed on the front of the laptop, yet, some are located by the side of the laptop.
Further Reading: How to Upgrade Memory for Sony VAIO Laptop?
Sufficient memory is important to maintain a high system speed and make multitasking seamless. If you want to upgrade the memory for your laptop, try the procedures as follows.
- Shut down your computer and unplug the power cable.
- Discharge any residual electricity by holding the power button for 5 seconds.
- Open the laptop’s case and you can take a picture of that to make it easier when you need to put it back together.
- Ground yourself to touch an unpainted metal surface.
- Locate the memory modules and press down on the clips on the sides of each module. The clip mechanism will push the memory module up and you can pull the module completely out.
- Align the memory module keys along with the memory socket keys for proper installation and press the memory into the socket until the tabs snap into place and secure the memory module.
- Replace your computer’s cover and power on the device to check if everything works well.
Bottom Line
Does your Sony VAIO laptop get slower and slower over time and frequently run into troubles? Maybe that’s a sign for you to upgrade a Sony VAIO laptop for better performance. What you should do is upgrade your HDD to SSD or choose a larger SSD to leave enough room for running the system.
During the upgrade, you may need disk cloning software to transfer your data and ensure data security. As we recommend, MiniTool ShadowMaker has this powerful function and you can follow the guide to perform the SSD upgrade. If you have any issues when using MiniTool ShadowMaker, please contact our support team via [email protected].
Upgrade Sony VAIO Laptop FAQ
1. Regularly delete temporary files and other unwanted software and data.
2. Make sure your C drive has enough space.
3. Upgrade the memory.
4. Disable unwanted startup programs.
5. Keep your software and system up to date.
6. Replace your hard drive and install SSD.
![[Full Guide] How to Recover Data from Sony Vaio in 5 Ways](https://mt-test.minitool.com/images/uploads/2024/05/recover-data-from-sony-vaio-thumbnail.png)
