For Windows Server users, users are allowed to install, configure, and schedule backup jobs by using the Windows Server Backup feature. There are some built-in backup features available for a better backup experience, one of which is Windows Server backup deduplication. If you want to know how to use it, this article from MiniTool will give a guide.
Windows Server Backup Deduplication
Windows Server provides the Data Deduplication feature to optimize the free space for your volumes. This feature can eliminate the repetitive data by checking every portion and piece of your volume, accomplishing Windows Server data deduplication. It’s an ideal method for some complicated and redundant computing operations, especially data backup.
To save time, people will set a time point allowing automatic backups. If the full backup is the prior choice in the regular backup process, your data will be repeatedly backed up to the destination drive, eating up more and more space and resources. When you start the recovery, a disaster occurs – repeated data fills up where it is.
That’s why we called this feature – Windows Server backup deduplication – quite vital for users who are used to applying regular backups. It is quite lucky for users of Windows Server 2012 and later versions because Data Deduplication was added as a new feature since then.
When you enable deduplication, your backup solution deduplicates the backups and saves them to a managed storage. A storage location where deduplication is enabled is called a deduplicating storage. If you allow both the backup sources and destinations with the Data Deduplication feature, which can achieve the maximization of resource utilization.
How to Install and Enable Windows Server Data Deduplication?
Before you start using the Data Deduplication feature, you need to install it by using Windows Server Manager or using PowerShell. After that, you need to enable the feature.
In the following guide, we will take Windows Server 2016 as an example to make it clear. Check it out and follow the instructions to try data deduplication Windows Server.
How to Install Windows Server Data Deduplication?
There are two methods for Windows Server users – via Server Manager or PowerShell.
How to Install Data Deduplication via the Manager Server?
Compared to PowerShell, Manager Server is what users prefer to use and the steps are more facilitated and easier. Let’s see how to work on it.
Step 1: Click the Search icon on the system tray and type Server Manager in Search. Choose the result under Best match to open Server Manager.
Step 2: Click Manage from the top menu bar and choose Add Roles and Features.
Step 3: In the pop-up wizard, click Server Roles from the left pane. If it is grayed out, you can click Server Selection and then the next option will turn to be available.
Step 4: Please expand the File and Storage Services (1 of 12 installed) option and then expand the File and iSCSI Services section.
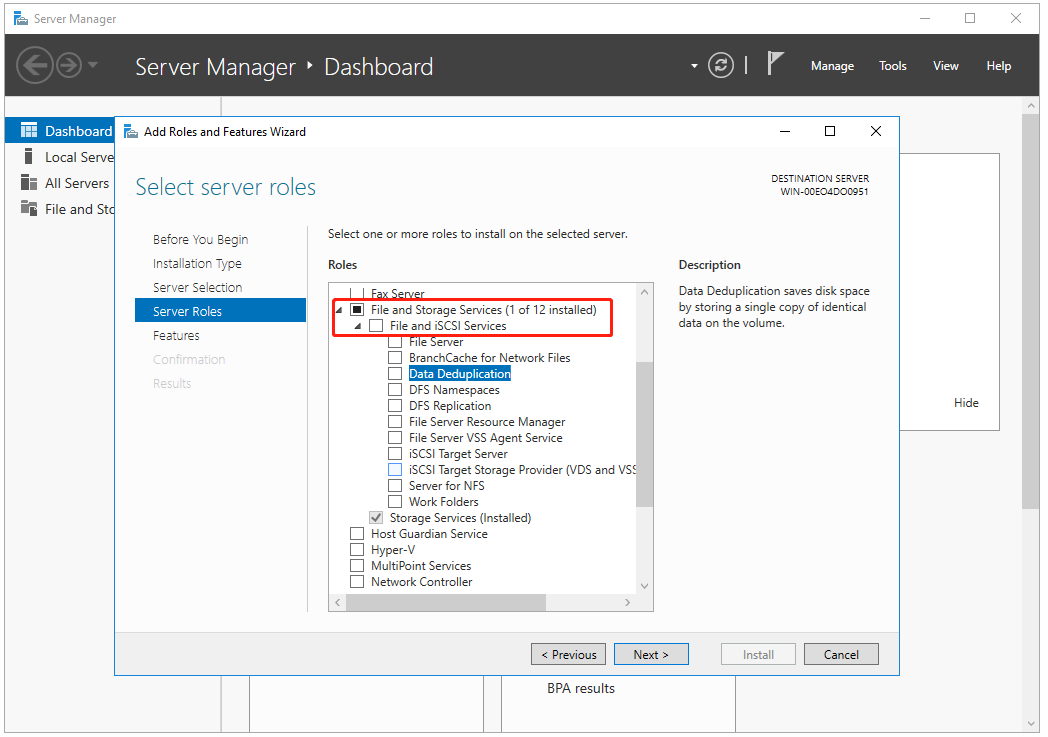
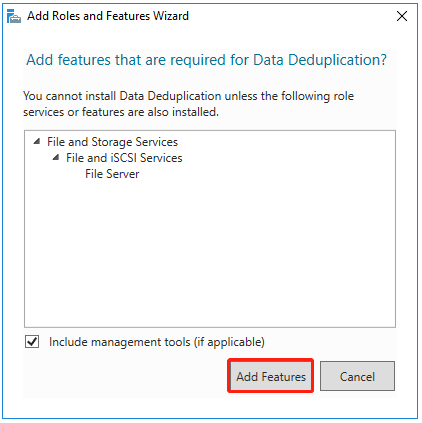
Step 5: Check the option of Data Deduplication and click Add Features in the pop-up window.
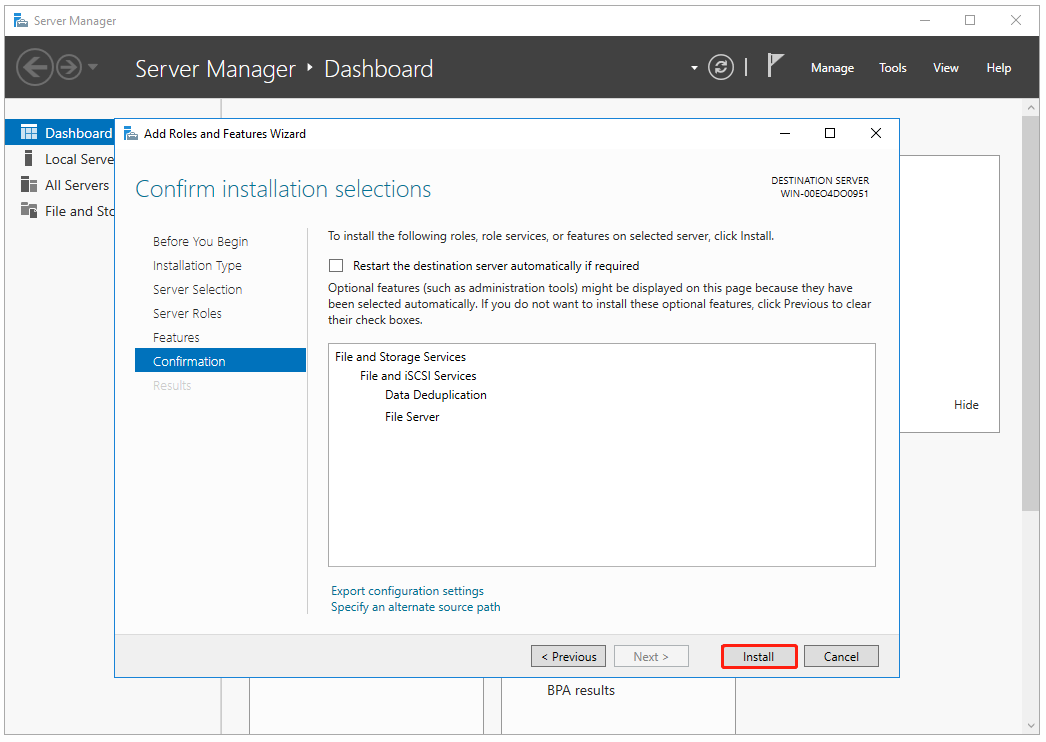
Step 6: Then click Next > Next until the Install option is active in the Confirmation tab and please click Install.
How to Install Data Deduplication via PowerShell?
If you are used to executing commands when issuing orders, you can try the following steps to install Data Deduplication. The commands are available for users of Windows Server 2016 and later devices or PCs with the Remote Server Administration Tools (RSAT) installed.
Step 1: Type PowerShell in Search and right-click on Windows PowerShell to choose Run as administrator.
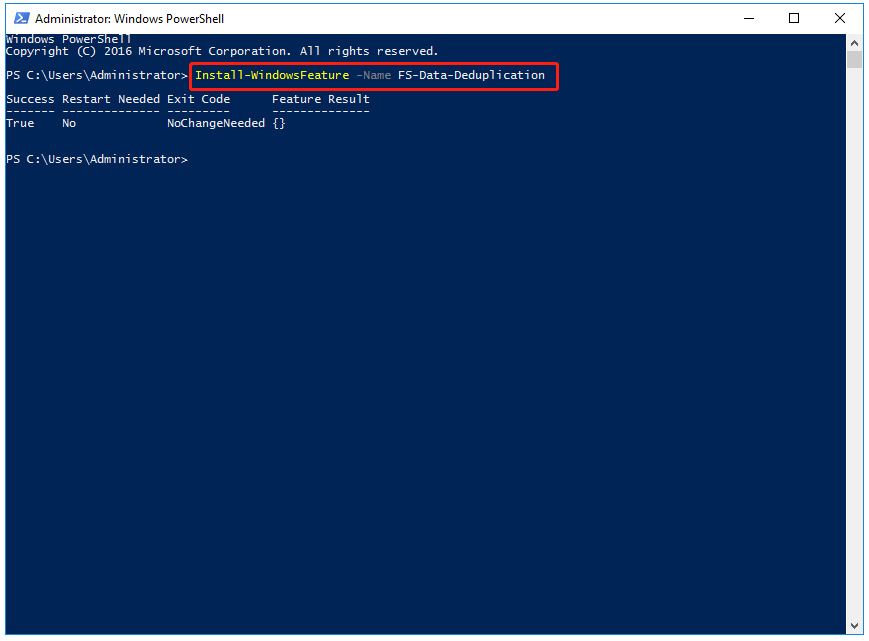
Step 2: Now you can type this command and press Enter to execute the command.
Install-WindowsFeature -Name FS-Data-Deduplication
How to Enable Windows Server Data Deduplication?
Now, you have installed the Windows Server Data Deduplication feature and for the next move, we will guide you to enable it.
Step 1: Open Server Manager and click File and Storage Services from the left panel.
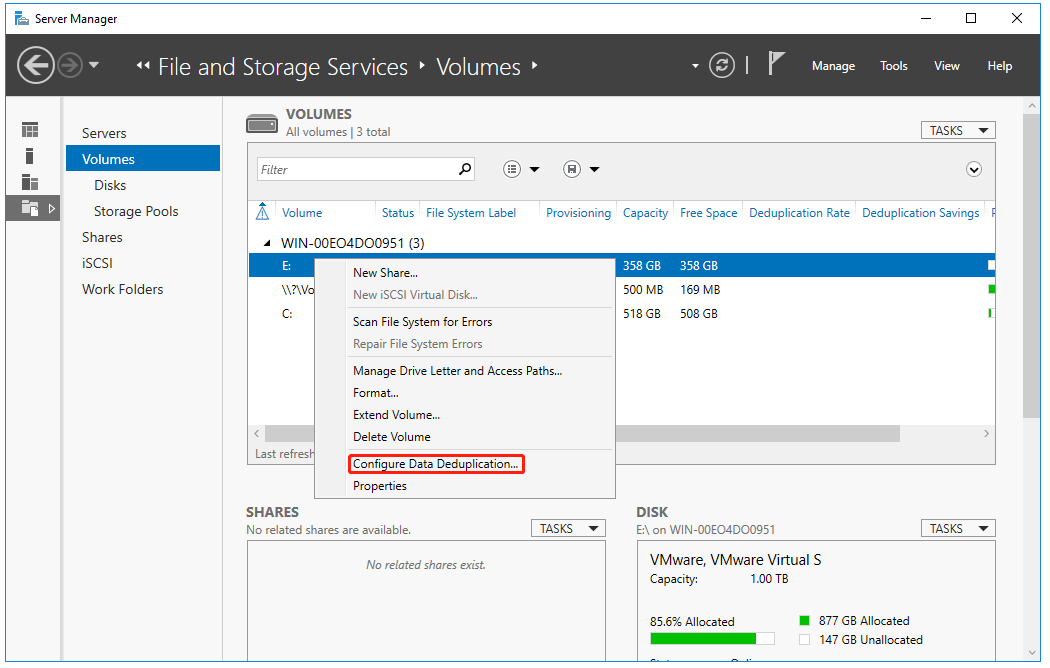
Step 2: On the next page, choose Volumes from the left pane and right-click on the wanted volume to select Configure Data Deduplication….
Step 3: Then you need to choose your usage type from the drop-down menu, including, General purpose file server, Virtual Desktop Infrastructure (VDI) server, and Virtualized Backup Server (such as Microsoft Data Protection Manager).
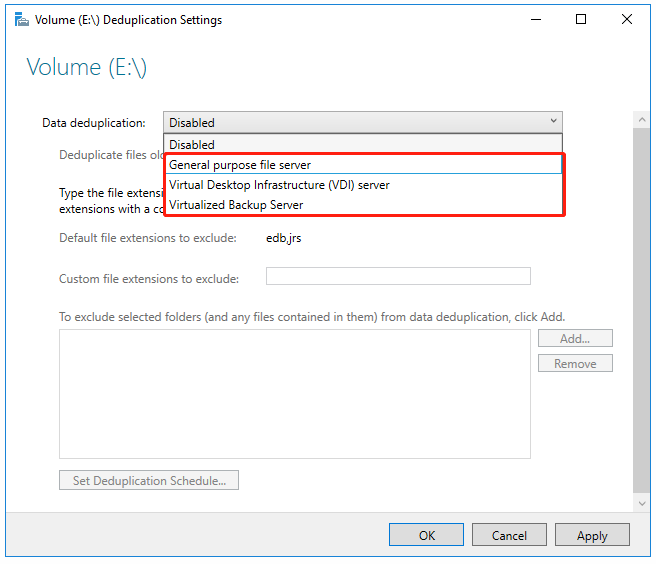
Step 4: You can also configure other settings and options in this window. These include:
- Custom age of the files to be deduplicated
- Custom file extensions to exclude
- Custom folders and files to exclude
Furthermore, you can click Set Deduplication Schedule… to create a schedule for throughput optimization. There are customized options available to optimize the background process used to run the data deduplication.
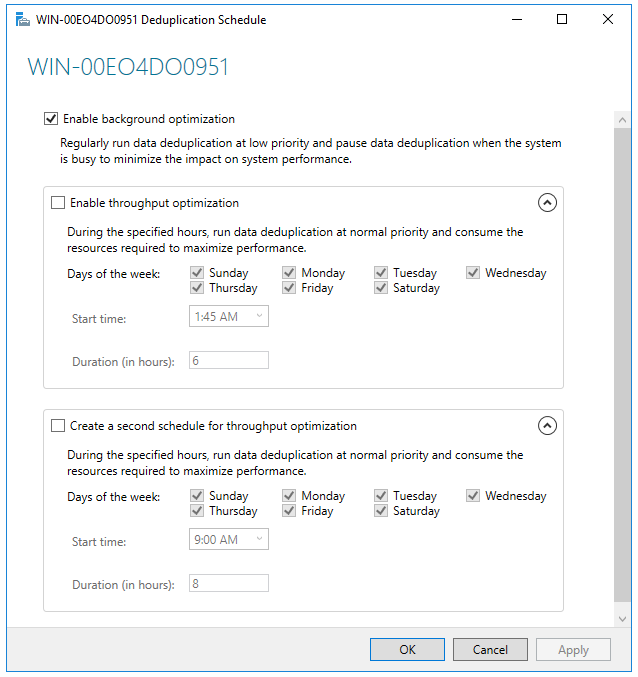
When you finish that, click Apply > OK to save the changes. After you return to the volume deduplication settings, you still need to click Apply > OK for changes.
How to Use Windows Server Backup Deduplication?
The above content has introduced how to install and enable the Data Deduplication feature. If you want to back up a deduplicated volume, you can start the data backup by using Windows Server Backup after enabling the feature.
First of all, please make sure you have installed Windows Server Backup on your server and if not, follow the next steps to install it.
Step 1: Open Server Manager and click Manage from the top bar to choose Add Roles and Features.
Step 2: Go to the Features tab and scroll down in the Features box to locate and check Windows Server Backup.
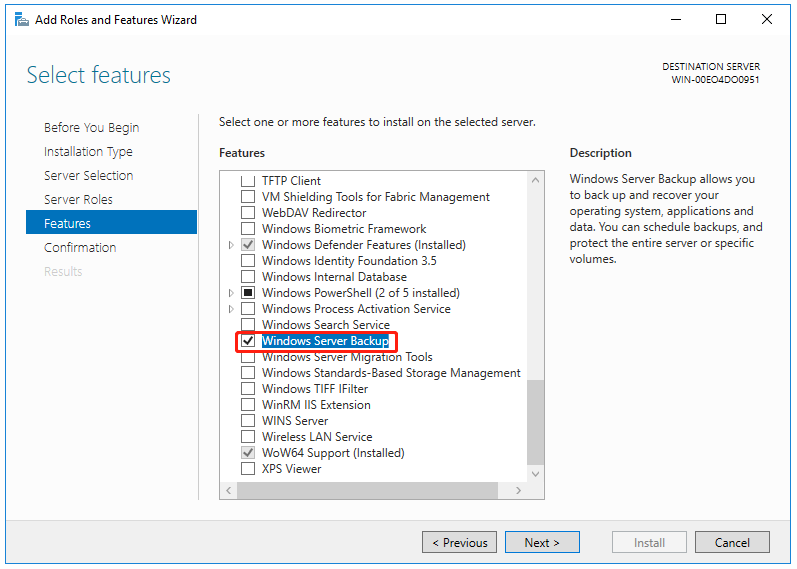
Step 3: Click Next > Install to start the process. You need to wait for a while until you see the installation succeeded note appears.
Now, you can start backing up your data via the following steps.
Step 1: In Server Manager, click Tools > Windows Server Backup and then you will be prompted to a new window.
Step 2: Then click Backup Once… from the right pane and choose Different options > Next in the pop-up window.
Step 3: Choose Custom and click Next. Here, click Add Items to select the desired partitions and files and choose Advanced Settings for optimization. When you finish, click Next for the proceeding move.
If you want to perform a Windows Server backup and bare metal recovery, you can check this article: What Is Windows Server Backup Bare Metal Recovery? Answered.
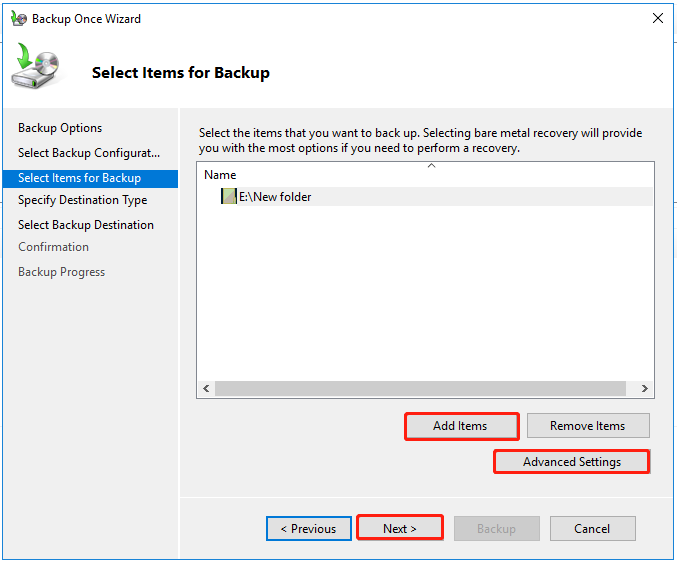
Step 4: In this move, choose the type of storage for the backup. Here you can choose local drives or remote shared folder and click Next to choose the backup destination. The target should be the drive you have enabled the Data Deduplication feature.
Step 5: Then in the Confirmation tab, click Backup to start the task.
If you are a Windows Server 2022 user, you can follow this guide to back up files: How to Back up Windows Server 2022 Files? Here Are 2 Ways.
How to Restore the Windows Server Backup?
With this backup, you can restore your lost data in need, and at the same time, whenever you start the recovery, the repetitive data will be deduplicated. Of course, you can enable data deduplication on every volume so that the storage space of the drive can be utilized at maximum.
So, how to restore your Windows Server backup? Here is a guide for you.
Step 1: Launch your Windows Server Backup and in Local Backup, click Recover… from the Actions box.
Step 2: Then you can follow the prompts on the screen to get the recovery process started. If your backup is stored on the device, choose This server and click Next.
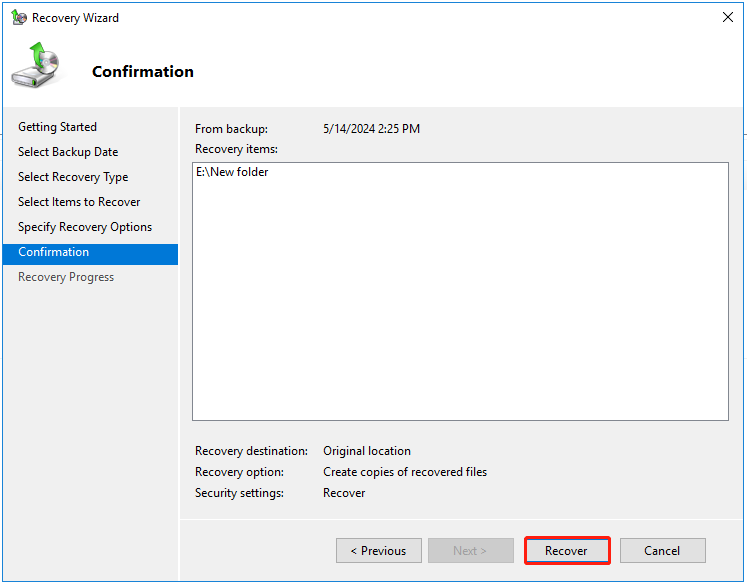
Step 3: Select the date of a backup to use for recovery and recovery type. After the options, you can choose the right items to recover and click Next to specify recovery options.
Step 4: When you are prompted to the Confirmation tab, click Recover to start it.
What Are the Limitations of Deduplication in Windows Server?
Windows Server Data Deduplication starts from the Server version 2012 and after multiple updates, now it has more advanced features available. Even so, there are still some limitations compared to other deduplication backup software.
For example, Windows Server Data Deduplication only supports volume sizes up to 64 TB and files up to 1 TB for deduplication, which is set for Windows Server 2016 users. However, before the version, files approaching 1 TB in size were not good candidates for deduplication.
In the next parts, another excellent alternative will be introduced then.
Better Alternative – MiniTool ShadowMaker
You may think the process to install and enable the Data Deduplication feature is complicated. Here, we have an easier method to ensure the backup deduplication in Windows Server – use MiniTool ShadowMaker.
MiniTool ShadowMaker is free backup software available for both Windows and Windows Server. With the help of this software, you can back up files, folders, partitions, disks, and your system. In addition, MiniTool develops Schedule Settings and Backup Scheme for a better backup experience.
Among them, Backup Scheme offers Full, Incremental, and Differential options for different types of backups. The latter two kinds help only back up the added or changed data but they have some nuances that users need to distinguish.
- Incremental: The incremental backup means backing up all the files that have changed since the last backup operation of any type of backup.
- Differential: Differential backup refers to backing up the only changed files or newly added data since the last full backup.
In addition, you can set a time point to start the automatic backups as daily, weekly, monthly, and on-event.
In this way, you will have more choices compared to Windows Server Backup to finish your backup. You can download and install this program by clicking the following button.
MiniTool ShadowMaker TrialClick to Download100%Clean & Safe
Step 1: After the installation setup, you can launch the program and click Keep Trial to enter the interface.
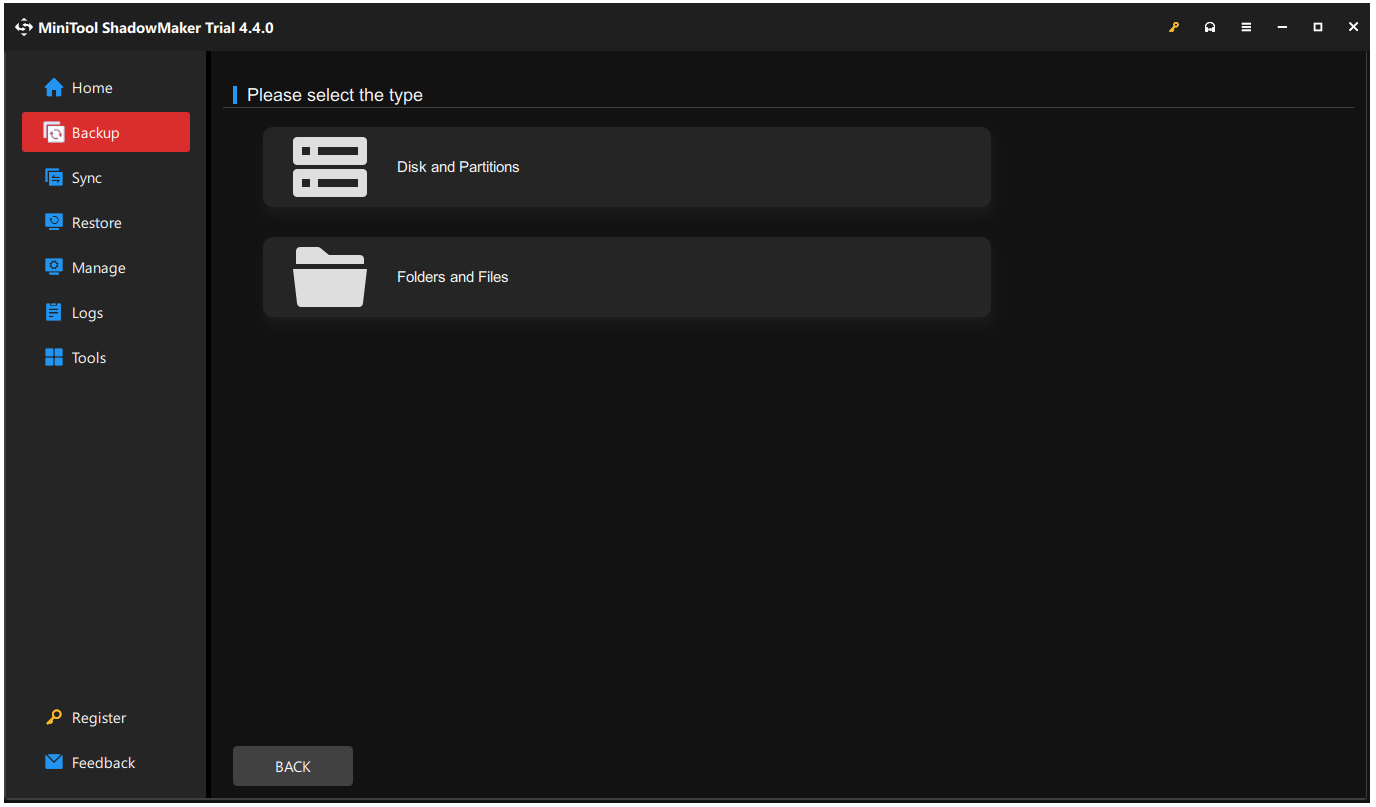
Step 2: In the Backup tab, the system-related partitions have been selected by default. If you want to change the backup source, click the SOURCE section to choose Folders and Files or Disk and Partitions. You can find and choose what you want to back up and click OK to save the changes.
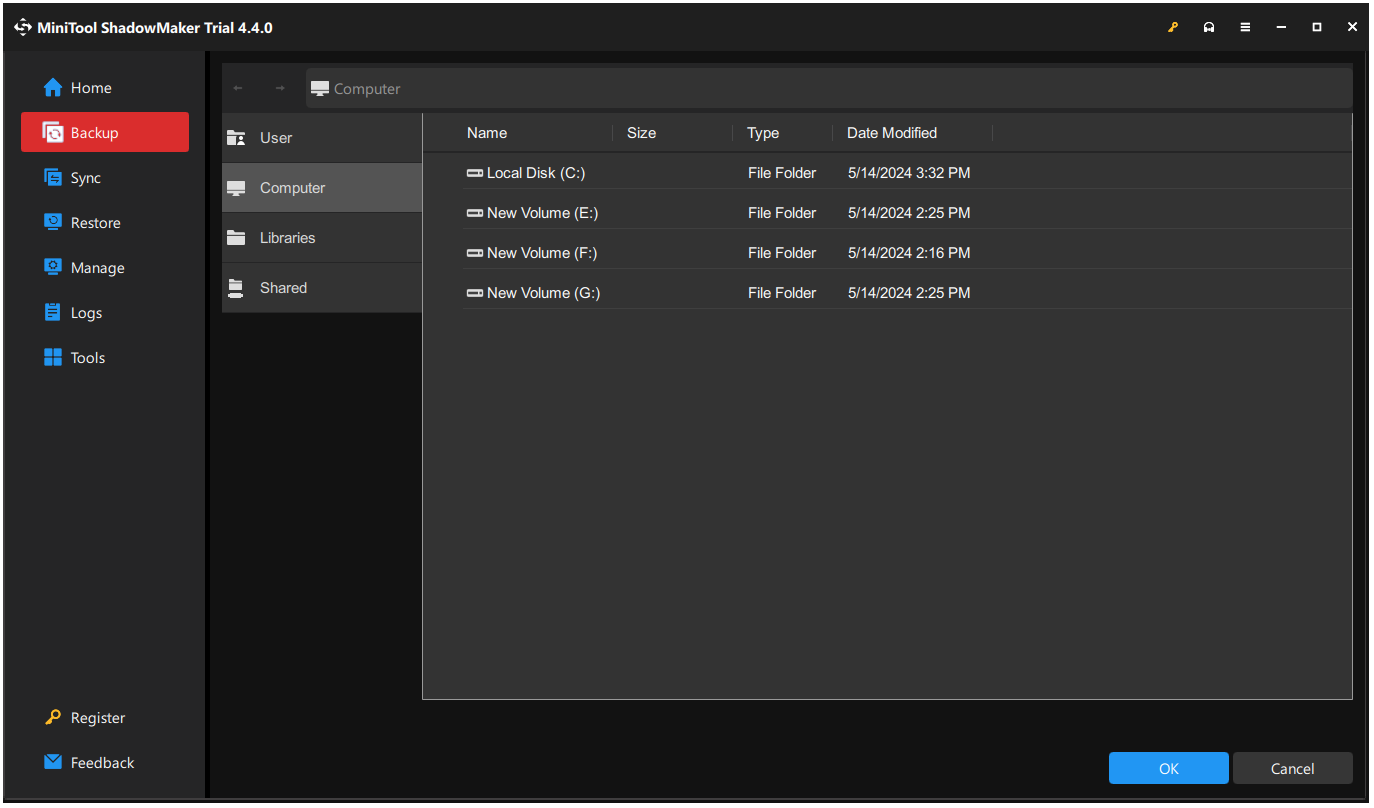
Step 3: Then you can click the DESTINATION section to choose where you want to store the backup. Here, you have four choices – User, Computer, Libraries, and Shared. If you want to back up data to an external hard drive, you should connect the drive to your device before launching the program.
Step 4: To accomplish the same purpose as Data Deduplication, you can click the Options feature and switch the tab to Backup Scheme. Please turn the toggle on and choose one type of backup deduplication – Incremental or Differential.
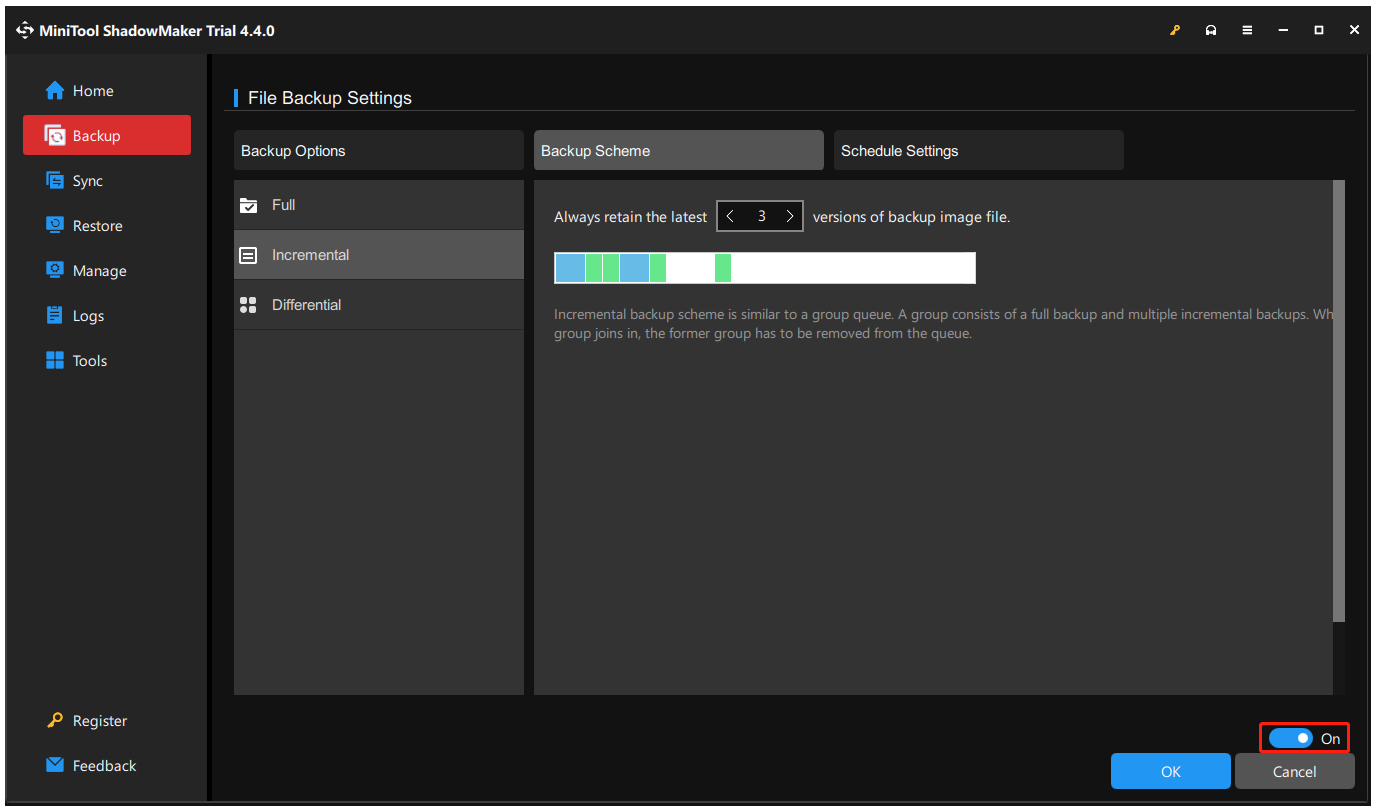
You can also configure how many latest versions of the backup image file should be retained every time.
Apart from the feature, you can also switch to Schedule Settings to enable automatic backups, which can be used in combination with an incremental or differential backup.
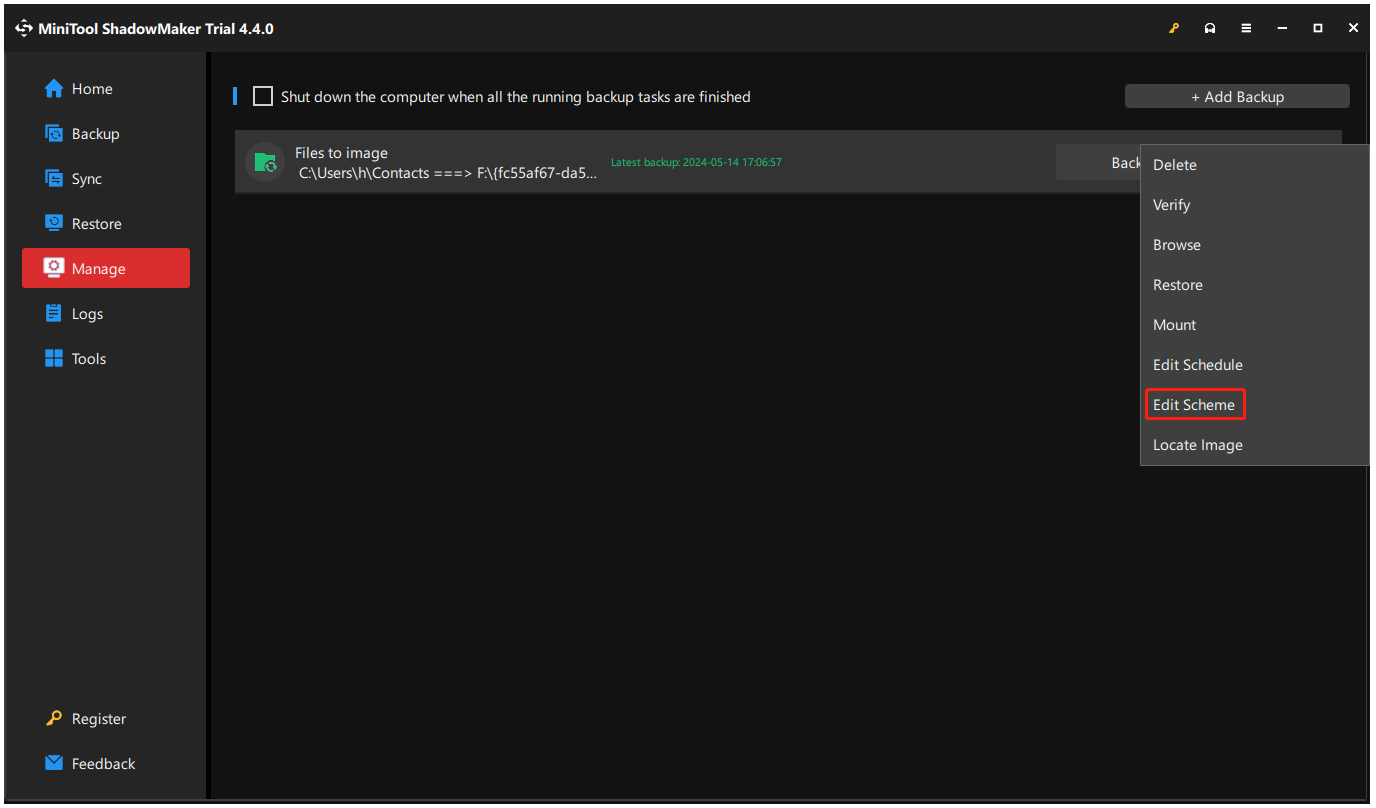
Step 5: After all of these, you can start the backup by clicking Back Up Now. Alternatively, when you are prompted to the Manage tab where you can see the backup task, you can click the three-dot icon to choose Edit Scheme and turn on the feature to configure the settings.
Bottom Line
By using the Windows Server backup deduplication feature, users can save resources by reducing the duplicated copies of repetitive data. Apart from Windows Server Backup, you can use MiniTool ShadowMaker to perform Windows Server backup deduplication, which will be more facilitated and more features are available.
If you have any issues when using MiniTool ShadowMaker, you can contact us via [email protected]. We have a professional support team to resolve your concerns. Try this utility and it won’t let you down.
