Network-attached storage (NAS) is a data storage device that connects to and is accessed through a network. With its specialties, such as quick file transfer and backup speed, total control over data access, ease of use, low cost, scalable storage, etc., NAS devices serve as the prime choice of extended storage for backup.
Related post: The Best NAS for Home Media Storage You Can Try
Some Windows Server users are looking for a quick and easy way to back up Windows Server to NAS. Is it possible to perform a Windows Server backup to NAS? Of course, yes. Windows Server comes with Windows Server Backup to satisfy all kinds of backup demands from users.
Windows Server Backup is one of the NAS backup options. Apart from that, there is an alternative – MiniTool ShadowMaker – with more advanced features to provide a better experience. Now, let’s check how to back up Windows Server to NAS.
Windows Server Backup to NAS via Windows Server Backup
How to back up Windows Server to NAS via the built-in backup tool? First of all, you need to download and install Windows Server Backup from Server Manager. In this part, we will take Windows Server 2016 as an example.
Step 1: Open your Server Manager and click Manage > Add Roles and Features.
Step 2: In the pop-up window, choose Server Selection and the Features option will be available.
Step 3: In the Features tab, scroll down to choose Windows Server Backup > Install.
Then follow the on-screen instructions to install this tool. Now you can proceed to another move – Windows Server backup to NAS devices.
Step 1: Click Tools in Server Manager and choose Windows Server Backup.
Step 2: Click Backup Once… from the right pane and then check the option of Different options > Next.
Step 3: Choose what type of configuration you want to schedule. There are two options – Full server (recommended) (includes your server data, applications, and system state) and Custom (choose custom volumes, and files). Then click Next.
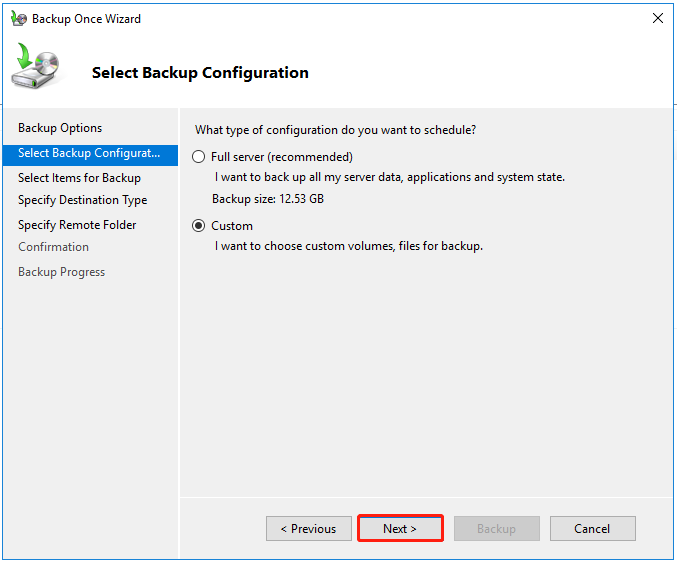
If you choose Custom, you need to add items for backup and click Next for the next move. In this section, you can also exclude files that you don’t want to back up by clicking Advanced Settings.
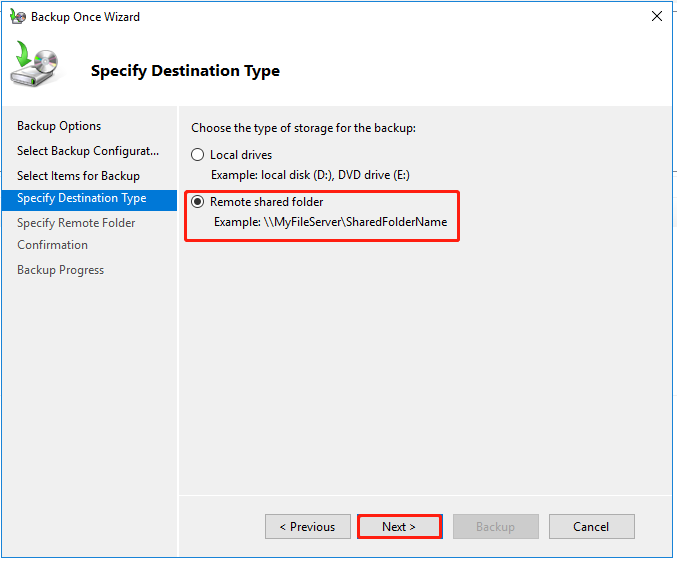
Step 4: Now you can choose the destination type. Check the Remote shared folder option and click Next.
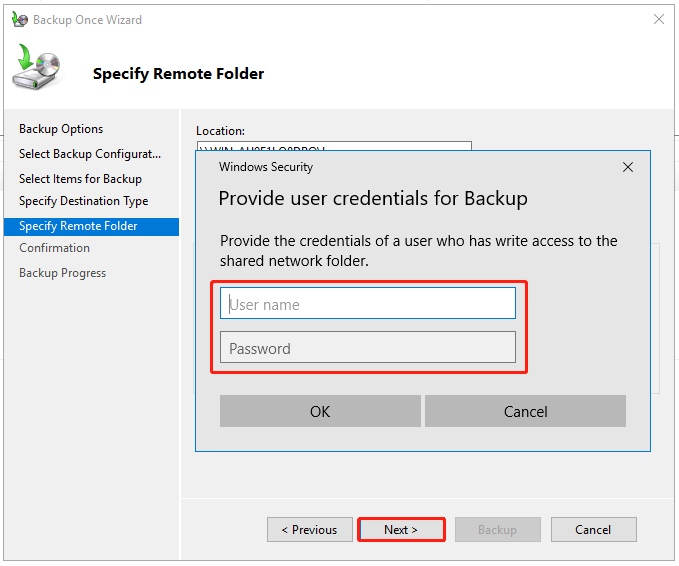
Step 5: Please enter your NAS location and you will be asked to provide user credentials for backup. please save the information and click Next for the next part.
Then you can confirm the backup summary and start it. The process may require some time, which depends on the size of the backup source.
If you want to perform automatic backups to NAS devices, you can choose Backup Schedule… from the right pane in Windows Server Backup. The procedures are quite similar to the above and you just need to configure the backup time additionally.
Related post: 4 Simple Ways to Fix Windows Server Backup Schedule Not Running
Windows Server Backup to NAS via MiniTool ShadowMaker
We find some users always receive errors for some unknown reasons when performing Windows Server backup to NAS. If you don’t think Windows Server Backup is a good choice, you can try another Server backup software – MiniTool ShadowMaker.
MiniTool ShadowMaker can back up files, folders, partitions, disks, and your system. Internal/external hard drives and NAS devices are allowed to be chosen as a backup destination.
MiniTool ShadowMaker will give you more reliable and powerful services for every backup task. Please download this software by clicking the button and then install it on your device.
MiniTool ShadowMaker TrialClick to Download100%Clean & Safe
Step 1: Launch the program and click Keep Trial.
Step 2: Go to the Backup tab and the system-related partitions have been selected by default in the SOURCE section. If you want to back up files, please choose SOURCE > Folders and Files and select the items.
Step 3: Choose the DESTINATION section and go to the Shared section. Then click Add and enter your path, username, and password to connect your NAS device.
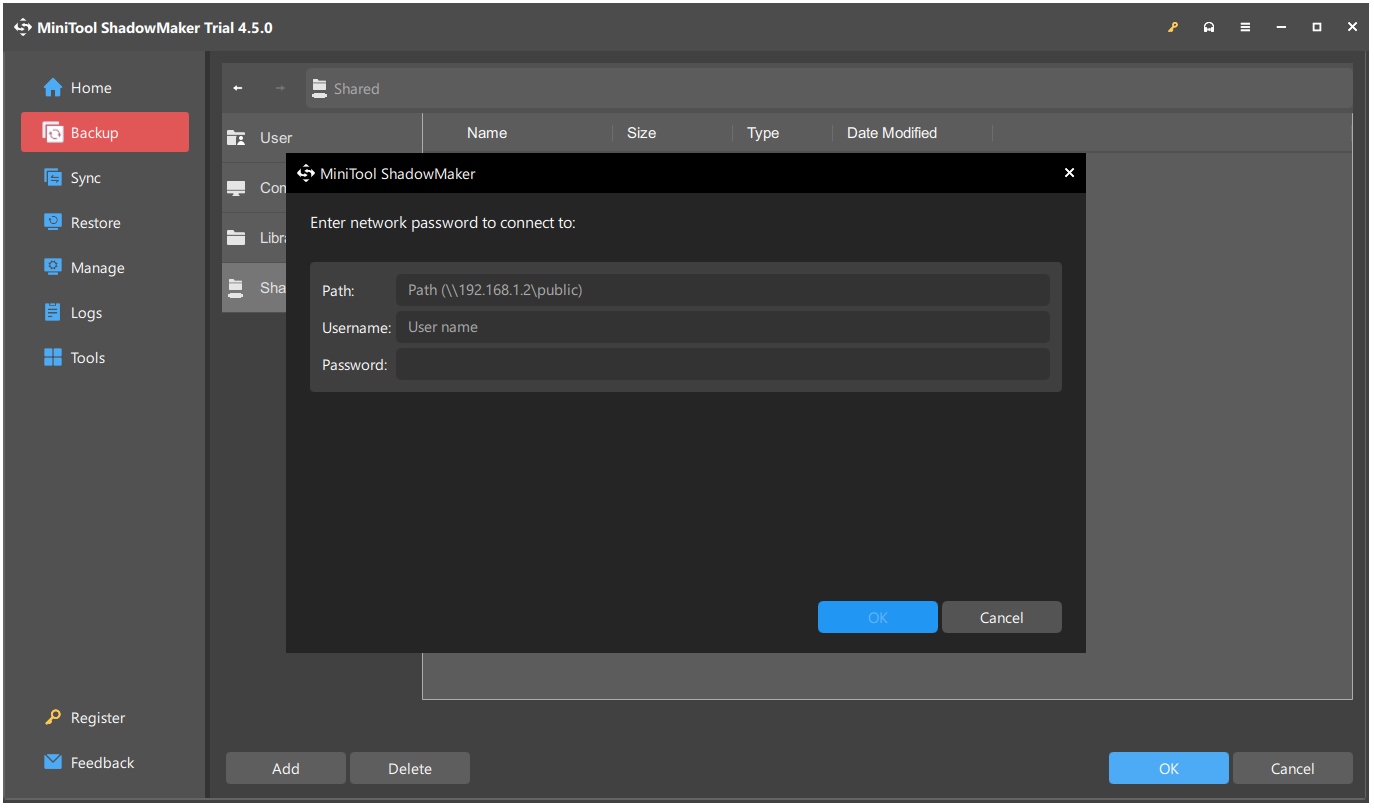
Step 4: After selecting the shared target, you can click Back Up Now to start the task immediately or Back Up Later to postpone the task.
To set up automatic backups, you can go to the Manage tab and expand the three-dot drop-down menu to choose Edit Schedule or Edit Scheme. If you want to restore the needed backup, please go to the Restore tab and locate the image file to click Restore.
Apart from the above two tools for Windows Server backup to NAS, you can try some built-in backup software from the NAS device. Some tech giants will develop features, like file sync, data backup, cloud storage, etc., to attract more customers.
For example, Synology NAS brings Active Backup for Business to perform a NAS backup. If you are a Synology user, you can try this tool as well.
Bottom Line:
This post has introduced how to perform Windows Server backup to NAS. There are two methods available for you. Besides, different NAS brands may provide some extra backup services for users so you may check for that.
For more backup services, MiniTool ShadowMaker is a better choice and that won’t let you down. If you have any questions when using MiniTool ShadowMaker, you can contact us via [email protected], and a professional support team is dedicated to resolving the concerns.
