Stuck at Making Sure You’re Ready to Install Windows 10
Since Microsoft has ended the support of Windows 7, some of you may choose to upgrade from Windows 7 to Windows 10. In Windows 7, you may download Windows 10 Media Creation Tool and set something to install through some steps.
However, during the update, you encounter this situation – Windows 10 setup stuck on making sure you’re ready to install. Sometimes this error also appears when updating to the latest build of Windows 10 using Media Creation Tool.
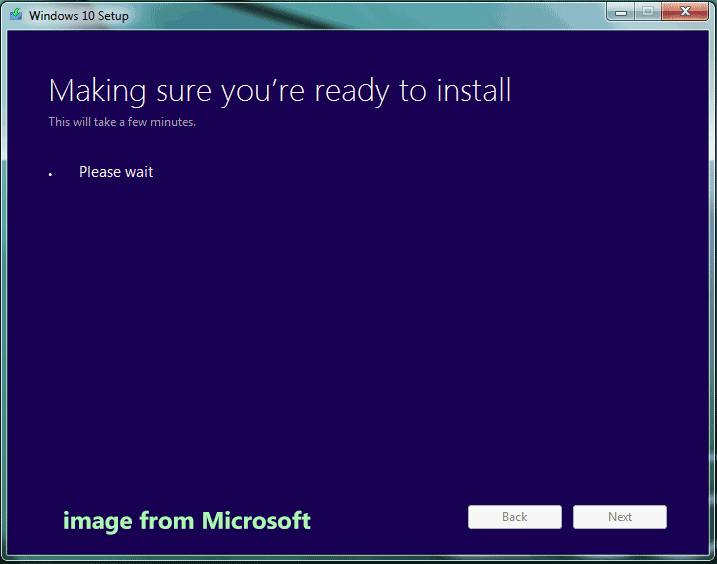
The computer may get stuck on that screen for more than one hour and cannot continue the updating process, which could be the most annoying experience. You can exit this screen by restarting the PC. But when performing the update via Media Creation Tool, you may still encounter this issue.
If you wonder why Windows 10 gets stuck on making sure you’re ready to install, there is no specific reason for this case. It is not easy to figure out the reasons but don’t worry, we list different means to fix the upgrade error.
Fixes for Windows 10 Setup Stuck on Making Sure You’re Ready to Install
Wait It out
Perhaps the Windows installer is running some tasks in the background including downloading and installing files, changing the settings of apps and modules, starting a Windows update process, etc. This may take a few minutes or hours based on the program’s number to finish these tasks. So, you can wait for 2 to 3 hours. If Windows 10 stuck on making sure you’re ready to install still appears, move on to other solutions.
Common Fixes
You can do some things to get your PC ready for installation/upgrade.
- Remove any unnecessary peripherals like an external hard drive, SSD, HDD, printer, scanner, keyboard, etc.
- Make sure you have installed the latest updates for some device drivers including Printer, Chipset, SATA/RAID controller, Ethernet/Wireless webcam, and sound chip.
- Uninstall your third-party antivirus program and don’t only disable it.
- Uninstall the motherboard utilities you have installed like Motherboard Overclocking tools, MSI Afterburner, Speedfan, etc.
- Ensure your hard drive has at least 20GB of disk space.
According to some users, these common fixes can help to get rid of the stuck screen of Windows 10 making sure you’re ready to install. If you still encounter the issue, proceed to the other workarounds below.
Boot PC to Safe Mode
Sometimes some apps may hinder the proper installation of Windows 10 update, as a result, the issue – Windows 10 making sure you’re ready to install stuck happens. You can try to boot Windows to Safe Mode to see if the issue is solved. This can stop the installed programs and files from loading and let you out of the stuck screen.
How to boot your PC to Safe Mode?
In Windows 10, you can restart your PC about three times when seeing the Windows logo and the system can start an automatic repair. Then, go to Advanced options to enter WinRE. Click Troubleshoot > Advanced options > Startup Settings > Restart. Press F4, F5, or F6 to enable Safe Mode.
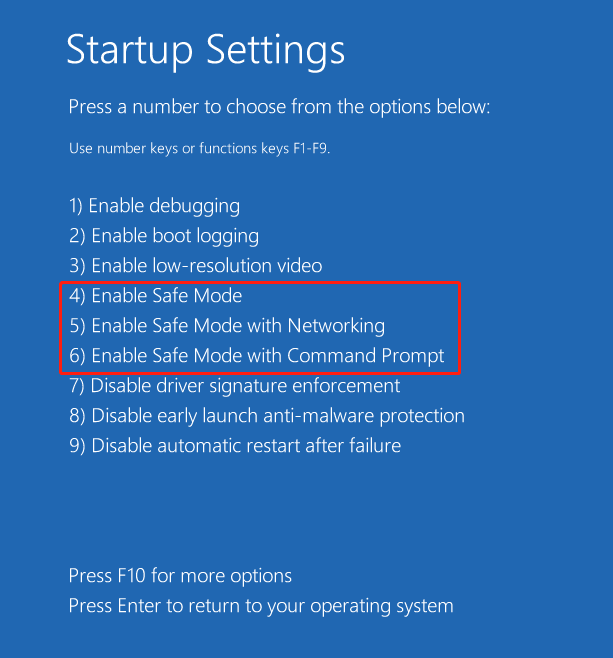
In Windows 7, press and hold the F8 key when restarting the machine to enter the Advanced Boot Options screen and use the arrow keys to choose a Safe Mode option. After that, check if the issue is resolved.
Disable Windows Defender Real-Time Protection
Antivirus software can lead to an installation issue of Windows like Windows 10 setup stuck on making sure you’re reading to install. Since Windows Defender is a built-in program, you cannot uninstall it. So, you need to disable Windows Defender and then upgrade Windows 10. See how to do this:
Step 1: Open the Settings app in Windows 10.
Step 2: Go to Update & Security > Windows Security.
Step 3: Click on Virus & threat protection > Manage settings.
Step 4: Under the Real-time protection section, switch the toggle to Off.
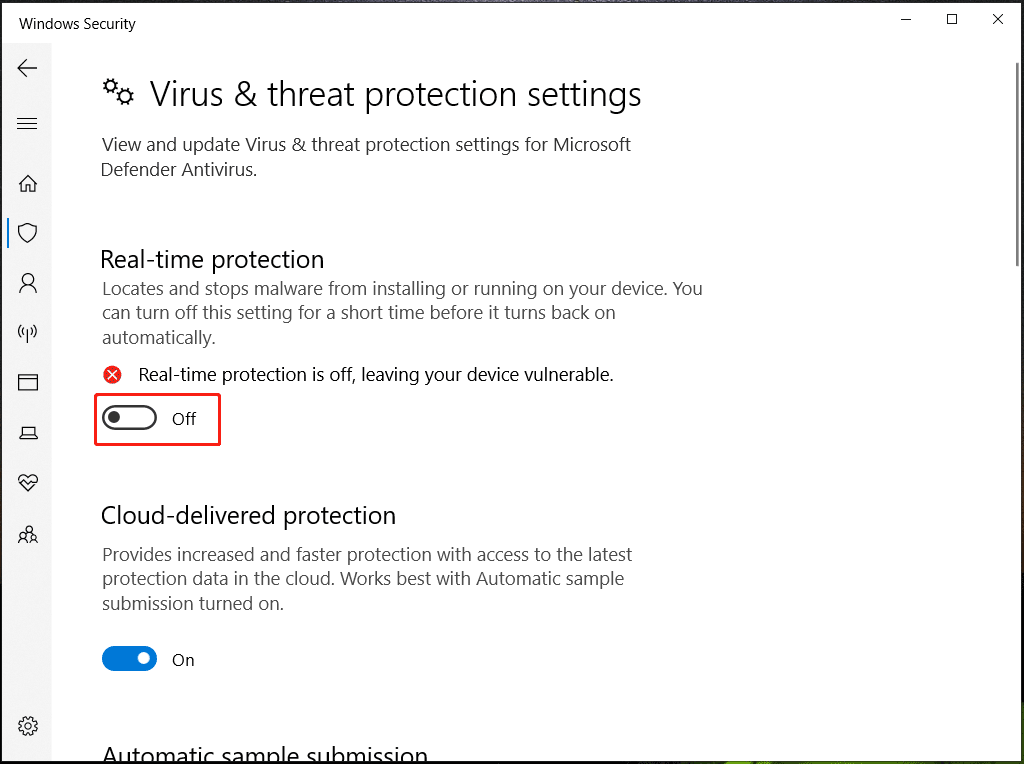
After that, you can disable Windows Defender Firewall – just go to Control Panel > Windows Defender Firewall > Turn Windows Defender Firewall on or off, and disable the firewall.
Run SFC Command
System File Checker (SFC) is the system tool to help check the Windows operating system for corrupted system files. Once it finds some, it can help to repair them to revert the PC to the normal state.
If your PC fails to boot to Desktop after a restart in case of stuck on making sure you’re ready to install, you can also perform the fix in Safe Mode.
See how to check the integrity of system files:
Step 1: Launch Command Prompt as an administrator in Windows 10/8/7.
open-command-prompt-windows-11
Step 2: In the CMD window, type sfc /scannow and press Enter. This tool will take some time to finish the scan process.

When performing the SFC scan, you may run into a stuck problem. To get rid of this annoying issue, refer to our previous post - Windows 10 SFC /Scannow Stuck at 4/5/30/40/73, etc.? Try 7 Ways.
In addition to SFC, you can also run a DISM scan. In the Command Prompt window, type these commands below in order and press Enter after each one.
DISM /Online /Cleanup-Image /CheckHealth
DISM /Online /Cleanup-Image /ScanHealth
DISM /Online /Cleanup-Image /RestoreHealth
Rebuild Boot Configuration Data
Boot Configuration Data, also known as BCD, stores information about the boot options and it is used to tell Windows Boot Loader where to look for boot information. BCD may be corrupted due to malware, incomplete system installation, incompatible system updates, etc., and as a result, your PC runs into the issue – Windows 10 setup stuck on making sure you’re ready to install.
To fix this issue, you can choose to rebuild BCD. If BCD gets damaged, your PC may be unbootable. If you restart the PC when you are stuck on the screen of making sure you’re ready to install for a long time, the machine may fail to enter Desktop. In this case, you need to create a bootable USB stick or CD/DVD using an ISO file of Windows 10/8/7 to boot the machine to enter the recovery environment.
Step 1: Boot your PC and press a specific key like Del, F2, F10, etc. based on your PC brand when seeing the Windows logo to enter BIOS.
Step 2: Choose the language, time format, and keyboard input.
Step 3: Click Repair your computer.
Step 4: Go to open Command Prompt. For Windows 10, go to Troubleshoot > Advanced options > Command Prompt.
Step 5: Type the following commands one by one and press Enter after each command.
Bootrec /FixMbr
bootrec /FixBoot
bootrec /ScanOs
bootrec /RebuildBcd
Clean Install of Windows 10
After trying so many methods, the issue – Windows 10 setup stuck on making sure you’re ready to install may be fixed. But if you still run into the annoying problem when performing an update of Windows 10, try another way to clean install Windows 10. A clean install can let you prevent from the stuck screen while upgrading to Windows 10.
Back up Files Before Your Do
Before you proceed, you should make sure you have backed up your important files to an external hard drive or USB flash drive since a clean install can erase your data. To back up your critical data, you can use professional file backup software, and here you can try the third-party software – MiniTool ShadowMaker.
This backup program can be used to create backups for your Windows operating system, disks, partitions, files, and folders. If you need to back up data at intervals, this software can help you since it supports scheduled backup – you can configure a time point to let the tool starts backups automatically. Besides, you can create differential backups or incremental backups for only changed or modified data.
Besides, MiniTool ShadowMaker supports file sync for data backup and disk cloning for disk backup. To back up your important data, you can try its Trial Edition which gives you a free trial in 30 days. Just click the following button to get the installer and double-click on the .exe file to start installing it on your Windows 7/8/10 PC.
MiniTool ShadowMaker TrialClick to Download100%Clean & Safe
When the issue – Windows 10 setup stuck on making sure you’re ready to install appears, you sometimes can boot to Desktop. In this case, you can directly back up your files. If your PC fails to enter Desktop, you should use Trial Edition to create a bootable drive with Media Builder and boot the PC from that drive. Then, start a backup with the Bootable Edition. Here is a related post - How to Back up Data without Booting Windows? Easy Ways Are Here.
Here take how to back up data with MiniTool ShadowMaker in Windows 10/8/7 (Desktop). Connect your external drive or USB drive to your PC and start the operation.
Step 1: Double-click on the icon of this software on the Desktop to open MiniTool ShadowMaker Trial Edition.
Step 2: Click Keep Trial to continue.
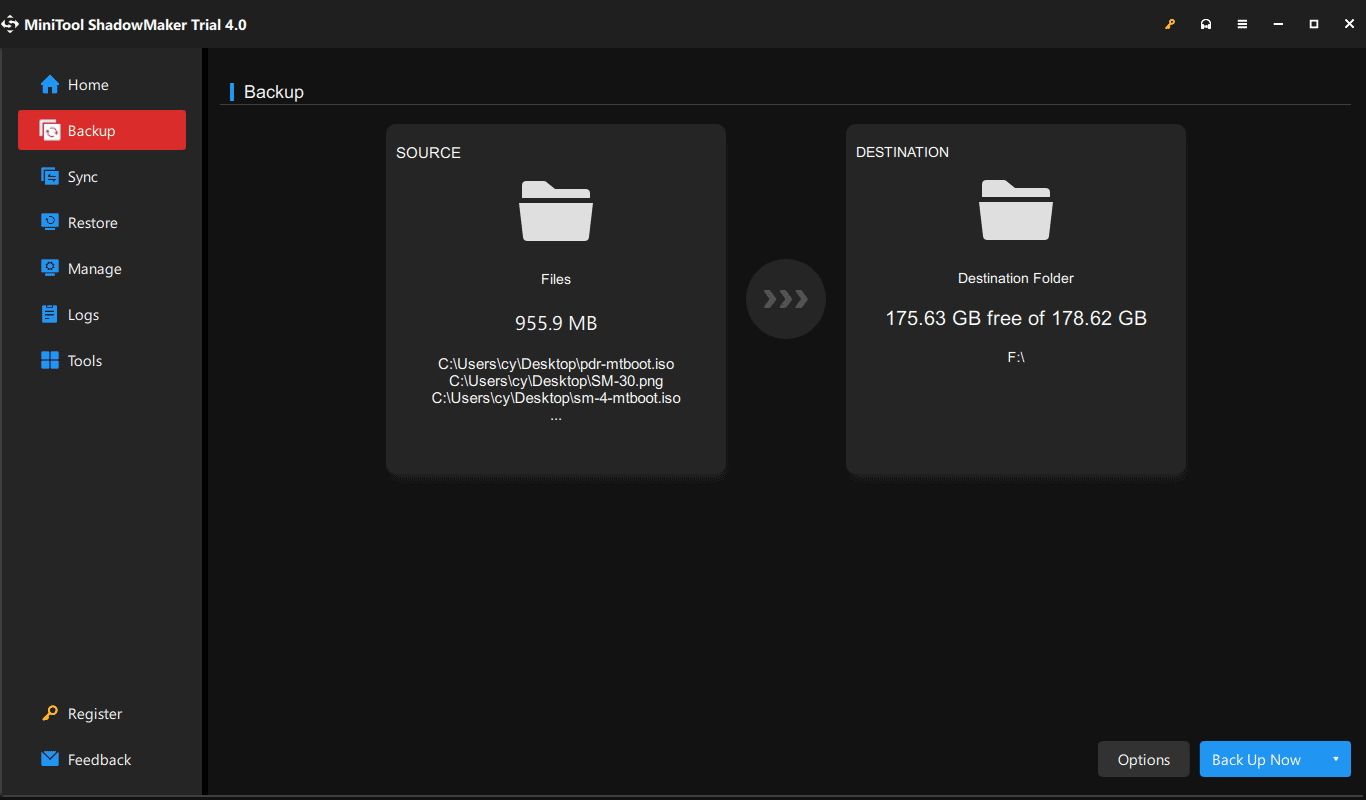
Step 3: Click Backup from the top menu and then you will see system partitions are selected in the SOURCE section. To back up files and folders, go to click this section, choose Folders and Files, then go to explore your computer to find items you want to back up and click OK.
Step 4: Click DESTINATION to choose a partition on your external hard drive or USB flash drive as the backup destination.
Step 5: At last, click the Back Up Now button to start the file backup. You can go to the Manage page to see the backup progress.
After the data backup, you can start the clean install.
Clean Install Windows 10
To do this thing, you can use Media Creation Tool to create a bootable USB flash drive from ISO and then boot the PC from that drive to reinstall Windows.
Step 1: Click the link to get Windows 10 Media Creation Tool.
Step 2: Connect your USB drive to your PC. Run this tool and accept notices and license terms.
Step 3: Choose the option of Creation installation media (USB flash drive, DVD, or ISO file) for another PC.
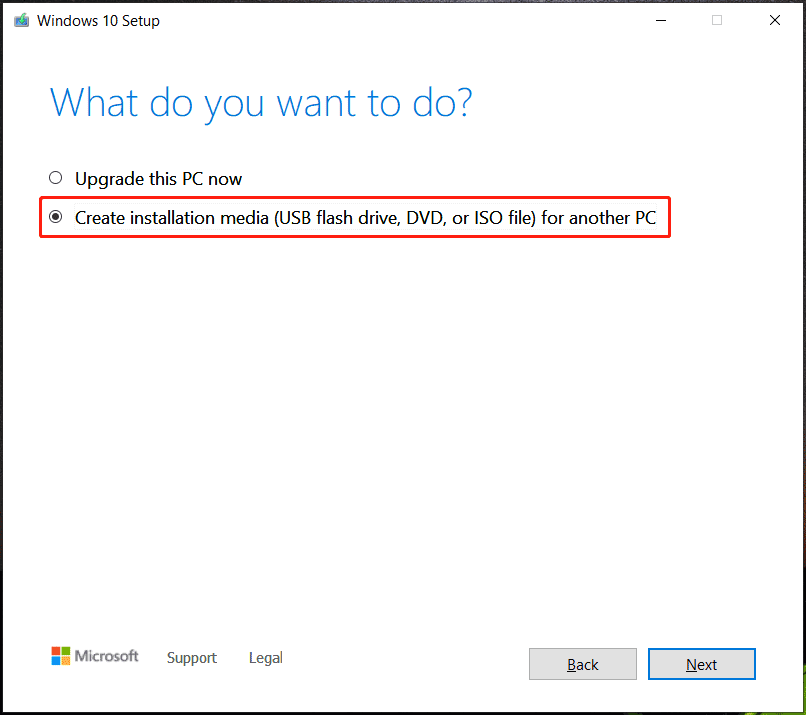
Step 4: Choose a language, architecture, and edition to go on.
Step 5: Select USB flash drive and finish all the operations by following the on-screen instructions.
After getting the bootable USB drive, you can use it to clean install Windows 10.
Step 1: Restart your PC, press F2, Del, or another key based on your PC brand to enter BIOS, change the boot order and boot the machine from the bootable drive.
Step 2: Choose a language, time format, and keyboard input.
Step 3: Click the Install now button.
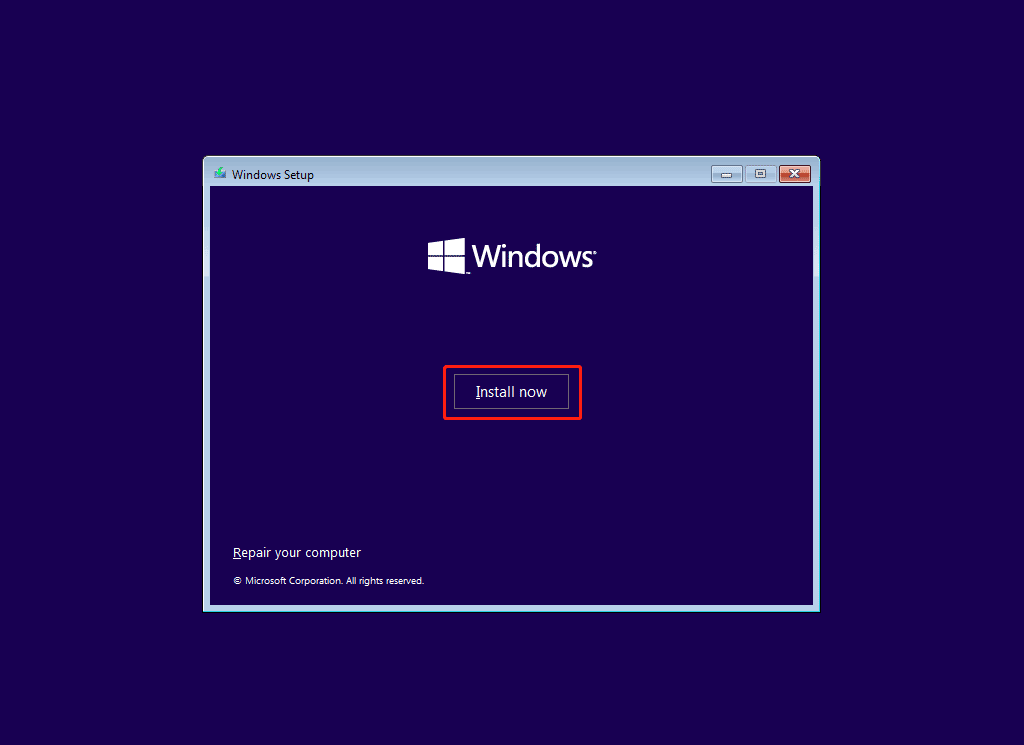
Step 4: Click I don’t have a product key and choose an edition.
Step 5: Click Custom: Install Windows only (advanced).
Step 6: Complete all the operations by following the instructions on the screen.
Via this way, you won’t meet the issue – Windows 10 stuck on making sure you’re ready to install.
Verdict
Is your PC stuck at making sure you’re ready to install when upgrading to Windows 10 or installing Windows 10 updates using Media Creation Tool? Take it easy and you can easily solve this issue with the above methods.
If you have any other workarounds on the issue – Windows 10 setup stuck on making sure you’re ready to install, welcome to leave a comment to inform us.

![[5 Ways] How to Get Into BIOS on Windows 11 on Restart?](https://mt-test.minitool.com/images/uploads/2021/11/windows-11-bios-settings-thumbnail.png)
