Facing the Buffalo hard drive not working issue can be quite frustrating, as it prevents you from accessing your files. We have investigated this issue and compiled a number of practical methods in this post on MiniTool Software to assist you in resolving the problem and returning your disk to a working condition.
Buffalo Hard Drive Not Working/Not Recognized/Not Detected
Buffalo is a well-known computer hardware manufacturer, whose products include external hard drives, portable hard drives, network-attached storage devices, etc. Its main product is external hard drives. Like any other file storage device, Buffalo hard disk or external hard drive is susceptible to issues like Buffalo hard drive not working or Buffalo hard drive not recognized.
Why does this issue appear? We have dug into this issue and collected the most common reasons why it occurs. Here are some reasons why a Buffalo hard drive may not work:
- The connection between the hard drive and the computer is unstable: Issues with the external hard drive interface, the USB port, or the cable can cause the hard drive to fail to be recognized.
- Some other software is interfering with the hard drive: Programs or tasks running in the background may interfere with the hard disk, causing the hard disk to not work properly.
- The disk driver is damaged or outdated: Corrupted or outdated disk drivers can also be responsible for the Buffalo external hard drive not working issue.
- The disk is not partitioned: If your hard drive is not partitioned, it won’t show up in File Explorer, and you won’t be able to use it.
- The hard drive does not have a drive letter: A hard drive without a drive letter won’t appear in Windows Explorer until a drive letter is assigned.
- The disk file system is corrupted: The corrupted file system of the disk may lead to various problems, such as file loss, hard drives not working, and so on.
- The hard drive has a file system that cannot be recognized by Windows: Not all file systems can be recognized by the Windows OS. Buffalo hard disks with file systems like Ext2, Ext3, Ext4, etc. may experience errors when inserted into a Windows computer.
- The hard disk is physically damaged: Physical damage to the disk due to collision, drop, or water immersion can cause disk problems and inaccessible data.
After having a basic understanding of why your Buffalo hard drive is not working, now you can follow the instructions below to address this issue.
Basic Troubleshooting Steps When Buffalo Hard Drive Not Recognized/Working
Since disk errors or problems may be temporary, you can try some basic troubleshooting steps before resorting to complex repair methods. You can check the physical connection between the Buffalo hard drive and your computer, including the hard disk interface, USB port, or USB cable.
First, disconnect the external hard disk and check the interface for physical damage such as dents, nicks, etc. Second, check the cable for any obvious breaks or damage. If so, replace the cable and see if the disk is recognized. Also, you need to make sure the USB port on your computer is working. Try switching to another USB port or connecting the hard drive to another computer and check if it works well.
Additionally, to rule out temporary system failures, it is necessary to restart the computer and reconnect the hard drive.
If the “Buffalo hard drive not working” issue is not caused by temporary glitches, you need to try some advanced approaches to repair it. Before doing so, you are highly suggested to recover files from the hard drive since complex repair steps may further damage the file system or disk data.
How to Perform Buffalo Hard Drive Data Recovery Before Advanced Repair
Is it possible to recover data from the Buffalo hard drive when the disk is not working? Typically, you have a chance to get your data back as long as the disk is not physically damaged. In order to avoid the huge expenses caused by data recovery agencies, you can try to recover files by yourself using professional data recovery software.
Here Windows file recovery tool, MiniTool Power Data Recovery, is strongly recommended due to its versatility, high compatibility, user-friendliness, and multi-version support.
Adaptability of file type/file loss situation/data storage device:
MiniTool Power Data Recovery is capable of restoring kinds of data, including documents, pictures, videos, audio files, and other types of data from internal hard disks, external hard drives, USB flash drives, SD cards, and so on. Moreover, this file recovery tool excels at dealing with various data loss situations, such as external hard drive not recognized, hard disk showing unallocated, hard drive showing as RAW, and more.
Compatibility with Windows versions:
This Windows data recovery software is fully compatible with all Windows versions, including the latest Windows 11/10 and older Windows 7/8/8.1. This allows you to recover data regardless of the version of Windows.
Clear software interfaces:
MiniTool Power Data Recovery possesses intuitive and simple interfaces, so you can easily master it and perform secure data recovery even if you are using it for the first time.
Multiple software editions:
There are multiple editions available of this file recovery software, including MiniTool Power Data Recovery Free, MiniTool Power Data Recovery Personal Ultimate, and so on. Therefore, you can download the free edition which supports free file preview and 1 GB of free data recovery if this is the first time you use it to check if it is suitable for you.
MiniTool Power Data Recovery FreeClick to Download100%Clean & Safe
Here are the major steps to recover files from a non-working Buffalo hard drive. You are required to connect the disk to your computer if you are going to carry out external hard drive data recovery.
Step 1. Double-click the shortcut file of MiniTool Power Data Recovery Free to launch it.
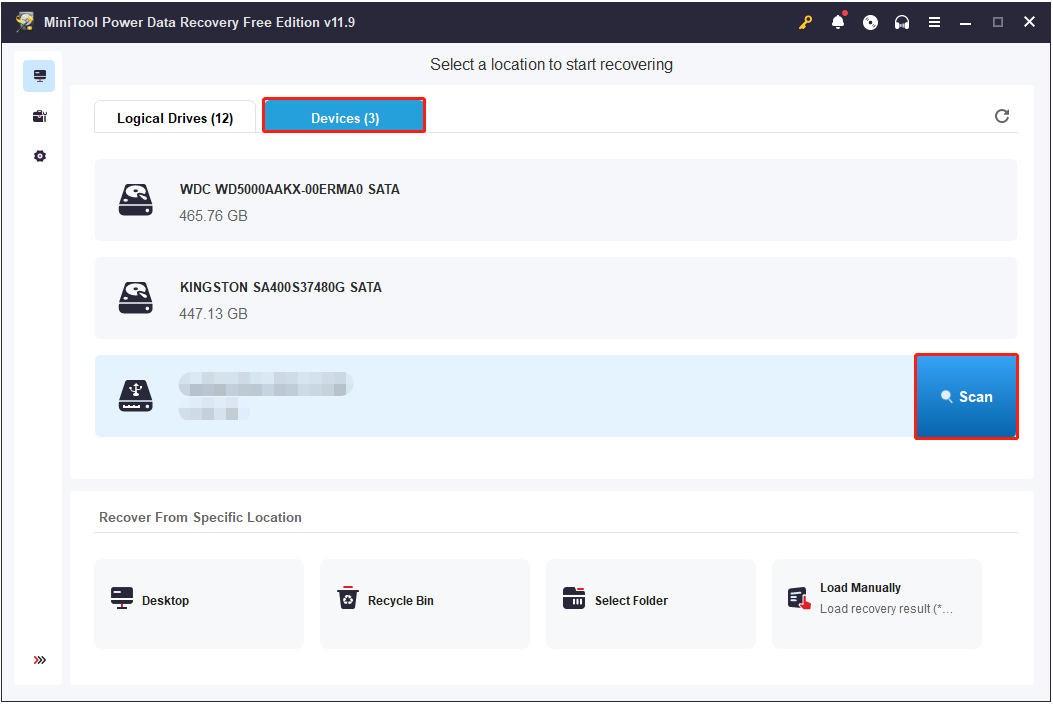
Step 2. When you see the main interface of this software, select the Buffalo hard disk partition where you want to recover files from and click the Scan button. Or, you can switch to the Devices tab and choose the entire disk to scan. This comes in handy for retrieving files across several partitions or when you’re unsure of the exact partition of the inaccessible or missing data.
To get the best data scanning outcome, you need to wait patiently until the whole scan is completed though you have the option to halt the scan process.
Step 3. After scanning, you can start finding and selecting the files you want to recover. During this process, the Type, Filter, and Search features are of great help.
Under the Type category list, you can view and browse all found files according to their file type (Document, Picture, Audio & Video, Archive, and Other files). Moreover, you can even locate the required files according to the specific file format.
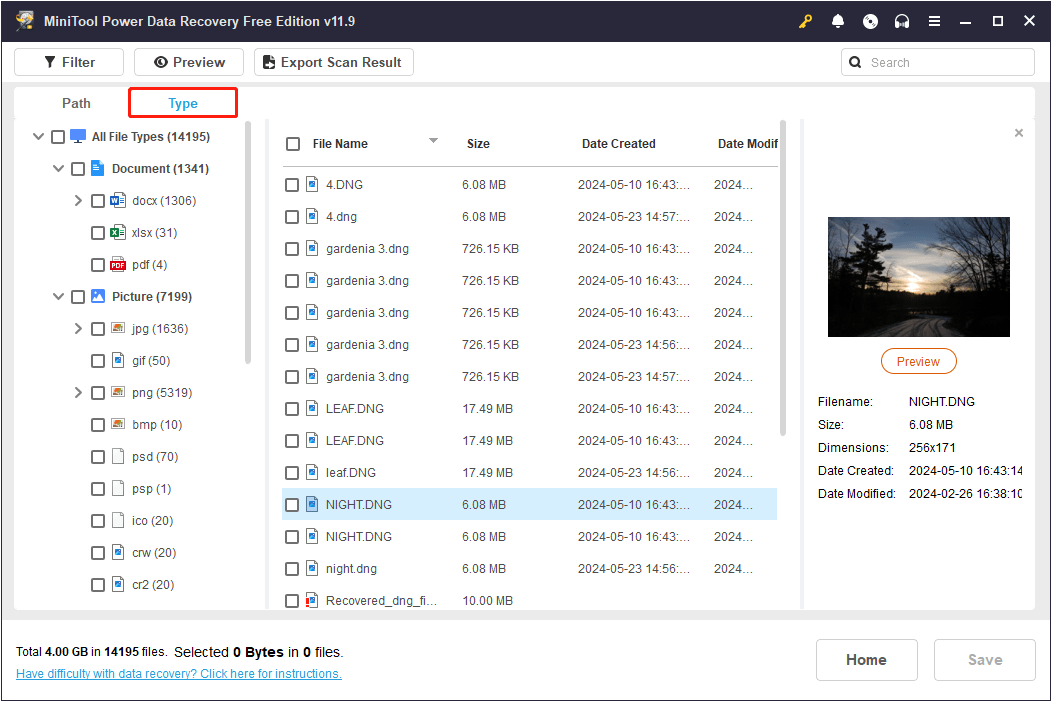
On the scan result page, click the Filter button, and then the filtering rules will pop up, enabling you to filter out unwanted files by file type, file size, file modification date, and file category. This makes it easier and faster to find the files you want.
Furthermore, you can look for a certain file by typing the keywords of the file name in the search box from the upper right corner and pressing Enter.
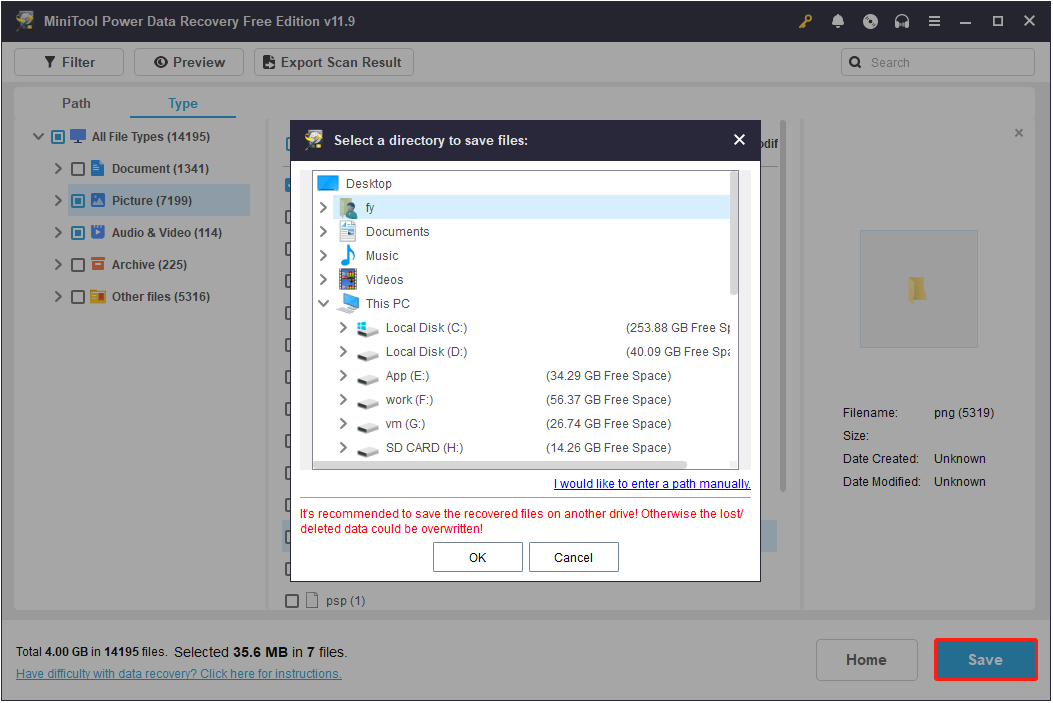
Step 4. Finally, select a target file and click the Preview button to verify that it is the wanted one. Duplicate this process to all target files. Then, select all required items, click Save, and choose a preferred location to save them.
How to Repair Buffalo Hard Disk Not Detected/Not Working/Not Recognized
Once you have rescued the files on the Buffalo hard disk, you can then proceed to deal with the non-working disk without worrying about further file corruption or loss. Listed below are some feasible solutions for the Buffalo hard drive not being detected or detected but not working.
Solution 1. Assign a Drive Letter
As mentioned before, if the hard disk does not have a drive letter, it won’t be displayed in File Explorer and will appear to be damaged or non-working. Here you can see how to manually assign a drive letter to a disk.
Step 1. On your taskbar, right-click on the Start button and choose Disk Management.
Step 2. Check if there is a drive letter assigned to your hard disk. If not, right-click the disk partition and select Change Drive Letter and Paths.
Step 3. In the new window, click Add, choose an available drive letter from the drop-down list, and click OK.
Step 4. Return to File Explorer and check if the hard disk is back to normal.
Solution 2. Create a New Partition
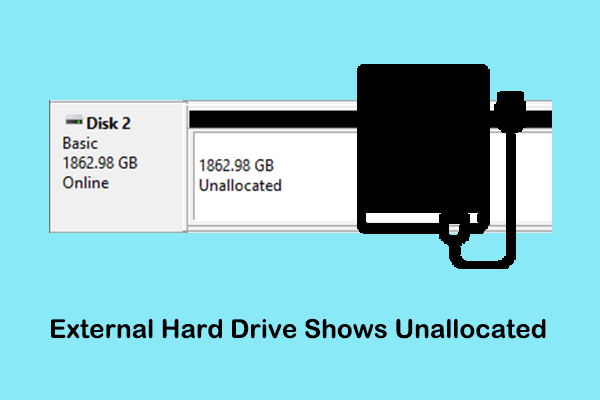
In certain cases, the Buffalo hard drive originally had no partitions, or partitions were deleted due to virus attacks, system failures, etc. In this situation, the disk will appear as unallocated in Disk Management but not in Windows Explorer. To reuse the hard drive, you need to create new partitions on it.
Step 1. Open Disk Management by using the Windows search box.
Step 2. Right-click the unallocated space of your hard drive and choose New Simple Volume.
Step 3. Click Next to continue. Then set up the volume size, drive letter, and file system according to the instructions on your screen.
Solution 3. Check Disk File System
When your Buffalo hard drive is recognized but not working, its file system may be corrupted. You can use the Windows built-in error-checking tool or professional and free third-party disk diagnostic tools, such as MiniTool Partition Wizard, to detect and repair damaged file systems.
Using the built-in error-checking tool:
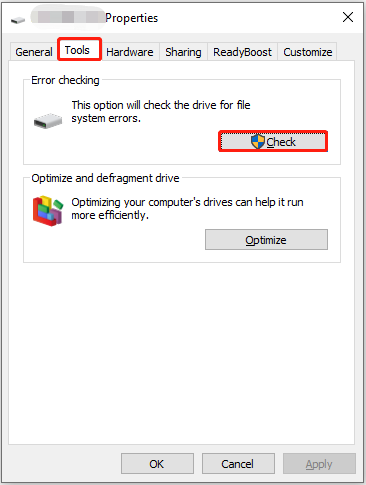
In the This PC section in File Explorer, right-click the Buffalo hard drive and choose Properties. Under the Tools tab, hit the Check button. Then this tool will begin to diagnose and repair the file system automatically.
Using MiniTool Partition Wizard:
First, download and install MiniTool Partition Wizard Free.
MiniTool Partition Wizard FreeClick to Download100%Clean & Safe
Second, launch this free disk management tool, right-click the Buffalo hard disk partition, and select Check File System from the context menu.
Third, choose Check & fix detected errors and click Start to let the software check and repair file system issues immediately.
Solution 4. Update/Reinstall the Disk Driver
Updating/reinstalling the disk driver is helpful when the “Buffalo hard drive not working” problem is caused by the drivers. You can complete this task from Device Manager.
First, right-click the Start button and choose Device Manager.
Second, double-click Disk drives to expand it.
Third, right-click the Buffalo hard drive and choose Update driver or Uninstall device. Subsequently, follow the guidance on your screen to update or uninstall the driver. Note that if you uninstall the disk driver, the most appropriate driver will be automatically downloaded and installed when you restart the computer.
Solution 5. Format the Buffalo Hard Drive
Formatting a hard drive is always regarded as one of the most effective solutions to resolve common disk errors. It is a process of completely removing data from disks, setting up file systems, and preparing new partitions.
You can format the Buffalo hard drive from Disk Management. Here is the tutorial.
Step 1. Open Disk Management.
Step 2. Right-click the hard drive partition and choose Format.
Step 3. In the next window, type a volume label, choose a file system, and tick Perform a quick format. After that, hit OK.
MiniTool Power Data Recovery FreeClick to Download100%Clean & Safe
See Also: Quick Format VS Full Format
Bottom Line
When faced with the Buffalo hard drive not working issue, recovering its data should be the first concern before implementing advanced repair methods. After making sure your data is safe, you can try to repartition the disk, check the disk file system, update the disk driver, or format the hard drive.
Should you experience any errors or issues while using MiniTool software, please do not hesitate to contact the support team for help via [email protected].
