What can you do if the Windows Documents folder shows empty when you try to open a file in it? Why does this problem occur and how to address it? Now check out this MiniTool Software guide to get comprehensive guidance.
Issue: Windows Documents Folder Empty but Contains Files
The Documents folder, previously called My Documents, is a special folder in Windows operating systems. It is located by default in the user profile folder which exists on the hard drive where the Windows OS is installed. The default location should be C:\Users\username\Documents.
The Documents folder is not restricted to storing a certain type of file but is usually used to store personal documents, pictures, and other important files. However, some users reported that they encountered an issue: Documents folder suddenly shows empty. Here is an example:
“My Documents folder has seemingly deleted itself, just as if its contents never existed. The contents have just disappeared overnight. I've tried quite a few solutions, but none have helped in the slightest. Yes, I've attempted restarting my computer on many occasions and yet there is no change. The PC is also well over a year old and I've had no issues with it whatsoever. If anyone knows a potential fix to this error, it'd be greatly appreciated.”answers.microsoft.com
Numerous factors can cause the Documents folder to appear empty suddenly. Continue reading to understand these reasons, which will help you make your files reappear and prevent this issue from recurring more effectively.
Why Is the Documents Folder Showing Empty on PC
The Documents folder empty issue should be attributed to the following causes.
- The files are hidden: Files in the Documents folder may be hidden and invisible due to human operations, virus attacks, software conflicts, etc.
- The items are mistakenly deleted: One of the big factors that causes the Documents folder to become empty is accidental deletion. You may inadvertently delete the files in the Documents folder while organizing or transferring files.
- The files are located in the OneDrive folder: Your files may have been moved to the Documents folder in your OneDrive directory and no longer be located in the original location.
- You are logged into the wrong user account: There may be more than 1 user profile on your computer, and the wanted files are in the Documents folder of another profile. This usually happens after updating Windows.
- The hard drive is failed: Hard disk failure or file system errors can cause files in the Documents folder to disappear.
Fixes to Documents Folder Shows Empty
Depending on why the Documents folder empty issue occurred, there are a few potential fixes you can try to make your files visible again.
Fix 1. Check if the Files Are Hidden
The first troubleshooting step is to verify if the files are hidden by showing hidden files. Here are two ways you can use to display hidden files on Windows.
Use File Explorer View:
- Press the Windows + E key combination to open File Explorer.
- Go to the View tab and tick the Hidden items option. Now, you can go to the Documents folder and check if the needed files are back. The icons of hidden files will be more transparent.
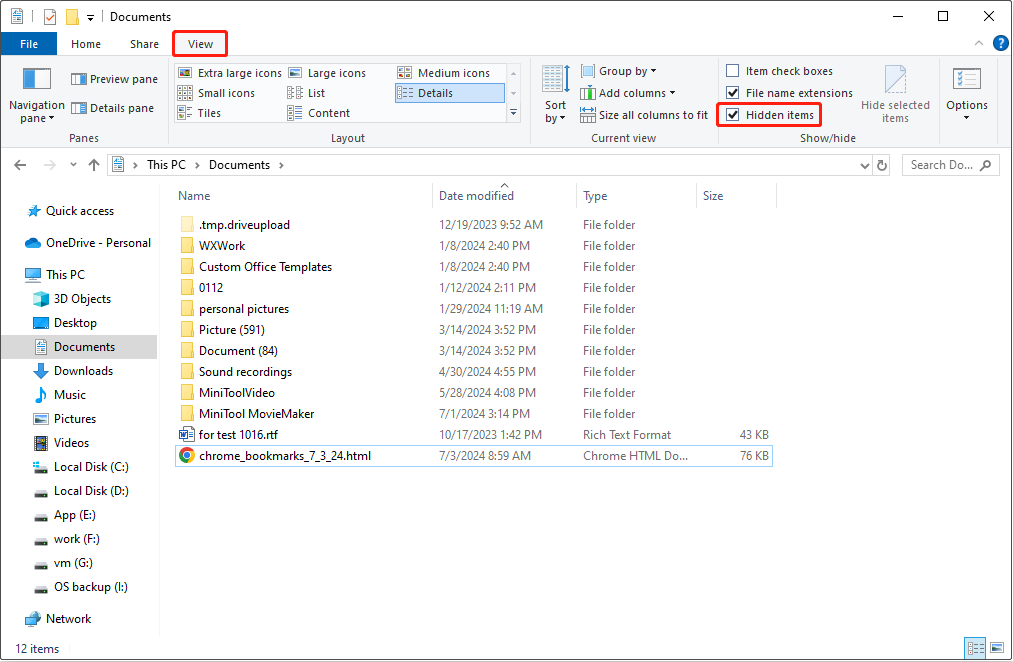
If you prefer to unhide them, you can select the target files and then click the Hide selected items option under View.
Use Command Prompt:
- Type cmd in the Windows search box. When the Command Prompt option appears, choose Run as administrator from the right panel.
- Type attrib -h -r -s /s /d drive letter:\*.* and press Enter. You should replace the drive letter with the actual letter of the hard drive where you want to show hidden files. For example, attrib -h -r -s /s /d E:\*.* is used to unhide files in the E drive.
Fix 2. Check the OneDrive Folder
Sometimes Windows is set to store your files in the Documents folder in OneDrive instead of the traditional location. In this case, you can go to C:\Users\username\OneDrive\Documents and check whether your files are there.
In addition, if you cannot find the files in File Explorer, you can go to the OneDrive website, sign into your OneDrive account, and look for the required documents there.
Fix 3. Check Another User Account
Occasionally, the Documents folder shows empty when Windows encounters an issue reading the user profile information and creates and logs you into a temporary user profile. In this case, you can navigate to C:\Users and choose if the required files are in another user profile.
If the files in the Documents folder still do not show up after attempting the approaches above, they may have been deleted. under this circumstance, you need to use professional and green data recovery software to carry out secure data recovery.
How to Recover Files From Documents Folder on Windows
In this section, we will detail how to recover deleted or missing files from the Documents folder by using free data recovery software, MiniTool Power Data Recovery. It is specially designed for Windows operating systems and is compatible with Windows 11/10/8/7.
This data restore tool supports the recovery of a variety of file types, including documents, pictures, videos, audio, emails, and so on. It works well under various data loss circumstances, such as accidental deletion, virus infection, hard drive failure, and so on.
Moreover, this secure file recovery software is equipped with a quick scan and recovery feature, allowing you to scan and recover files from the Desktop, the Recycle Bin, and a specific folder respectively. This makes great sense in reducing the scan duration.
Now, download, install, and launch MiniTool Power Data Recovery Free to start the file recovery.
MiniTool Power Data Recovery FreeClick to Download100%Clean & Safe
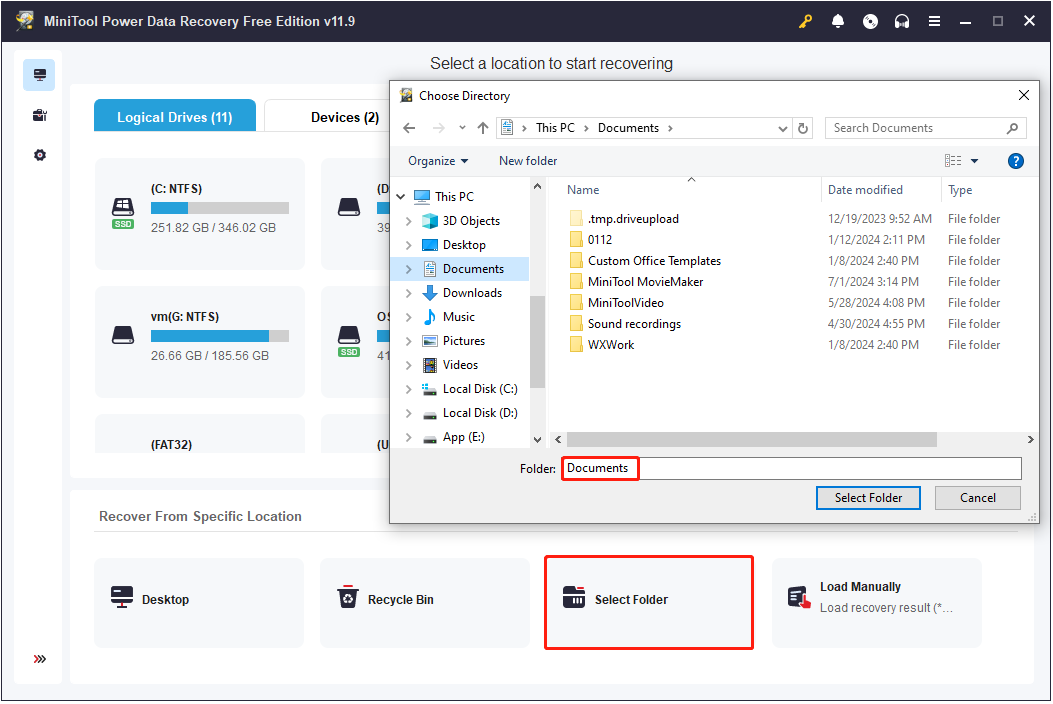
Step 1. Select the Documents folder to scan.
When the main interface of this file restore tool appears, click Select Folder and then choose the Documents folder to scan. After clicking the Select Folder button, this software will start scanning the folder for lost or deleted files immediately.
Step 2. Find the required files with multiple useful features.
The scan duration varies depending on the file capacity and hard drive status, and you have the option to pause or stop the process. However, for the best scan outcomes, you are highly suggested to wait for the scan to complete rather than halting it midway.
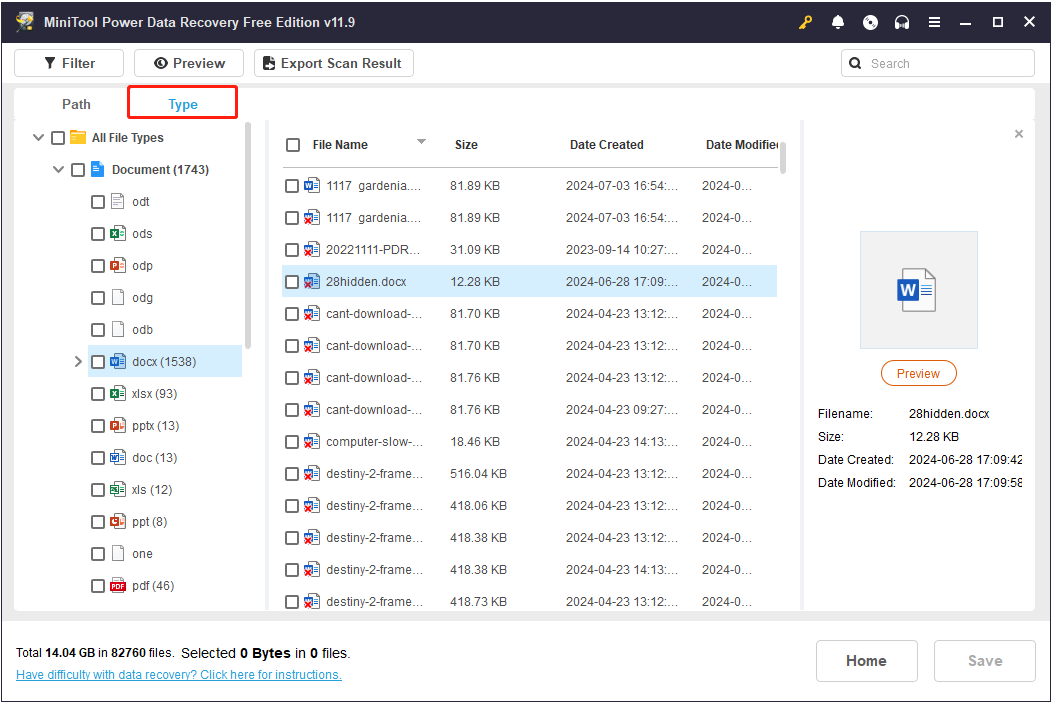
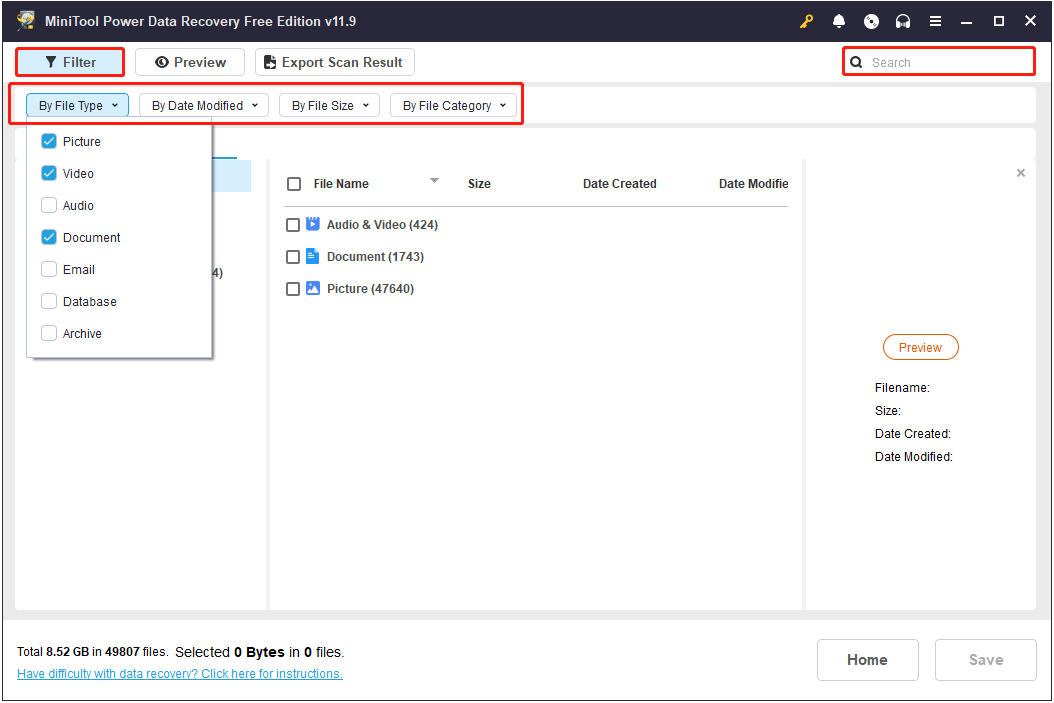
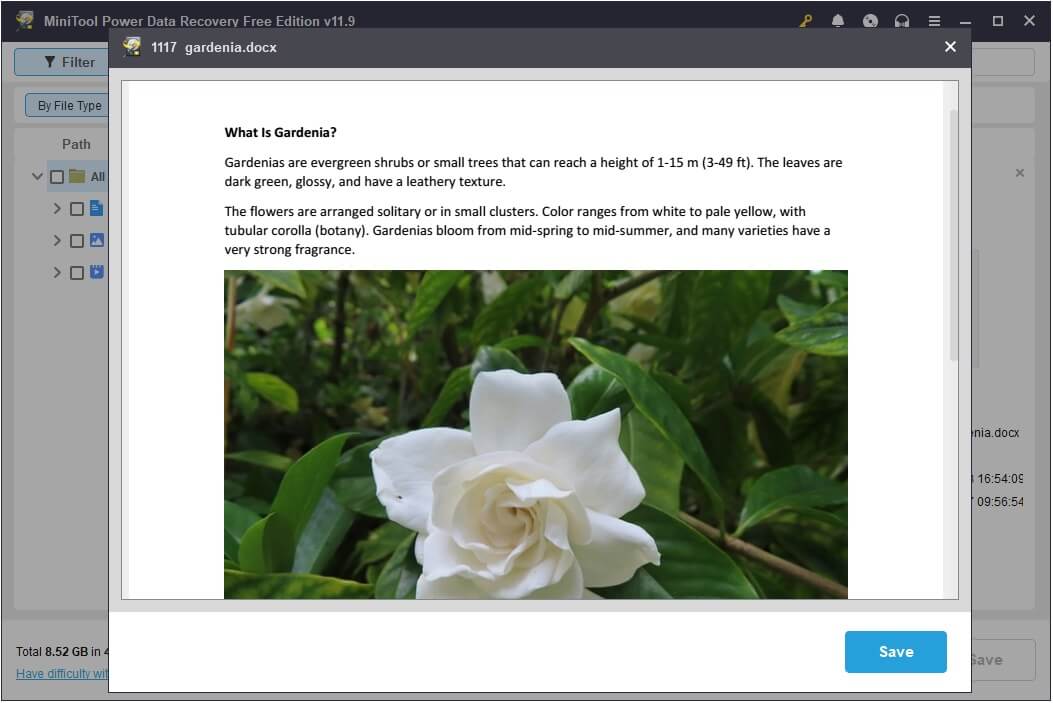
After scanning, you can start looking for the files you want to recover. This file restore tool is packed with features, including Type, Filter, Search, and Preview, to help you locate your files faster.
Type: By default, the found files in the Documents folder are displayed according to the file path under the Path section. You are required to expand each folder to locate the desired files, which can be a tedious process. To speed up the file discovery, you can go to the Type category list, which categorizes files based on their file type.
Filter and Search: Once you click the Filter button, filtering rules will pop up. You can set the file type, file modification date, file size, and file category filter conditions to filter out unnecessary files. As for the Search feature, type keywords for the file name in the search box and press Enter to display only files or folders whose names contain the keywords.
Preview: To avoid recovering unnecessary files, you are suggested to preview the files by double-clicking on them one by one. Note that the files supported to preview should be no larger than 2 GB in size.
Step 3. Tick the required items and restore them.
Finally, it is time to save the wanted items. Tick the checkboxes next to the required files and click the Save button. When a new small window pops up, choose a preferred location to store the recovered data and then click OK. Do not store the recovered files to the original Documents folder to prevent the old data from being overwritten.
How to Prevent Documents Folder From Being Empty Again
To prevent secondary data loss in the Documents folder, you should take some preventive measures. Here is a summary of the effective and functional data security measures we have compiled.
Tip 1. Back up Files Regularly
Data backup is the primary line of defense to prevent data loss. It can be very easy when you want to recover files deleted due to mistaken deletion, hard disk failures, malware infections, etc. Conventional data backup methods cover offline backup to external devices, online backup to cloud services, File History backup, and backup with professional data backup software.
Here we strongly recommend you back up the Documents folder with robust Windows backup software, MiniTool ShadowMaker. This PC backup software can help create automatic backups of folders, files, disks, partitions, and Windows systems. You can use it to back up the files on the Documents folder to another partition on the internal hard disk or a removable hard drive.
Click the button below to download MiniTool ShadowMaker Trial which allows you to enjoy most of its features at no cost within 30 days.
MiniTool ShadowMaker TrialClick to Download100%Clean & Safe
- Launch MiniTool ShadowMaker and click the Keep Trial button to continue.
- When you see the home page of this backup software, go to the Backup tab in the left menu bar. Hit SOURCE > Folders and Files and choose the Documents folder as the source file. Next, click DESTINATION and choose a location to store the backup files.
- Click to Options button to enable and configure backup schemes and schedule settings.
- Click Back Up Now to start the file backup process.
Tip 2. Enable Delete Confirmation Dialog
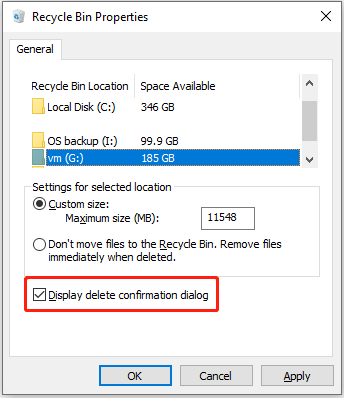
Human deletion accounts for a large part of the empty Documents folder. To prevent this from happening, you can enable the Delete Confirmation Dialog, which is a dialog box for confirming your operation when you try to delete a file. With this feature enabled, you will receive a prompt saying “Are you sure you want to move this file to the Recycle Bin” when you delete an item. If it is an accidental deletion, you can cancel it.
How to enable Delete Confirmation Dialog? First, right-click the Recycle Bin shortcut on your desktop and choose Properties. In the new window, tick the Display delete confirmation dialog option and click Apply > OK.
See more ways in this post: How to Enable Windows Confirm Delete.
Tip 3. Turn on Real-Time Antivirus Protection
To prevent viruses from attacking your computer and deleting files from the Documents folder, you can turn on the real-time antivirus protection of Windows Defender. In this way, the antivirus software will constantly scan your computer in real time for viruses, malware, or other threats.
- Open Windows Settings by pressing the Windows + I keyboard shortcut.
- Click Update & Security > Windows Security > Virus & threat protection. Hit Manage settings under Virus & threat protection settings.
- Make sure the Real-time protection option is turned on.
Tip 4. Check Disk Health on a Regular Basis
The disk status is closely related to the files in the Documents folder and other folders, so keeping your disk healthy is critical to the safety of your files. You can keep a close eye on disk health by using CMD commands or professional hard disk detection tools. See How to Check if a Hard Drive Is Failing With SMART.
Closing Words
If your Documents folder shows empty, you should first check if the files are hidden. If yes, you can unhide them. Also, the files may be stored in the OneDrive folder or another user profile. Suppose the files are permanently deleted, you can use MiniTool Power Data Recovery to get them back.
MiniTool Power Data Recovery FreeClick to Download100%Clean & Safe
Should you encounter any issues while using MiniTool software, please feel free to send an email to the support team via [email protected].
