Till now, the famous company ASUS has released various series of laptops and computers. People are doing work, playing games, and getting entertainment on an ASUS laptop. But they are bothered by ASUS laptop startup problems sometimes. How to fix when an ASUS laptop won’t turn on has been asked many times. This MiniTool post will give you some practical ways to solve the problem.
The ASUS laptop not turning on issue can be divided into two types:
- ASUS laptop won’t turn on but the lights are on.
- ASUS laptop won’t turn on with no lights.
If you have encountered the same situation, just keep reading to find solutions.
How to Recover Data When ASUS Laptop Will Not Turn on
Before ASUS laptop troubleshooting, it’s better to move files from your ASUS laptop first. I’ll show you how to use two programs to get data off a broken laptop.
The First Way: Turn to MiniTool Power Data Recovery
MiniTool Power Data Recovery is devoted to creating a safe and green environment to retrieve data. It can recover data without any damage and is efficient in restoring deleted/lost data under different situations. You can use the free edition of this data recovery software to find your wanted files and recover up to 1GB of data.
The software with snap-in WinPE Bootable Builder can help you restore data from a dead laptop. With the snap-in WinPE Bootable Builder, you can create a bootable USB drive and then boot your ASUS laptop from the drive. Here you can visit the License Comparison page to choose a suitable edition with snap-in WinPE Bootable Builder.
Part 1: Make a Bootable Disk
In this part, you need to work on a computer that works well and a USB flash drive.
Step 1: Download and install MiniTool Power Data Recovery Free edition, and register with the license to upgrade the software.
MiniTool Power Data Recovery FreeClick to Download100%Clean & Safe
Step 2: Connect the USB drive to the computer and launch the software.
Step 3: Click on the Bootable Edition icon at the top right.
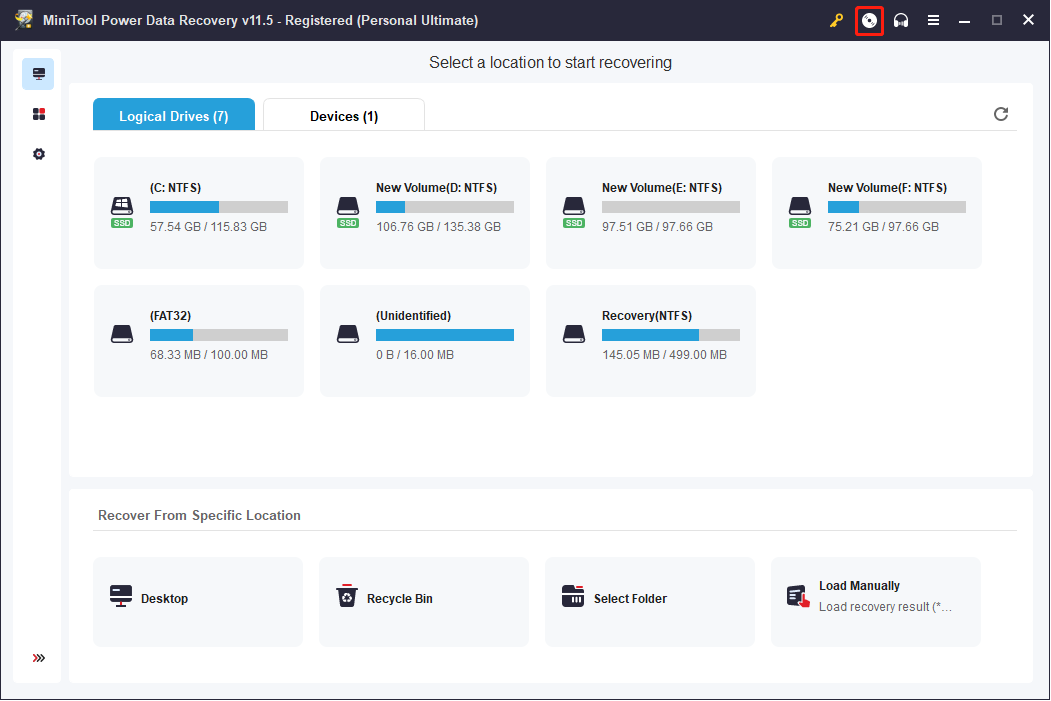
Step 4: Click WinPE-based media with MiniTool plug-in in the MiniTool Media Builder window.
Step 5: Choose USB Flash Disk to create the bootable drive.
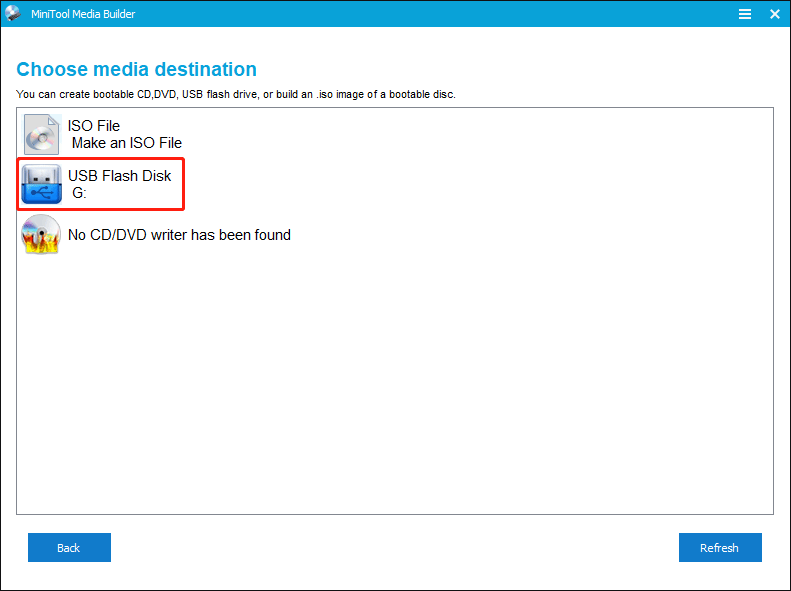
Step 6: Wait for the disk building process to complete and click Finish.
Part 2: Recover Data from ASUS Laptop
Step 1: Connect the USB drive to the problematic ASUS laptop.
Step 2: Press and hold F2 and then click the Power button. Do not release F2 until the laptop enters BIOS.
Step 3: Adjust the bootable disk to the first place by the arrow keys, then save the changes and exit BIOS.
Step 4: Wait for the laptop restarting and it will enter MiniTool Power Data Recovery automatically.
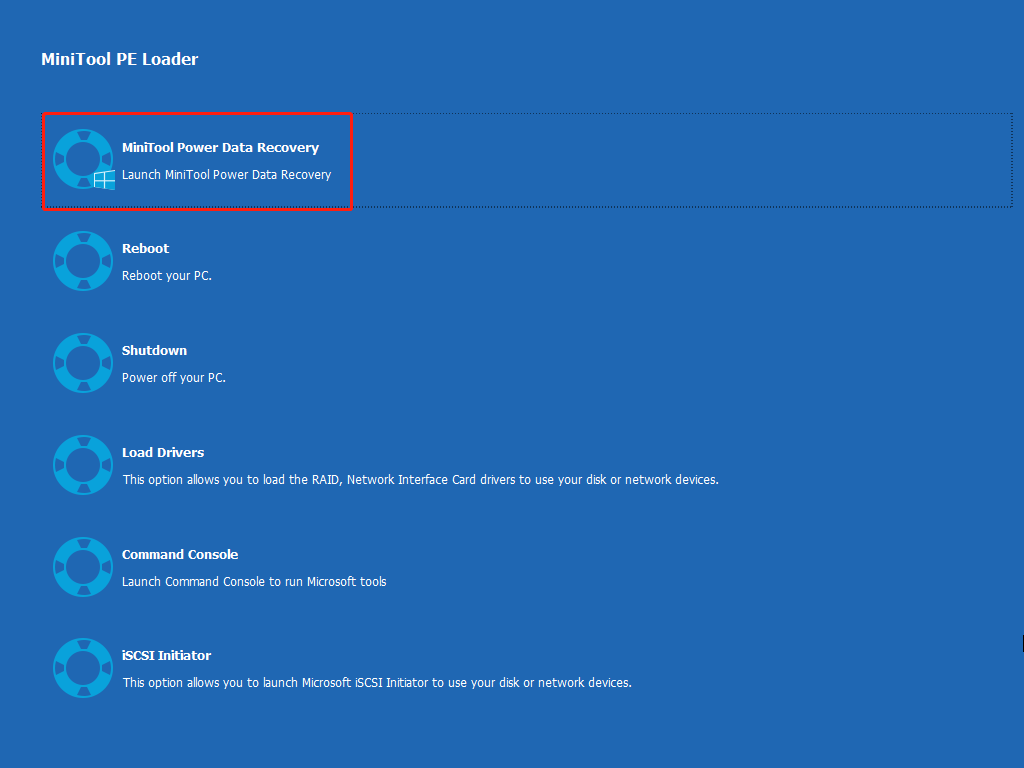
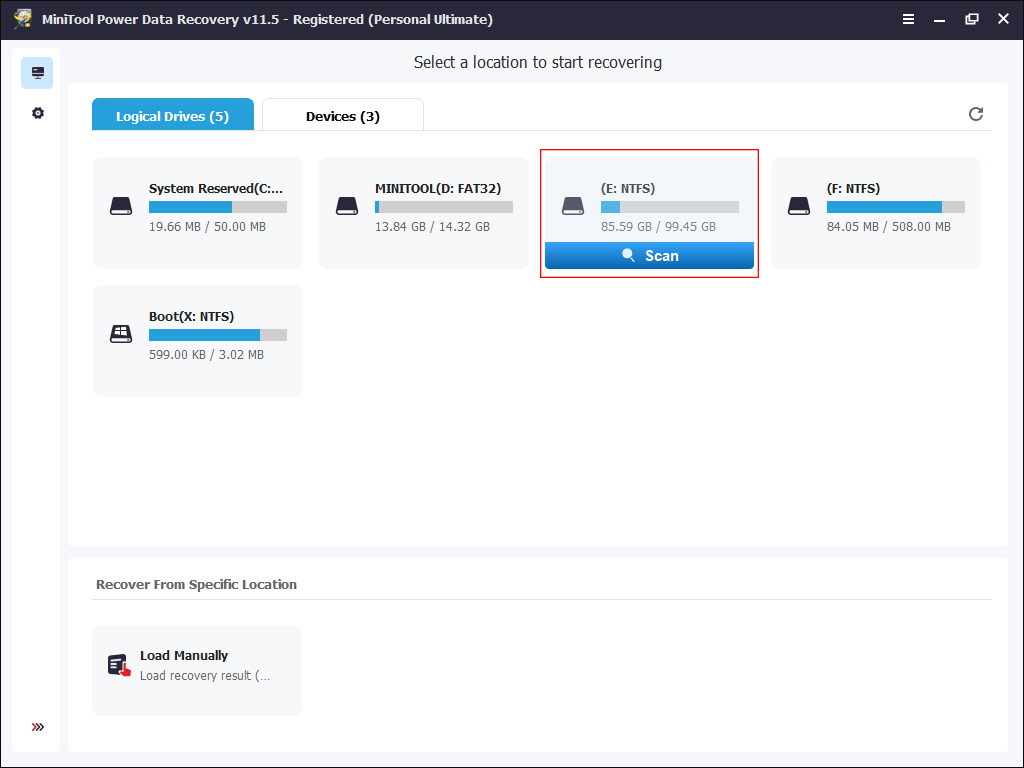
Step 5: Select a partition to scan and wait for the scan process to complete.
Step 6: Browse the scan result page and choose the files you wanted to recover. You can preview these files before saving them.
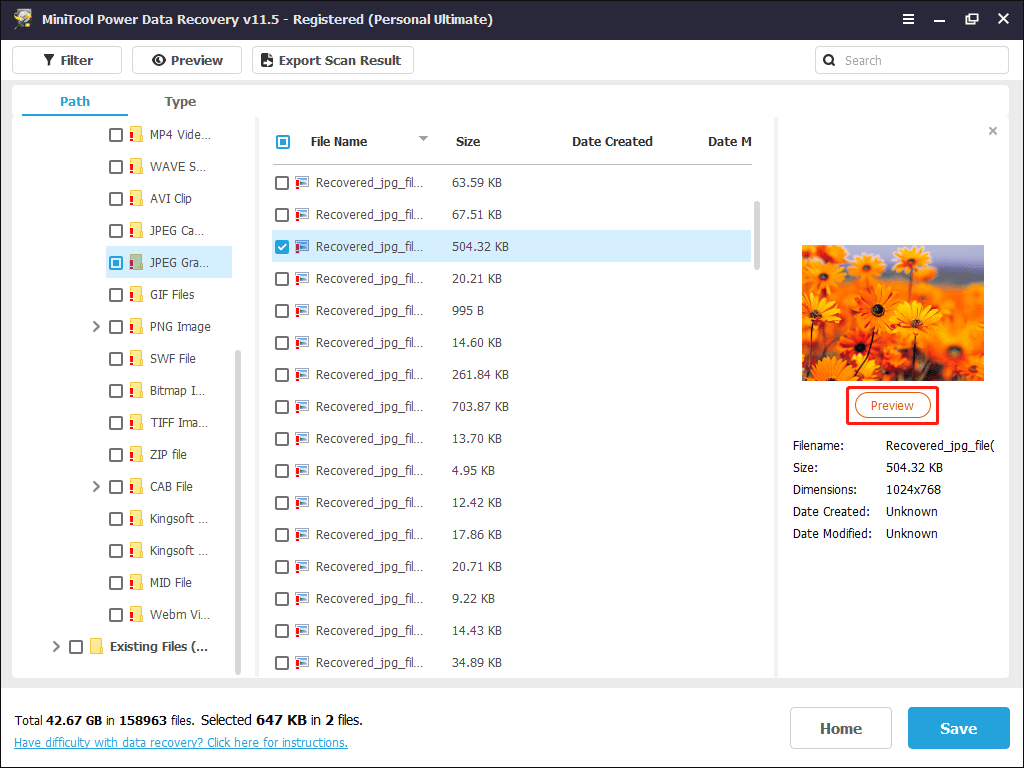
Step 7: Click on the Save button, then choose a proper path and click OK to restore them.
Please click here to know more about how to recover data from the hard disk without OS or a crashed disk.
The Second Way: Use MiniTool Partition Wizard
MiniTool Partition Wizard is an all-in-one software. It can manage your partitions easily by merging, splitting, resizing, and formatting partitions, and is professional in converting file systems from FAT to NTFS and migrating OS to SSD/HDD.
Here we recommend this software to help you copy partitions from the ASUS laptop that won’t turn on. Since your ASUS laptop won’t boot normally, it is needed to create a bootable disk and boot your laptop from this disk. You can choose one edition that suits you best through this page.
Using MiniTool Partition Wizard to copy partitions from a dead laptop is also divided into two parts.
Part 1: Create a Bootable Disk
Step 1: Download and install the MiniTool Partition Wizard Free edition on a working computer and register it with your license.
MiniTool Partition Wizard FreeClick to Download100%Clean & Safe
Step 2: Connect a USB drive and launch the software.
Step 3: Click on the Bootable Media icon and follow the instructions to create a bootable drive.
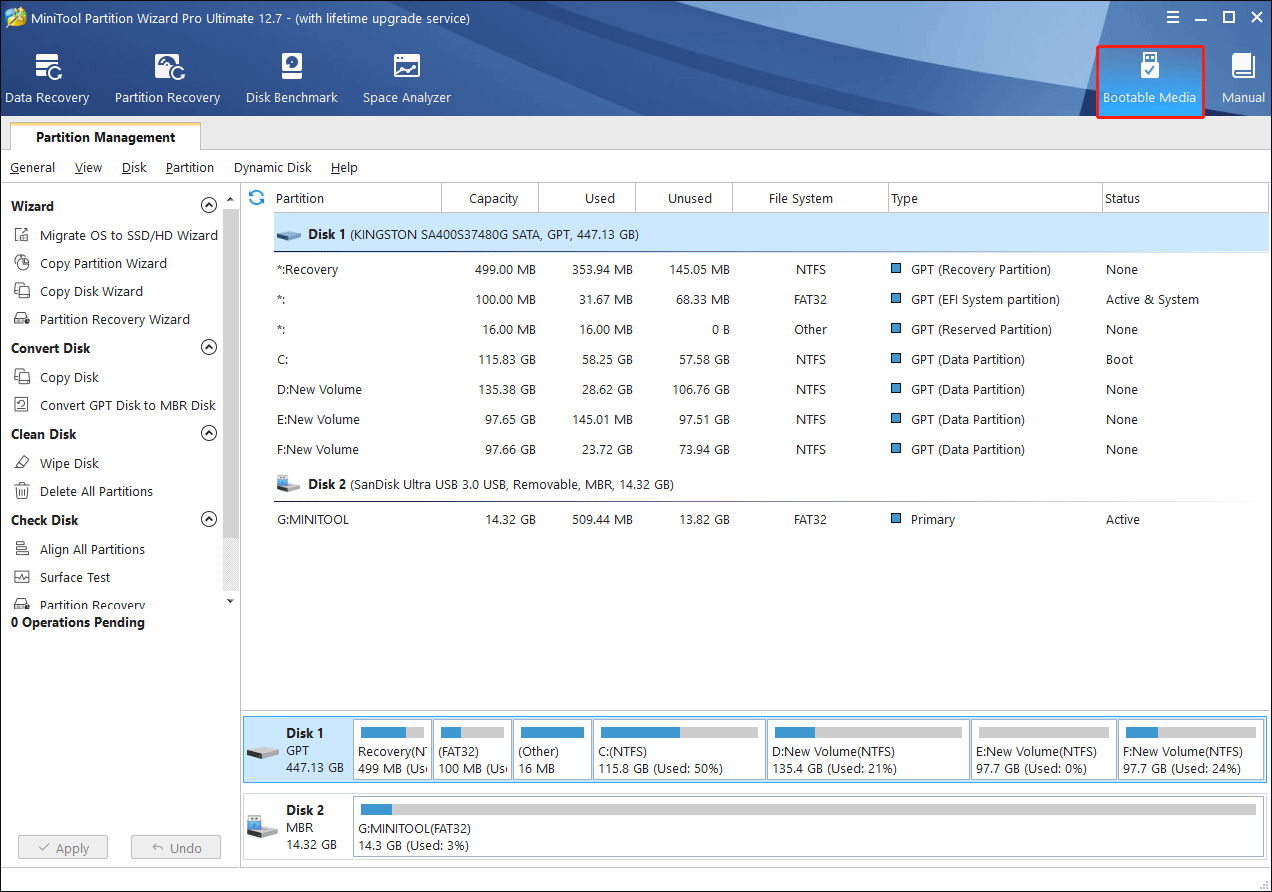
Step 4: When the process is finished, click Finish and remove the USB drive.
Part 2: Use the Bootable Disk to Copy Partition/Disk
Step 1: Connect an external hard drive (with a large capacity) to the ASUS laptop not turning on.
Step 2: Connect the bootable disk you created to the laptop and restart your laptop.
Step 3: Press and hold F2 and click the Power button to enter the BIOS menu, then adjust the bootable disk to the first place under the Boot menu.
Step 4: Wait for the laptop restarts and enter MiniTool Partition Wizard automatically.
Step 5: Click Copy Partition Wizard and finish the steps with the following instructions.
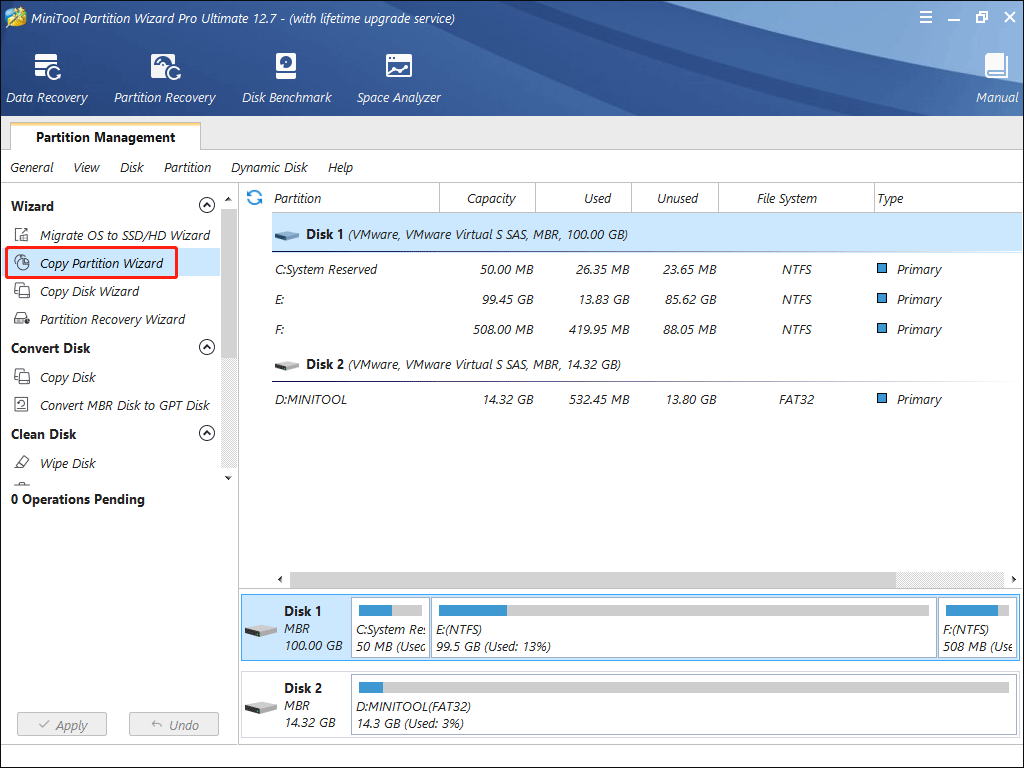
If you want to know how to copy all partitions at once (which means copy a disk), please read this passage: Copy Disk Wizard
How to Troubleshoot ASUS Laptop Not Turning on
ASUS Laptop Won’t Turn on
You may find your ASUS laptop won’t turn on and shows a black screen. This is a problem reported by lots of ASUS users. Some people said their ASUS laptop won’t turn on and the light is off while others said the ASUS laptop won’t boot but the power light is on. How to troubleshoot in these 2 situations? Please read the following content.
Situation 1: ASUS Laptop won’t Boot and the Light Is Off
When you find the power light is off, it means your computer doesn’t have a sufficient power supply to boot. You need to check whether the charger works well.
Step 1. Make sure both the AC power cord and the AC power adapter have the correct specifications supported by ASUS. The purpose of this step is to roll out the cases where the hardware is incompatible with the ASUS laptop.
Step 2. Check the connection between the AC adapter plug and your ASUS laptop. You can also try a different outlet on the laptop.
Step 3. Go to check the cable of the AC adapter, making sure it has no physical damage. You can also try a different cable or AC adapter.
Step 4. Disconnect all the external devices from your ASUS laptop, like memory card, USB flash drive, HDMI, CD-ROM, internet cable, and so on.
Step 5. Remove all the expansions on the hard drive or memory if they were connected before the problem occurs.
Situation 2: ASUS Laptop won’t Turn on But Power Light Is On
If the power light is on but your laptop fails to boot, it means other components of your laptop are wrong. Please try the following methods to solve the issue.
Method 1: Check Display Settings
- Press Fn + F7to turn on/off the display to avoid accidentally close of the display and make sure there is no response from the screen.
- Press Fn + F6to adjust screen brightness. This step ensures enough brightness of the laptop to roll out cases the screen brightness sets too low to be seen.
- Press Fn + F8to switch between the laptop display and the connected external monitor. If your laptop works well with an external monitor, please download and install graphics drivers on the ASUS support site. Then, restart your computer to see if it can work normally.
Please note that the key combination may be different on different ASUS laptop models.
Method 2: Reset Display Settings
Sometimes, the black screen may be caused by the wrong display setting. You can press Win + Ctrl + Shift + B to reset the display settings to see whether it works.
Method 3: Hard Reset
Step 1: Remove all the portable external devices and expansions.
Step 2: Remove the battery and charge the laptop with an AC adapter directly.
Step 3: Shut down the laptop forcefully by pressing and holding the power button for about 30 seconds.
Step 4: Unplug the AC adapter.
Step 5: Press and hold the power button for about 40 seconds to do a hard rest.
Step 6: Put back the battery and plug in the AC adapter. Then, restart the computer.
Method 4: Update BIOS
If something is wrong with BIOS settings, the laptop operation system will fail to boot, thus the power light is on but the screen is blank. Please follow the next steps to fix the issue.
Step 1: Find a computer that works normally, and download the corresponding BIOS files of the computer model with the problem through the ASUS support site.
Tip: Please read the article to find more information about downloading BIOS files: How to search and download Drivers, Utilities, BIOS, and User Manuals.
Step 2: After the download process ends, rename the file extension as “.bin”.
Step 3: Connect a USB drive to the computer and copy the file to it.
The format of the USB driver should be FAT32.
Step 4: Connect the USB driver to the problematic computer.
Step 5: Restart the problematic computer and press and hold Ctrl + R during the start process to enter the BIOS Safe Mode.
Step 6: Wait for the computer to restart automatically, then it will enter EZ Flash utility.
Step 7: Select the “.bin” file of the USB drive and click Yes to update the BIOS.
Step 8: The laptop will reboot automatically after the update process is finished.
Verdict
Undoubtedly, the computer problem is a universal topic. A laptop that won’t turn on is one of the problems everyone tends to meet in daily work. Hope this post can help you when this issue happens to you. Besides, protecting your data is also vital when your computer occurs problems. When you use MiniTool software to rescue data or manage disks, please feel free to contact us via [email protected] if necessary.
