Some ASUS laptop users are complaining about the black screen issue. This issue usually indicates an underlying problem with your laptop. But there is no need to be frustrated with it. Here we compile several methods to get rid of the black screen.
Why Do You See an ASUS Laptop Black Screen
The ASUS laptop black screen on startup or while you’re working on it is very annoying; it prevents you from entering the system successfully or stops what you’re doing forcibly. Nobody wants to run into a black screen, but the reality is we have to face this problem sometimes.
When will your ASUS laptop screen become black?
- Some people said their ASUS laptop won’t turn on and they finally get a black screen.
- Others said their ASUS laptop screen goes black randomly while working on it.
You may find your laptop is not booting when seeing ASUS black screen, while others may be bothered by the ASUS laptop black screen but the computer on. What should you do in both cases? You may first restart your laptop to see what happens. Then, try to perform a hard reset or use other methods to fix an ASUS Black Screen. How to do that? Please let me explain the detailed steps to you.
Recover Data from Black-screen ASUS Laptop
If you worry about data loss during the process of fixing the problem, you can recover your data from this black-screen laptop first by using MiniTool Power Data Recovery. This is a green and secure data recovery software, that will cause no damage to your data. Besides, it allows you to recover lost data in different situations, such as OS crashes, mistakenly deleted, virus attacks, etc. You can also retrieve deleted data from various data storage devices like external and internal hard drives, memory cards, and so on.
When your laptop encounters a black screen, MiniTool Power Data Recovery also works. Generally speaking, recovering data from the black-screen ASUS laptop needs two steps. First, you should create a bootable disc by using MiniTool Power Data Recovery with a snap-in WinPE Bootable Media Builder. Second, you’re supposed to boot the black-screen ASUS laptop with the created Bootable Media.
Step 1: Create a Bootable Media
1. Download MiniTool Power Data Recovery on a well-performing computer.
MiniTool Power Data Recovery FreeClick to Download100%Clean & Safe
2. Turn to the Utilities interface and click on the Download button in the Power Data Recovery Bootable section to get the full edition.
Please notice to get the edition with a snap-in WinPE Bootable Builder.
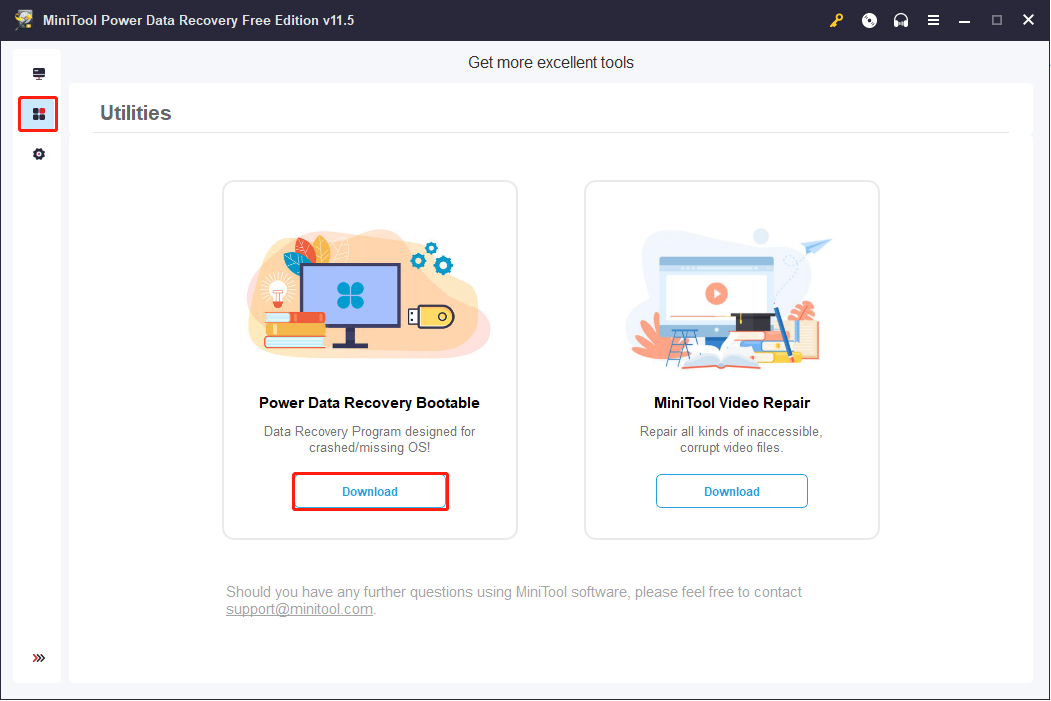
3.Register the MiniTool Power Data Recovery with your license key by clicking the key icon on the top right.
4. Plug in a USB flash drive and click the Refresh button on the right corner.
5. Click on the Media Builder on the top right and select WinPE-based media with MiniTool plug-in.
6. Select a USB flash disk to create a bootable drive.
7. Wait until its preparation process ends, click Finish, and unplug the USB drive.
Step 2: Recover data from your black-screen ASUS laptop.
1. Plug the USB drive into the black-screen laptop and restart it.
2. Enter the BIOS menu to adjust the bootable order, making it boot from the USB bootable disk.
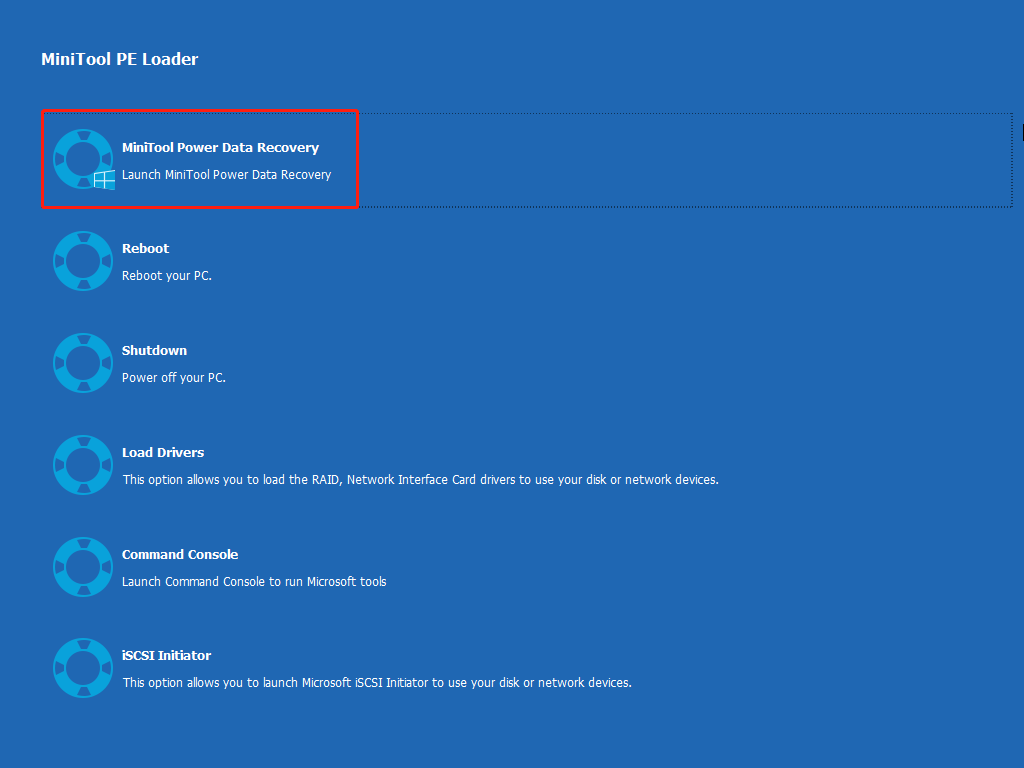
3. Wait patiently, the laptop will open MiniTool Power Data Recovery. Whether you install the software on the laptop or not, it can launch successfully.
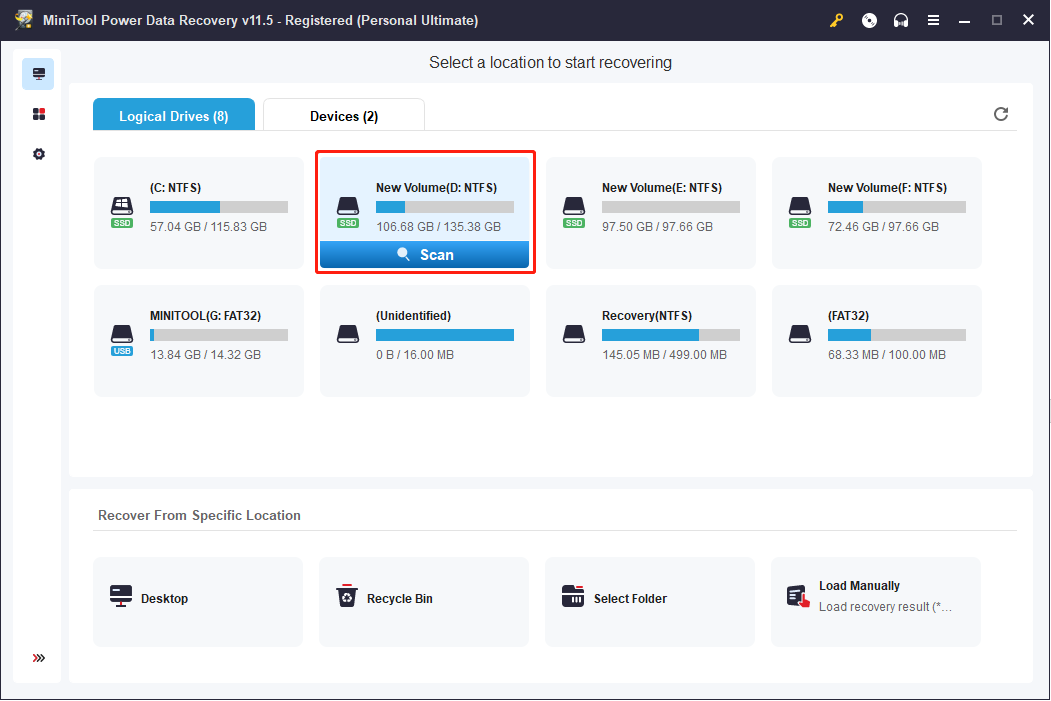
4. Select a partition to scan or switch to the Drives tab to scan the whole ASUS disk.
5. Select the files you want to recover from the result page.
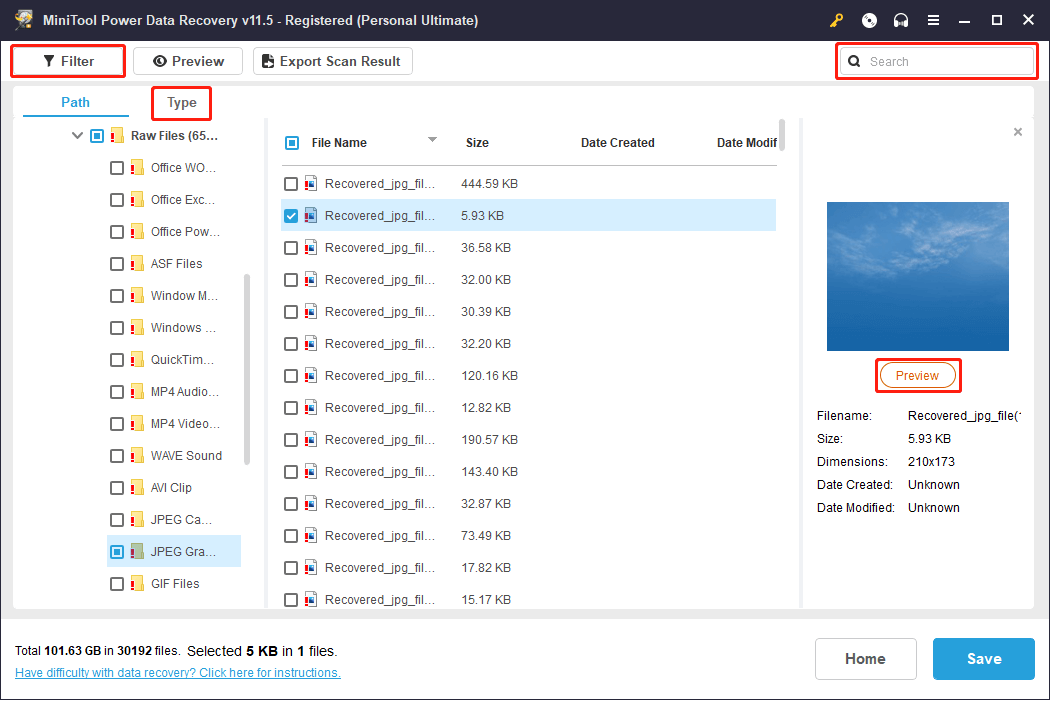
To quickly locate your desired files, you can use Type, Filter, and Search functions to reduce unnecessary options.
To check whether the file is what you want, you can use Preview function to confirm.
6. Click on the Save button and choose a proper path to restore the files.
Way 1: Check the Connection & the Screen
Facing the black screen issue, you are supposed to check whether the power light is on or not.
If the power light is off, you need to check the connection from the following aspects.
- You’re using an AC power adapter and AC power cord which are provided by ASUS.
- Remove all the external devices to avoid one of them interfering with the process of booting. Then, restart your laptop.
- If your laptop is equipped with a removable battery, please remove it and use an AC adapter to supply the charge directly. Then restart your laptop. If it works, you should change to a new battery.
If the power light is on, check your laptop in three ways.
- Press Fn and function key, usually F7, on the keyboard to confirm that there’s no response on your screen. The function key may be different due to different laptop models. You can research online for the user manual or contact the ASUS support team.
- Press Fn + F6 to adjust the screen brightness because the laptop display may look like a black screen with low brightness.
- Connect to an external monitor, and press Fn + F8 to switch between the laptop display and the external monitor. If the external monitor displays normally, your laptop display may have a problem.
Way 2: Restart the explorer.exe Process
If the explorer.exe doesn’t start up normally, your laptop display may become black. In this case, you can usually see a cursor on your laptop but no other image. Then, you can try the following steps.
Step 1: Press Ctrl + Shift + Esc at the same time to open Task Manager.
Step 2: Click the Details tab on the top bar and find explorer.exe.
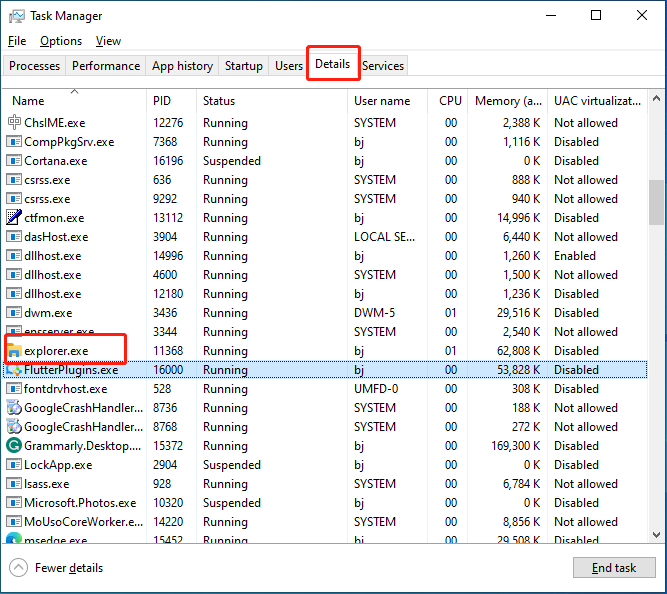
Step 3: Right-click on it and choose End task.
Step 4: Restart your computer.
Way 3: Do a Hard Reset
If your ASUS laptop has connected with peripheral devices, they may be the causes of the black screen. Thus, you can do a hard reset to see whether the black screen is caused by these devices or not.
If your laptop performs well after a hard reset, you should check the peripheral devices. Then, please follow the steps.
Step 1: Turn off the ASUS laptop completely.
Step 2: Unplug any adapter or power cord from the laptop and remove all external devices.
Step 3: Locate the battery and remove it properly from your laptop.
Step 4: Press the Power button and hold it for 40 seconds to do the hard reset.
Step 5: Put back the battery and re-plug the power cord.
Step 6: Press the Power button to turn on the ASUS laptop and check whether it can work well.
Way 4: Reset Display Settings or Reset the Laptop
Sometimes, the black screen is caused by the occasional disconnection between the operating system and the screen display. You may try to reset the display settings by pressing Windows + Ctrl + Shift + B to see if it works.
However, if it doesn’t work, please follow this guide to reset the laptop:
Step 1: Restart your ASUS laptop showing a black screen.
Step 2: Press Windows + L to boot into the Windows sign-in screen.
Step 3: Hold the Shift key and click on Power -> Restart at the bottom right to enter Windows Recovery Environment (WinRE).
Step 4: Click Troubleshoot -> Reset this PC -> Keep my files.
Step 5: Wait for the process to end.
Way 5: Re-install Graphic Driver
If your laptop starts on normally but turns into a black screen when enters the desktop, it may be caused by a problem with the graphics driver. You can try to boot your laptop into Safe Mode to solve it.
Step 1: Press and hold the Power button for 15 seconds to shut down the laptop forcefully.
Step 2: Press the Power button to turn on the laptop.
Step 3: When the ASUS logo appeared, press and hold the Power button for 15 seconds to shut down.
Step 4: Press the Power button to restart the laptop.
Step 5: Repeat the steps 3 and 4 to make the laptop fully restart.
Step 6: The laptop will enter Windows Repair Environment.
Step 7: Select Troubleshoot > Advanced option > Startup Settings > Restart.
Step 8: To upgrade the graphics driver, you’re suggested to select Enable Safe Mode with Networking by pressing F5.
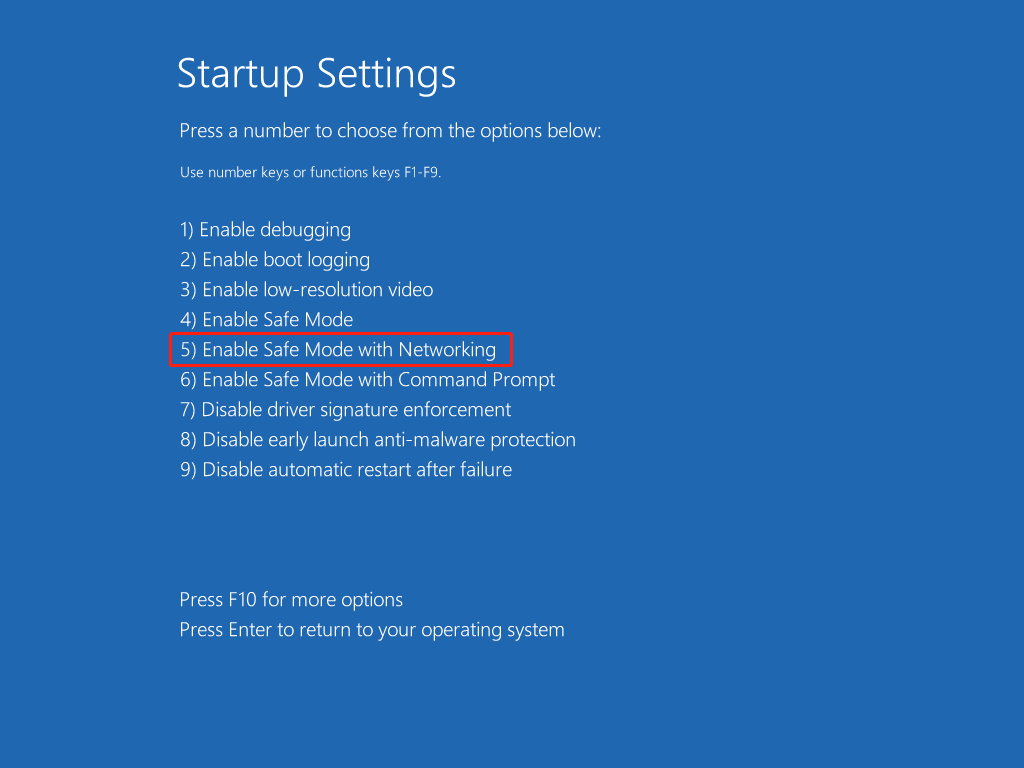
Step 9: Visit ASUS support site and type your Model Name in the search bar.
Step 10: Select Support > Driver & Tools to enter the product support site.
Step 11: Then you can reinstall the graphics driver with instructions in this page.
Way 6: Update BIOS
BIOS updates can help resolve your ASUS laptop black screen issue in some cases. But in this method, you need a second computer to operate. If you have another one, follow the next steps.
Step 1: Download the BIOS file
- Download the BIOS file to the work-well computer via the ASUS support site. Type your laptop model to obtain the exact BIOS file. Or you can read this passage for detailed information.
- After downloading finished, right-click the folder and select Extract All selection.
- Click Extract in the pop-up window.
- Find the file and right-click to rename its extension name to “.bin”.
- Prepare a USB drive whose format should be FAT32, and connect it to the computer.
- Send the “.bin” file to the USB drive.
Step 2: Update BIOS on the black-screen laptop
- Connect the USB drive to the black-screen laptop and restart it. During the process of computer startup, press Ctrl + R to enable BIOS Recovery Mode.
- Your laptop will enter EZ Flash utility automatically, then select the “.bin” file from the USB drive.
- Click Yes to start BIOS updating.
- The laptop will restart automatically after the BIOS update. You can check whether the problem is solved.
Please do not unplug the AC adapter to prevent the BIOS update process from being interrupted due to an insufficient power supply.
What to Do After Fixing the Black Screen
Other Settings
ASUS laptop black screen can be caused by many reasons. If the above methods help you fix the problem this time, you can try the settings below to avoid the same situation happening in the future.
Turn Off Fast Startup
Step 1: Press Windows + R to open Run.
Step 2: Type powercfg.cpl into the textbox and click OK.
Step 3: Click Choose what the power button does in the left pane.
Step 4: Click Change settings that are currently unavailable in the System Settings window.
Step 5: Uncheck Turn on fast startup (Recommended) and click Save changes.
Step 6: Restart your ASUS.
Perform a System Restore
After trying all the above methods, you still have one trump card – restoring your system to a previous point when the problem didn’t show up. You should turn to the System Restore feature. However, this is only effective if you have enabled system restore in advance and there is at least one restore point available for you to choose from.
Backup and Recover Data
Backup Data with MiniTool ShadowMaker
You can back up your data to avoid situations where computer data is urgently needed but the screen turns black. MiniTool ShadowMaker is a functional backup software. It can back up not only folders and files but also the partitions and system. The trial version of MiniTool ShadowMaker can be used for free for 30 days. You can download this edition first to have a try and upgrade it through this page if necessary.
Step 1: Download and install the MiniTool ShadowMaker.
MiniTool ShadowMaker TrialClick to Download100%Clean & Safe
Step 2: Launch the software and select Backup.
Step 3: Click SOURCE to select what you want to back up, including disk, partition, file, or folder. Then click OK to back the main interface.
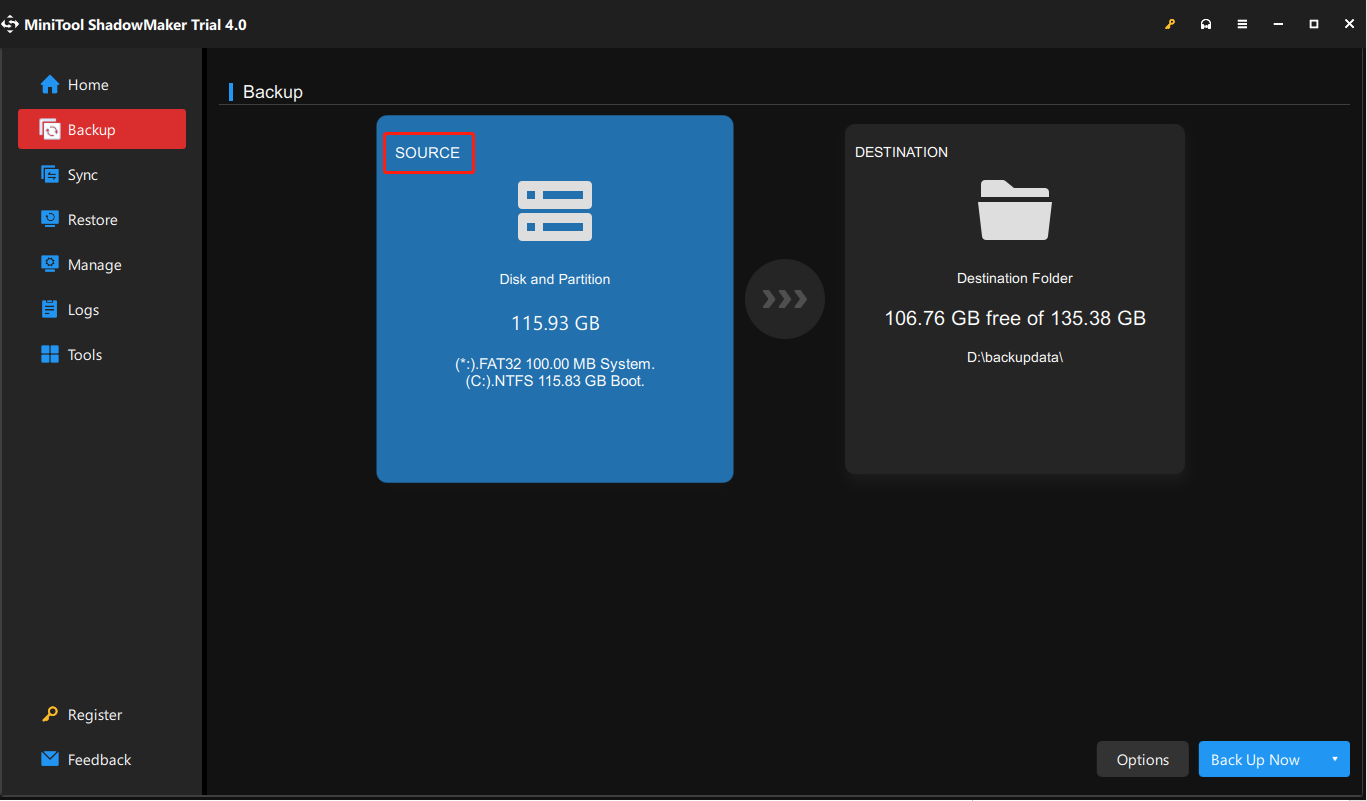
Step 4: Click DESTINATION to choose the destination path and click OK to back.
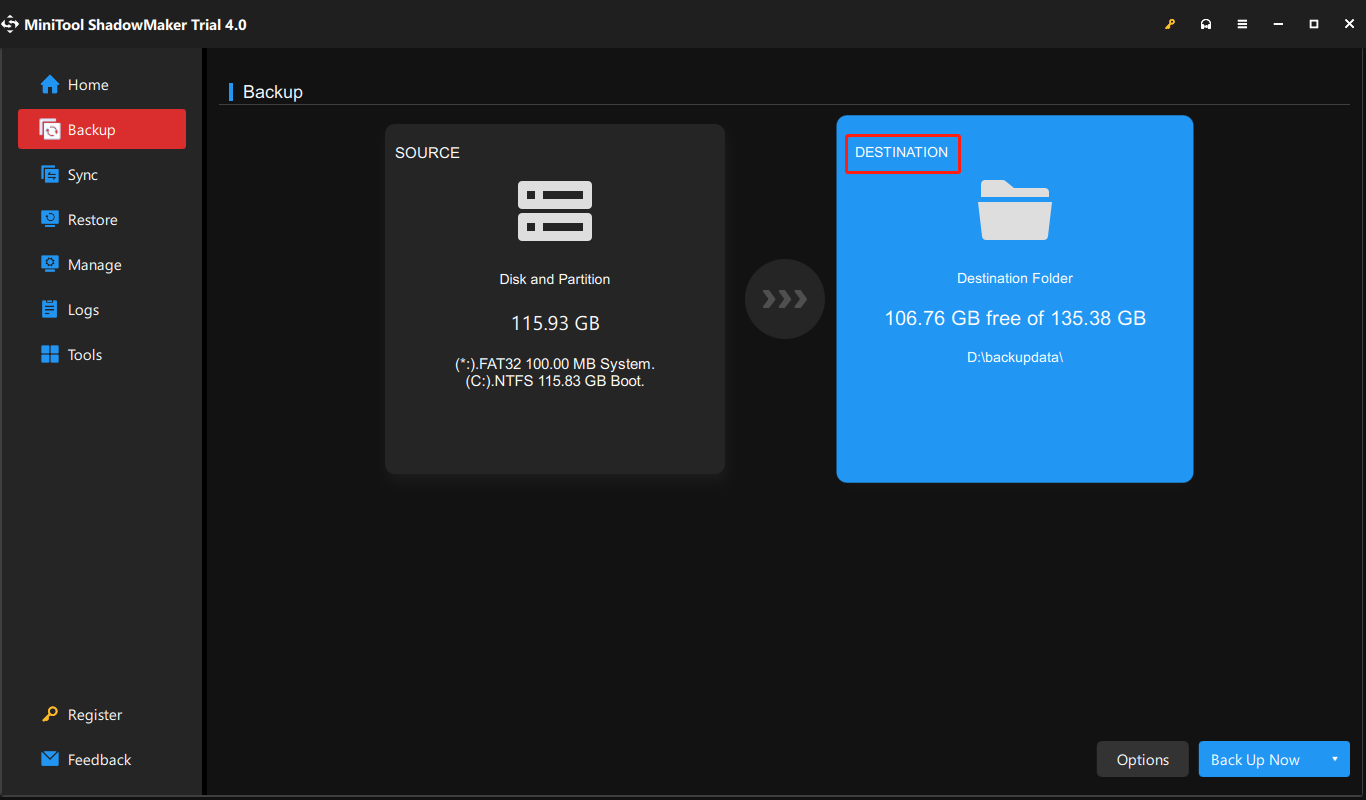
Step 5: Click the Back Up Now button to start the process.
You can get more detailed information about backup data with MiniTool ShadowMaker from this passage:
Recover Data with MiniTool Power Data Recovery
After you fix the black screen issue on your laptop, you may find data loss because of it. MiniTool Power Data Recovery is a powerful free data recovery software that can recover any lost data under various situations, such as disk failure, file system error, virus attack, etc. Besides, with a multiple-choice filter function, MiniTool Power Data Recovery can locate required files accurately.
Step 1: Download and install MiniTool Power Data Recovery.
MiniTool Power Data Recovery FreeClick to Download100%Clean & Safe
Step 2: Launch the software and choose one partition to scan. Alternatively, you can choose to scan the Desktop, Recycle Bin, Selected File, or the whole Disk based on your demand.
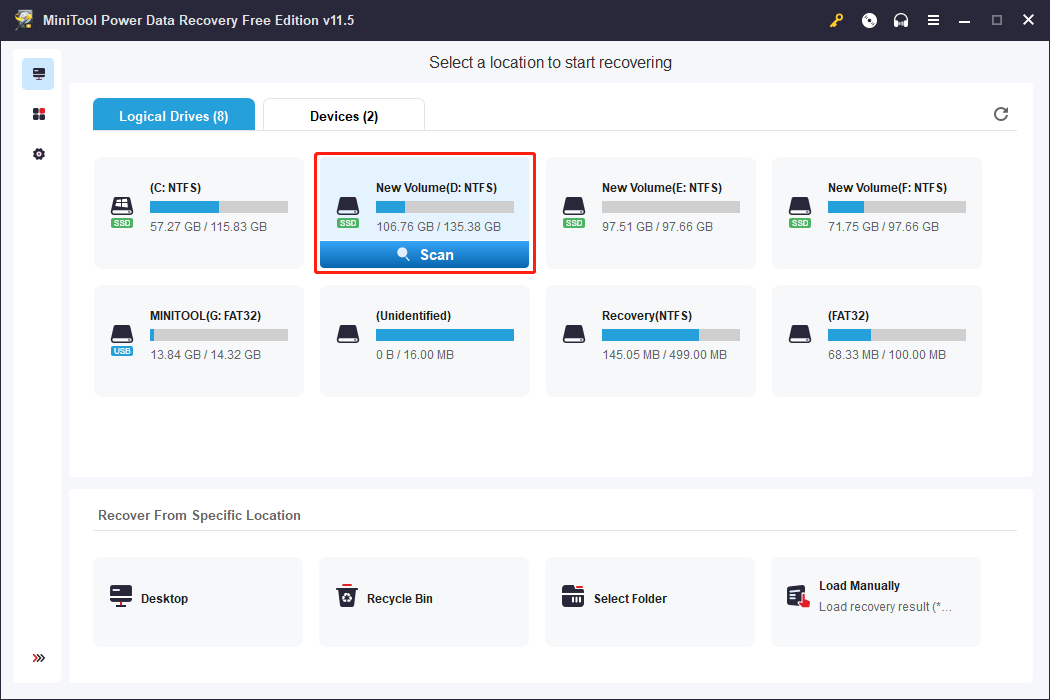
Step 3: After the scanning process is finished, you can type the file name in the Search bar, or click the Filter tab on the top left to set specific filter criteria.
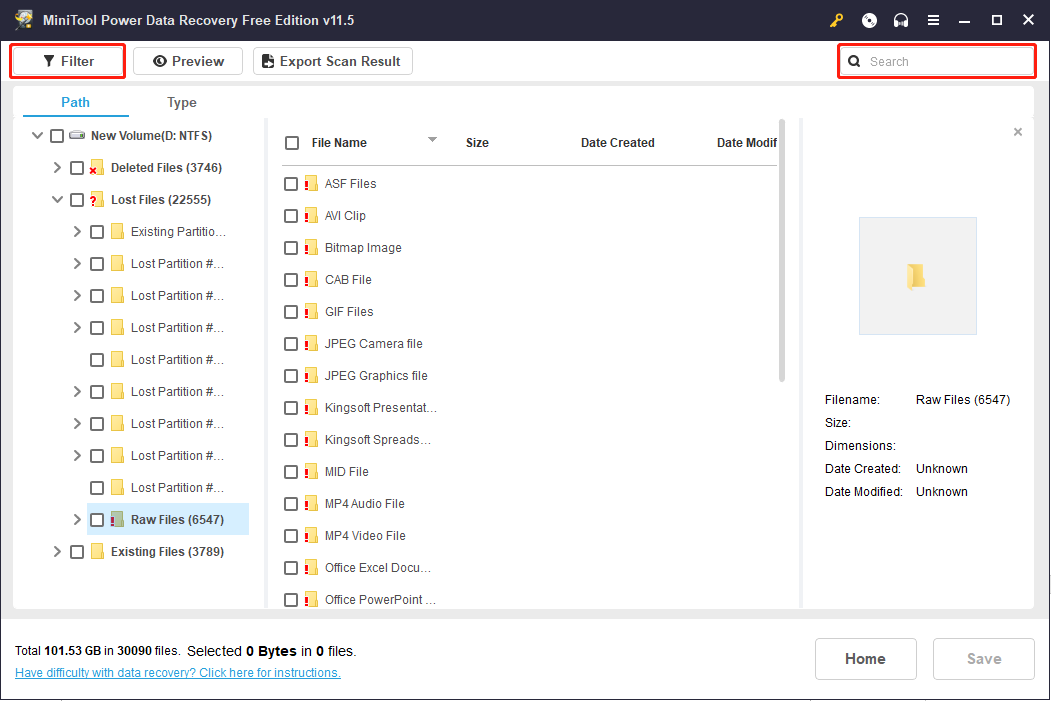
Step 4: Check your wanted files and click Save.
Step 5: Select an appropriate path to restore data and click the OK button.
Note: The free edition of MiniTool Power Data Recovery supports 1GB of data restoration for free. If you prefer a larger recovery capacity, you can get an advanced edition through this page.
Conclusion
The ASUS laptop black screen is one of the most common problems. On this page, some effective ways to settle down this issue are introduced. If you also face the same problem, this page can be very helpful. If you have any questions about fixing the ASUS laptop back screen or MiniTool Power Data Recovery, please contact [email protected].
