Windows 11 Flashing Screen and No Taskbar
Recently, I encountered this problem when using my Windows 11 computer: Windows 11 flashing screen and no taskbar. This issue happens after I enabled the new search box on the taskbar on Windows 11. In the beginning, my computer was stuck with no response. So I press the Power button for seconds to force shut down the computer. After restarting the computer, the taskbar never appeared again and the screen started flickering like the desktop kept refreshing.
At first, I didn’t think it was a problem, I thought restarting the computer would solve the problem. But I was wrong. After restarting the computer a few times, my Windows 11 desktop still kept flickering and I still couldn’t see the taskbar.
Interestingly, I could still use the keyboard shortcut to open Settings, File Explorer, Task Manager, the Run dialog, the Start menu, the search panel, and more. But since the desktop was keeping refreshing, I couldn’t do certain operations. For example, the Start menu and the search panel disappeared once the desktop was refreshed. It was different to use the Start menu and the search panel. Fortunately, the remaining available functions are enough to fix the issue of the Windows 11 missing taskbar and screen flickering.
The causes of the Windows 11 flashing screen and no taskbar issue are various. My situation is just one case. This issue can also happen after you install a new update on your Windows 11 PC.
You may just need to run specified commands in Command Prompt to resolve the issue. Of course, you may need to use advanced solutions to fix the issue.
In this article, we will show you 10 methods. You can try them and find the most suitable one.
Preparation: Back up Your Data
To protect your data, you’d better back up your files before fixing Windows 11 flashing screen and no taskbar. You can use MiniTool ShadowMaker to do this job. This is a special backup software that is designed to back up files, folders, partitions, disks, and systems on Windows 11/10/8/7.
This software has a trial edition. You can use this free tool within 30 days. Now, you can prepare an external hard drive that has enough disk space to save the backup and apply MiniTool ShadowMaker to back up your files to the external hard drive.
MiniTool ShadowMaker TrialClick to Download100%Clean & Safe
Fix 1: Run DISM and SFC
Windows 11 desktop keeps refreshing and the taskbar is missing can be caused by missing or corrupted system files. While the System File Checker (SFC) tool can repair the system files. On Windows 11, you need to run the inbox Deployment Image Servicing and Management (DISM) tool prior to running the System File Checker.
Here is how to run DISM and SFC on Windows 11:
Step 1: Press Ctrl + Alt + Delete at the same time to open the Security Options window. Then select Task Manager to open it.
Step 2: Click Run new task from the top menu, then you can see the Create new task interface.
Step 3: Type cmd into the box next to Open, then check the Create this task with administrator privileges option. Next, click the OK button. This can run Command Prompt as administrator.
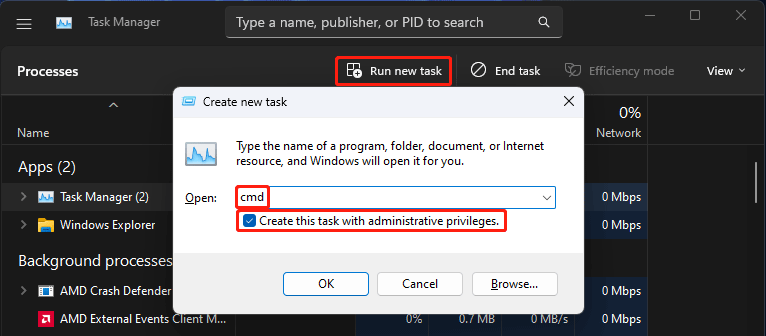
Step 4: Type DISM.exe /Online /Cleanup-image /Restorehealth in Command Prompt and press Enter. This command can use Windows Update to provide the files that are required to fix the corruptions.
Step 5: If your Windows Update client is already broken, you can use a running Windows installation as the repair source. You can also use a Windows side-by-side folder from a network share or from a removable media as the source of the files. You need to run this command if you want to do this:
DISM.exe /Online /Cleanup-Image /RestoreHealth /Source:C:\RepairSource\Windows /LimitAccess
Here, you need to Replace the C:\RepairSource\Windows placeholder with the location of your repair source.
Step 6: Type sfc /scannow in Command Prompt and press Enter to run it.
The sfc /scannow command will begin to scan all protected system files, and then replace corrupted files with a cached copy that is located in a compressed folder at %WinDir%\System32\dllcache. Here, the %WinDir% placeholder represents the Windows operating system folder like C:\Windows.
You should not close the Command Prompt window until the verification reaches 100%.
>> Get more information: Use the System File Checker tool to repair missing or corrupted system files.
After these steps, you can close Command Prompt and restart your computer to see if the issue is solved.
Fix 2: Run CHKDSK
Running CHKDSK can check the file system and file system metadata of a volume for logical and physical errors. You can also run this command to fix your system issue, which could be the cause of the Windows 11 desktop keeps flickering and the taskbar is missing. You can run /f /r command to check for errors and fix the found errors on the hard drive.
Step 1: Press Ctrl + Alt + Delete at the same time, then select Task Manager from the Security Options window to open it.
Step 2: Click Run new task from the top menu, then type cmd in the pop-up Create new task interface and check then Create this task with administrator privileges option.
Step 3: Click OK to run Command Prompt as administrator.
Step 4: Type chkdsk :c /f /r in Command Prompt and press Enter.
Fix 3: Perform a System Restore
If you have created a system restore point before, you can perform a system restore to make your computer go back to the previous version when it has no problem.
Apply a system restore from the Settings app
If you still can open Settings, you can use these steps to perform a system restore:
Step 1: Press Windows + I to open the Settings app.
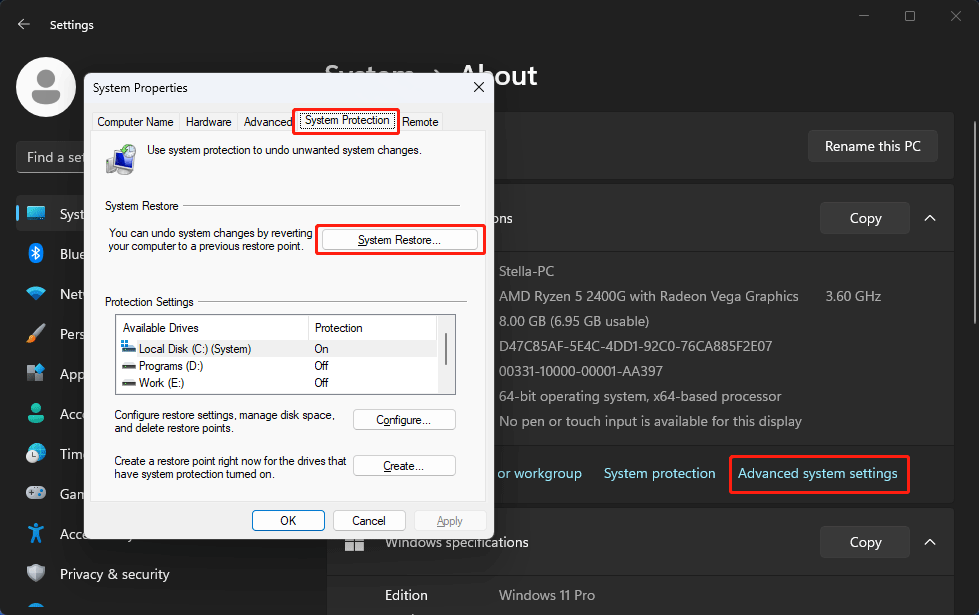
Step 2: Go to System > About.
Step 3: Click Advanced system settings from the line of Related links. This will open System Properties.
Step 4: Switch to the System Protection tab.
Step 5: Click the System Restore button and follow the on-screen instruction to restore your system to a previous point.
Apply a system restore from Advanced startup
If you can’t open the Settings app, you can use the following steps to perform a system restore:
Step 1: Power off your device if it is on. Then press the Power button to start the device. When you see the Windows logo, press the Power button for seconds to force shut down the device. Repeat this step two more times, then you will see the Windows Recovery Environment (WinRE) screen.
Step 2: Click the Advanced options button to continue.
Step 3: Go to Troubleshoot > Advanced options > System Restore.
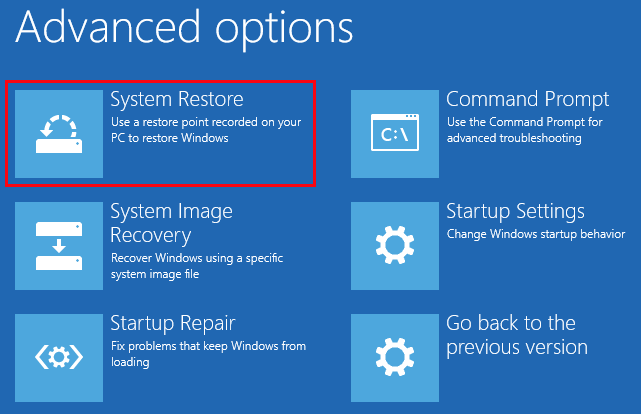
Step 4: You will see the System Restore interface. Select the target system restore point.
Step 5: Click Next and follow the on-screen guides to apply a system restore.
After reverting your computer to a previous restore point, you can restart your computer and then check if the issue disappears.
However, if there is no available system restore point, this method is not suitable for you. You can try other solutions.
Fix 4: Uninstall the Newly Installed Updates
If your Windows 11 desktop keeps refreshing and the taskbar is missing after you install a Windows 11 update, the update should be the cause. You can uninstall that update to fix the issue.
Uninstall a Windows 11 update via Settings
If you can open the Settings app, you can use this guide to uninstall a Windows 11 update from your computer:
Step 1: Press Windows + I to open the Settings app.
Step 2: Go to Windows Update > Update history > Uninstall updates.
Step 3: Find the newly installed update, then click the Uninstall button next to it.
Step 4: Click the Uninstall button to confirm the operation.
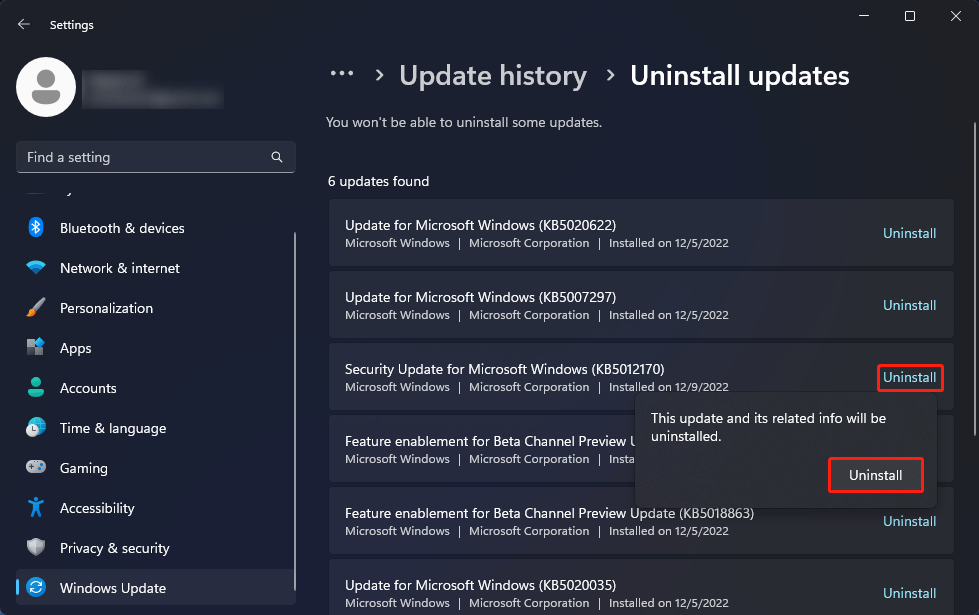
Step 5: Restart your computer and see if this method works.
Uninstall a Windows 11 update via Advanced startup
If you can’t open Settings using the keyboard shortcut, you can access Advanced startup and then select Uninstall updates to uninstall the Windows 11 update you want to remove.
Step 1: Power off your device if it is on. Then press the Power button to start the device. When you see the Windows logo, press the Power button for seconds to force shut down the device. Repeat this step two more times, then you will see the Windows Recovery Environment (WinRE) screen.
Step 2: Click the Advanced options button to continue.
Step 3: Go to Troubleshoot > Advanced options > Uninstall Updates.
Step 4: Select the target update to uninstall.
Fix 5: Go to the Previous Version of Windows 11
If the issue of Windows 11 flashing screen and no taskbar happens after installing a feature update, you can’t use the above method to uninstall the update. If the feature update was installed within 10 days, you can make your system go back to the previous version of Windows 11.
Go back to the previous version of Windows from Settings
Step 1: Press Windows + I to open the Settings app.
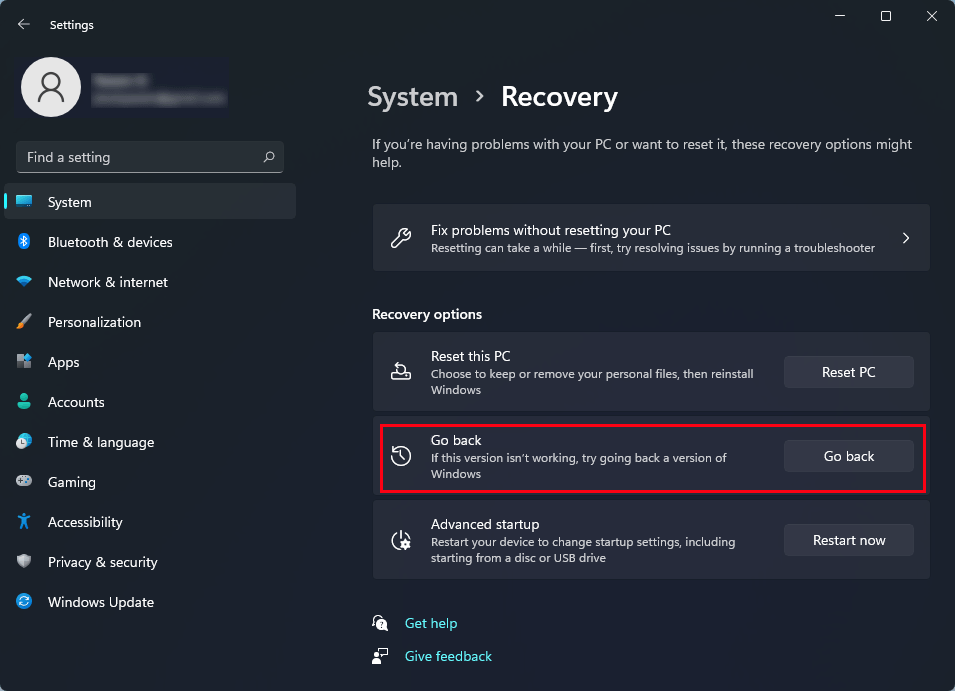
Step 2: Go to System > Recovery.
Step 3: Click the Go back button and follow the on-screen instructions to make your system go back to the previous version.
Go back to the previous version of Windows from Advanced startup
If the Settings app is not available, you can use do the same job from Advanced startup:
Step 1: Power off your device if it is on. Then press the Power button to start the device. When you see the Windows logo, press the Power button for seconds to force shut down the device. Repeat this step two more times, then you will see the Windows Recovery Environment (WinRE) screen.
Step 2: Click the Advanced options button to continue.
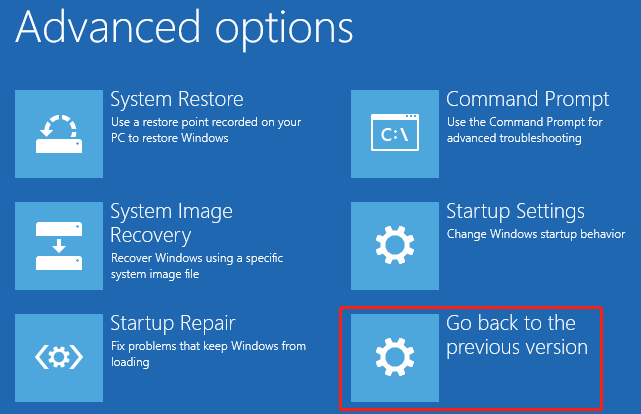
Step 3: Go to Troubleshoot > Advanced options.
Step 4: Click Go back to the previous build or Go back to the previous version and follow the guides to revert the system changes.
Fix 6: Reset Windows 11
If you can’t use the above methods to fix Windows 11 flashing screen and no taskbar, you can choose to reset Windows 11.
Reset Windows 11 from Settings
Step 1: Press Windows + I to open the Settings app.
Step 2: Go to System > Recovery.
Step 3: Click the Reset PC button under Recovery options.
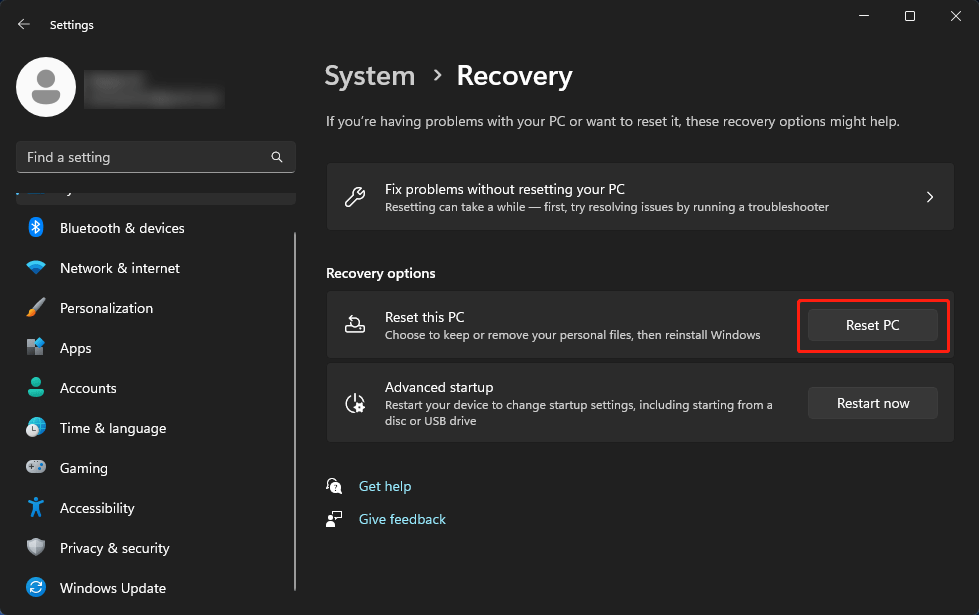
Step 4: Click Keep my files if you don’t want to lose your files.
Step 5: Follow the on-screen guides and select your desired options to reinstall Windows 11 on your device.
Reset Windows 11 from Advanced Startup
You can also reset Windows 11 via Advanced startup:
Step 1: Power on your PC and then disturb the startup. Do this three times. Then, you will see the WinRE screen.
Step 2: Go to Advanced options > Troubleshoot.
Step 3: Click Reset this PC.
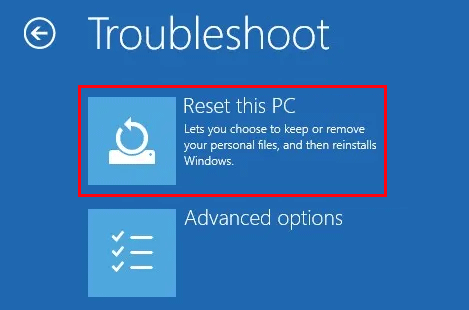
Step 4: Follow the on-screen guides to reinstall Windows 11 on your device.
After resetting Windows 11, your system should run normally.
Recover Your Data if Needed
You may find some of your files are missing after fixing the Windows 11 desktop keeps refreshing and no taskbar issue. If you have backed up your files, you can directly restore your files from the backup. If not, you can use a free file recovery tool like MiniTool Power Data Recovery to get your data back.
This MiniTool data recovery software can recover data from all kinds of data storage devices. It can run on all versions of Windows including the latest Windows 11. With the free edition, you can recover up to 1 GB of data without limits.
MiniTool Power Data Recovery FreeClick to Download100%Clean & Safe
After downloading and installing this software on your device, you can open it, select the drive where the lost files were previously saved to scan, and select your needed files from the scan results to save.
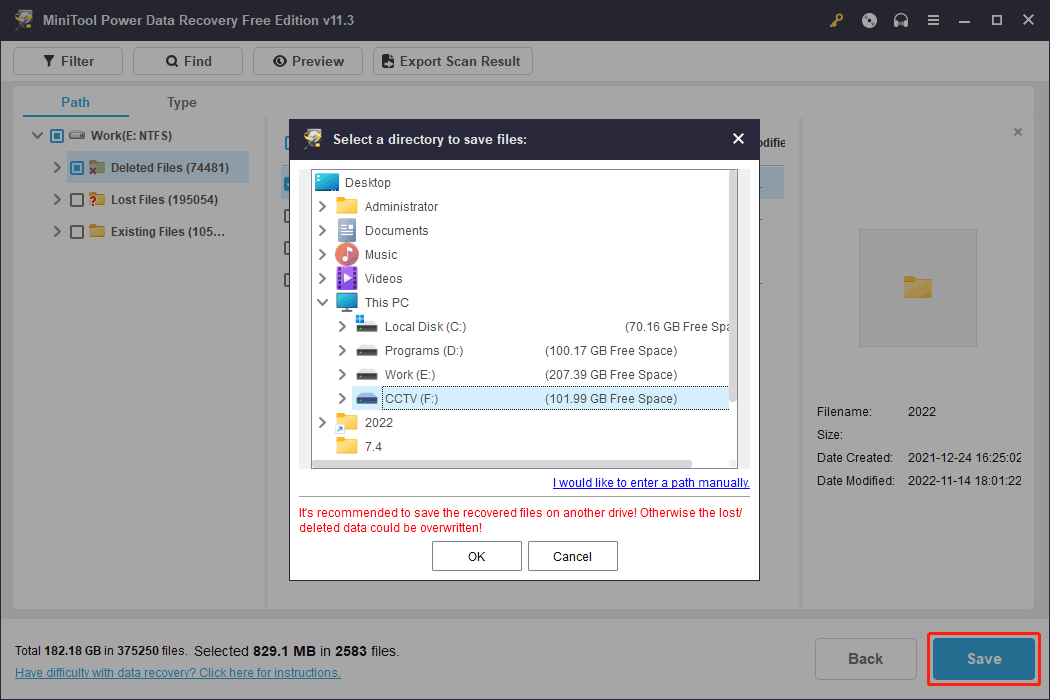
This software allows you to preview the files (up to 70 types) on the scan results interface. But if you use the free edition for the first time, you need to first download the package of previewer.
Bottom Line
Bothered by Windows 11 flashing and no taskbar? You should not worry about it so much. To solve the problem, you can just try the methods mentioned in this post. There should be one proper methods for you.
If you have other good solutions or suggestions, you can let us know in the comments. You can also contact us via [email protected].
