You can use a thumb drive on both Windows and Mac. But you need to format it to a suitable format. What is the best format for a thumb drive on Windows and Mac? How to format a thumb drive for Mac and PC. MiniTool Software will show you the information you want to know in this post.
Why Do You Need to Format a Thumb Drive for Mac and PC?
You use a thumb drive to store files to use them on your computer at home and in your computer/school/local library. Perhaps, your computer at home runs macOS but other computers run Windows-based operating systems or vice versa. In a situation like this, you need to format your thumb drive to a suitable format to make it can be read and written on both Windows and Mac.
All in all, when you want to use your thumb drive on Windows and Mac, you need to format the drive to a suitable file system that is compatible with both of these two operating systems.
What Format of Flash Drive Works on both Windows and Mac?
Before you format a thumb drive for Mac and PC, you need to know which file systems can work on these two operating systems. Now, let’s look at which files systems can be used on Windows and which file systems can run on Mac. Then, you can the best file system for a thumb drive on both Mac and PC.
Windows OS supports the following file systems:
macOS supports the following file systems:
- Apple File System (APFS)
- Mac OS Extended (HFS+)
- MS-DOS (FAT)
- exFAT
We can see that FAT and exFAT can work on both Windows and Mac.
Which Is the Best Format of a Thumb Drive for both Windows and Mac?
If you want to use a thumb drive, USB drive, pen drive, or flash drive on both Windows and Mac, you can format the drive to FAT or exFAT. But which is the best format. It depends on.
FAT VS. exFAT
Both FAT and exFAT have their advantages and disadvantages. Here is the truth:
FAT File System
>>Pros:
- It is compatible with all versions of Windows and Mac.
- It is compatible with removable thumb drives, USB flash drives, pen drives, and other USB interface-based storage devices
>>Cons:
- It doesn’t support a single file that is larger than 4GB.
- It doesn’t support a FAT32 partition that is larger than 8 TB (Windows only recognizes 2TB)
- Modern versions of Windows can’t be installed to a drive that is formatted with a FAT32 file system.
>>Usage:
The FAT file system is a good choice for removable drives due to its good compatibility. But you need to make sure a single file in it is no larger than 4GB.
exFAT File System
>>Pros:
- It supports a single file that is larger than 4GB.
- It doesn’t have realistic limits on the size of the file and the partition.
>>Cons:
It is not as compatible as FAT32.
>>Usage:
- When you need to create large partitions and save files that are larger than 4GB, you can use the exFAT file system.
- When you want to share large files between Windows and Mac, exFAT is a better choice.
In a word, you can select a suitable file system for your thumb drive according to your usage.
FYI: NTFS vs. FAT32 vs. exFAT – Differences and How to Format to.
Tip: Back up Your Files in the Thumb Drive
If there are important files in your thumb drive, you should back them up before you format the drive.
- If you are using a Windows computer, you can use MiniTool ShadowMaker to make a backup of the files on your USB drive.
- If you are running macOS, you can use Time Machine to back up the drive.
How to Format a USB on Mac for Windows?
If you have a Mac computer and want to format your thumb drive for Windows, you can use Disk Utility to do the job. Of course, you can use it to format other kinds of USB drives like USB flash drives, pen drives, and more.
- Connect your thumb drive to your Mac via the USB port.
- Go to Applications > Utilities > Disk Utility.
- Go to View > Show All Devices.
- Select the connected thumb drive from the left sidebar.
- Click the Erase button (you can find it from the top toolbar).
- On the pop-up Erase dialogue, you can select a partition scheme, choose ExFAT as the format, and type a name for the thumb drive.
- Click the Erase button to start formatting the drive.
- Click Done when the formatting process completes.
How to Format a USB on Windows for Mac?
You can use different methods to format a USB drive on Windows for Mac. You can use File Explorer, Disk Management, Command Prompt, or a third-party partition manager.
Use File Explorer to Format a Thumb Drive on Windows
- Connect the thumb drive to your Windows computer via a USB port.
- Press Win + E to open File Explorer.
- Right-click the connected thumb drive and select Format.
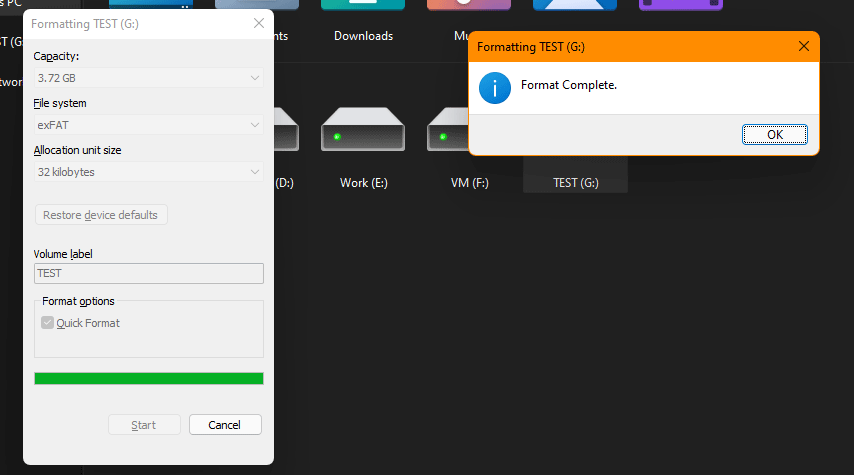
- On the Format dialogue, select the file system you want to use (here we select exFAT) and add a volume label for it.
- Click the Start button to start formatting.
- When the formatting process ends, click OK.
Use Disk Management to Format a Thumb Drive on Windows
1. Connect the thumb drive to your Windows computer.
2. Right-click This PC on the desktop and select Manage.
3. Select Disk Management from the left menu.
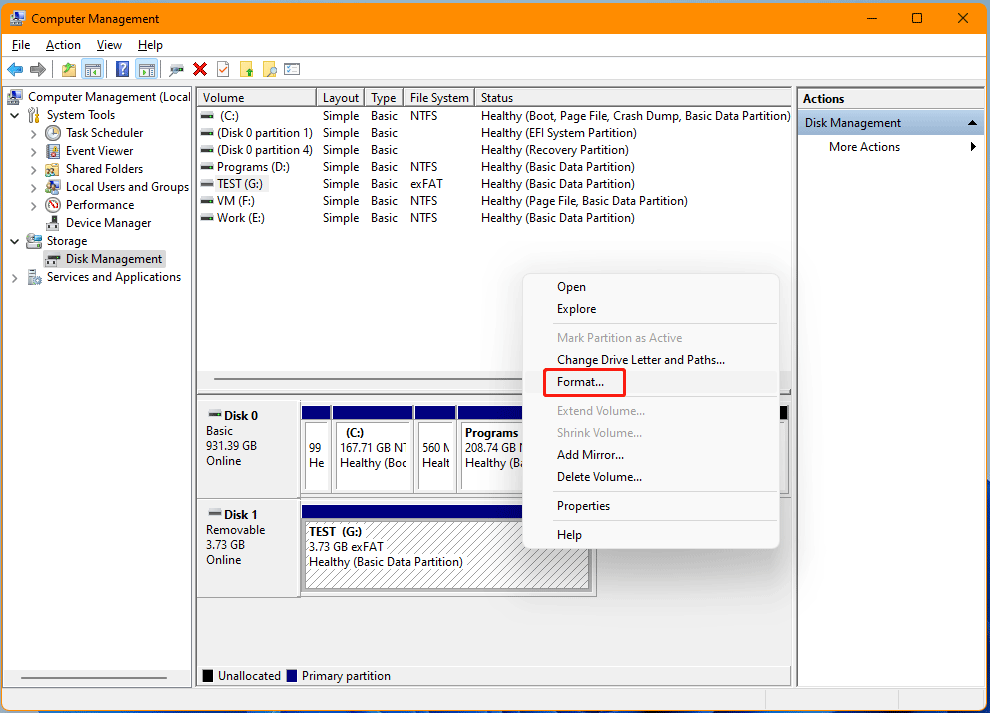
4. Right-click the thumb drive and select Format.
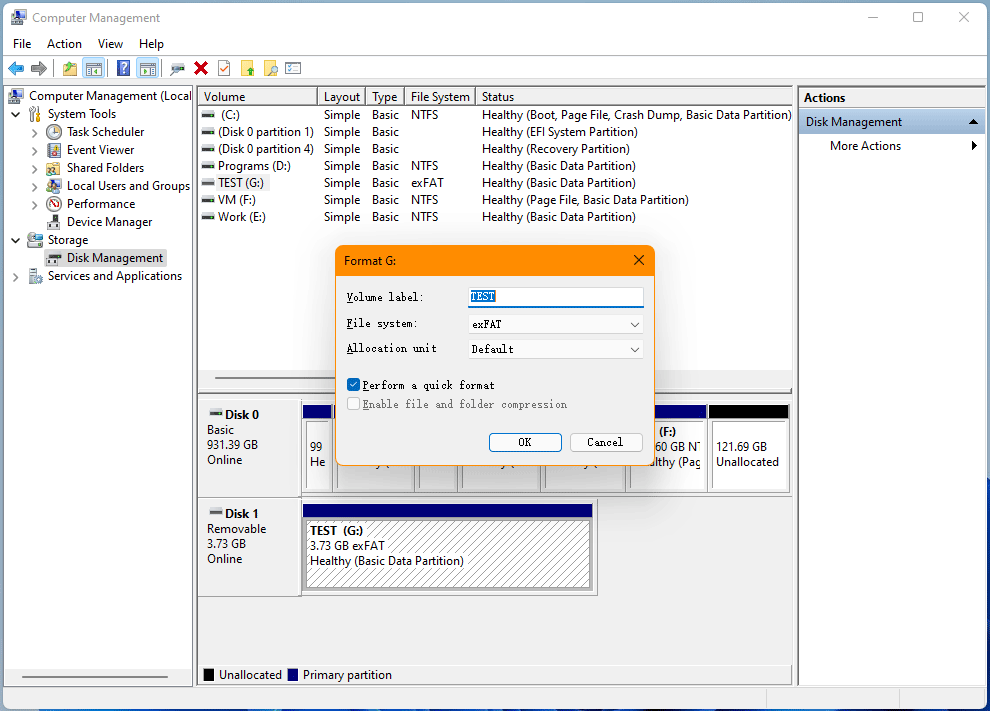
5. Type a name for the Volume label.
6. Select a file system for the drive. Here, we select exFAT.
7. Click OK to start formatting the drive.
8. Click OK on the pop-up interface to confirm the operation. Then, you should wait until the formatting process ends.
Use Command Prompt to Format a Thumb Drive on Windows
- Make sure the thumb drive is connected to your computer.
- Use Windows search to search for cmd and select the first result to open Command Prompt.
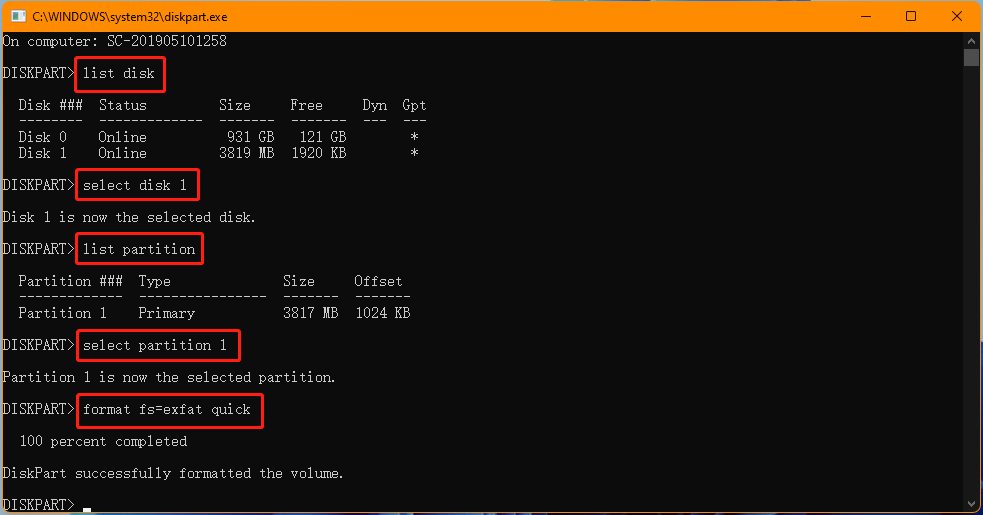
- Type diskpart and press Enter to open the DISKPART window.
- Type the following commands and press Enter after each.
- list disk
- select disk n (n stands for the drive letter of the external disk)
- list partition
- select partition x (x is the partition you want to format to exFAT)
- format fs=exfat quick (if you want to format the drive to fat, you can replace exFAT with fat).
Use MiniTool Partition Wizard to Format a Thumb Drive on Windows
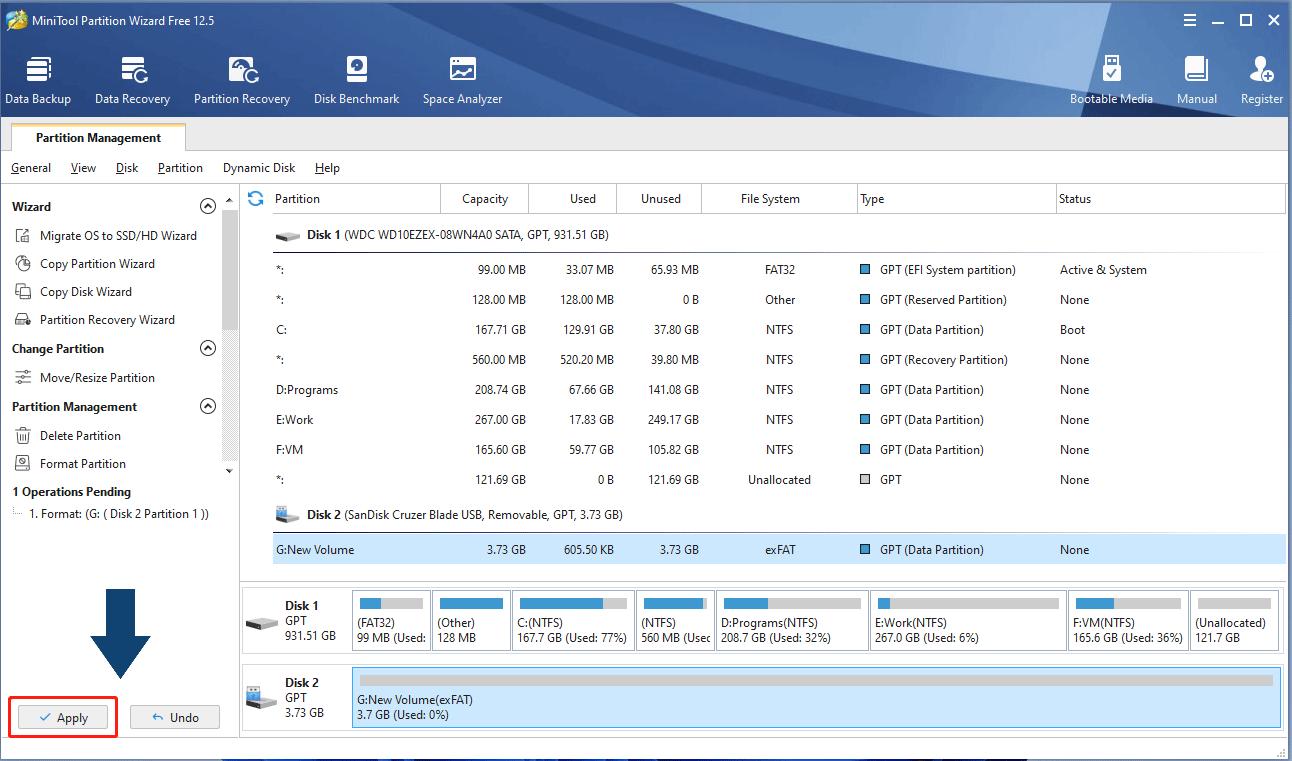
Using the Windows snap-in tools to format a USB drive for Mac and Windows doesn’t give you the chance to preview the formatting effect. While, if you use MiniTool Partition Wizard (a professional partition management tool), you can preview it before you confirm the drive formatting operation.
The Format feature of this software is available in the free edition of this software. You can press the following button to get this freeware.
MiniTool Partition Wizard FreeClick to Download100%Clean & Safe
1. Connect the USB drive to your computer.
2. Open the software.
3. Right-click the target USB drive and select Format.
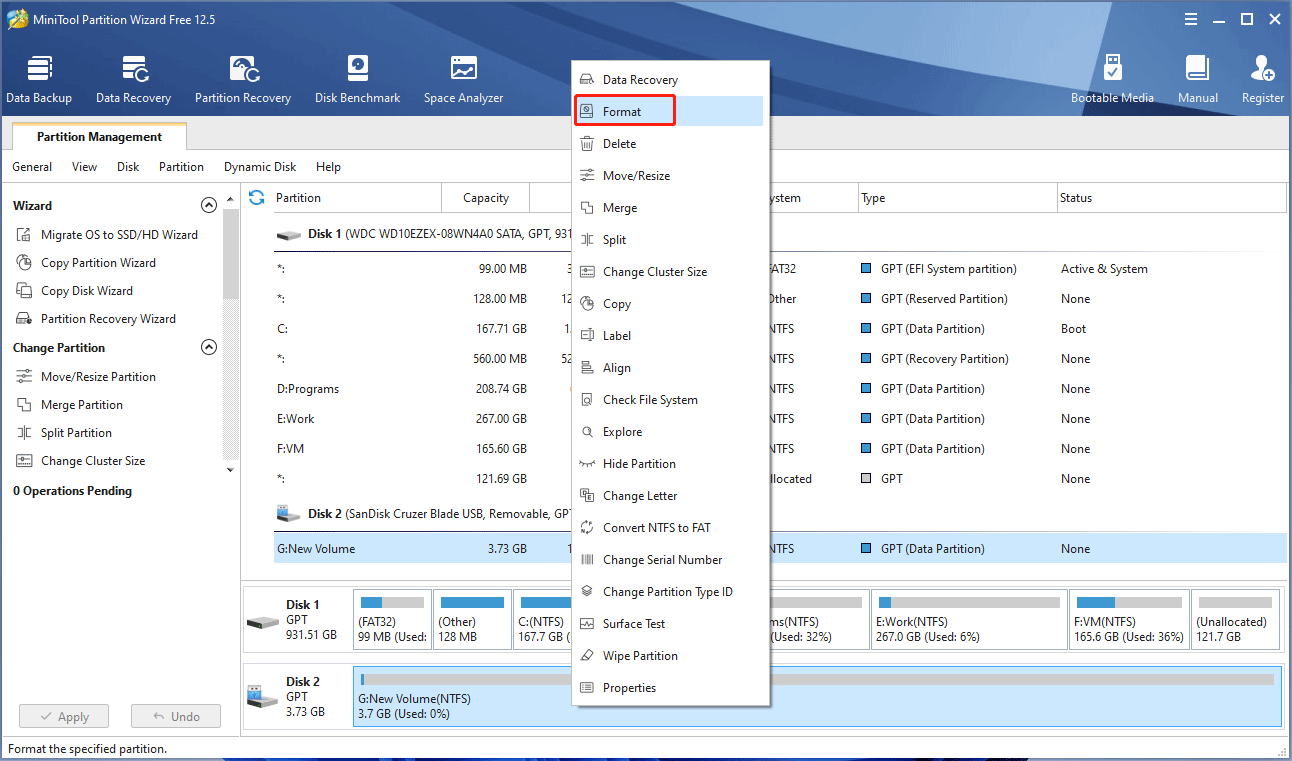
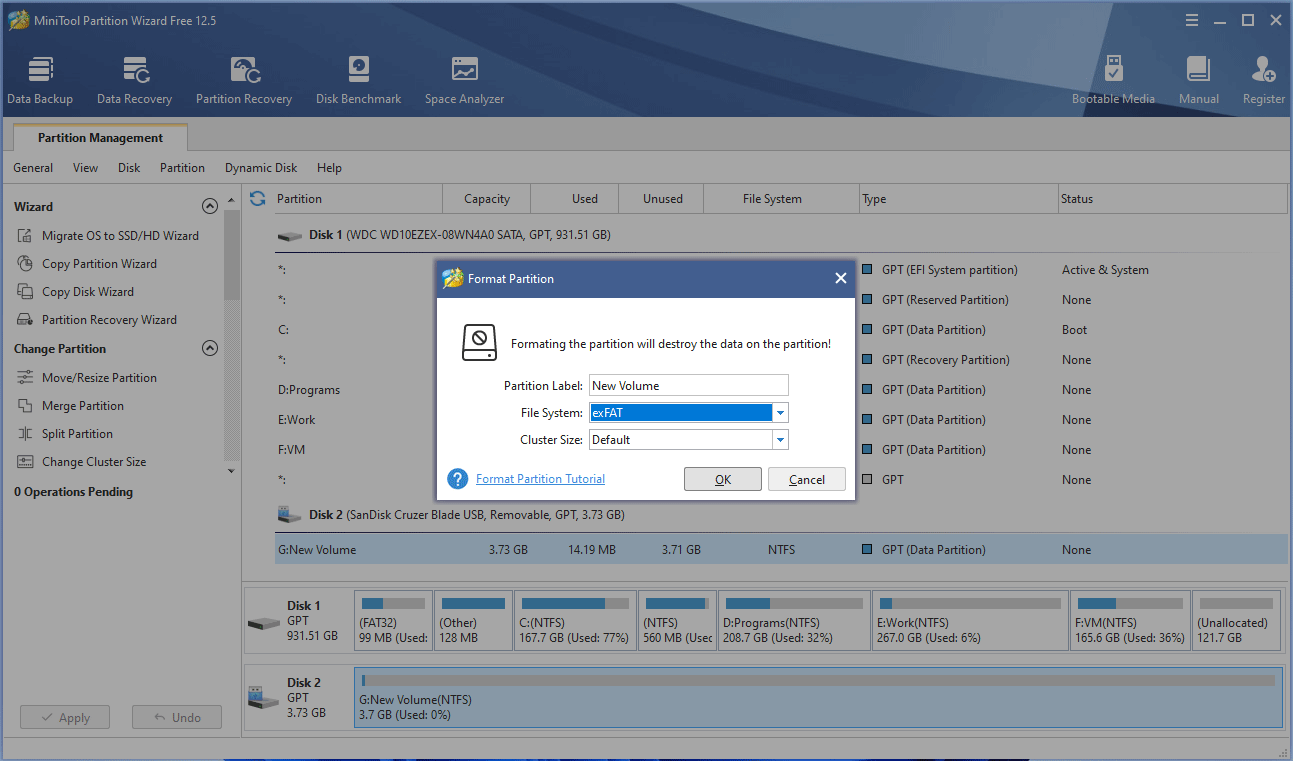
4. Select a suitable file system for the drive and add a partition label for it.
5. Click OK and you will go back to the software main interface.
6. You can preview the effect of the formatting. If everything is OK, you can press the Apply button to continue.
7. Click OK to confirm the operation.
8. Click OK when the process ends.
How to Partition a USB Drive for Windows and Mac?
You can also use MiniTool Partition Wizard to create a new partition on the USB drive for Windows and Mac.
MiniTool Partition Wizard FreeClick to Download100%Clean & Safe
1. Open the software.
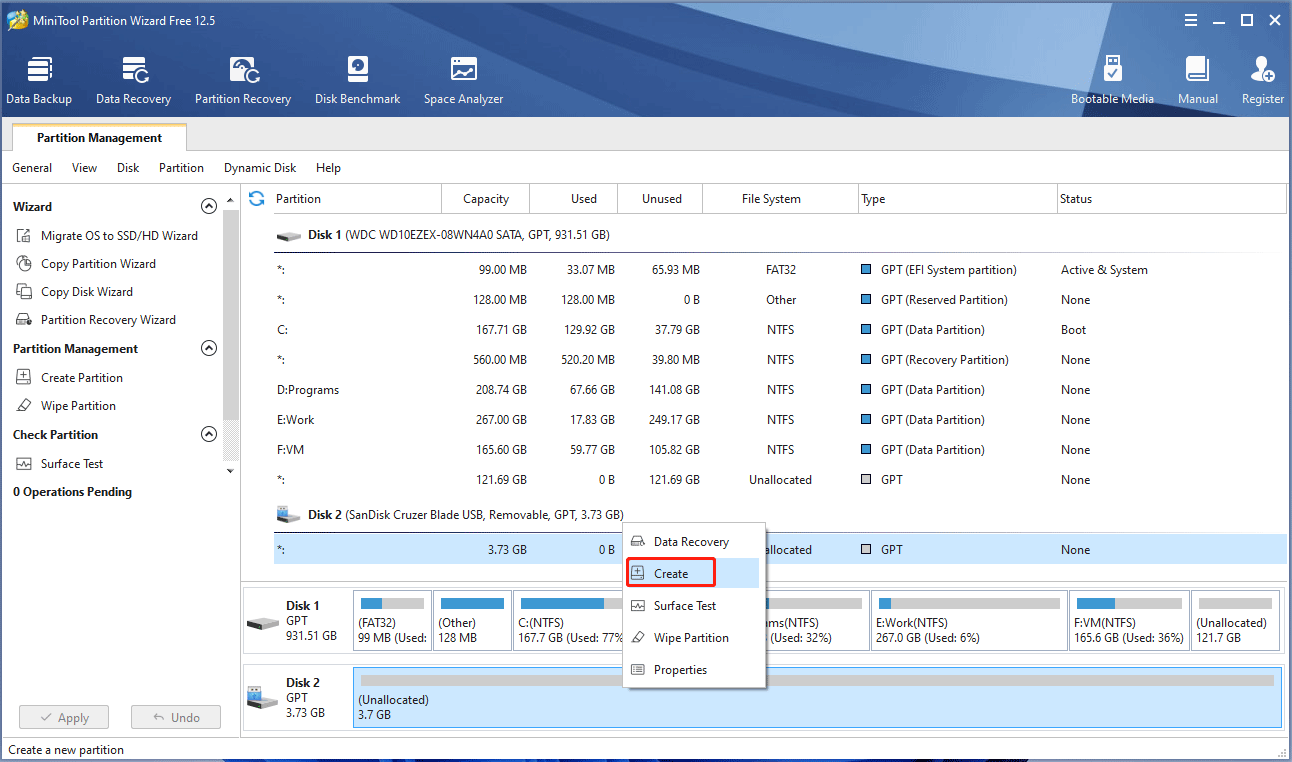
2. Right-click the unallocated space on the drive and select Create.
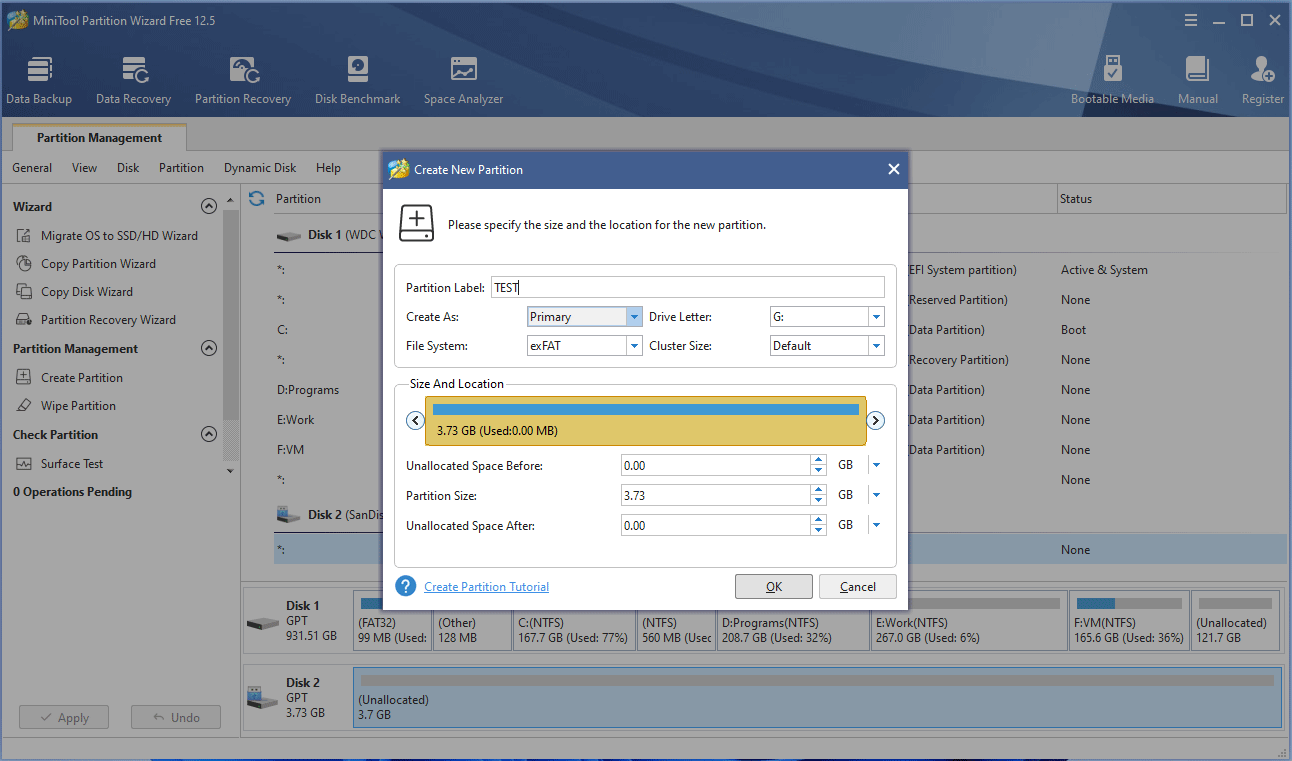
3. Select the file system for the drive and add a label for it. You can also modify other parameters when necessary.
4. Click OK when everything is prepared.
5. Preview the effect on the software interface.
6. Click Apply to continue.
7. Click OK.
8. Click OK.
Want to format a USB drive for Mac and Windows? This post shows you some easy methods.Click to Tweet
How to Recover Data from a Mistakenly Formatted Thumb Drive?
If you format a thumb drive by mistake and you don’t back up your data, you can use data recovery software to get your data back.
How to Recover Data from a Formatted Thumb Drive on Windows?
You can use MiniTool Power Data Recovery, a free Windows files recovery tool, to recover files from a formatted thumb drive on Windows. You can use the free edition to scan your drive for formatted files. If this software works, you can recover up to 1 GB of files without paying any cent. If you want to recover more data, you need to use a full edition.
MiniTool Power Data Recovery FreeClick to Download100%Clean & Safe
- Make sure that your thumb drive is connected to your computer.
- Open the software.
- Select the drive and click Scan to start scanning it.
- When the scanning process ends, you will see the scan results. You can check whether you can find your needed files.
- Select your needed files and click Recover to select a suitable folder to save them. In this step, you should not select the formatted thumb drive as the destination, otherwise, the formatted files may be overwritten and become unrecoverable.
How to Recover Data from a Formatted Thumb Drive on Mac?
If you want to recover formatted files from your thumb drive on Mac, you can try Stellar Data Recovery for Mac, a free Mac file recovery tool.
This software has a trial edition. You can use it to see whether it can find your formatted files. You can get this software from the MiniTool official download center.
1. Connect the USB drive to your Mac.
2. Open the software.
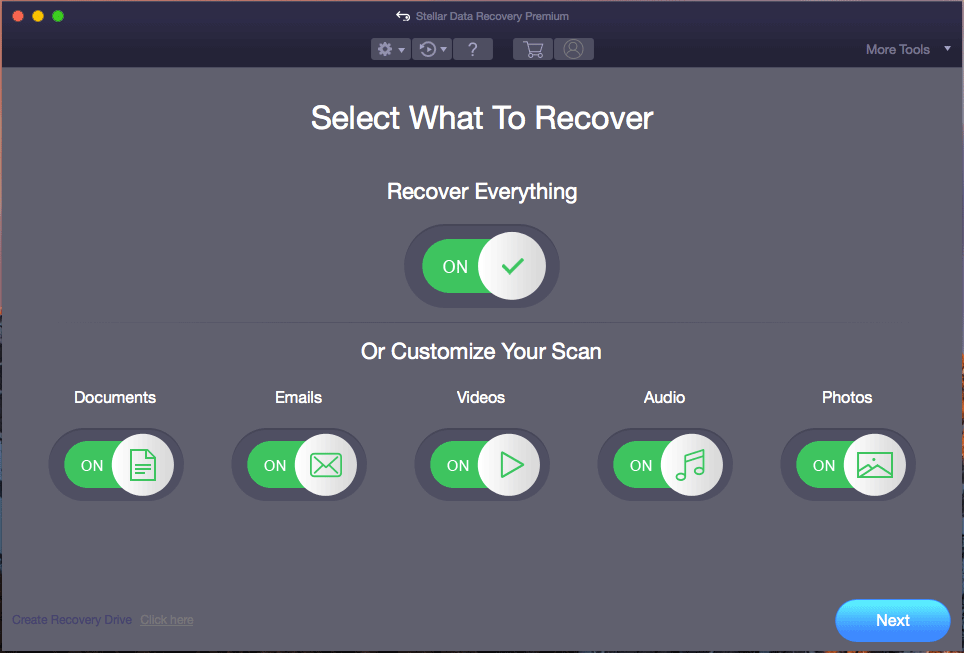
3. Select the types of files you want to recover.
4. Click Next.
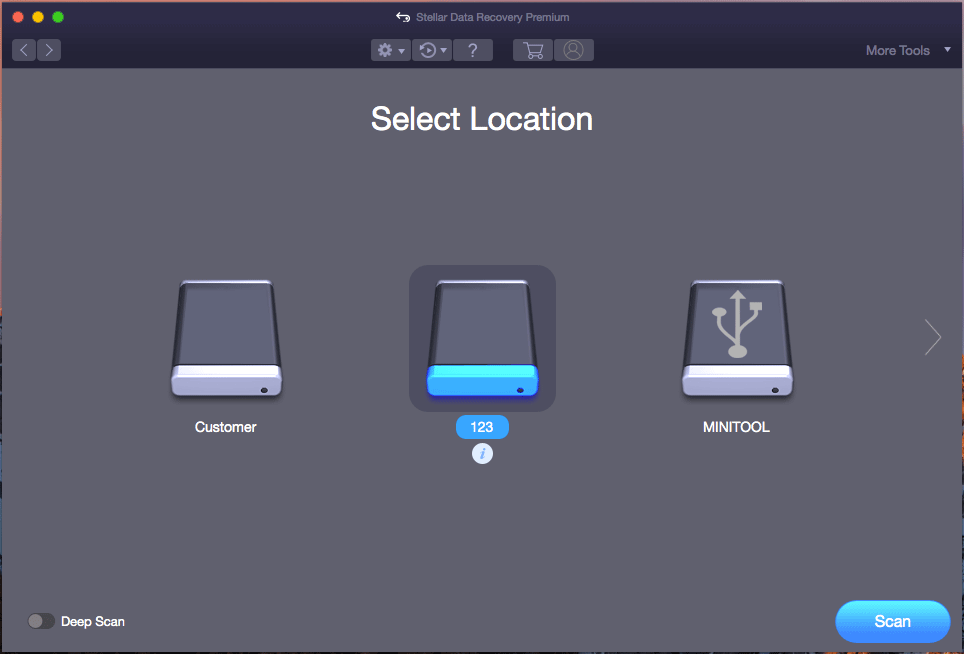
5. Select the target USB drive on the next page. If you want to perform a deep scan, you need to turn on the button next to Deep Scan.
6. Click Scan to start scanning.
7. When the scanning process ends, you can check the scan results and see whether your needed files are there.
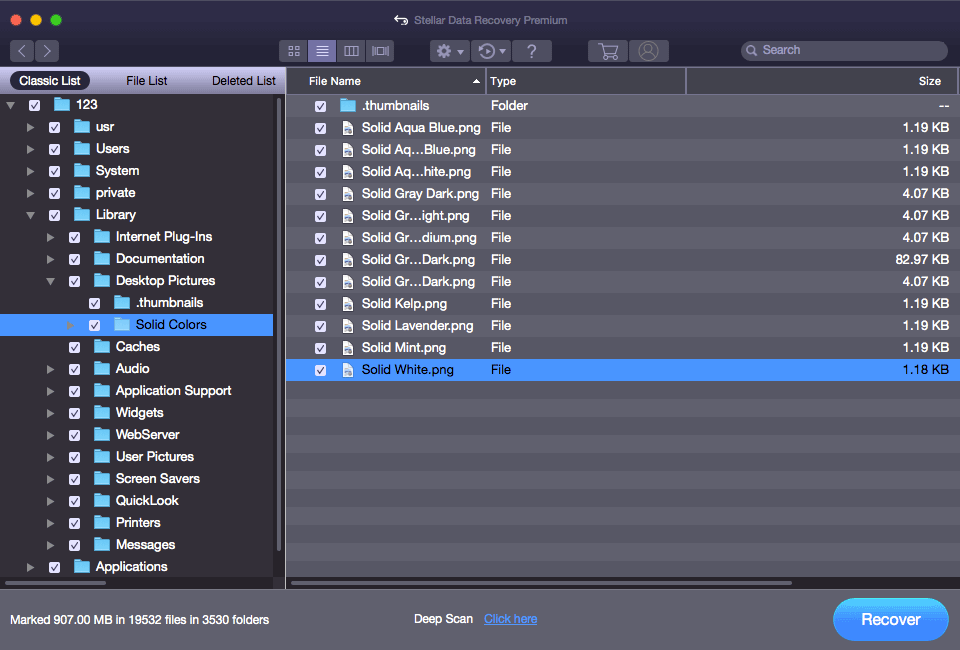
8. If you want to use this software to recover all your needed files, you need to use a full edition. Likewise, you should not save the selected files to the formatted drive to prevent data from being overwritten.
Bottom Line
This post shows you how to format a thumb drive for Mac and PC using different methods. You can select a suitable one based on your situation. Besides, if you accidentally format a USB drive, you can use the two data recovery programs mentioned in this post to help you get your data back.
Should you have other issues or suggestions, you can let us know in the comments. You can also contact us via [email protected].
