Issue: Hard Drive Keeps Disappearing
Whether it is a computer’s internal hard drive or an external hard drive, it is used to store personal data or system files needed to run the Windows OS. During the use of computers, hard drive problems arise one after another. Today we are going to discuss the problem of computer hard drives that continue to disappear. Here is a true example:
“Hi, I need some help. My D drive keeps disappearing and it only appears sometimes. I need help on how I can let the drive not disappear, so I can use it. Thanks!”answers.microsoft.com
Understanding the reasons behind hard drives disappearing in Windows is the key to finding an effective solution.
Common Causes of Hard Drive Missing Suddenly
Below we have summarized some possible factors why does the computer hard drive always not show up:
- The cable connecting the external disk to the computer is loose. An unstable disk connection causes the disk to keep disappearing and appearing.
- The computer USB port is damaged, causing the external drive to not be accurately recognized by the computer.
- Missing disk drive letter prevents the disk from being displayed in File Explorer.
- The disk driver is outdated or damaged.
- Disk partitions are lost and become unallocated space, causing the drive to disappear from File Explorer.
After discovering the cause of the disk disappearing repeatedly, now you can take the corresponding solutions to fix the problem.
How to Fix if Hard Drive Keeps Disappearing on Windows
Fix 1. Check the Connection Between the Hard Drive and the PC
For removable drives, such as external hard drives, USB flash drives, and SD cards, if the cable connecting the drive to the computer is loose or damaged, it is likely that the drive will suddenly disappear.
To rule out the cable failure, you can unplug and reinsert the drive, replace a cable, or connect the drive to another computer and see if the problem resolves.
If the drive connection problem has been rectified but the drive still disappears, please refer to the methods below.
Fix 2. Run the Hardware and Devices Troubleshooter
The Hardware and Devices troubleshooter is designed to fix common problems with your keyboard, printer, Bluetooth, USB, etc. You can run it to troubleshoot the matter of hard drive missing.
Step 1. Press the Windows + R keyboard shortcut to bring up the run window.
Step 2. In the pop-up window, type msdt.exe -id DeviceDiagnostic and click OK.
Step 3. After that, the Hardware and Devices troubleshooter will appear. You need to click the Next button to start issue detection and repair.
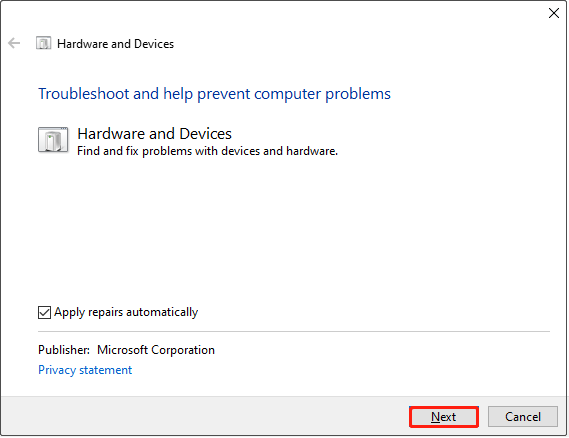
Step 4. Wait patiently until the whole scanning process ends and the detected problems are resolved.
Fix 3. Update Hard Drive Driver
The role of the hard disk driver is to convert the operating system’s requests into a language that the hard disk can understand and to convert the hard disk’s responses into a language that the OS can understand. If the hard drive driver is outdated or corrupted, it can affect the function and use of the disk. In this case, you need to update the disk driver.
Step 1. On the taskbar, right-click the Start button to choose Device Manager.
Step 2. In Device Manager, expand the disk drives, then right-click the target problematic disk and choose Update driver.
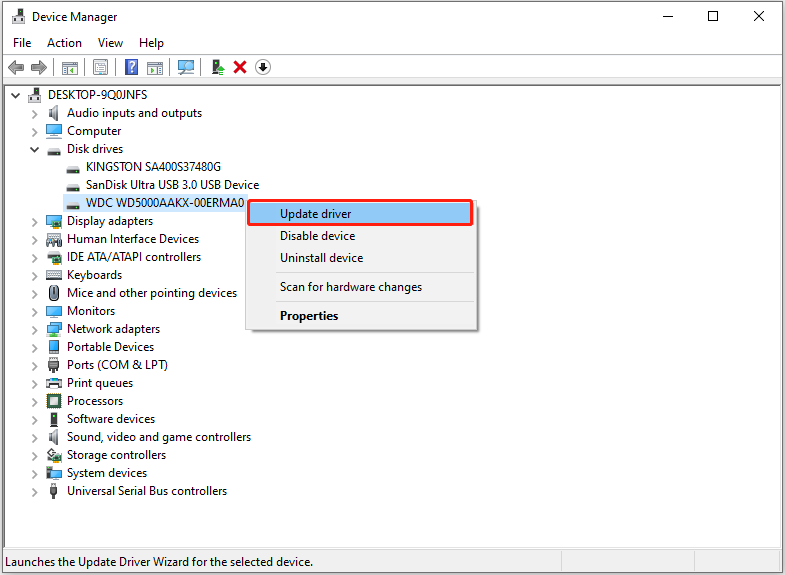
Step 3. In the next window, select the Search automatically for drivers option and then follow the on-screen instructions to complete the necessary actions.
Fix 4. Change Hard Drive Letter
If the drive letter is missing or not assigned automatically, you may encounter the “external or internal HDD disappeared suddenly” issue. The solution to this problem is to assign a new drive letter to the disk. You can complete this task in Disk Management.
Step 1. Right-click the Windows logo button to select Disk Management.
Step 2. Find and right-click the drive that lacks a drive letter and choose the Change Drive Letter and Paths option.
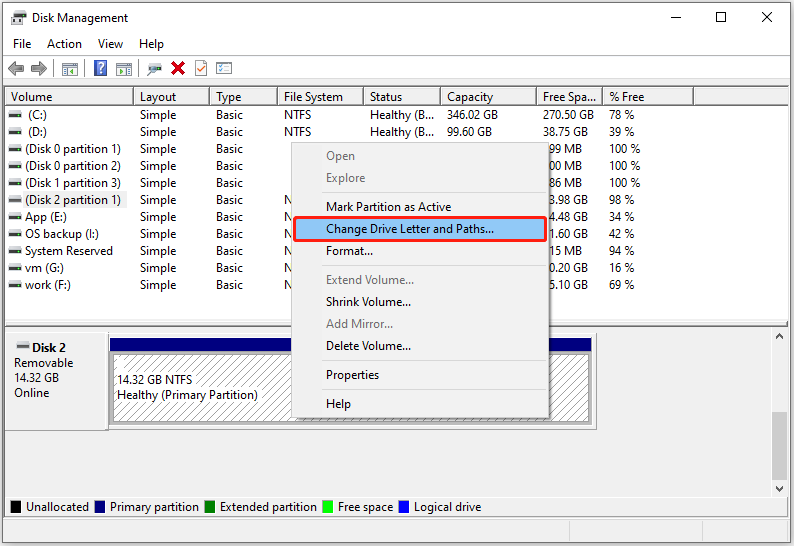
Step 3. Click Add. Then choose a drive letter from the drop-down menu of Assign the following drive letter.
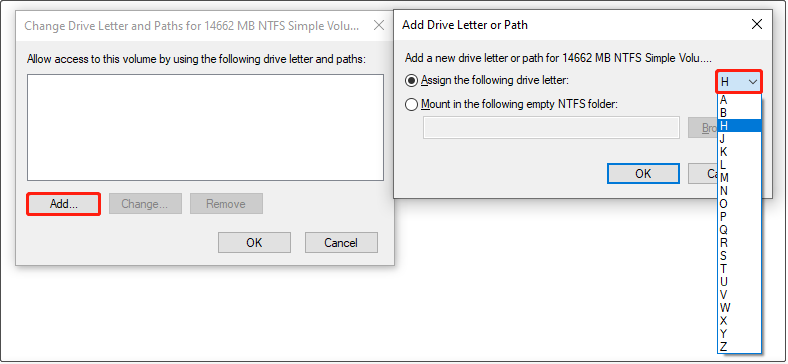
After assigning a drive letter, the hard drive should be displayed in both Disk Management and File Explorer.
Fix 5. Recover Data if the Partition Is Lost
If the disk shows as unallocated in Disk Management, it means that you may have accidentally deleted the disk partition, or the partition may have disappeared automatically due to various failures. Disks without partitions will not show up in File Explorer, and this may be the cause of “hard drive missing after restart”.
Once the disk becomes unallocated, you are unable to access its data. If there are important files exist in the unallocated space, you need to recover files immediately. How to recover data from unallocated space? Here MiniTool Power Data Recovery is highly recommended.
Serving as the best data recovery software, MiniTool Power Data Recovery helps recover files from internal/external hard drives, USB flash drives, SD cards, and other types of file storage media regardless of whether the partition exists or not.
You can download and install the Free Edition by clicking the button below, then scan the unallocated space to check if it can find the required files and recover 1 GB of files without paying a penny.
MiniTool Power Data Recovery FreeClick to Download100%Clean & Safe
Step 1. Scan the unallocated space.
Launch MiniTool Power Data Recovery Free to get its home page. Here all detected existing partitions, lost partitions, and unallocated spaces are displayed. You can hover over the target unallocated space/lost partition according to the capacity and then click the Scan button to start scanning for lost files.
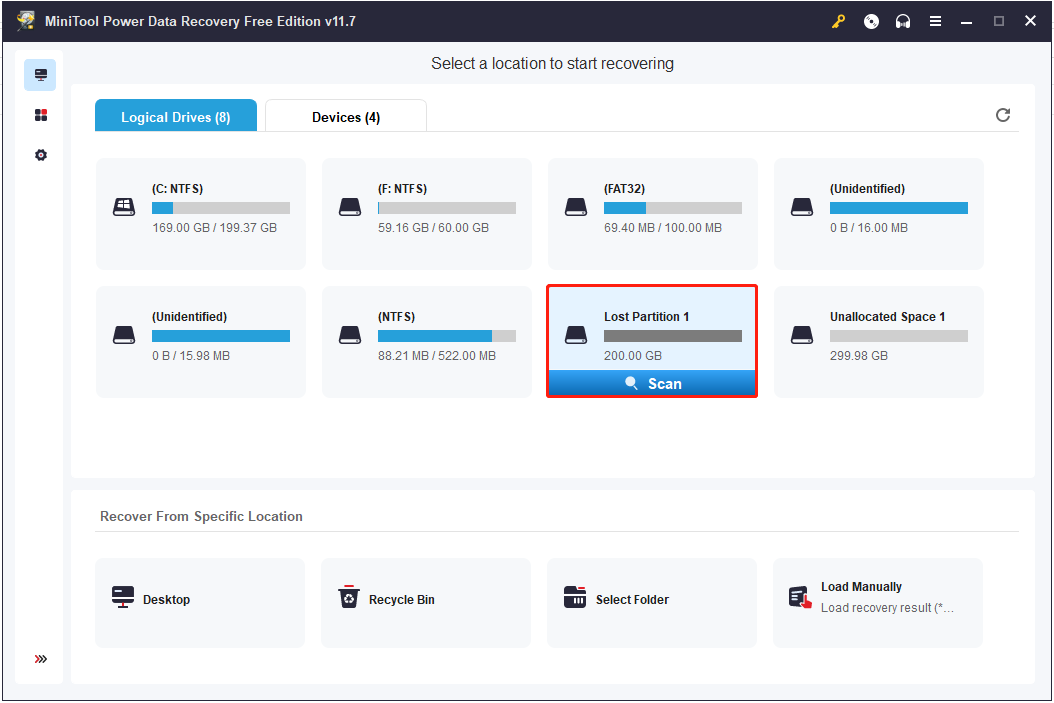
The scanning duration mainly depends on how many files are in the unallocated space. If the file size is large, the scan may take a long time. In order to obtain the best scan results, it is recommended that you wait patiently until the whole scan is completed.
Step 2. Find and preview the needed files.
After scanning, all found files will be categorized by file path. You can expand each path to find the needed items. Or, you can move on to the Type category list to make all files be displayed by file type. This will make it easier and faster to locate the wanted data.
Besides, the Filter and Search features facilitate locating the needed data quickly.
- Filter: This feature enables you to filter out unwanted items by file type, file size, date modified, and file category.
- Search: You can make use of the search box to search for a certain file by using its file name. Partial file name and complete file name are both supported.
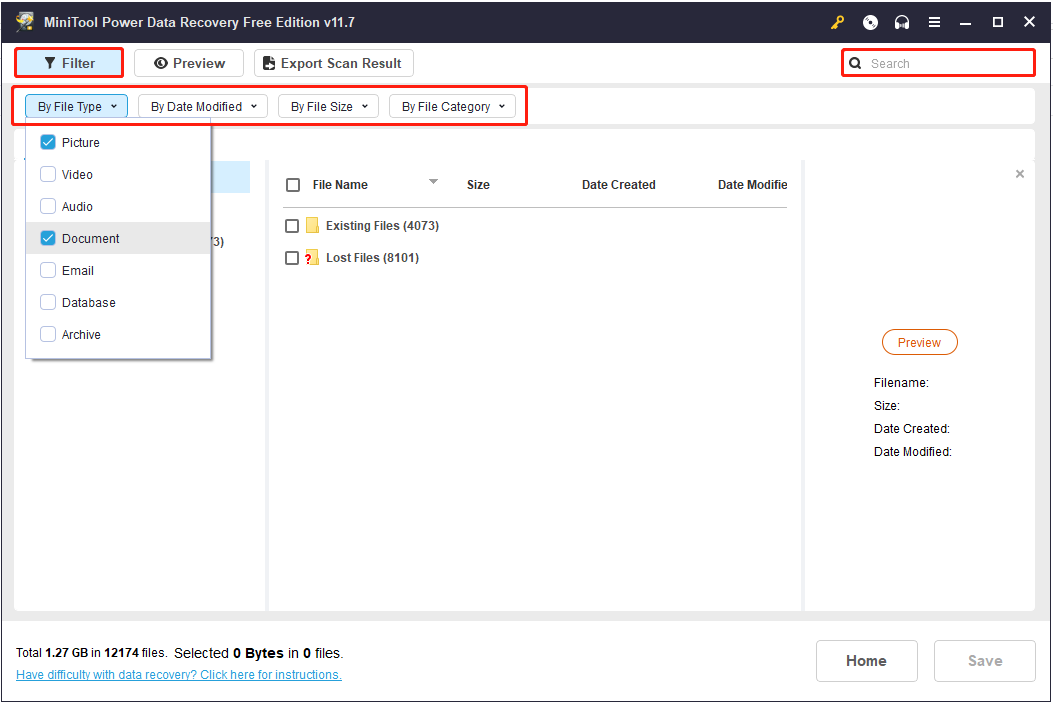
Since MiniTool Power Data Recovery Free supports 1 GB of file recovery as mentioned before, it is especially significant to preview the located items to avoid recovering unwanted files. You can preview many types of files, such as documents, pictures, videos, audio files, and other types of files.
To preview a file, you can choose to double-click on it or opt for the Preview button.
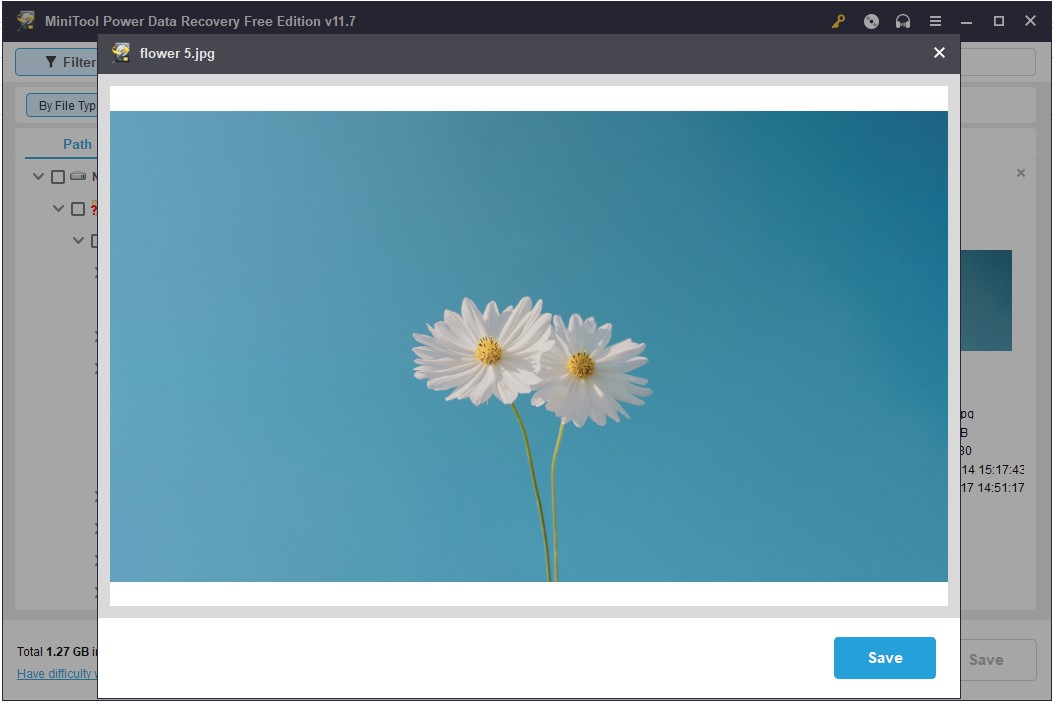
Step 3. Select and save the required items.
Finally, select all needed files and click the Save button. In the pop-up window, you need to select a proper file location to store the recovered files.
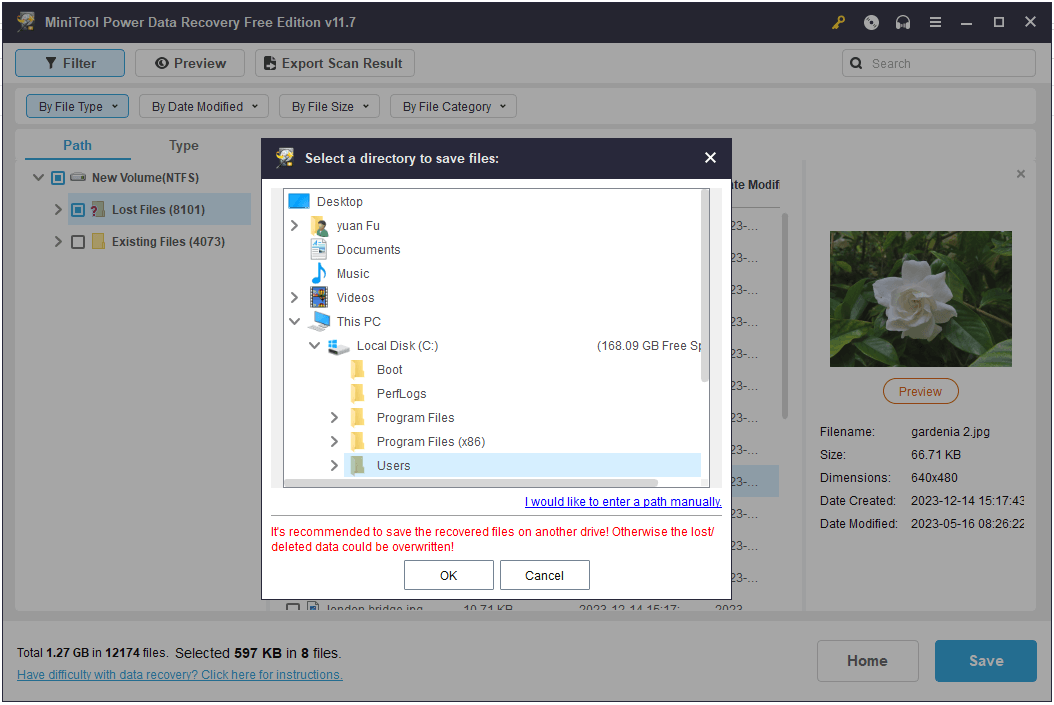
Once you rescued your vital data, you can create a new partition on the hard disk. After that, if necessary, you can move all recovered files to the newly created partition.
This is all about how to recover lost data if the disappeared hard drive becomes unallocated. Some of you may wonder: Is it possible to recover the lost partitions directly?
Fortunately, the answer is Yes. Now, keep reading to get the detailed steps.
Fix 6. Recover the Lost Partition
For partition recovery, choosing a professional and green partition recovery tool is the most efficient and economical way. MiniTool Partition Wizard is worth a try.
MiniTool Partition Wizard is a reliable partition manager that works great on internal hard drive recovery, external hard drive data recovery, SSD data recovery, and so on.
Here are the major steps to recover lost partitions by using this partition magic:
Step 1. Download, install, and launch MiniTool Partition Wizard Free.
MiniTool Partition Wizard FreeClick to Download100%Clean & Safe
Step 2. On the main interface of this partition management tool, select the disk where partition loss happens. Then click the Partition Recovery button from the top menu bar.
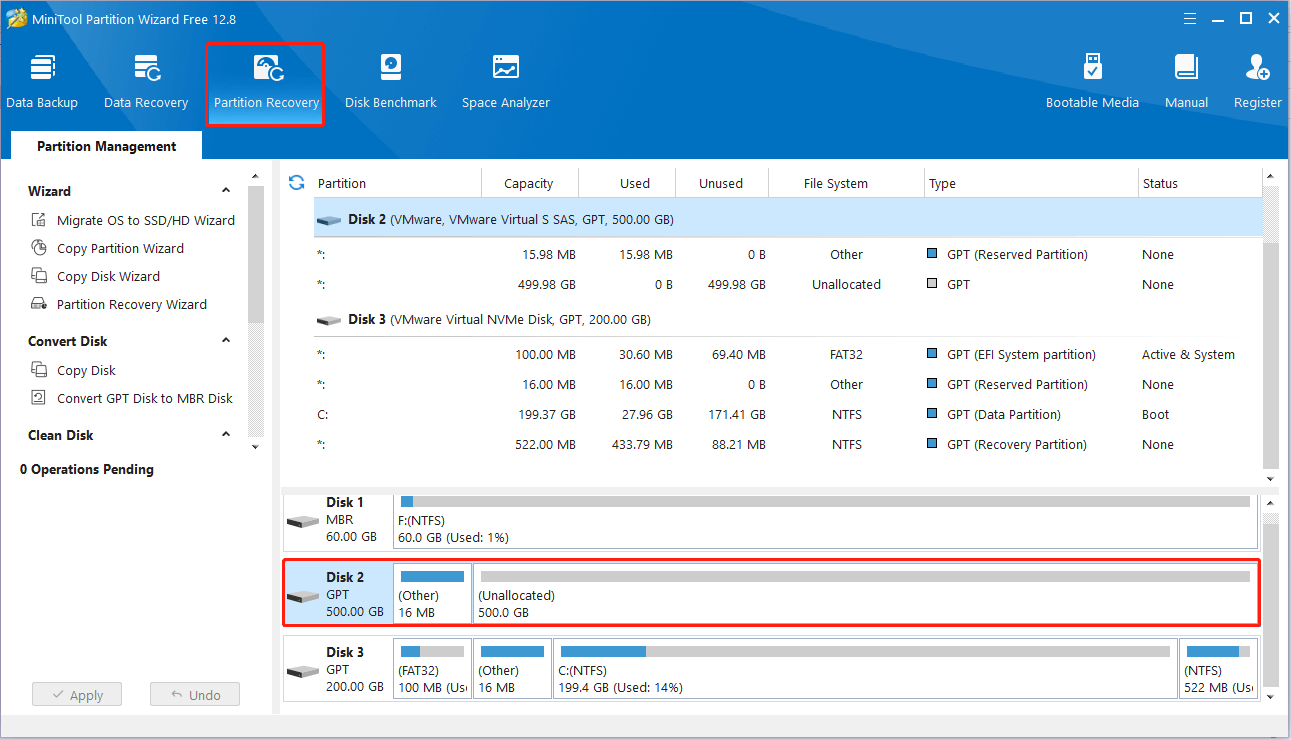
Step 3. Click Next to continue.
Step 4. Choose the disk from which you want to recover lost partitions and click Next.
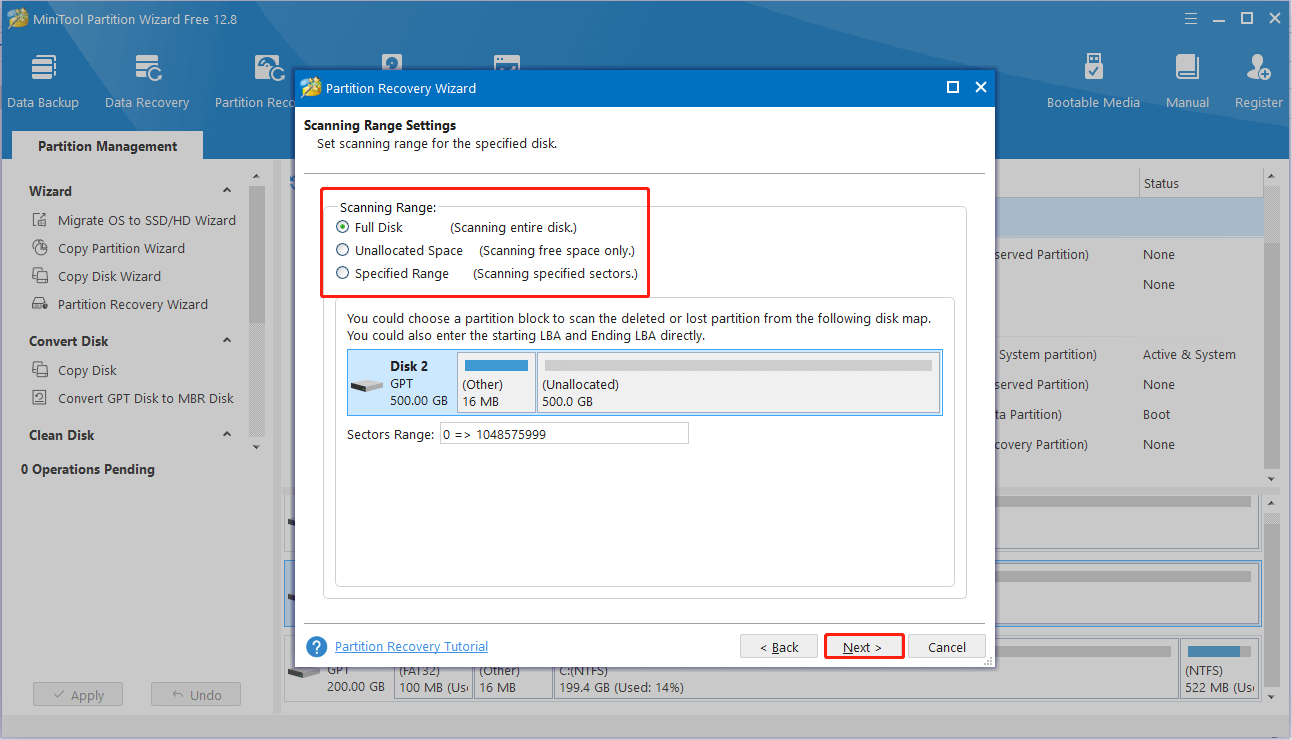
Step 5. Choose a scanning range from Full Disk, Unallocated Space, and Specified Range based on your requirements. Sequentially, click the Next button.
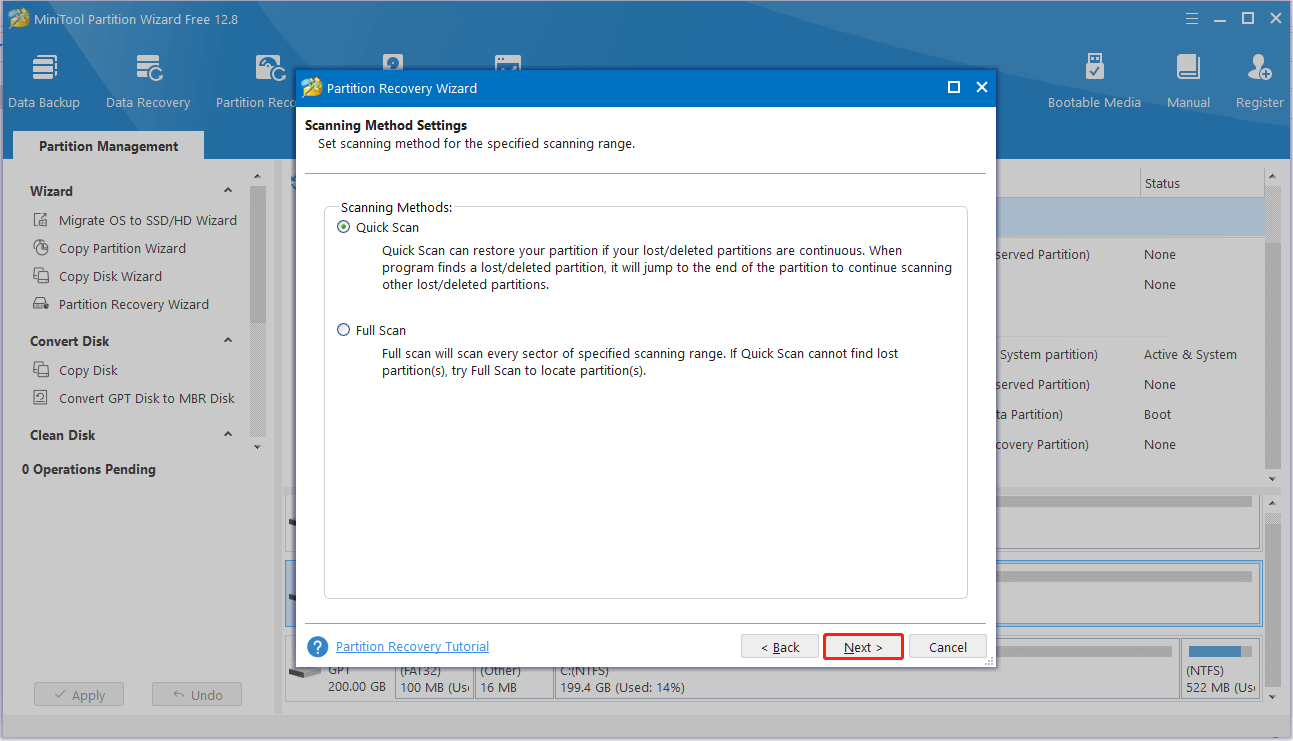
Step 6. In the new window, choose a scanning method based on the on-screen instructions and click Next.
Step 7. After scanning, select all lost partitions and existing partitions and click the Finish button.
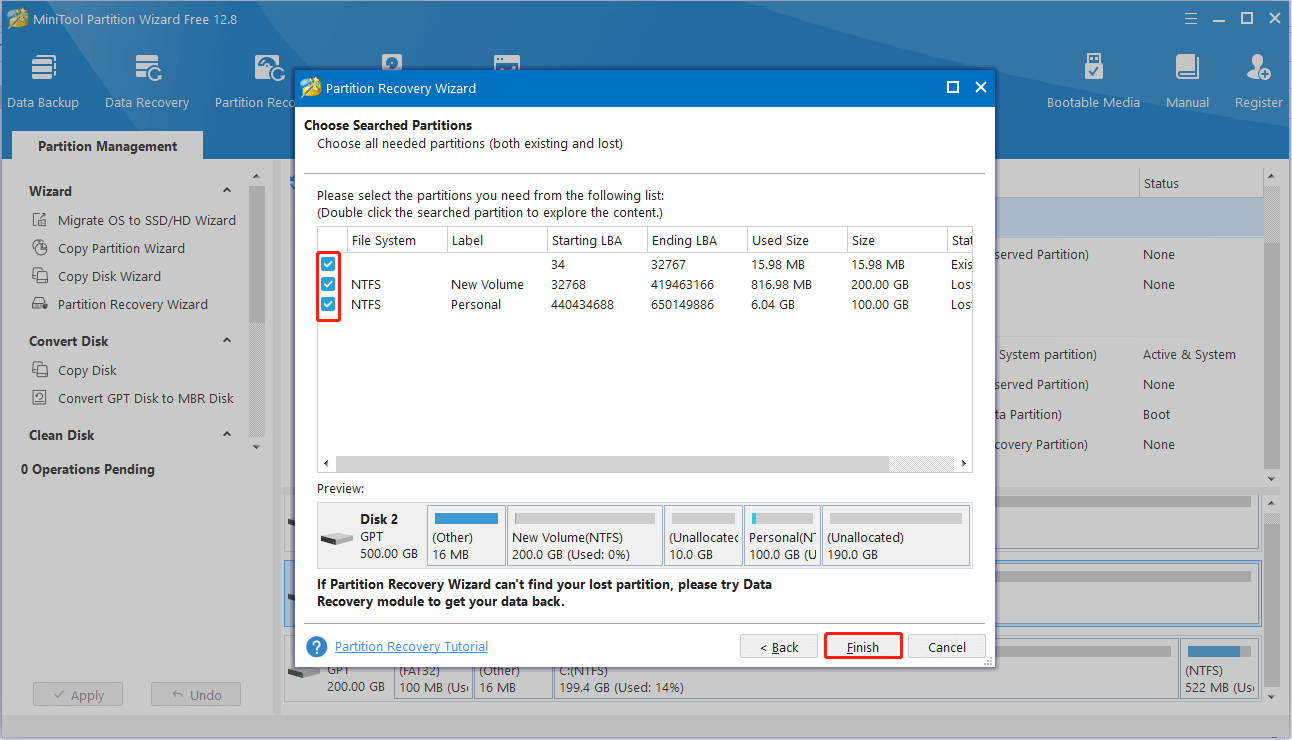
If you are using the Free Edition, a new window will pop up prompting you to register the software. You need to finish the registry process and then save the recovered partitions.
Recommendation: Always Back up Important Data
As you can see, even with powerful data or partition recovery tools, you still need to spend time and effort on data recovery, and just as there are no absolutes, you still face the risk that the data cannot be found.
To reduce the risk of data loss, you can make a habit of backing up crucial data regularly. In this way, if data or partitions are lost or deleted accidentally, you can easily retrieve data from the backup image.
If you are looking for great data backup software, you can give MiniTool ShadowMaker a try. This powerful file backup tool is designed for the Windows operating system that can not only help back up files/folders, disks/partitions but also back up the system.
It offers you a 30-day free trial so that you can use it to protect your data and system for free within 30 days. Now download and install the Trial Edition and start file backup.
MiniTool ShadowMaker TrialClick to Download100%Clean & Safe
Step 1. Launch MiniTool ShadowMaker, then click the Keep Trial button to continue.
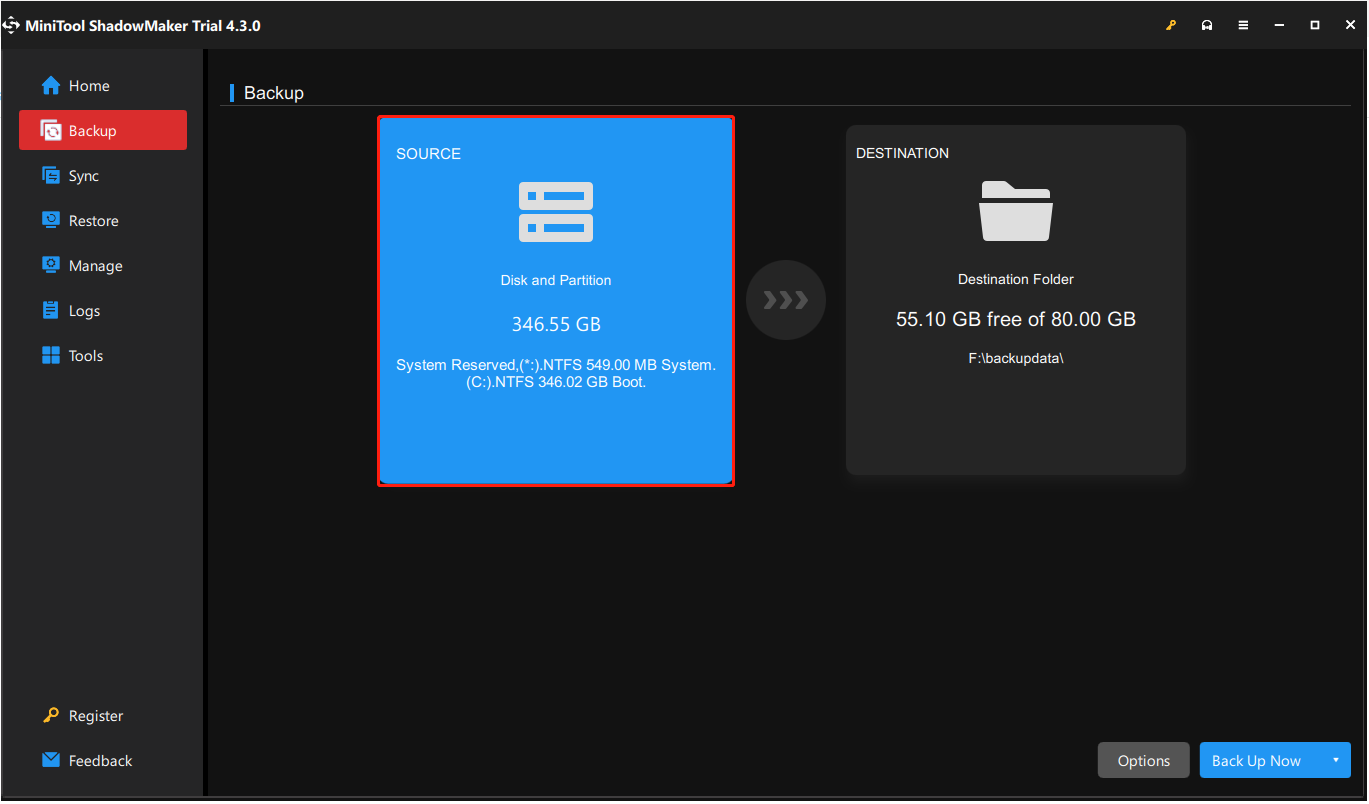
Step 2. On the main interface of this MiniTool file backup software, go to the Backup tab. Next, click SOURCE to choose which partitions/disks or files/folders you want to backup.
Step 3. Click DESTINATION to choose a location where you want the backup files should be restored.
Step 4. Finally, click the Back Up Now button located in the lower right corner. Once the whole process is completed, your files are well protected.
Wrapping Things Up
In a word, there are many causes why hard drive keeps disappearing. You can fix this issue by applying the corresponding solutions listed above. If the partition is lost and becomes unallocated, it is significant to recover its data immediately by using MiniTool Power Data Recovery or MiniTool Partition Wizard in the event of permanent file loss.
MiniTool Power Data Recovery FreeClick to Download100%Clean & Safe
By the way, prevention is better than cure. Always making a backup of important files is the best way to protect files.
If you need any help from the MiniTool support team, feel free to send an email to [email protected].
