“SSD reports wrong size” is an annoying issue that troubles lots of users. If you are encountering this problem, you’ve come to the right place. Here this tutorial on MiniTool explains why your hard drive showing wrong capacity and how to restore the SSD to full capacity.
Issue: SSD Reports Wrong Size
Solid state drive (SSD) is a type of storage device with high speed and low power consumption. Compared with traditional mechanical hard drives, SSDs have higher read and write speeds, longer life, greater reliability, and better durability. Although SSD has so many advantages and is popular, it does have some problems, such as the “SSD showing the wrong size” issue that we are going to discuss today.
“SSD reports wrong size” often occurs after reinstalling Windows, cloning an SSD to a larger SSD, etc. To make matters worse, this problem may also be accompanied by data loss or invisibility. Why does the SSD not report the correct size in File Explorer or Disk Management?
Why SSD Not Showing Correct Size
We have collected several possible reasons that can be responsible for the SSD capacity errors, as listed below.
- SSD uses the MBR partition style. If your SSD drive is larger than 2 TB but is initialized as MBR, there is a good chance that the SSD reported size is wrong. This is because the MBR partition style is only suitable for disks up to 2 TB in size, and space beyond that is not recognized. You might be interested in this post: How to Check Partition Style in Windows 10/11.
- There are virtual memory paging and hibernation files in the SSD. These files may occupy SSD storage space, being the possible culprit causing SSD to report wrong space.
- The SSD’s firmware is incompatible with the computer.
If the SSD shows wrong size, you can perform some general troubleshooting steps. For example, you can try unplugging and re-plugging the SATA transfer cable or placing the SSD into another computer device and see if the disk size appears correctly. In addition, you can update the SSD driver in Device Manager.
If these simple attempts fail to restore the correct capacity of the SSD, then you need to resort to some advanced approaches. But before that, you need to recover the lost files or transfer the existing data in the SSD first, because during the process of repairing the SSD, the data in the disk may be permanently lost.
Before Issue Repair: Recover Data From the SSD
MiniTool Power Data Recovery, serving as the best data recovery software, not only helps extract existing files from drives but also finds and recovers files that are invisible due to wrong capacity. Apart from SSD data recovery, this file recovery service still works great on HDD data recovery, SD card recovery, USB drive file recovery, etc.
MiniTool Power Data Recovery even can recover files from dead SSDs, corrupted SSDs, and formatted SSDs. You can download and install this software on all your Windows PC versions, such as Windows 11, Windows 10, Windows 8, and Windows 7.
Now, click the button below to get MiniTool Power Data Recovery installed and start file recovery or extracting.
MiniTool Power Data Recovery FreeClick to Download100%Clean & Safe
Step 1. Select the target SSD to scan.
Launch MiniTool Power Data Recovery to go to its home page. Here all drives on your computer are listed under Logical Drives. Now you need to move your cursor to the target SSD that reports wrong size and then click the Scan button to scan for its data.
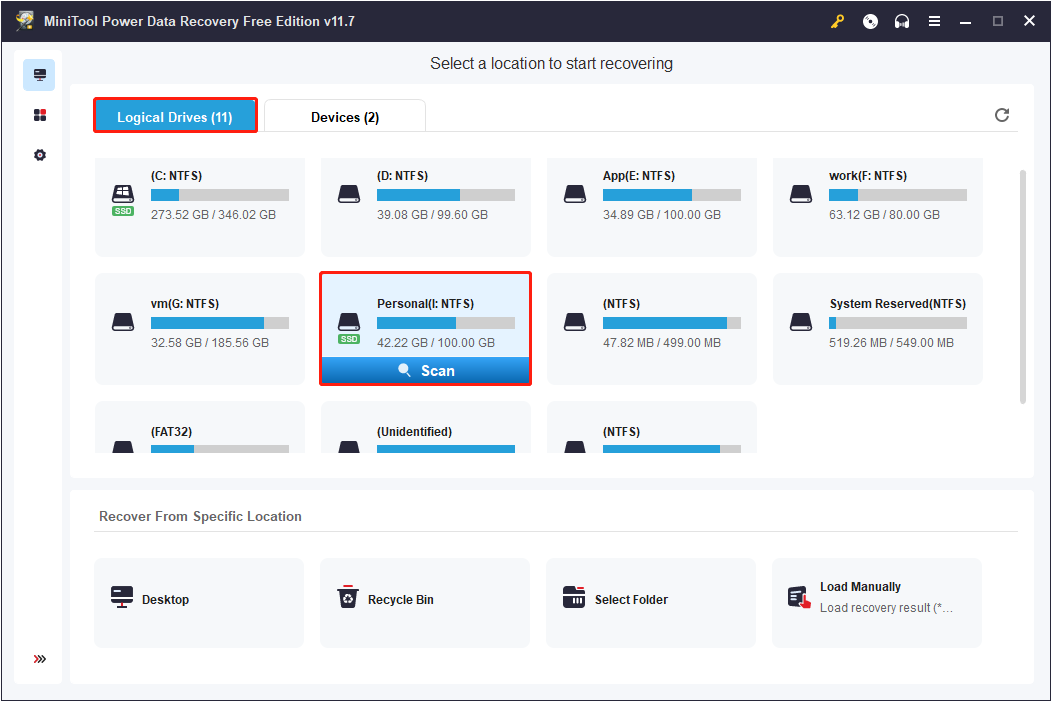
If there are multiple partitions on the SSD, you can switch to the Devices tab and scan the entire disk.
The scan duration mainly depends on the data amount on the selected SSD. For the best scanning outcomes, you are not suggested to halt the process midway.
Step 2. Preview the listed files.
Once the scanning ends, you can expand each folder path to find the desired files. Alternatively, you can move on to the Type category list to locate needed items by file type.
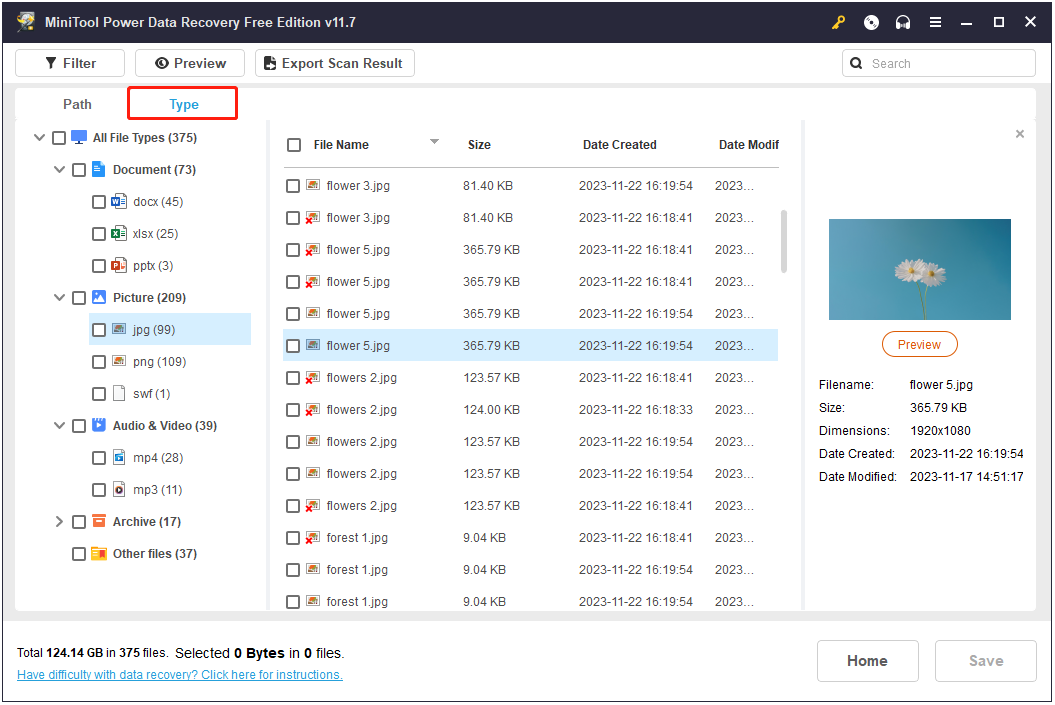
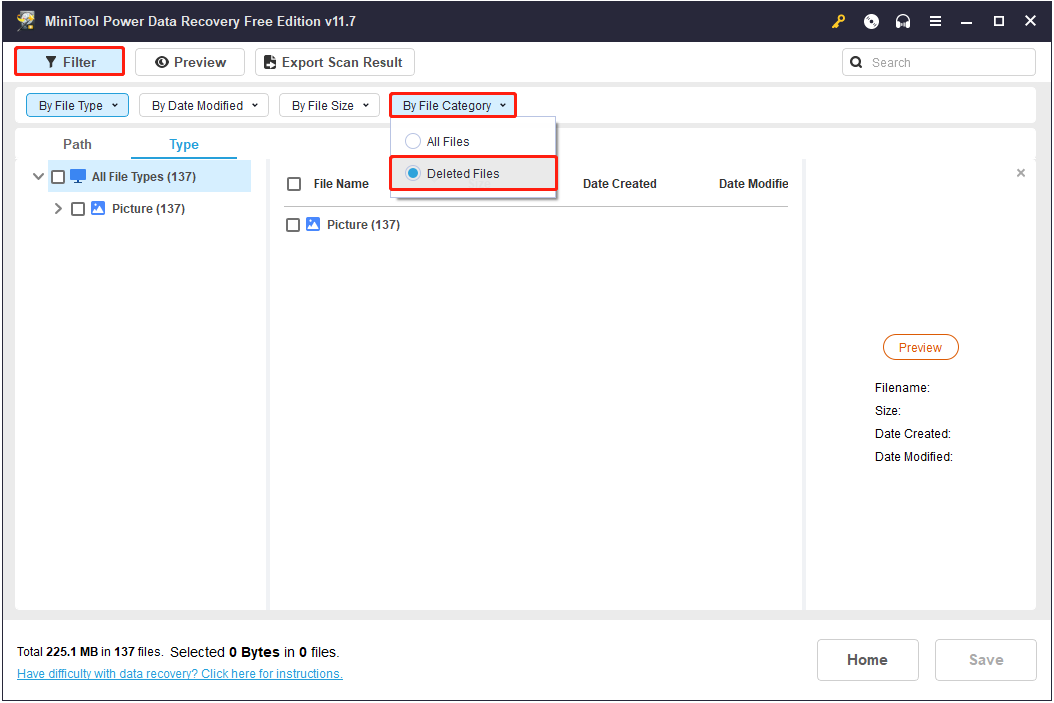
Furthermore, the Filter and Search features are also helpful for finding the required files faster.
- Filter: After clicking the Filter button, you will have the option to filter all listed files by file type, file size, file modification date, and file category. For example, if you prefer to view all deleted files only, you can choose the Deleted Files option under By File Category.
- Search: As long as you remember the file name, you can locate that file easily by typing the file name in the search box and pressing Enter.
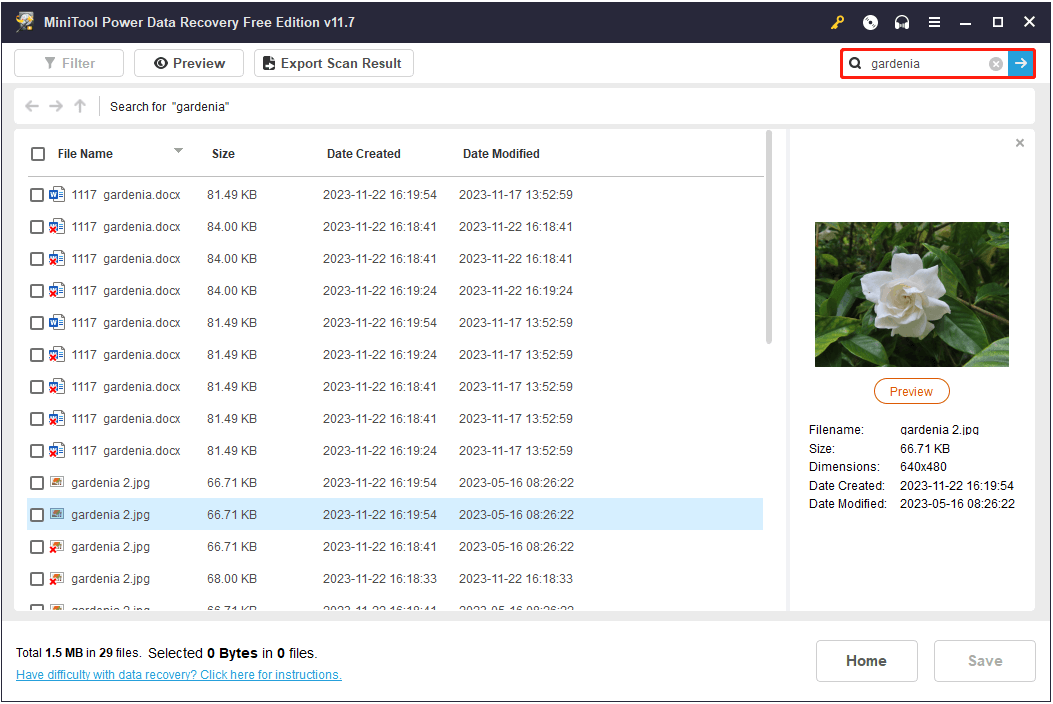
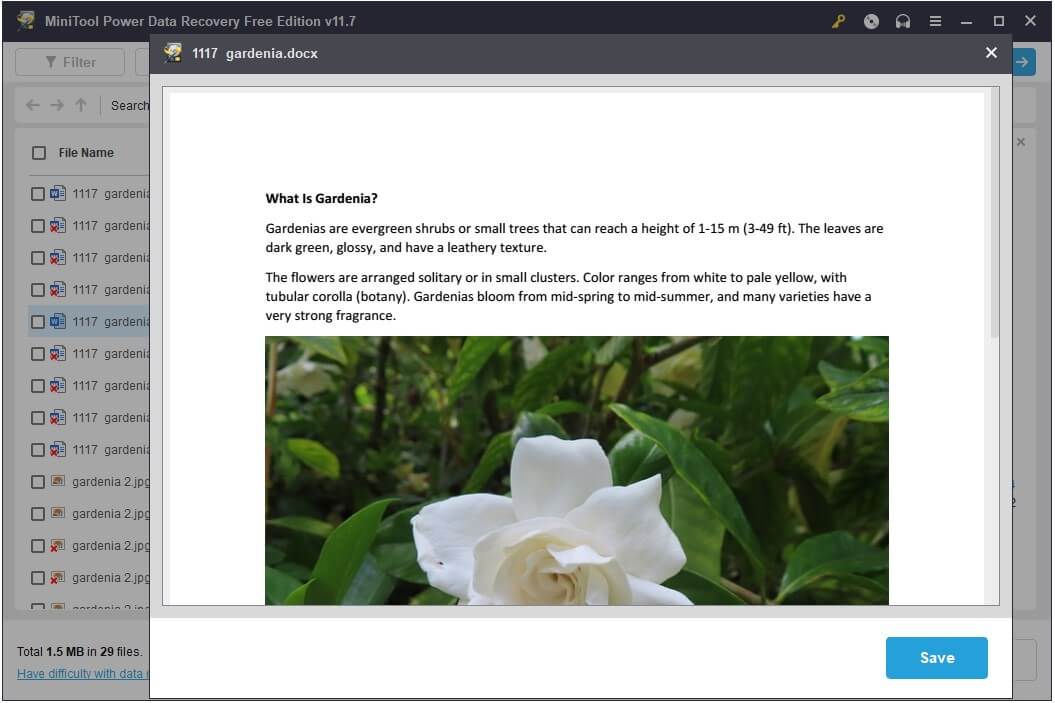
To make sure the recovered items are the ones needed, you can double-click on each of them to preview them. You are allowed to preview documents, pictures, videos, audio, emails, and other types of files.
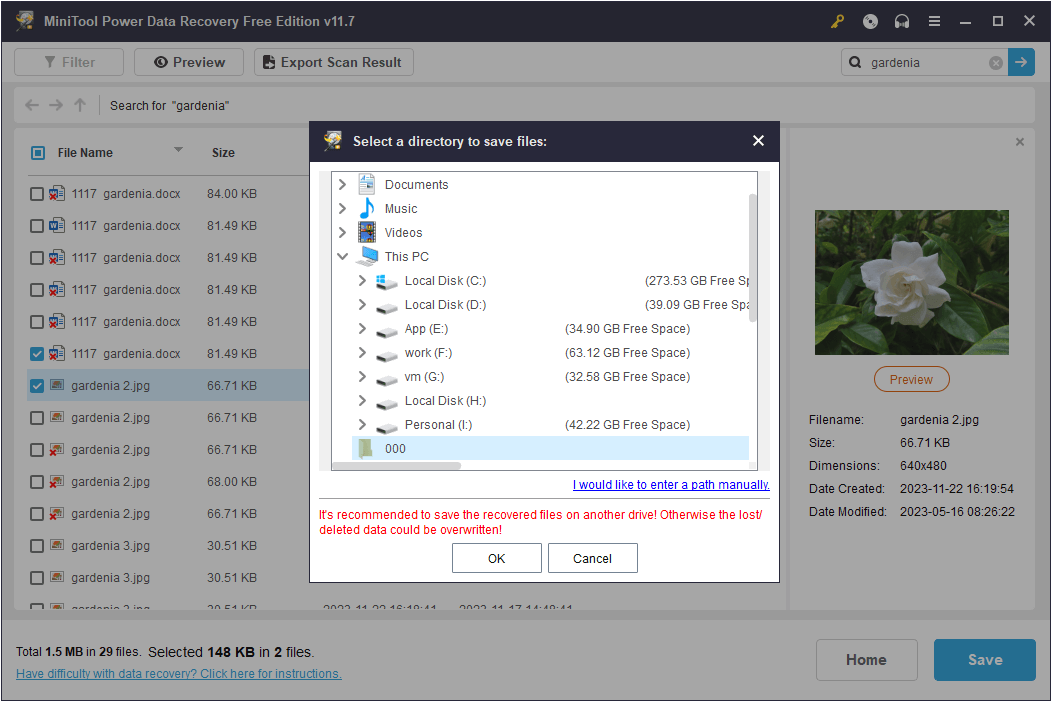
Step 3. Save the required items to another drive.
Once you locate the desired files, you need to check the checkboxes next to them. Finally, click the Save button and choose a safe path to store the recovered items. Note that you should not store them to the SSD drive that reports the wrong size since this drive needs to be repaired.
MiniTool Power Data Recovery Free can help to recover 1 GB of files in total. To break this limitation, you need to use a full edition like MiniTool Power Data Recovery Personal Ultimate.
MiniTool Power Data Recovery FreeClick to Download100%Clean & Safe
How to Fix if SSD Not Showing Full Capacity Windows 11/10
After rescuing the files on the SSD, you might be wondering:
“How do I restore my SSD to full capacity?”
Listed below are several useful methods to fix the SSD reports wrong size issue. You can implement them one by one until the issue has gone.
Solution 1. Convert MBR to GPT
The most common reason why SSD shows wrong size is that it has an MBR partition style. MBRs are constrained by supporting only four main partitions and a volume size of less than 2 TB. If the SSD is initialized in MBR, even if it has a storage space larger than 2 TB, the disk space beyond 2 TB will be recognized as unallocated and won’t show up in File Explorer.
To make the SSD show full capacity in such a situation, you need to convert the MBR partitioning style to GPT.
See Also: MBR VS GPT (Focus on Difference and How to Convert Safely)
Method 1. Use Command Lines.
You can complete the disk conversion process by using command lines.
Close any programs that access the disk before converting the SSD, then you can follow the steps below to perform disk conversion.
Step 1. In the Windows search box, type cmd and then click the Run as administrator option from the right panel.
Step 2. In the User Account Control window, select the Yes option.
Step 3. In the Command Prompt window, type the following command lines. Press Enter after each command line.
- diskpart
- list disk
- select disk * (* represents the disk number of the target SSD)
- clean
- convert gpt
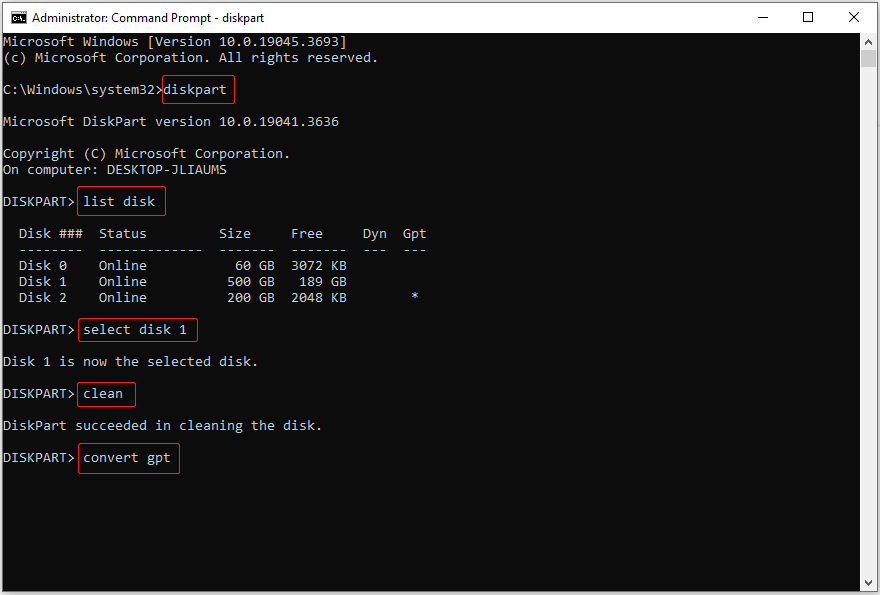
Once the disk conversion completes, you can go to File Explorer and check if the SSD shows full capacity.
Method 2. Use MiniTool Partition Wizard.
If you do not want to delete all partitions and files on the SSD, you can choose a third-party partition manager to convert MBR to GPT alternatively. Here MiniTool Partition Wizard is highly recommended.
Step 1. Download, install, and launch MiniTool Partition Wizard Free to enter its main interface.
MiniTool Partition Wizard FreeClick to Download100%Clean & Safe
Step 2. Select the MBR SSD disk, then choose the Convert MBR Disk to GPT Disk option from the left panel.
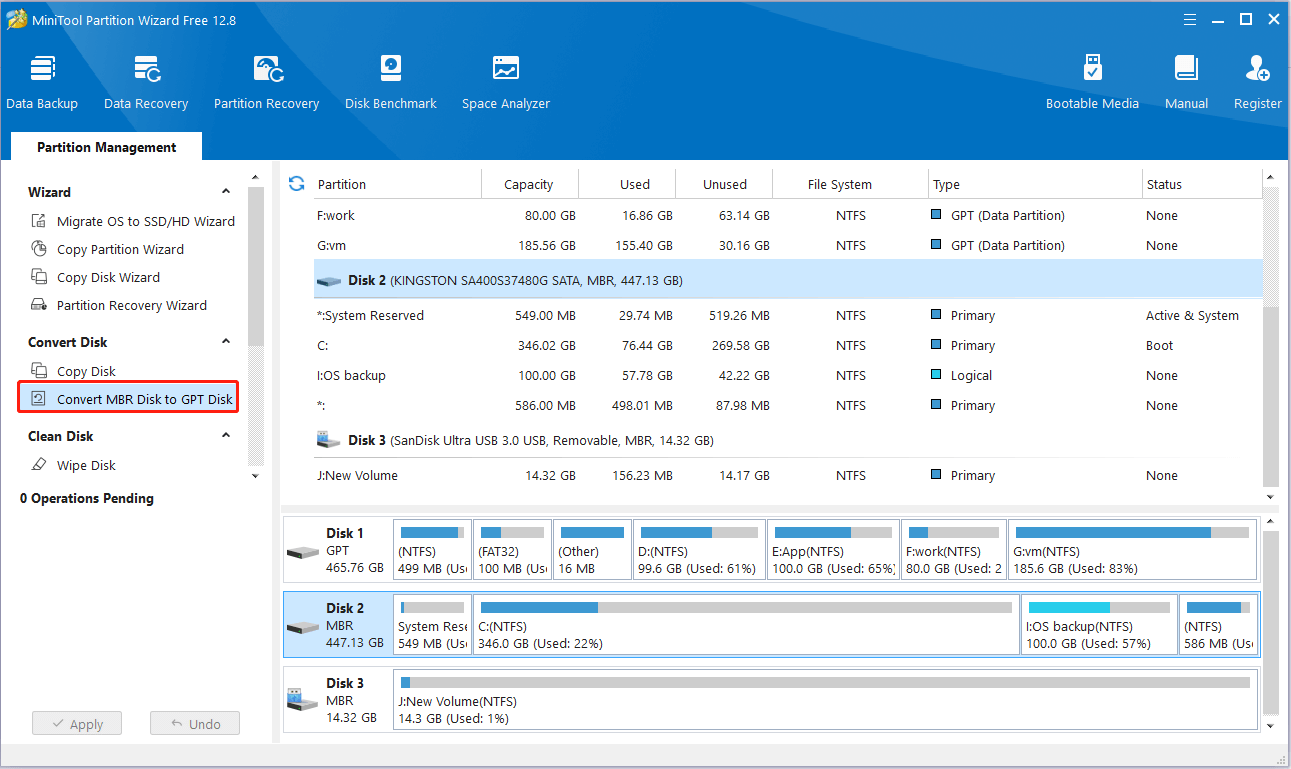
Step 3. Finally, click the Apply button located in the lower left corner to make this change take effect.
Solution 2. Reset the Virtual Memory Paging File
The Windows operating system uses virtual memory technology to combine the computer’s RAM with the temporary space on the hard disk to increase the computer’s memory capacity. Based on user experience, resetting the virtual memory paging file is also an effective way to restore the SSD to full volume. Here you can refer to the steps below to complete this task.
Step 1. In File Explorer, right-click the This PC option and choose Properties.
Step 2. In the Windows Settings window, click Advanced system settings.
Step 3. In the new window, click the Settings button under the Performance section. Next, move on to the Advanced tab, and click Change under the Virtual memory section.
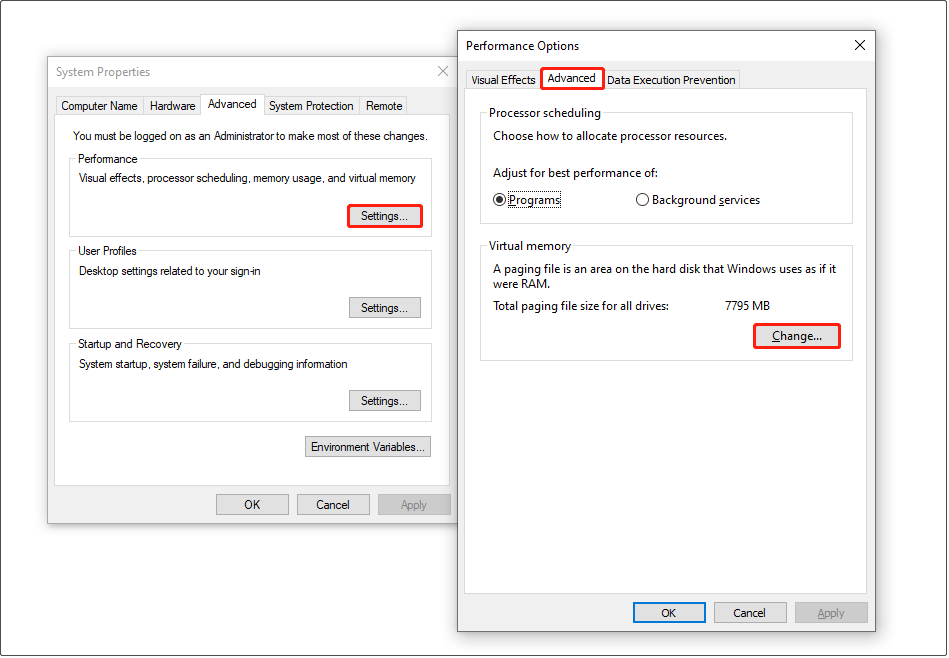
Step 4. Uncheck the Automatically manage paging file size for all drives option, select the SSD drive, then click the Customize size option. After that, specify the initial size and maximum size, and then click Set > OK.
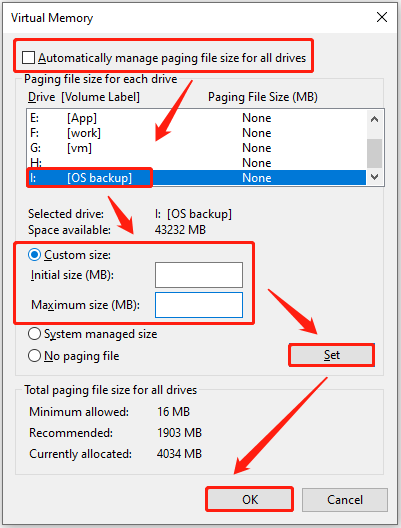
Now, you can check if the SSD capacity is correct. If not, try the next way.
Solution 3. Delete the Hibernate File
The last way you can try restoring the SSD to its full capacity is to delete the hibernate file and disable hibernation.
Step 1. Open an elevated Command Prompt.
Step 2. In the command line window, type powercfg.exe -h off and press Enter.
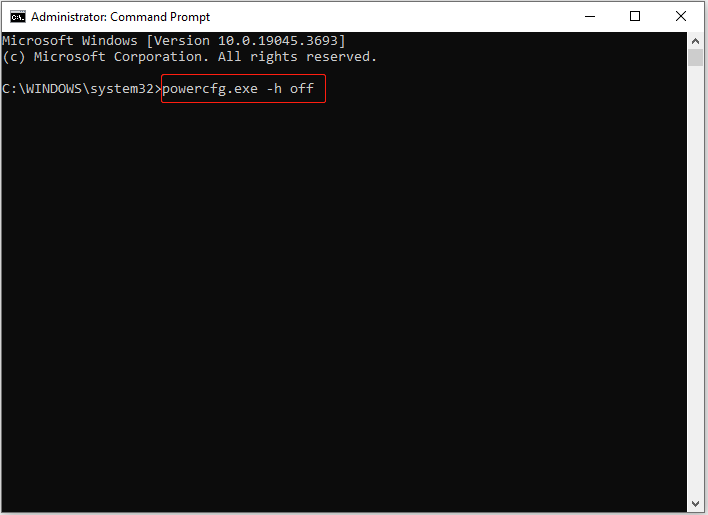
Step 3. Next, go to File Explorer or Disk Management and check the SSD capacity.
Further Reading: SSD Not Showing Correct Size After Cloning
There is another situation where the hard drive shows the wrong capacity: SSD shows the wrong size after cloning.
Hard drive clone means creating a copy that is identical to the source disk, including the number of partitions and partition size. When you upgrade a smaller capacity SSD to a larger one, since the cloned SSD’s partition size remains the same as the old disk, the extra space beyond the original hard drive size may be recognized as unallocated. This is why cloned SSDs don’t show full disk capacity in File Explorer.
In this case, to restore the SSD to its full volume, you can use the professional partition manager, MiniTool Partition Wizard, to resize the cloned disk. You can complete this task with its free edition.
Step 1. Download, install, and launch MiniTool Partition Wizard Free.
MiniTool Partition Wizard FreeClick to Download100%Clean & Safe
Step 2. On its main interface, select the SSD partition that you want to adjust and click Move/Resize Partition from the left panel.
Step 3. In the new window, drag the handle until all unallocated space is occupied. After that, click OK.
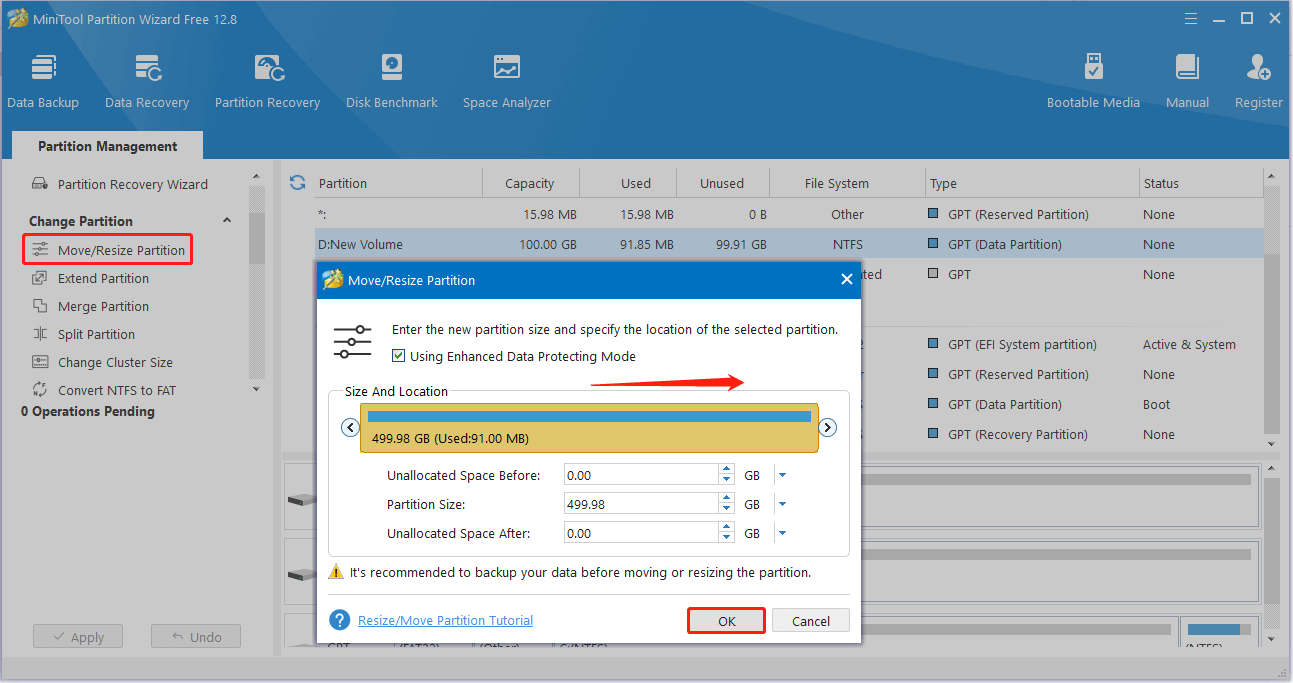
Step 4. Finally, click the Apply button located in the lower left corner to apply this change.
Once this operation is performed, the SSD should show its full capacity.
For more information about this issue, you can refer to this tutorial: Clone Hard Disk Shows Wrong Size | Here’s How to Fix and Avoid It.
Wrapping Things Up
In a word, this post explains what measures can you take if SSD reports wrong size. Hope the approaches mentioned above are beneficial to you.
Should you have any concerns about MiniTool software, please do not hesitate to send an email to [email protected]. We are ready to help.
