Are you seeking a temp file recovery solution on Windows or Mac? If yes, you’ve come to the right place. Here this post on MiniTool shows you how to recover temp files with the best data recovery software for Windows and Mac.
A Brief Introduction to Temporary Files
Temporary files are created by the operating system for specific tasks during normal computer operation and are used to store temporary information.
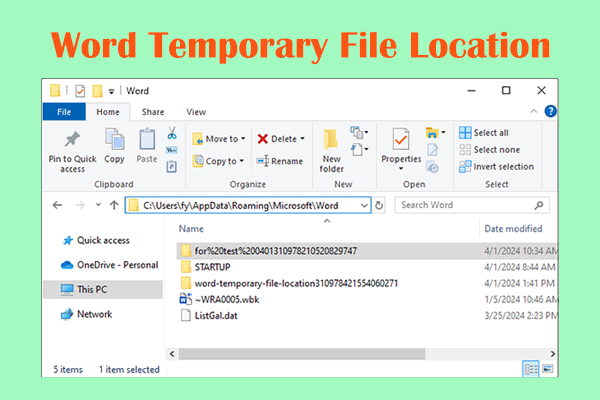
Typically, temporary files are used to cache data required at runtime to improve system or application performance. Also, when processing large documents or performing complex computational tasks, the program may create temporary files to store intermediate results. Additionally, some programs create temporary files for backup purposes. For example, Microsoft Office saves a temporary file of open documents every few minutes to allow data recovery in the event of an unexpected crash.
The location of temporary files varies depending on the program and operating system, but they are typically located in the following locations:
For Windows:
- System drive temporary folder: C:\Windows\Temp
- User’s temporary folder: C:\Users\username\AppData\Local\Temp
For Mac:
- System-level temporary folders: /private/var/folders
- User-level temporary folder: ~/Library/Caches
Common Reasons for Temporary File Loss
There are many reasons for the loss of temporary files on your computer, and here are some common scenarios:
- Manual deletion: Temporary files are most commonly deleted due to manual deletion during the process of managing computer files.
- System cleanup: If you set up Storage Sense or other features to regularly clean up temporary folders to free up disk space, temporary files will be cleared.
- Disk failure: Hard disk failure, file system corruption, etc. may cause temporary file loss.
- Malware or virus attacks: Certain malware or viruses may tamper with, hide, encrypt, or delete temporary files, causing them to be lost or inaccessible.
- Operating system problems: System crashes or unexpected shutdowns can cause temporary files to be lost.
After having a basic understanding of the reasons for temporary file loss, you can implement the following ways to try to recover deleted temporary files.
How to Recover Temp Files on Windows 11/10/8/7
In this section, you will learn how to recover temp files on Windows OS.
Way 1. Check the Recycle Bin
The Recycle Bin is one of the system folders in the Microsoft Windows operating system, which is mainly used to store deleted documents temporarily. When you delete files, Windows puts them in the Recycle Bin instead of permanently deleting them.
Recycle Bin files are usually not cleared automatically unless you set the Recycle Bin properties. So, to recover temporary files, you should first open the Recycle Bin and check if the relevant files are there. If yes, select and right-click on them and choose Restore. Then the deleted files will be restored to their original locations.
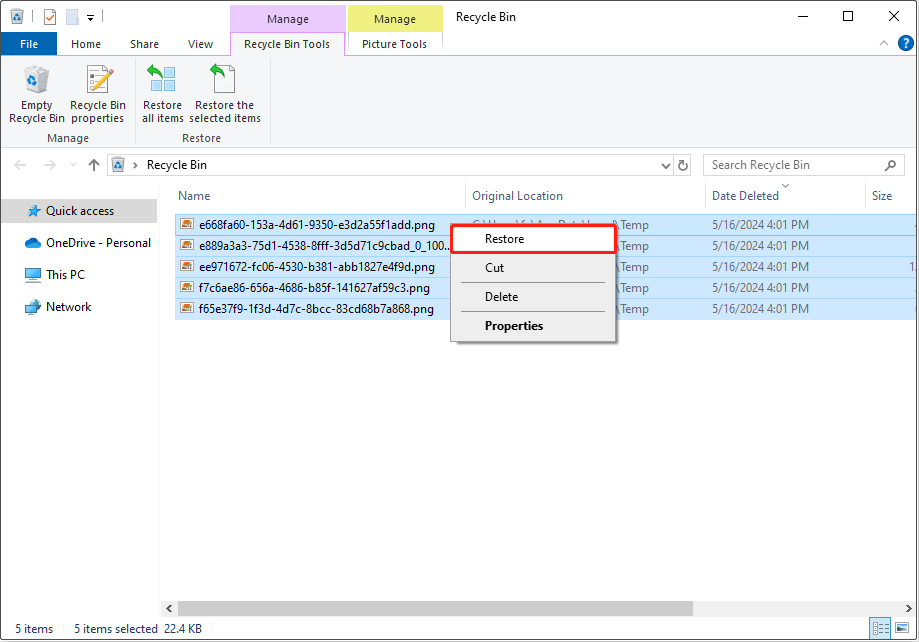
Though it is easy to restore deleted temporary files from Recycle Bin, sometimes you are unable to complete this task. For example, the Recycle Bin may get corrupted or appear grayed out, and prevent you from accessing it. In such cases, you can try repairing the Recycle Bin or using file recovery software to restore the temporary files.
Way 2. Use MiniTool Power Data Recovery
For deleted file recovery, MiniTool Power Data Recovery is the best choice. Why you should choose this file recovery software to recover lost files on Windows?
- Support for various file types/file systems: This professional file recovery software helps deeply scan your computer and recover almost all types of files, including documents, images, archives, videos, audio, databases, and so on. Furthermore, besides the NTFS file system, this software also supports FAT12, FAT16, FAT32, exFAT, etc.
- Secure data recovery: As one of the most secure data recovery services, this MiniTool software scans and recovers deleted files in read-only mode without any modification or overwriting of the original data. Therefore, neither your data nor your disk will be harmed.
- Easy-of-use: It has a user-friendly interface that is easy to use and can help you quickly implement the data recovery process.
- Support for specific file location scanning: Unlike full disk scanning, this software supports scanning specified folders or paths to obtain the most efficient scanning results with the least scanning time.
- Free data recovery capacity: This software allows you to recover 1 GB of files for free without charge. This can be very beneficial if the amount of data you lose is not large.
- Multiple software editions: In addition to MiniTool Power Data Recovery Free, MiniTool provides multiple license types to meet your diverse needs.
Now, you can click the button below to get MiniTool Power Data Recovery Free downloaded and installed, then use it to recover temporary files.
MiniTool Power Data Recovery FreeClick to Download100%Clean & Safe
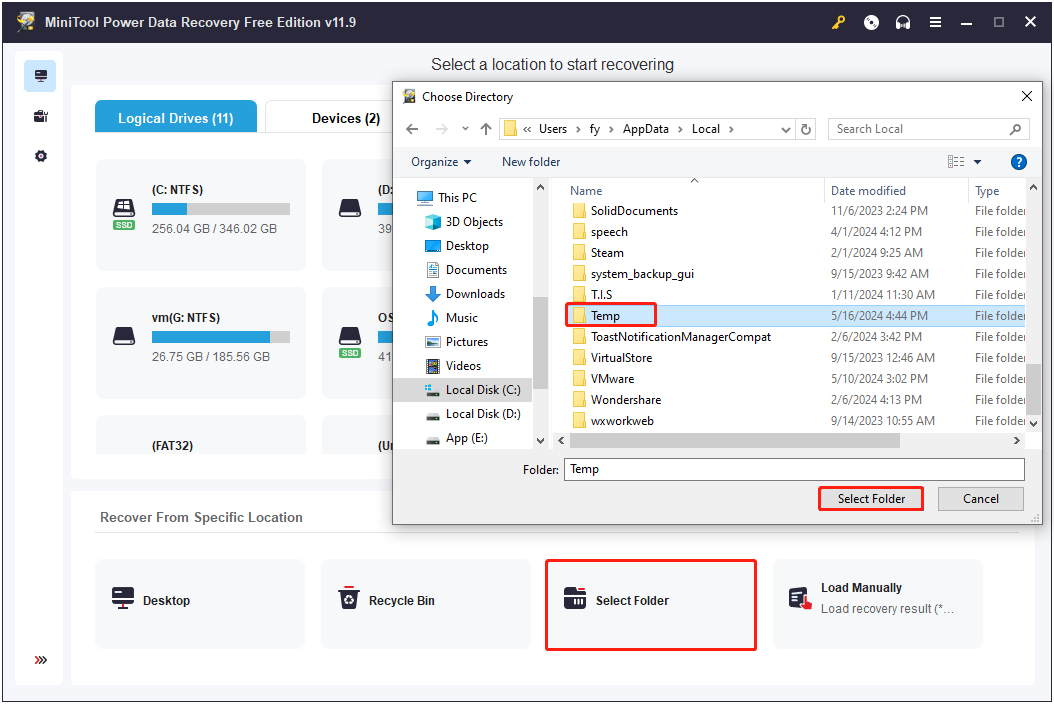
Step 1. Launch MiniTool Power Data Recovery Free, then you can see its home page. Here you can directly hit Select Folder and select the Temp folder to scan so as to reduce the scan duration. Alternatively, you can scan the Recycle Bin individually if the deleted temporary files were stored there. Also, you can move the cursor to the C drive and choose to scan the whole drive for lost files.
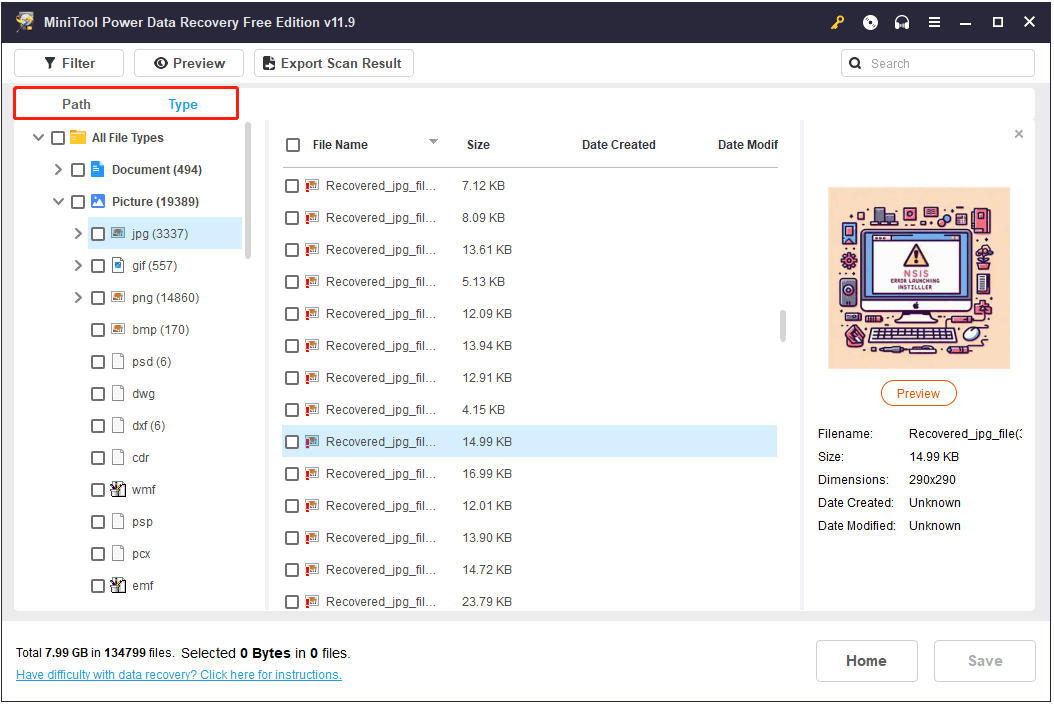
Step 2. After scanning, all the files will be categorized in a tree structure under Path, and you can expand each folder to find the needed files. Also, you can switch to the Type category list to locate the target files by file type.
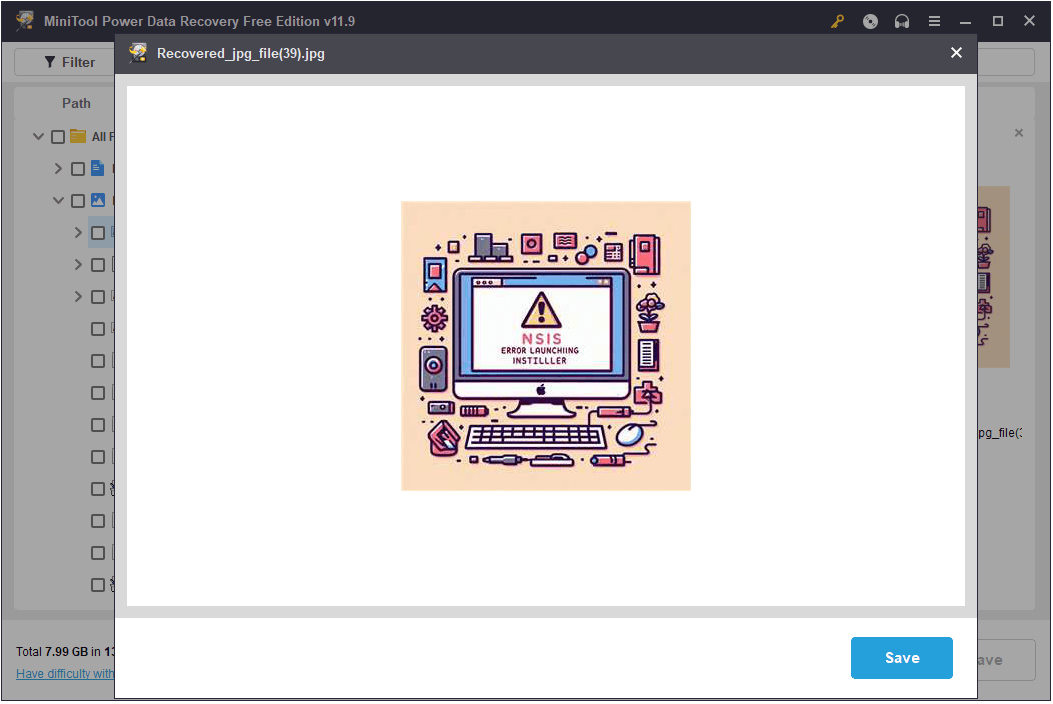
Furthermore, you are allowed to preview the listed files for confirmation. Supported file types to preview include documents, images, tasks, emails, PSD files, videos, audio files, and so on. You can simply double-click on a file to preview it. If the previewed file is what you need, you can save it to your computer directly from this window.
Step 3. Finally, tick all needed files, then click the Save button from the lower right corner. When a new small window appears, select a directory other than the C drive to store the recovered data.
As mentioned before, only 1 GB of files can be recovered by using the free edition of this software. If you need to recover more than 1 GB of data, you should upgrade the software to MiniTool Power Data Recovery Personal Ultimate or other advanced editions.
How to Recover Temp Files on Mac
If you are a Mac user who wants to recover deleted temporary files, you can follow the instructions below.
Method 1. Check the Trash Folder
Similar to the Recycle Bin on Windows, there is also a folder on Mac called Trash that temporarily stores deleted files. By default, files in Trash will not be cleared unless you empty the Trash folder. Therefore, to recover deleted temp files, you can open Trash and check if the required items are there. If yes, you can simply drag them out of the Trash, or right-click the item, then choose Put Back.
Method 2. Use Stellar Data Recovery for Mac
If you are unable to find or recover deleted temp files from Trash, you can seek help from professional and green data recovery software. Here Stellar Data Recovery for Mac is strongly recommended. It specializes in data recovery on internal/external drives like SSD, HDD, SD card, USB drive, etc. on Mac devices. It is fully compatible with Mac OS X 10.11 and above versions.
Now you can click the button below to download and install Stellar Data Recovery for Mac and start to recover your files.
Data Recovery for MacClick to Download100%Clean & Safe
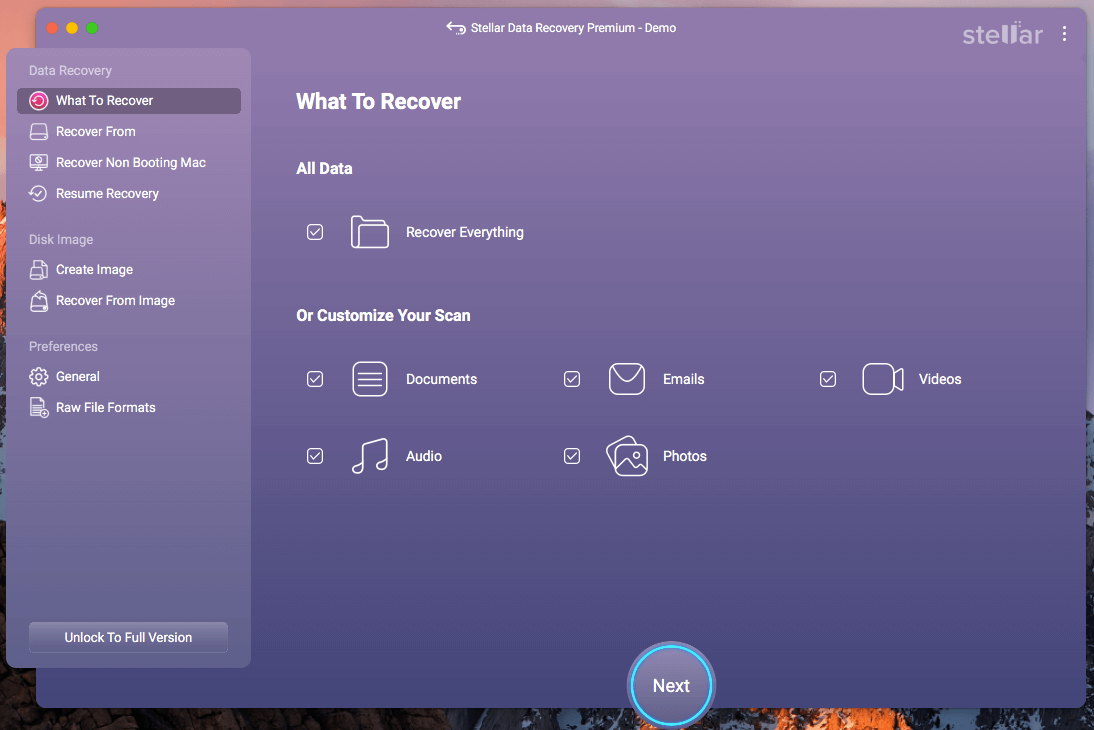
Step 1. Launch Stellar Data Recovery for Mac. When you see the following window, tick all the file types you want to recover, then hit the Next button to continue.
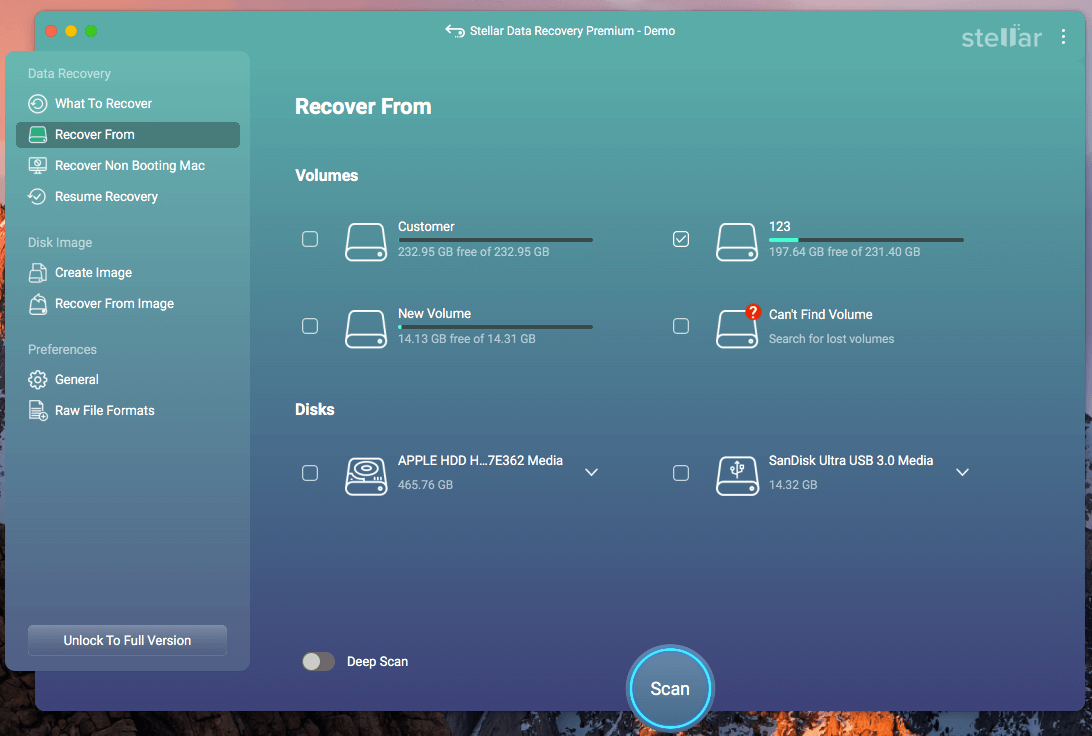
Step 2. Next, tick the target volume where your temporary files were stored, then hit the Scan button to start scanning it. Also, you can turn on the Deep Scan button located in the lower left corner to perform a comprehensive scan of your hard drive to recover every bit of lost/deleted data.
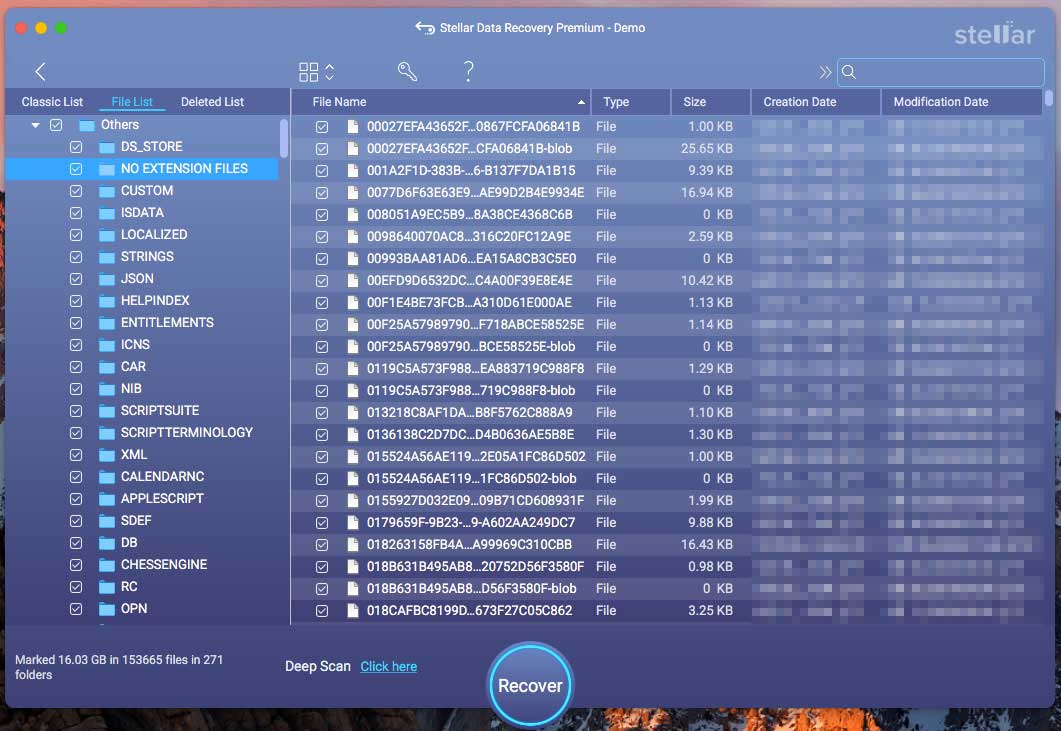
Step 3. Once the scanning process is completed, you can find the needed files and tick the checkboxes next to them. After that, you need to hit the Recover button to save them to a safe location separate from their original location in case of data overwriting.
How to Prevent Temporary Files From Being Lost Automatically on Windows
Temporary files in your computer will take up a lot of hard drive space, which may cause your computer to run out of disk space and freeze. Removing them regularly is key to solving the problem. However, if temporary files are automatically deleted, it may affect your occasional need to recover data from temporary files.
So, in the next part, you can learn how to prevent the temporary files from being deleted on the Windows OS.
Way 1. Disable Storage Sense
Storage Sense is a feature in the Windows operating system that is used to efficiently manage storage space on your computer. It can automatically delete temporary files, items in the Recycle Bin, and data in the Downloads folder to free up disk space. If you don’t want temporary files to be automatically deleted, you can follow the steps below to set it up.
Step 1. Press the Windows + I key combination to open Settings.
Step 2. Go to System > Storage.
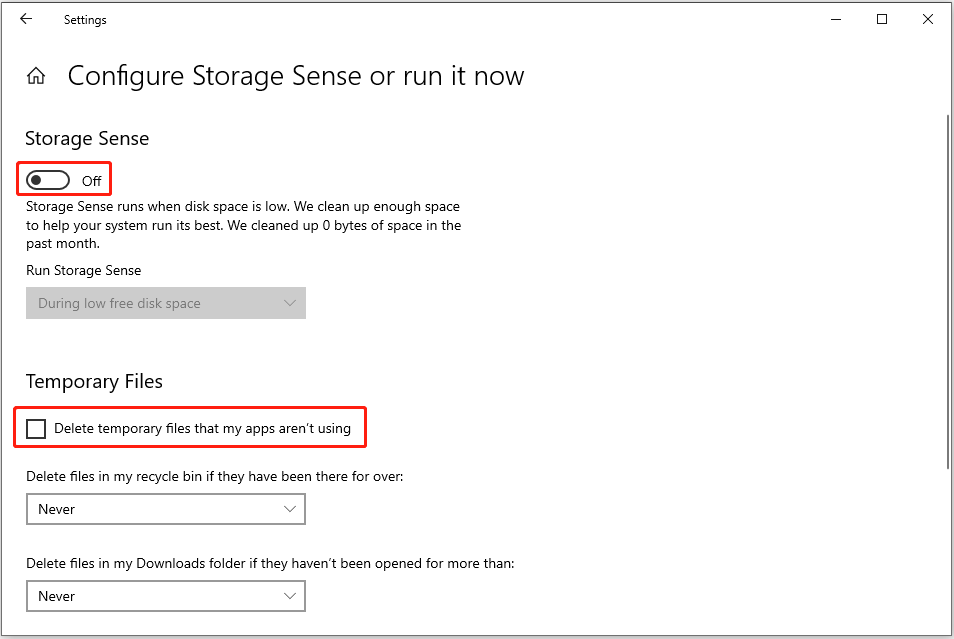
Step 3. On the right panel, make sure the button under Storage Sense is turned off. Next, click the Configure Storage Sense or run it now button.
Step 4. In the new window, untick Delete temporary files that my apps aren’t using.
Way 2. Scan for Viruses
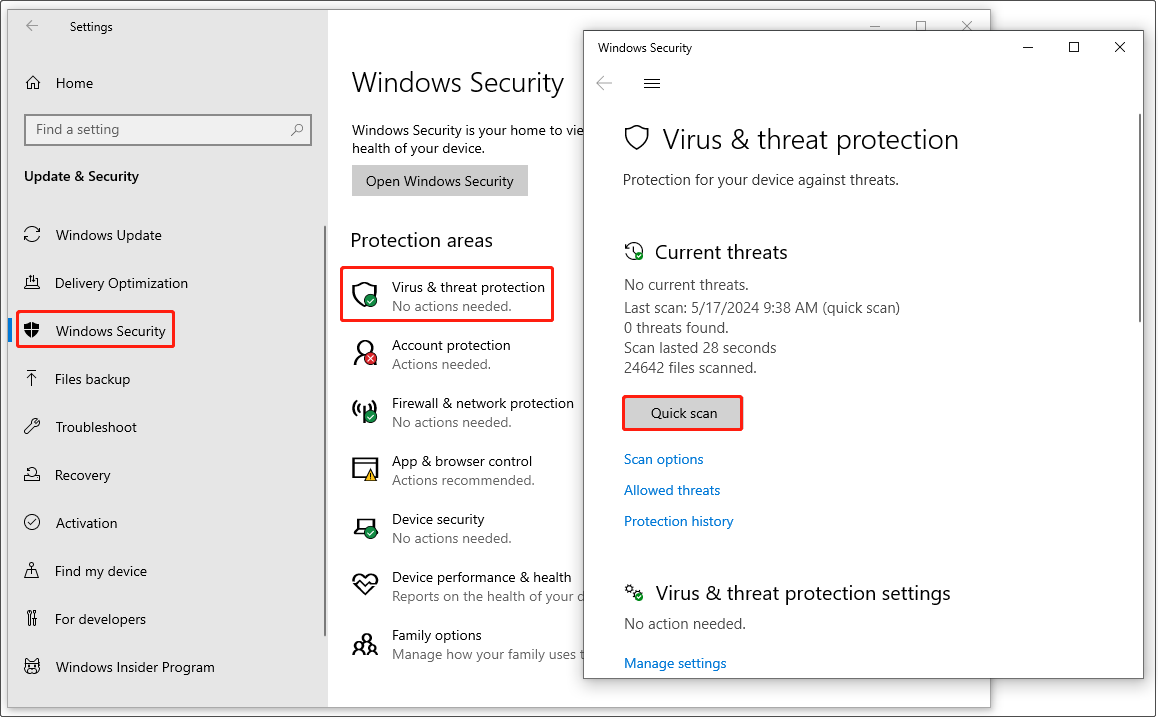
Viruses or malware may also delete temporary files or even other important files on your computer in order to hide or spread themselves or damage the system. Therefore, it is significant to run the virus scan regularly. You can use the snap-in tool, Windows Defender, to scan for viruses and kill them.
Step 1. On the taskbar, right-click the Windows logo button and choose Settings.
Step 2. Go to Update & Security > Windows Security, then hit Virus & threat protection from the right panel.
Step 3. Next, click the Quick scan button to scan for threats on your computer.
Way 3. Hide the Temp Folder
The last way to prevent the temporary files from being deleted is to hide the Temp folder.
Go to the location of the Temp folder and then right-click on the folder and choose Properties. Under the General tab, tick the Hidden checkbox and press OK. After that, follow the instructions on your screen to complete the task.
Bottom Line
Temporary files accidentally deleted and don’t know how to recover them? Data recovery becomes easy as long as you use MiniTool Power Data Recovery. If you are a Mac user, just try Stellar Data Recovery for Mac.
MiniTool Power Data Recovery FreeClick to Download100%Clean & Safe
Besides, taking some measures, such as disabling Storage Sense, running virus scans, hiding temporary files, etc., can protect your temporary files from being automatically deleted. In this way, you can save yourself from the hassle of data recovery.
