Insufficient disk space is a common error that occurs on Windows computers now and then. The not enough disk space error can show up on your PC in different situations. How to resolve this problem? In the following content, MiniTool will analyze this error for you in detail.
Error Message: There Is Insufficient Disk Space to Complete Operation
It’s a common thing to come across the insufficient disk space prompt when you’re using a PC. Numerous users have had the same experience: when they are trying to copy a file/folder to a destination, a prompt window (Error Copying File or Folder) will pop up: There is insufficient disk space to complete operation. At this time, users should know that they couldn’t complete the operation unless they solve the problem causing the error.
What Does Not Enough Disk Space Mean
What is insufficient disk space? The insufficient disk space on Windows indicates the free space left in the target drive is not enough to complete the operation you just performed. That is to say, the process requires more space than you have.
For instance, you may see the prompt – there is not enough space available on the disk to complete this operation – when changing the disk layout in Disk Management. Fortunately, you can fix the problem by yourself.
There is not enough space on the disk to complete this operation shrink/while extending.
When you’re extending/shrinking a drive on your disk in Disk Management, the following window with the error message will show up to inform you of the lack of space: There is not enough space available on the disk(s) to complete this operation.
Obviously, you are not allowed to extend/shrink the partition in Disk Management until you fix the not enough space problems. On this occasion, I advise you to use MiniTool Partition Wizard to change the size of a disk partition.
MiniTool Partition Wizard FreeClick to Download100%Clean & Safe
You can find detailed information about how to resize partitions with MiniTool Partition Wizard from this article: 3 Ways to Get out of Low Disk Space Warning in Windows 7/8/10/11.
Not Enough Disk Space but There Is Plenty
Users receive the error message “Not enough disk space”, but there is plenty of disk space left in the partition they’re operating. This problem is not limited to the local drive; some people also reported the problem: the external hard drive says not enough space when the drive does have enough space. Besides, insufficient disk space on a USB flash drive is possible.
Not enough disk space message on drive with plenty of space:
I am currently trying to install games from Steam, but I'm encountering an error message indicating that I don't have sufficient disk space. However, I have approximately 600 GB on disk G and 1.2 TB on disk M. I am perplexed as to why I am unable to install a 75GB game like death stranding. - Arthxr Ouyang answers.microsoft.com
Why does this happen? The three most possible causes are file corruption, antivirus program misjudgment, and problems with device drivers. How do you fix a disk that says there is not enough space? In the next part, I’ll provide specific ways to show you how to fix corrupted files or disks to eliminate the insufficient space error.
Solutions: How to Fix Insufficient Disk Space
Fix 1: Delete Useless Files
When you find insufficient space, the first thing you want to do is to clean junk files on your computer.
MiniTool System Booster TrialClick to Download100%Clean & Safe
However, some people may delete their important files by mistake. To recover the permanently deleted files, you can choose MiniTool Power Data Recovery. This file recovery software is deliberated on providing a professional and secure recovery service. As a free data recovery software, MiniTool Power Data Recovery contains powerful functions.
It fits all Windows systems thus you don’t need to worry about the compatibility issue. Besides, this software can recover lost/deleted files under various situations, like OS crash, virus attack, mistaken deletion, and so on. You can also restore your important data from different data storage devices with the help of MiniTool Power Data Recovery.
You can use MiniTool Power Data Recovery free edition to check where is your wanted file and retrieve up to 1GB of files. If you want to recover more files or need to rescue files from unbootable computers, you can get the full edition from this page.
Now, you can follow the following guide to recover your important files.
Step 1: Download and install MiniTool Power Data Recovery.
MiniTool Power Data Recovery FreeClick to Download100%Clean & Safe
Step 2: Launch the software.
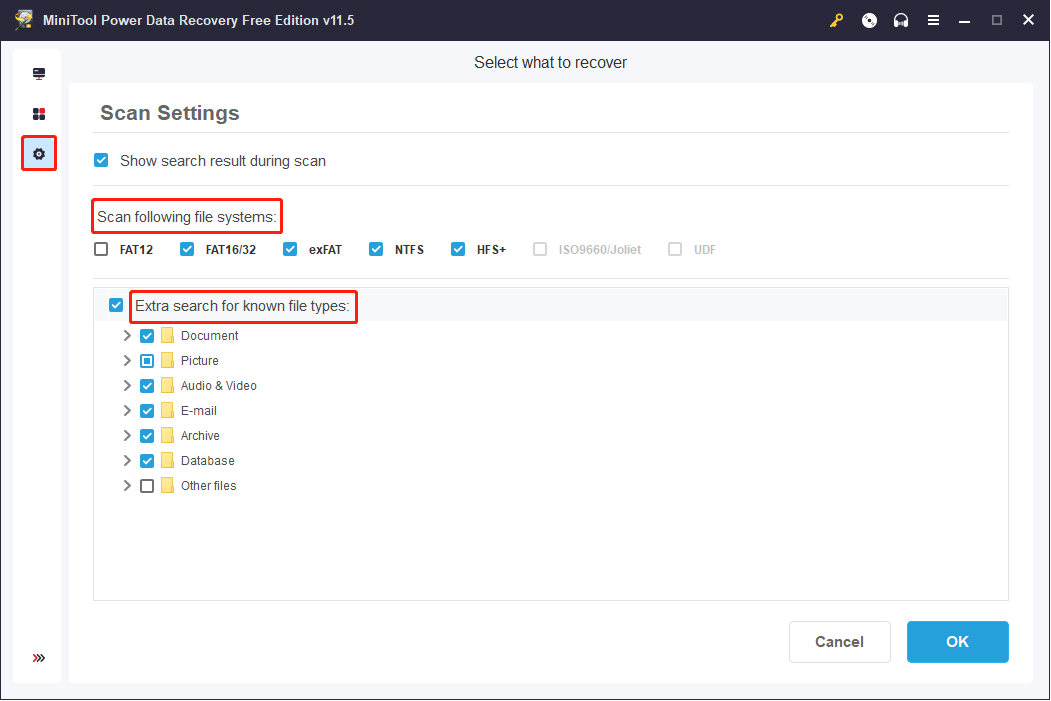
You can set Scan Settings like selecting file systems and file types before starting scanning. You can also skip this step and set conditions on the scan result page.
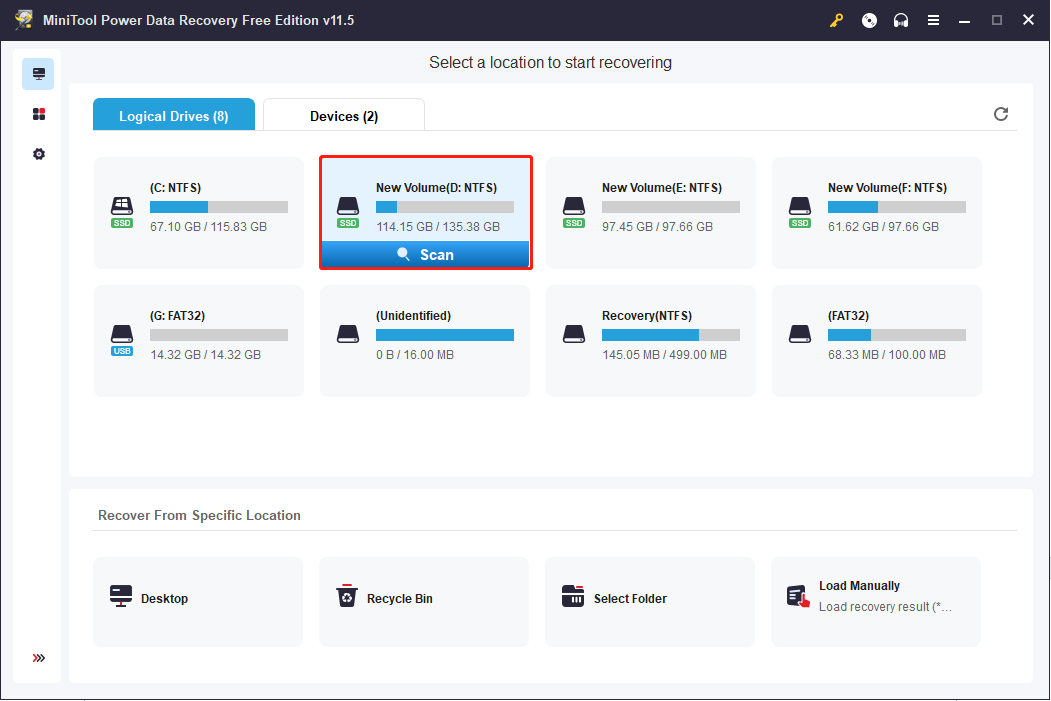
Step 3: Select a partition to scan. You can choose specific locations like a Desktop, Recycle Bin, and a selected folder to scan at the bottom of This PC interface.
Step 4: Wait for a few minutes until the scan process is completed. On the scan result page, you can search your wanted files with several practical functions. You can set filter conditions with Filter and Type functions. Additionally, the Search function makes sense in quickly locating a specific file with its name and the Preview function gives a chance to confirm whether the file is correct before saving it.
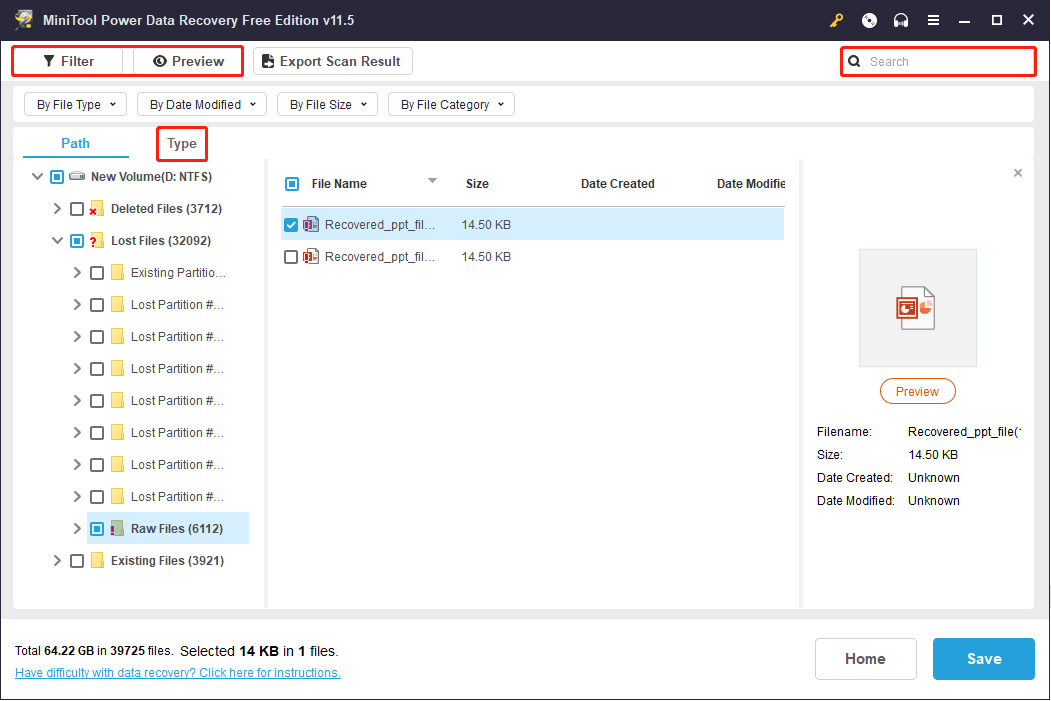
Step 5: Then, you can select all your wanted files and click the Save button.
Step 6: Choose a save path to restore your files and click OK to confirm.
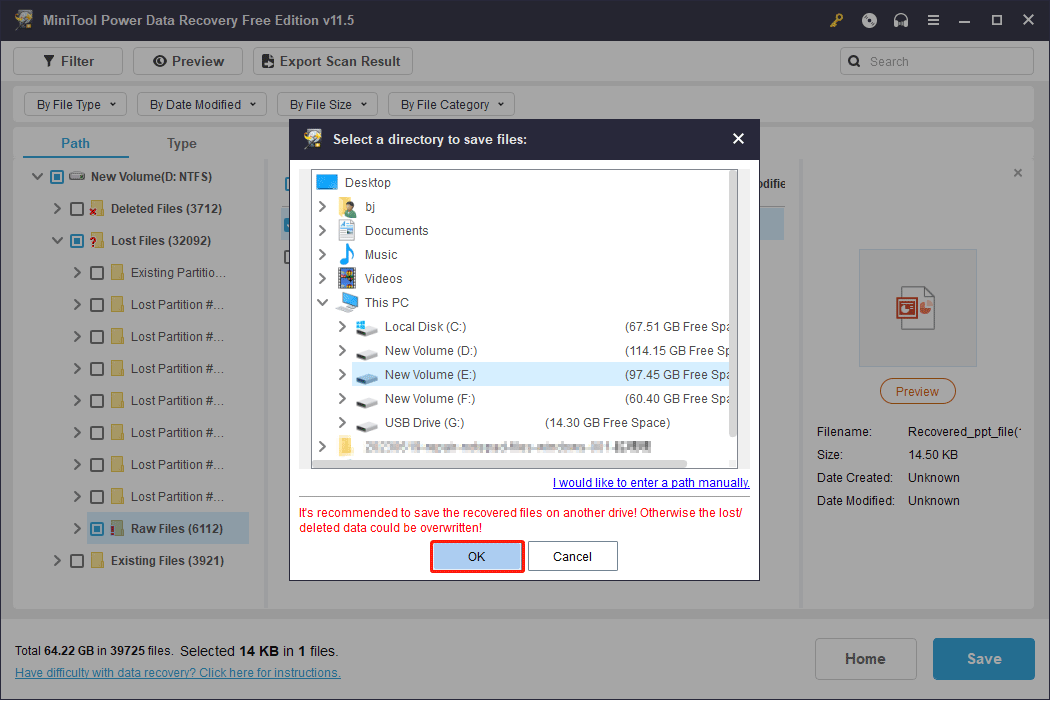
If there is insufficient disk space to recover lost data, you should connect an external drive to the PC to store the recovered files. Alternatively, you can fix the problem first by using the following methods; then, launch MiniTool Power Data Recovery to retrieve lost files.
Fix 2: Run Disk Cleanup
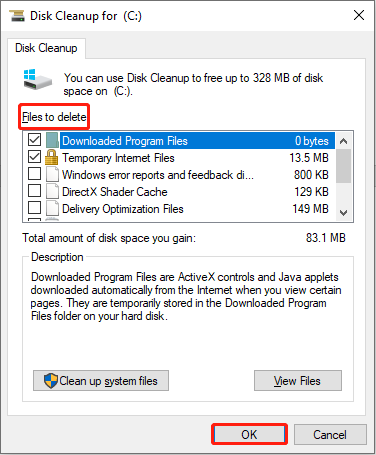
Disk Cleanup is a useful function in Windows 10 to delete redundant and temporary files. You can follow the next steps to clean up the disk using this tool.
Step 1: Press Win + S and type Disk Cleanup in the search box.
Step 2: Click Open on the right panel.
Step 3: Select the drive you want to delete files and click OK.
Step 4: In the pop-up window, select the unwanted files and click OK to delete them.
If you want to free up space on the system drive, usually the C: drive, you can use Storage Sense.
Fix 3: Try Clean Boot
Sometimes, this error occurs due to the software starting when the computer starts up. Clean Boot will start the computer with minimum drives and startup programs. You can clean boot the computer to check whether the background programs are responsible for the problem.
Step 1: Press Win + R to open the Run window.
Step 2: Type msconfig in the text box and hit Enter.
Step 3: Shift to the Service tab and check Hide all Microsoft services.
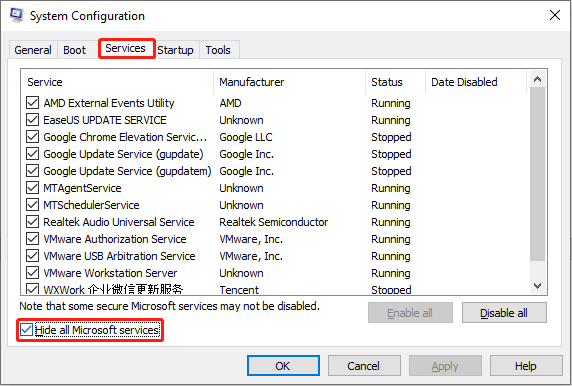
Step 4: Click on the Disable all button.
Step 5: Go to the Startup tab and click Open Task Manager choice.
Step 6: Select services that you want to close and click Disable.
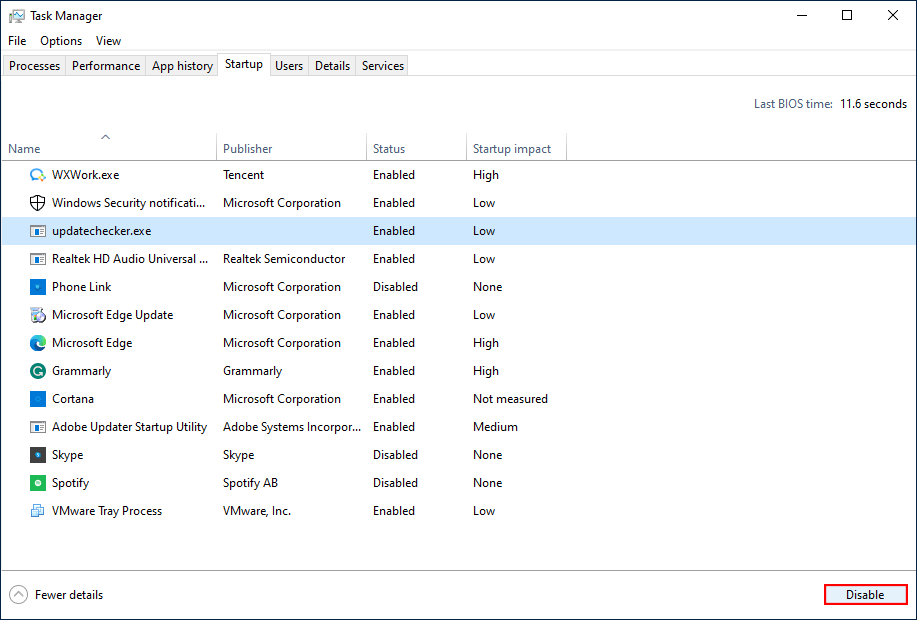
Step 7: Then, close Task Manager and click OK on the System Configuration window.
Step 8: Reboot your PC to check whether this issue is resolved or not.
If the problem doesn’t happen, you can figure out the cause by selecting the third-party software one by one, and then uninstall it to solve the problem.
Fix 4: Reboot PC
Whenever you encounter a problem that you can’t deal with, you can try rebooting the computer. Rebooting will close all programs, unload all device drivers, and restart the operating system for you and it is able to solve some common problems.
If this doesn’t help, you can try to boot your PC in Safe Mode. Safe Mode will start your computer with the core drives and a limited set of files. If the problem doesn’t happen in Safe Mode, it means the basic drivers and default settings are not the reason.
Step 1: Press Win + I to open the Settings window.
Step 2: Select Update & Security and turn to the Recovery tab.
Step 3: Click the Restart now button under the Advanced startup section.
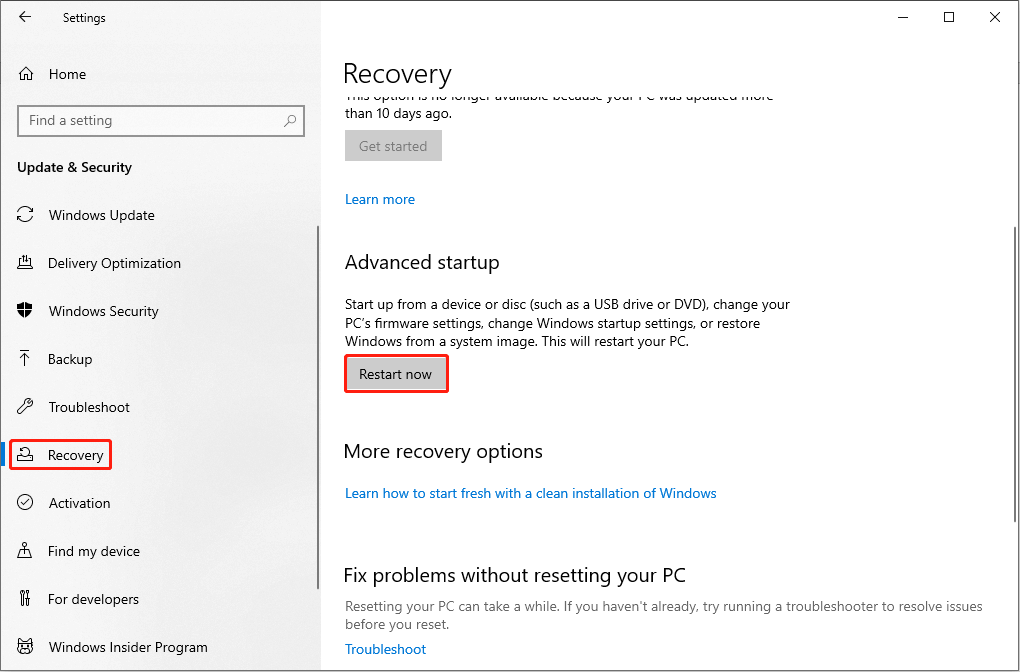
Step 4: Wait for the computer to reboot and you will find the Choose an option window.
Step 5: Select Troubleshoot > Advanced options > Startup Settings.
Step 6: Click Restart.
Step 7: Press F4 to boot your computer into Safe Mode.
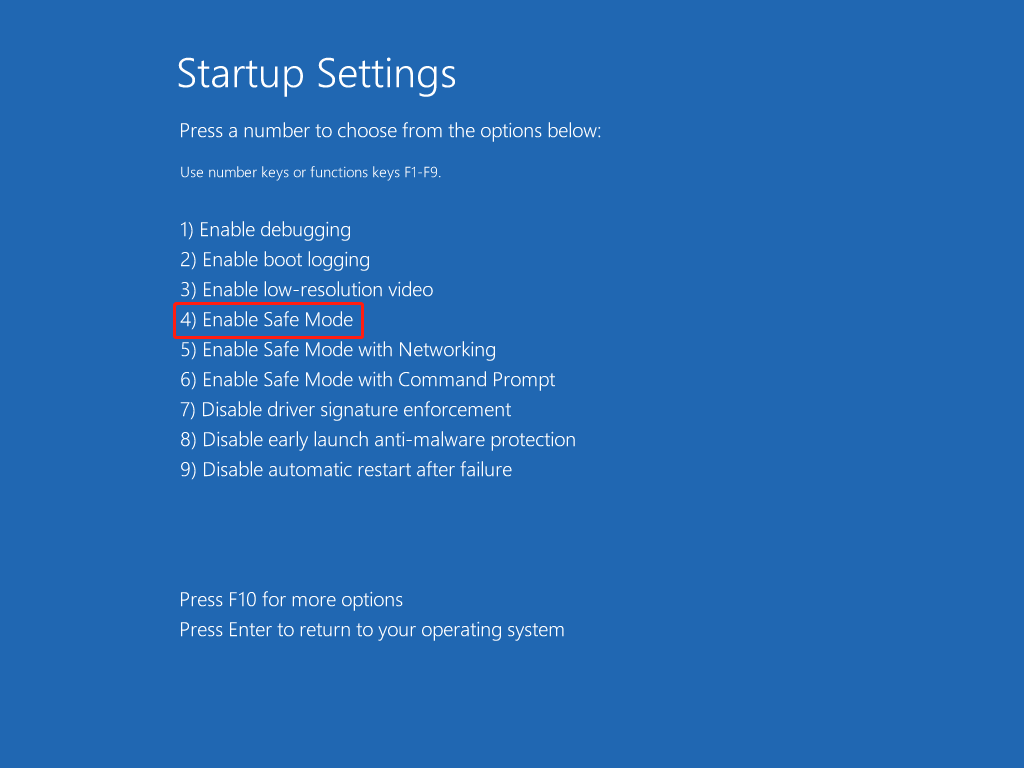
If you don’t encounter this problem in Safe Mode, you can figure out that the problem isn’t caused by the basic drivers.
You can also delete the add-ins from Registry in Safe Mode:
Step 1: Press Win + R to open the Run window.
Step 2: Type regedit in the box and hit Enter.
Step 3: Go to the certain locations to delete the add-in keys:
HKEY_CURRENT_USER\Software\Microsoft\Office\14.0\Word\Addins
HKEY_CURRENT_USER\Software\Microsoft\Office\Word\Addins
HKEY_LOCAL_MACHINE\SOFTWARE\Microsoft\Office\14.0\Word\Addins
HKEY_LOCAL_MACHINE\SOFTWARE\Microsoft\Office\Word\Addins
Then, you can exit Safe Mode and check whether the problem is solved.
Fix 5: Clean %temp% Folder
Temporary files are created in the process you use the computer. They are temporarily used and become redundant then. You can choose to clean these files to free up your computer.
Step 1: Press Win + R to open the Run window.
Step 2: Type % Temp% into the text box and hit Enter to find the Temporary Files Folder.
Step 3: Press Ctrl + A to select all these files.
Step 4: Press Shift + Delete to permanently delete them.
Please notice that an error prompt window may show up during the deleting process saying that some files cannot be deleted because they are in use. At this time, you should choose to skip them; then, wait for the system to complete the deleting operation for you.
Fix 6: Format the Problematic Partition to NTFS
Before you start this method, you need to back up your files in this partition because formatting will erase all your data in it. You can choose MiniTool ShadowMaker to help you. This software provides powerful functions like backing up files, systems, and disks, syncing files and folders, differential and incremental backup, etc.
MiniTool ShadowMaker TrialClick to Download100%Clean & Safe
Then, you can follow the next steps to resolve this problem.
Step 1: Press Win + X and select Disk Management in the context menu.
Step 2: Select the problematic partition and right-click on it.
Step 3: Choose Format from the context menu.
Step 4: Check Perform a quick scan and change the File system to NTFS.
Step 5: Click OK to confirm.
In addition to the above methods, you can also try to fix the insufficient drive space error by:
- Checking File Allocation Table (FAT)
- Repairing Office through Control Panel
- Using a disk compression utility
- Automatically free up space with Storage Sense
Final Words
To be honest, the insufficient disk space error: there is insufficient disk space to complete operation occurs now and then on users’ PC while they are copying files or folders. If you’re one of the victims, you should read this article carefully and choose suitable ways to fix it yourself.
In addition, when you find data lost after fixing this problem, you can try MiniTool Power Data Recovery to restore them safely.
MiniTool Power Data Recovery FreeClick to Download100%Clean & Safe
If you encounter any questions about using this software, let us know via [email protected].
![[SOLVED] How To Recover Permanently Deleted Files In Windows](https://mt-test.minitool.com/images/uploads/2018/08/recover-permanently-deleted-files-thumbnail.png)
