Did McAfee mistakenly quarantine or delete safe files? How can you recover files deleted by McAfee easily? Check out this tutorial on MiniTool Software now for detailed instructions on recovering deleted files and preventing McAfee from quarantining restored files again.
A Brief Introduction to McAfee
McAfee is a powerful antivirus and internet security software. It uses advanced technology to scan your computer and protect your device against various malware or virus threats. Once a threat is found, this antivirus software will remove it from your computer or quarantine it to prevent it from invading your computer.
While McAfee provides you with comprehensive virus protection, it can sometimes wrongly identify a safe file as a threat and then quarantine or remove it. In this case, how can you recover files deleted by McAfee? Continue reading to get detailed instructions.
How to Recover Files Deleted by McAfee Antivirus
Way 1. Check McAfee Quarantine Folder Location
Files deemed threats are typically quarantined by McAfee for further action, including permanent deletion or restoration to the original location. Where are quarantined files stored in McAfee and how to restore the quarantined items? Follow the steps below.
Step 1. Open the McAfee antivirus software.
Step 2. Click the My Protection icon from the left menu bar. Then choose the Quarantined Items option.
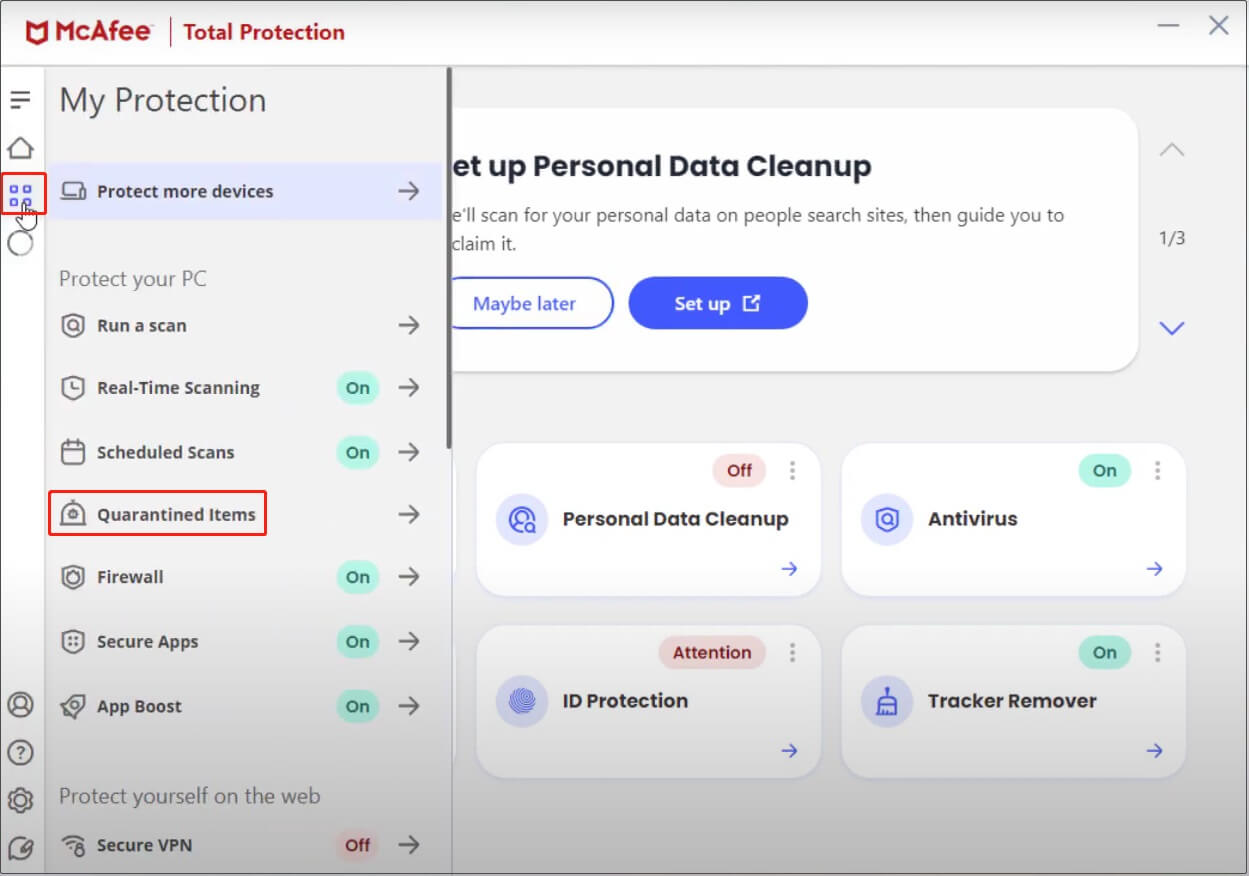
Image source: youtube.com
Step 3. Browse all quarantined files and select the target one or hit the Select all option. Next, click the Restore button to restore them to their original locations.
How to prevent McAfee from quarantining restored files again?
After recovering the quarantined files, there is a risk that the restored files will be quarantined again by McAfee. To prevent this from happening, you can exclude the files from virus checking.
On the main interface of McAfee, navigate to My Protection > Real-Time Scanning. Next, click the Add file button under the Excluded Files section and then add the target files to the quarantine exemption list.
Way 2. Recover McAfee Deleted Files From Backups
If you delete the quarantined files from the Quarantined Items location, the files are permanently deleted. In this case, you may need to recall whether you have backed up the files to a removable drive or a cloud drive. If yes, you can recover them from the backup files.
Way 3. Recover Files Deleted by McAfee With MiniTool Power Data Recovery
What can you do to recover deleted files without backup? Try using professional and green data recovery software. There are indeed a large number of data restore tools on the market, but MiniTool Power Data Recovery is always the most reliable and trusted one.
MiniTool Power Data Recovery is specially designed for Windows operating systems, from older Windows 7/8/10 to the latest Windows 11. No matter what kind of data loss situation you are experiencing, as long as the lost data has not been overwritten by new data, this power data recovery tool can deeply scan your local disk to find the deleted items.
More exciting still, this software offers multiple editions, including MiniTool Power Data Recovery Free, which supports free file scanning and 1 GB of free file recovery. If you are using the software for the first time, this edition is for you.
MiniTool Power Data Recovery FreeClick to Download100%Clean & Safe
Here are the major steps to recover files deleted by McAfee from your local disk.
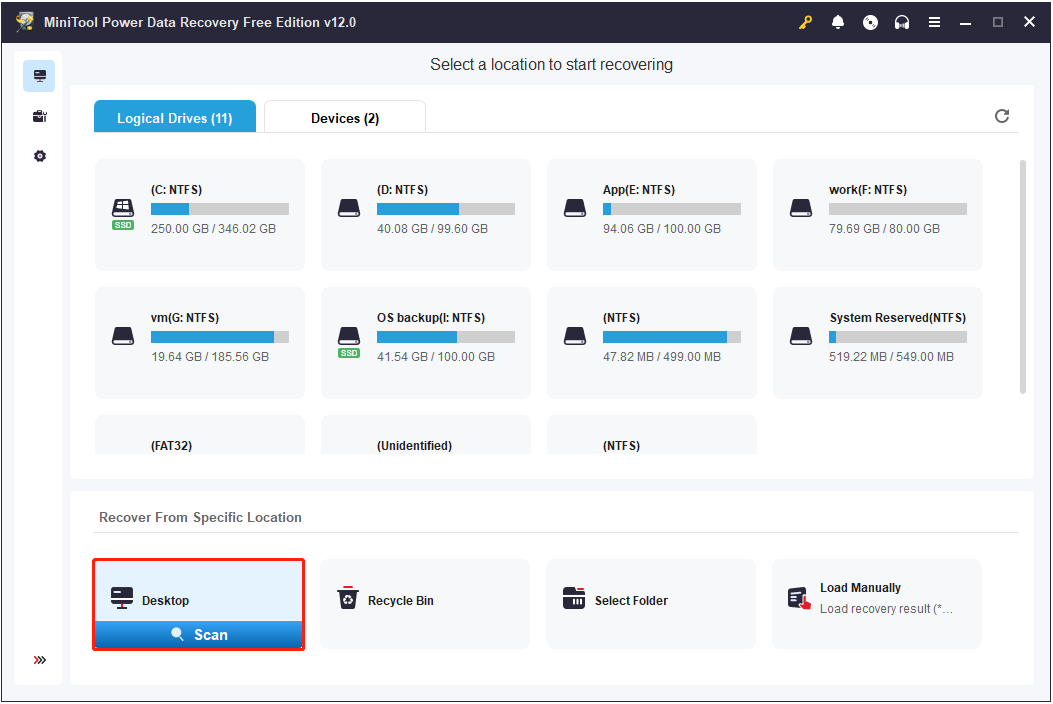
Step 1. Launch the free edition of MiniTool Power Data Recovery. When you see its main interface, select the target partition or location where the deleted files should exist, and then click the Scan button. Here we take scanning the Desktop for example.
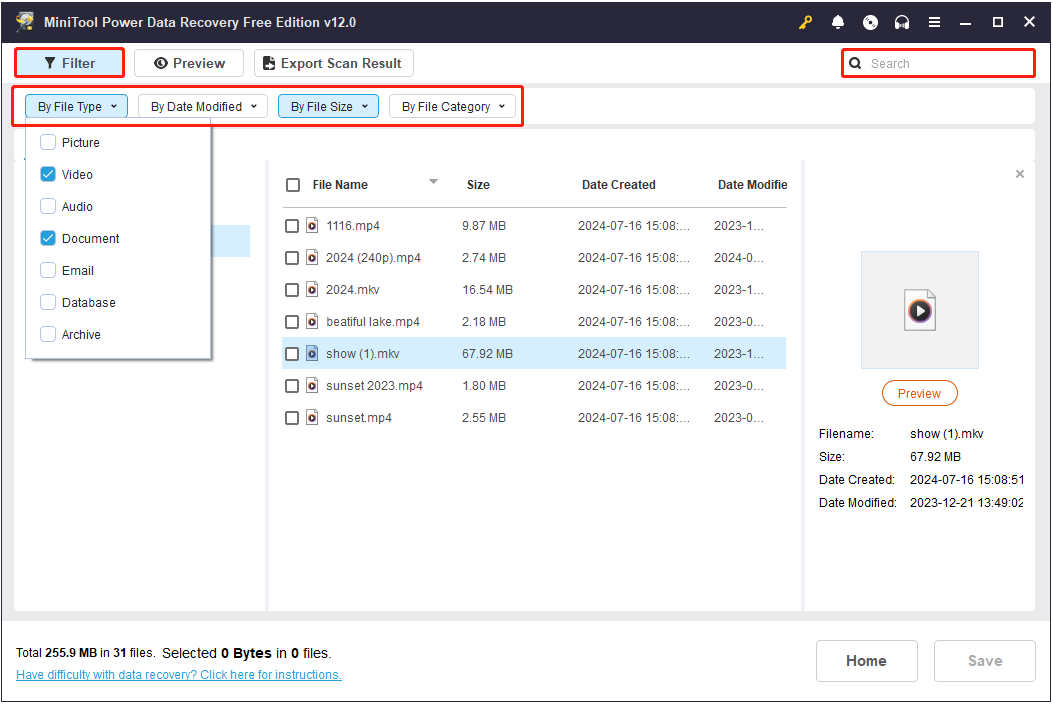
Step 2. Once the scan is completed, it is time to find the files you need from the scan results. During this process, you can utilize the Filter and Search features. The former enables you to filter out unnecessary files by file type, file modification date, file size, and file category. The latter allows you to look for a specific file by entering its name in the search box and hitting the Enter key.
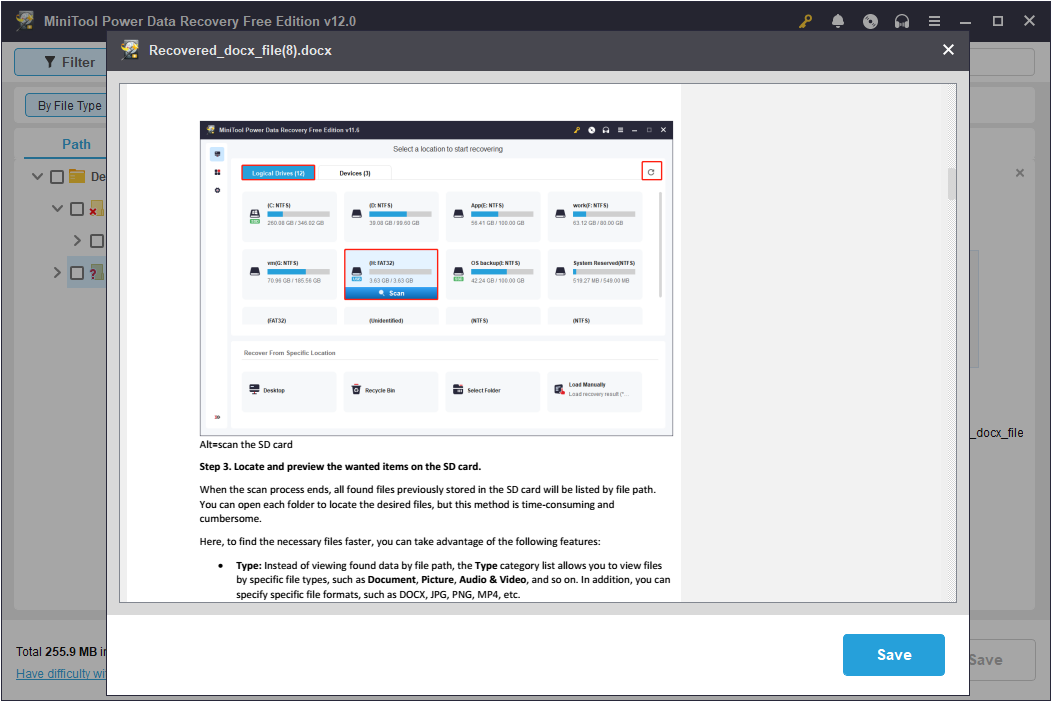
Moreover, this secure data recovery software supports free file preview to ensure the accuracy of the recovered files. Multiple file types are supported to preview, including documents, videos, audio, emails, tasks, and so on. Either double-click a file or select it and click the Preview button.
Step 3. Tick each required item, and then click the Save button. After that, you will have the ability to choose a safe location to store the recovered items. Do not store the recovered files to their original location to prevent data overwriting.
Note that if the total size of the selected files exceeds 1GB, the excess part will not be recovered. To recover more than 1 GB of files, you need to upgrade the software from the MiniTool Online Store.
Now you have completed the deleted file recovery task.
Bonus Tip: Always Back up Significant Files
In addition to antivirus misidentification, many other factors can cause your files to be lost, such as virus infection, hard drive corruption, OS crashes, human errors, and so on. To avoid a complicated data recovery process, it is vital to back up important files regularly.
Regarding data backup for Windows, you can use MiniTool ShadowMaker, the best PC backup tool. It is equipped with powerful features, enabling you to back up files/folders, partitions/disks, and systems to an external hard drive, USB flash drive, and so on. Moreover, it allows you to perform automatic backups at different time intervals.
This tool offers a trial edition that supports a 30-day free trial. Now, download it and try it out.
MiniTool ShadowMaker TrialClick to Download100%Clean & Safe
Final Words
To sum up, it is not quite difficult to recover files deleted by McAfee if you find the most reliable way and detailed tutorial. Hope the instructions above are detailed enough to help you perform quarantined or deleted file recovery.
For further assistance with downloading, using, or upgrading MiniTool software, or if you encounter any issues while using MiniTool software, feel free to contact the support team via [email protected].

