Does Robocopy /Mir Delete Files
Though this article talks about how to recover files deleted by robocopy /mir, some people don’t understand how can the Robocopy command delete files.
The first time you use the robocopy /mir command files will be mirrored from the source folder to the destination folder and the original files in the destination folder will be removed after executing this command. If you delete files in the source folder and then rerun the /MIR command, all the changes will be synced to the destination folder. This means files that no longer exist in the source folder will also be removed from the destination one.
Additionally, files removed by this command in the destination folder are permanently deleted; thus, you can’t find them in the Recycle Bin. When important files are deleted after running this command, you should recover them as soon as possible.
I used /mir to copy files from drive F to E, but there is data I wanted to keep in E.
robocopy F:\data1 E:\data2 /mir
Unfortunately, I lost quite a lot of data on E because, apparently, it mirrored the ones in F. Stupid me 🙁 I could've just used the copy command. Also, there are no previous versions of that drive. Is there a way to recover the data lost in E, using /mir command? What data recovery software would you suggest?
- r/sysadminreddit.com
How to Recover Files Deleted by Robocopy /Mir Command
Fortunately, you can recover files deleted by robocopy /mir easily with professional data recovery software and pervious backups. Then, I will walk you through the specific steps on data recovery.
Method 1: Recover Files After Robocopy /Mir Using MiniTool Power Data Recovery
MiniTool Power Data Recovery is specifically designed to recover deleted files under various situations. No matter whether your files are lost due to hardware issues or being deleted after running CHKDSK or Robocopy commands, this free file recovery software is a good helper for you to get files back.
Why you should choose MiniTool Power Data Recovery among various secure data recovery services? This tool works well on all Windows system versions and supports restoring files from various data storage devices, including external hard drives, SD cards, memory cards, USB sticks, and so on.
Guide on Recovering Deleted Files After Robocopy /Mir
Step 1: Get MiniTool Power Data Recovery software and install it properly on your computer with the on-screen instructions.
MiniTool Power Data Recovery FreeClick to Download100%Clean & Safe
Step 2: Run the software. After you enter the main interface, you can choose the partition where your deleted files are located. Alternatively, you can choose an accurate location to scan from the Recover From Specific Location Section.
Here I choose Select Folder to locate the target folder and click Select Folder. You can also double-click on the target location to start the scan process.
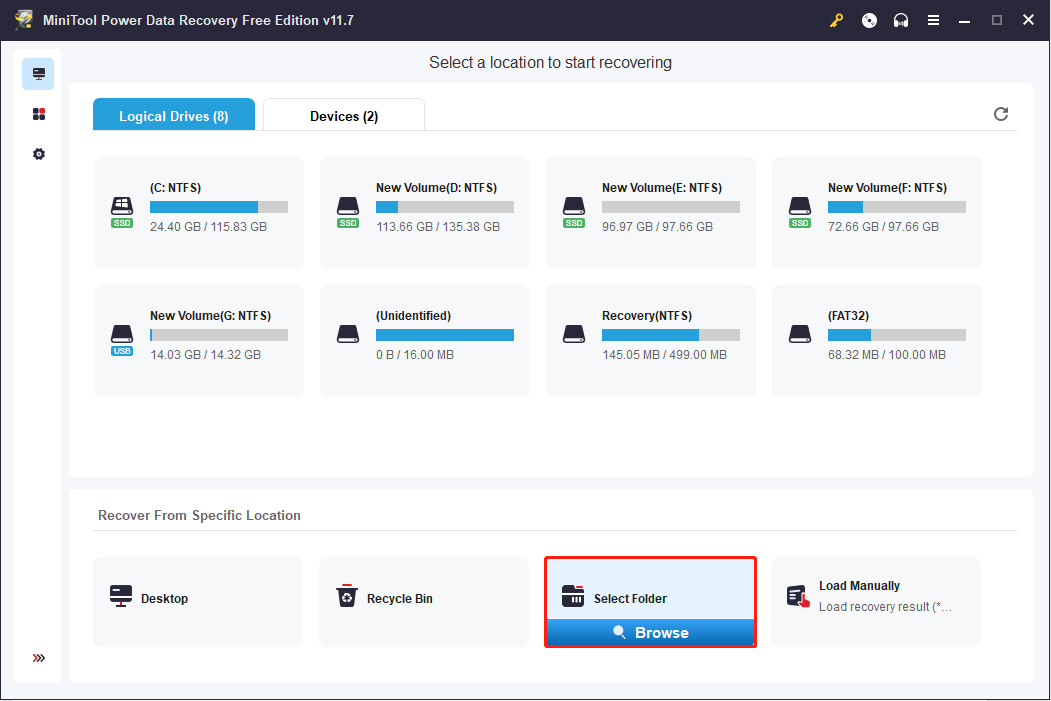
Step 3: Wait for the process to complete. In order to find all the deleted and lost files, please do not interrupt the scan process.
All the found files will be classified according to their paths. If you need to find deleted files, you can expand the Deleted Files folder on the result page.
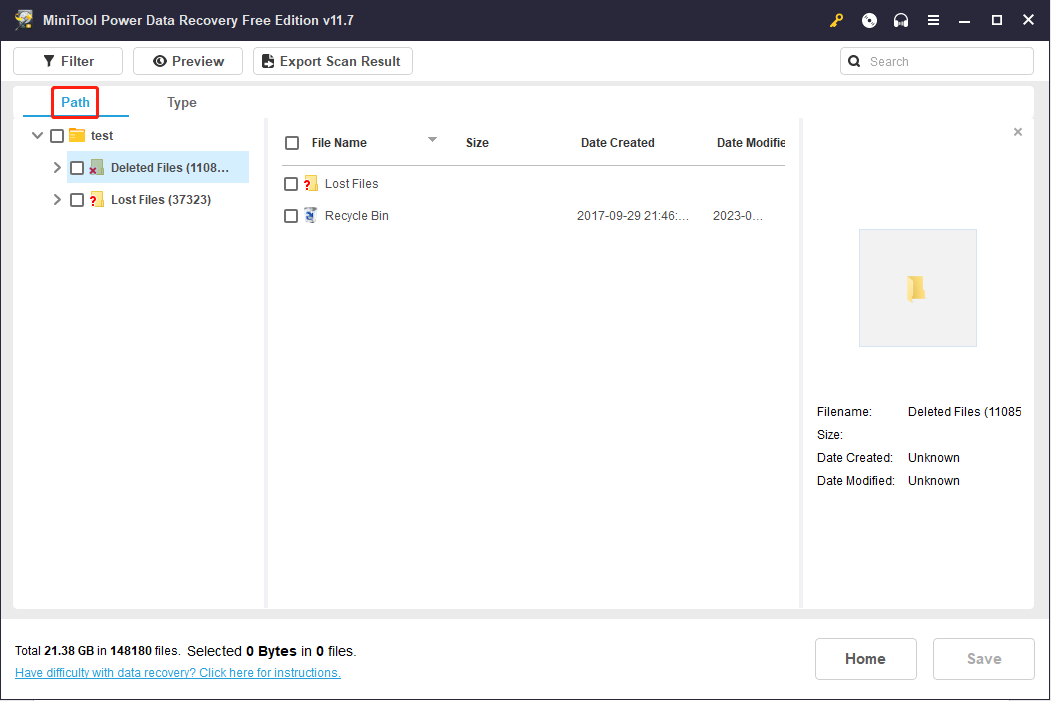
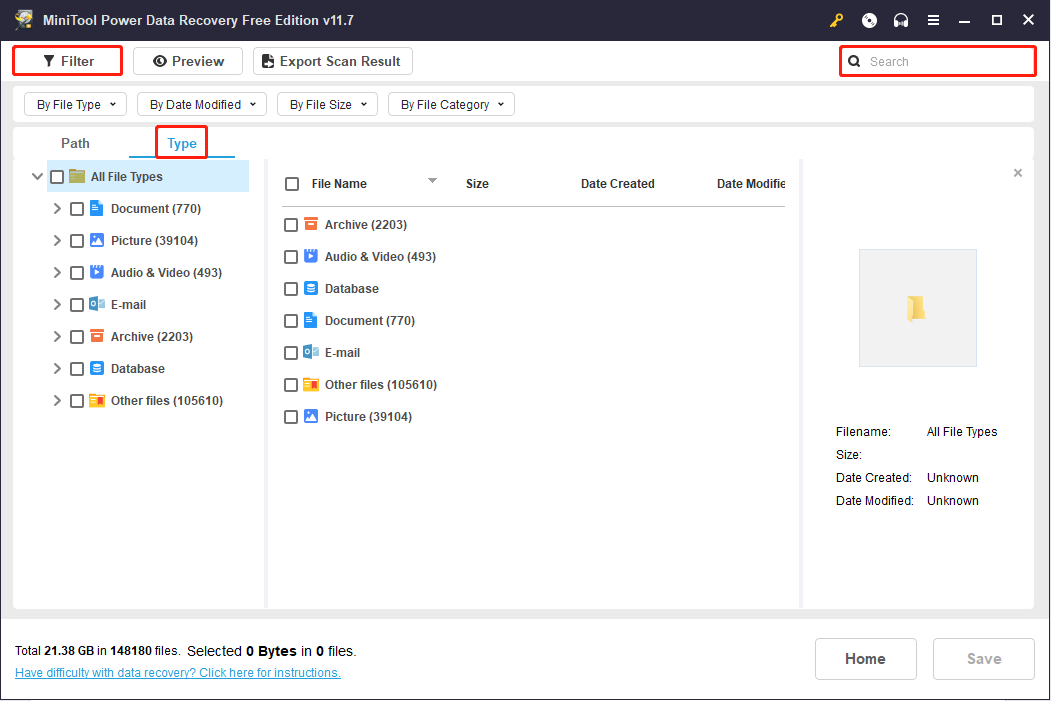
The result page may represent you with millions of files. How to find the wanted files quickly? Functions of the result page can help you narrow down the file list quickly.
- If you want to recover certain types of files, you can change to the Type category list where files are listed depending on their types, like Document, Audio & Video, Picture, etc.
- You can set more conditions to filter out unwanted files like file size, file category, file type, and file modified date by clicking Filter on the top toolbar.
- The Search feature works well to find files when you know their names. You can type the name into the search box and press Enter to filter all the matched results.
To make sure that you have chosen the right files, the Preview function makes sense. Documents, pictures, videos, and audio files are all supported for previewing.
Step 4: Tick the files you need on the result page and click Save. Then, you need to choose a destination to save these files. Do not save your files to the original path that might cause data overwriting and lead to data recovery failure.
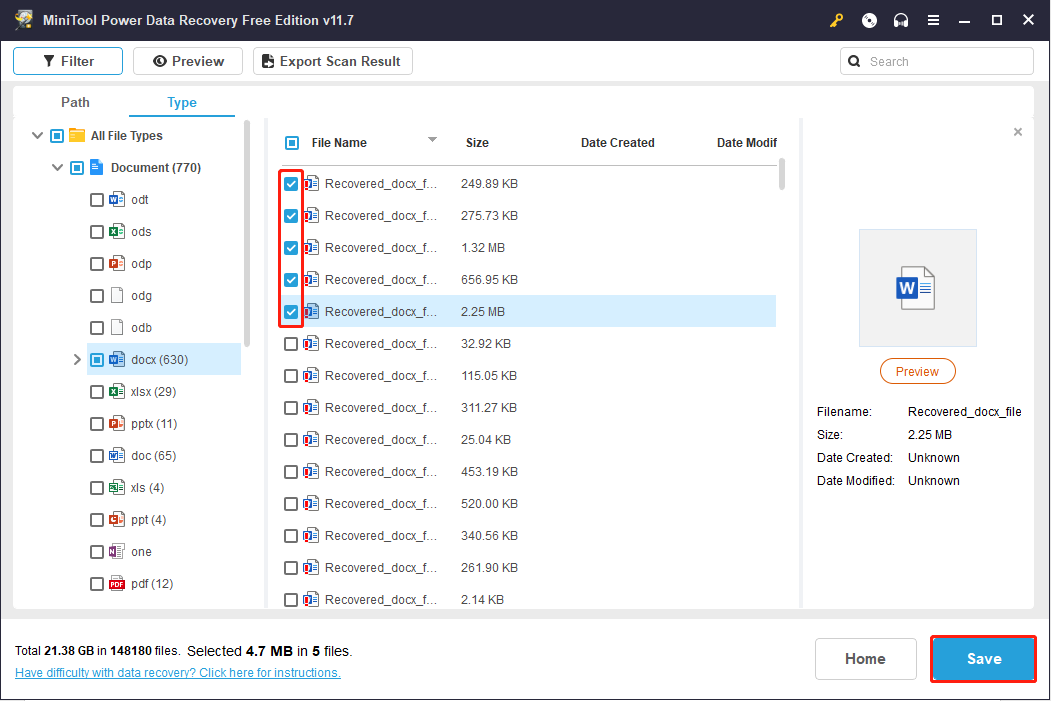
Please note that the free edition of MiniTool Power Data Recovery only provides 1GB of free file recovery capacity. If you choose files larger than 1GB, a window will prompt you to update to the full edition. You can also find different functions of different editions on this page.
Method 2: Recover Files Deleted by Robocopy /Mir via File History
Another method is to recover files from the previous backups. File History is a free data backup utility in Windows. It backs up the Windows libraries by default, including Desktop, Download, Music, Pictures, etc. But you can also add other folders through Windows Settings.
If you have enabled File History and used it to back up files before the files are lost, you can work with the following tutorial to restore files with File History.
Step 1: Type Control Panel in the Windows search box and press Enter to open the window.
Step 2: Choose File History from the interface if you choose Large icons of the View by menu.
Step 3: Select Restore personal files from the left pane.
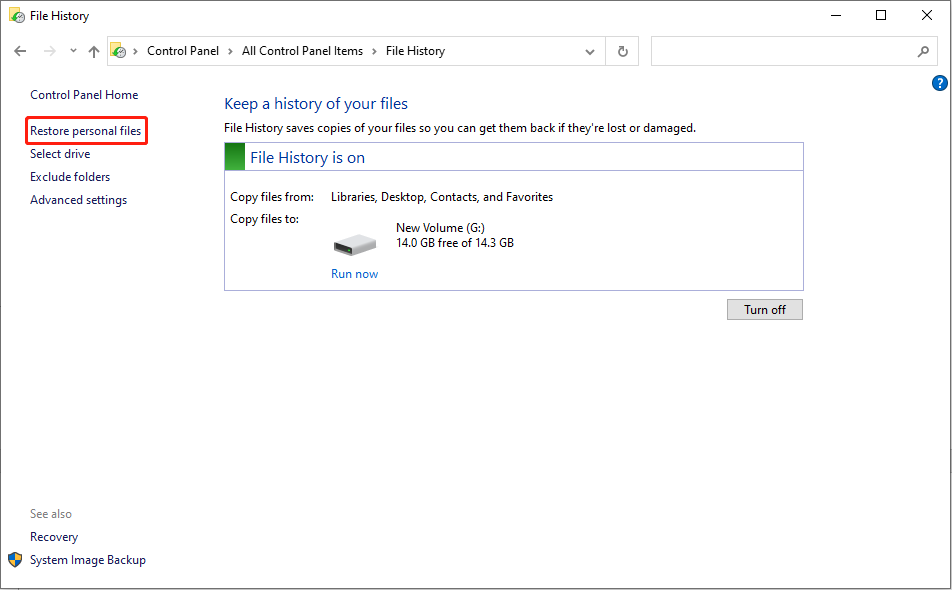
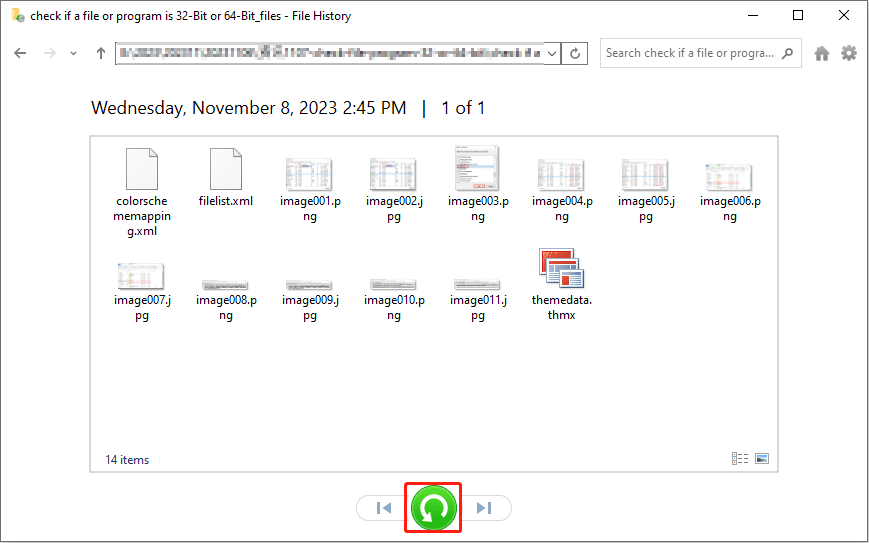
Step 4: You can find all the backed-up files. Find the file you want to recover and click on the green restore button to recover your files.
Bonus Tip: Protect Your Files from Being Deleted by Robocopy Command
When it comes to data, prevention is better and easier than recovery. Here are three methods for you to avoid the robocopy /mir command deleting files.
Way 1: Change the Destination Folder
This is the easiest way to avoid data loss. Every time you want to use the robocopy/mir command, you can choose an empty folder or a folder without crucial files as the destination folder. Thus, you don’t need to worry about file loss or data overwriting.
Way 2: Add Additional Parameters After the Command
As we mentioned before, the robocopy /mir command will not only copy files but also remove files. You can add parameters to exclude the existing files.
/XO: This parameter will exclude older files. If a file already exists in the destination folder and there is a new version of it, the file will be replaced with the newer one but not be overwritten.
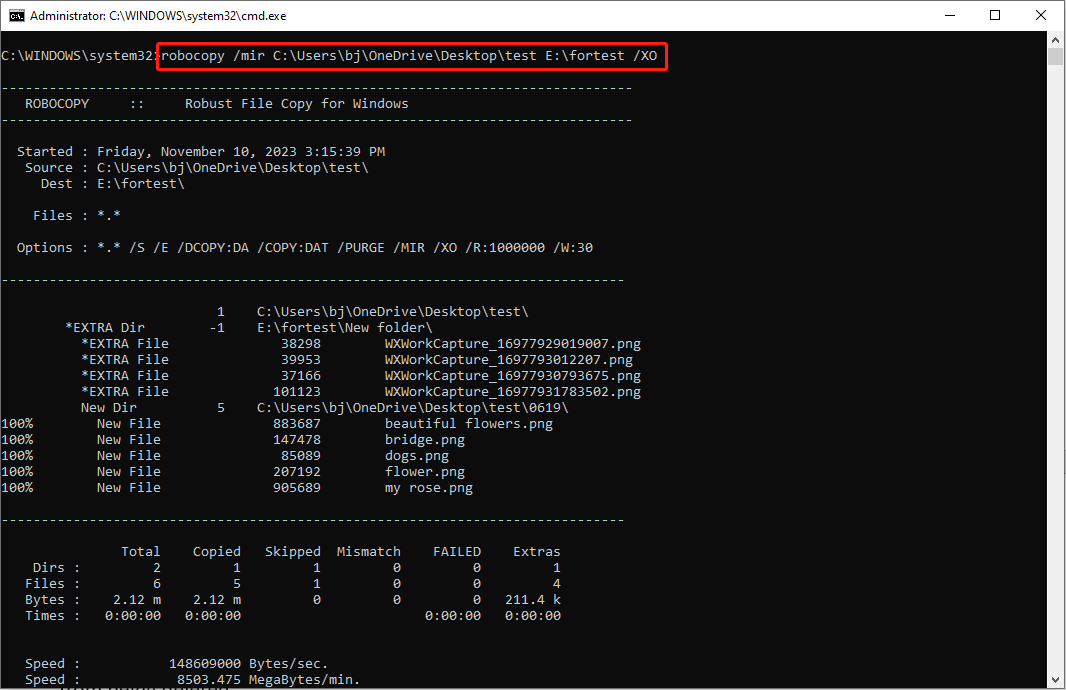
/XX: This parameter is used to exclude extra files in the destination folder. If the destination folder has important files or files that do not exist in the source folder, you can add this parameter to prevent these files from being deleted.
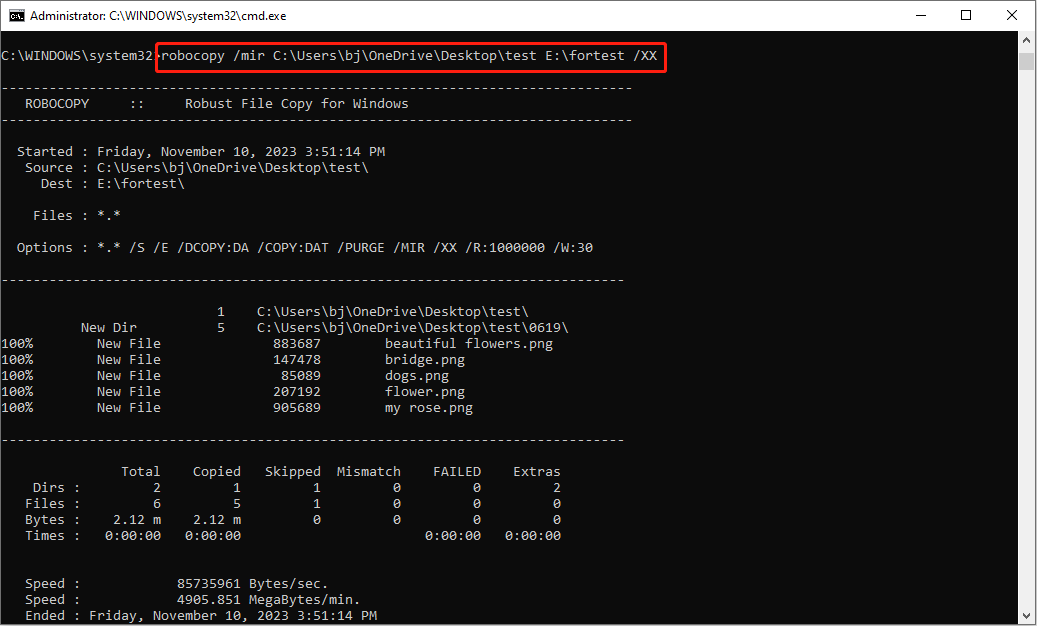
If you want to know more useful parameters of the Robocopy command, you can jump to the next part.
Way 3: Back Up Folder
The last method is always useful for coping with data loss because you can restore lost files from the backup. However, most people are not in a habit of backing up their data.
I’d like to recommend you a reliable backup software, MiniTool ShadowMaker. This user-friendly software can perform an automatic backup process as long as you set a backup schedule.
Besides, there are three different backup types: sync backup, incremental backup, and differential backup. You can choose different backup schemes based on your situation.
Step 1: Download and install MiniTool ShadowMaker properly.
MiniTool ShadowMaker TrialClick to Download100%Clean & Safe
Step 2: Launch the software, then change to the Backup tab on the left pane.
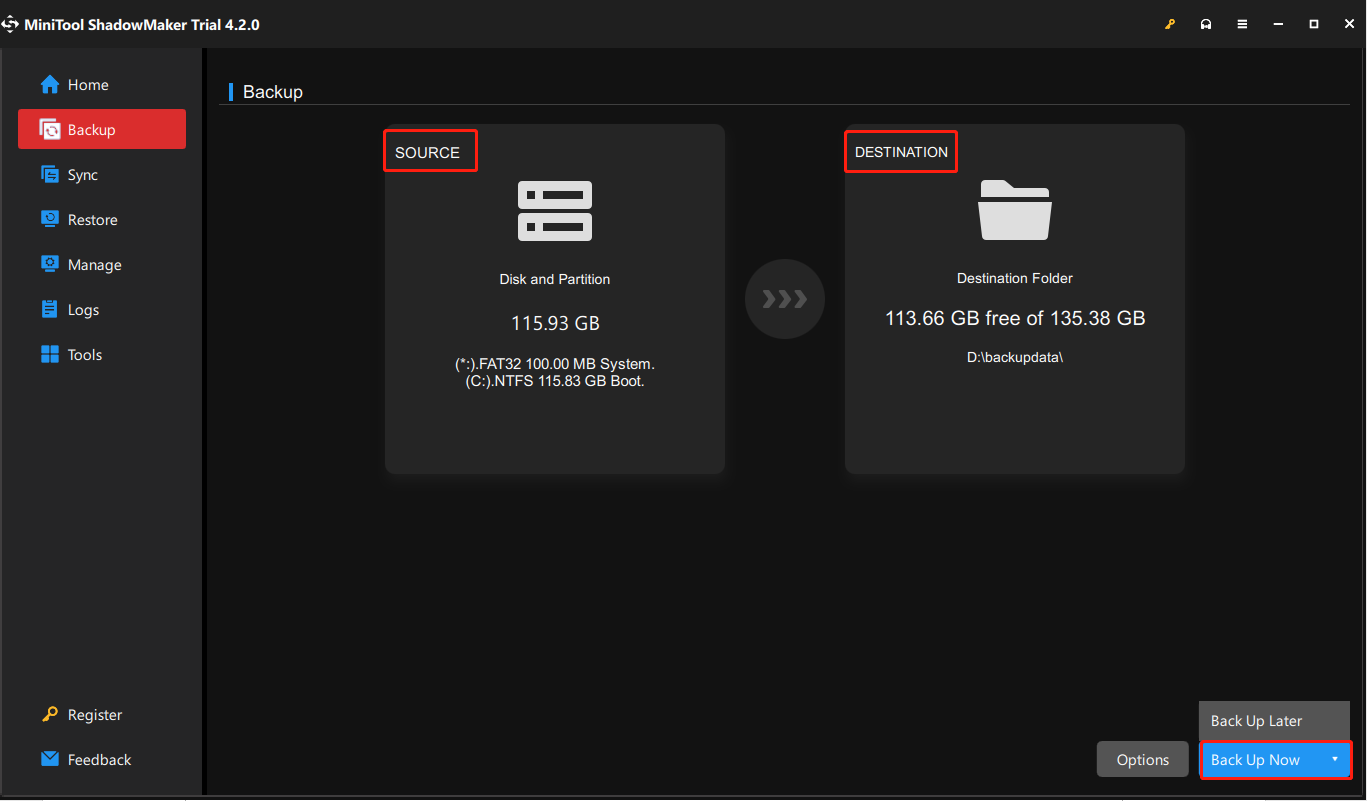
Step 3: You can click on the SOURCE section to choose the folder you want to back up. Then return to the Backup interface and choose Destination to select store path.
Step 4: Click the Back Up Now button. You can also choose Back Up Later and manage the pending backup process in the Manage tab.
Things You Should Know about the Robocopy Command
As mentioned above, Robocopy is a powerful command-line tool that can be used to mirror large data on your computer quickly. Compared with other methods, you don’t need to wait for a long time or be limited by the file size using this tool.
What Can the Robocopy Command Do?
Apart from copying files quickly, this command can also:
- Copy files via a network and resume the operation after a network failure happens.
- Copy files and directory attributes, including time stamps and extended attributes.
- Copy files in the Backup mode if the administrator doesn’t have rights to access them.
- Copy permissions of NTFS and its owners when copying files within an NTFS partition or to different NTFS partitions.
- Etc.
How to Use the Robocopy Command
There are a large number of parameters to meet different copy requirements. Here, I will briefly introduce you to some common Rebocopy commands.
The basic syntax of this command is: robocopy <source> <destination> [<options>]
Then, you can add some options to satisfy your needs.
For Source Folder
- /lev:<n>: only copy the top n levels of the source directory tree.
- /b: copy files in backup mode.
- /copyall: copy all the information of files.
- /purge: delete destination files that no longer exist in the source folder.
- /mir: mirror the directory tree of the source folder.
- /mov: move files and delete them from the source folder after this command.
- …
For Destination Folder
- /a+:[RASHCNET]: add specific attributes to the copied files. (If you use the /a-:[RASHCNET] parameter, it means to remove certain attributes of the copied files)
- /create: only create a directory tree and zero-length files.
- …
If you are interested in using the Robocopy command, you can jump to this post to obtain a more comprehensive and detailed introduction about this command.
Bottom Line
In short, this post explains two methods to recover files deleted by robocopy /mir and how to prevent data loss after running this command. Do not hesitate to run MiniTool Power Data Recovery to restore files when you find they are lost or mistakenly deleted.
MiniTool Power Data Recovery FreeClick to Download100%Clean & Safe
Data security is always a vital thing you should care about. If you encounter any problems with MiniTool software, please feel free to let us know via [email protected].

