Data loss is always a frustrating experience, especially when deleting precious photos by mistake for photographers. For Fuji camera users, getting lost RAF images should be a prime task. This MiniTool post shows you step-by-step instructions on how to recover RAF files from your Fujifilm camera as well as how to protect vital data.
Fujifilm is considered a leading player in the camera industry. Owing to its cost-effective prices and excellent lenses, Fujifilm cameras have been renowned in the past years. However, similar to other digital cameras, Fujifilm cameras are not immune to data loss. People search for methods to recover RAF files lost from their cameras and take precautionary measures to prevent RAF image loss.
In the following content, we will introduce steps to complete an RAF file recovery, tips to safeguard your photos, and methods to open RAF photos on Windows and Mac. Go to the part that interests you.
Part 1: Recover Deleted RAF Images from Fujifilm Cameras
When finding RAF files are lost from a Fujifilm camera, there are basically two solutions: recover RAF files from previous backups and recover images with third-party data recovery software. Since most people are not used to backing up files in time or a cycle, seeking assistance from professional file recovery software is the best choice.
Recover RAF Images with MiniTool Power Data Recovery
About MiniTool Power Data Recovery
Among several data recovery software in the market, I heartily recommended MiniTool Power Data Recovery. With professional technical support, this file recovery software is considered one of the top secure data recovery services. Additionally, it has the following advantages:
- Fully compatibility: This software is compatible with all Windows operating systems and supports a wide range of data storage devices, including external hard drives, USB drives, SD cards, memory sticks, etc.
- High efficiency: It is capable of scanning types of files, encompassing pictures, documents, videos, audio, compressed folders, etc. You can go to this post to check specific supported formats of files. Furthermore, practical methods are equipped with this tool to increase the efficiency of file scanning. You can experience these features when making an RAF file recovery.
- High cost-effectiveness: MiniTool Power Data Recovery provides several editions to satisfy different demands. For individual users, you can get MiniTool Power Data Recovery Free to deep scan your device and recover 1GB of files for free. For further technical support and prowess functions, you can go to the License Comparison page to learn different editions.
MiniTool Power Data Recovery FreeClick to Download100%Clean & Safe
Once you have completed the download and installation process, you can work with the recovery tutorial below.
Guide to Recover RAF Files from a Fujifilm Camera
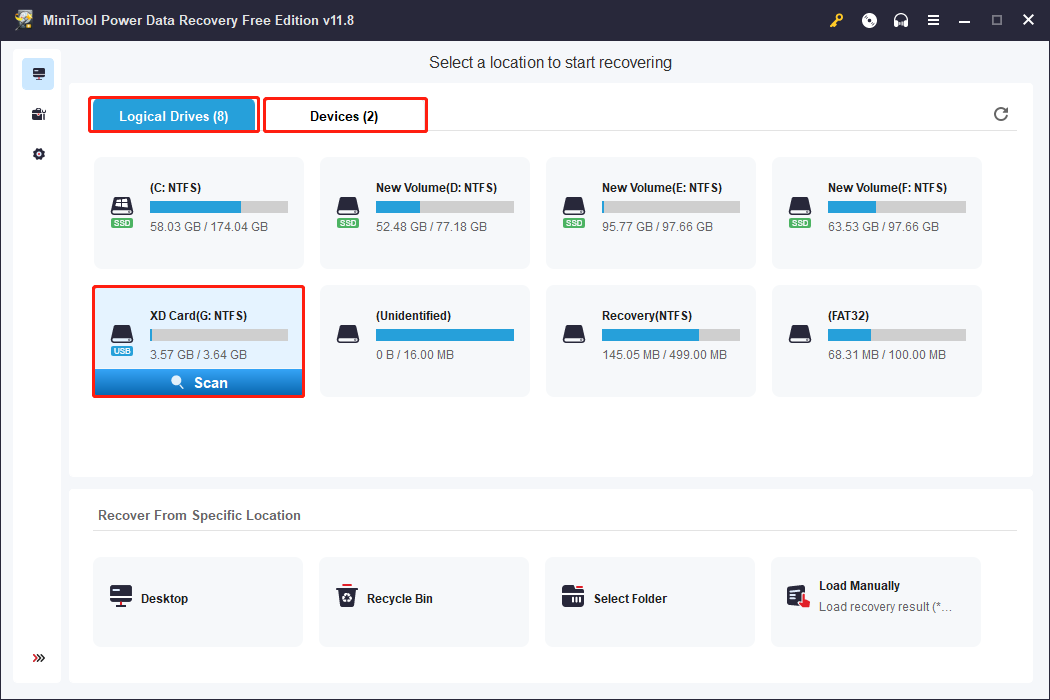
Firstly, you need to take the XD card out of your Fujifilm camera and connect it to the computer via a card reader. Ensuring the XD card is recognized by your computer, you can launch MiniTool Power Data Recovery to enter the main interface.
All partitions are listed under the Logical Drives section. Hover your mouse over the target partition and click Scan to start the scanning process. Optionally, you can change to the Devices tab to choose the XD card directly.
Secondly, wait patiently until the scanning process is completed. In order to detect all the deleted, lost, as well as existing files, you are not suggested to stop the process in the midway. The software will categorize all the found files in a hierarchical structure under the Path tab.
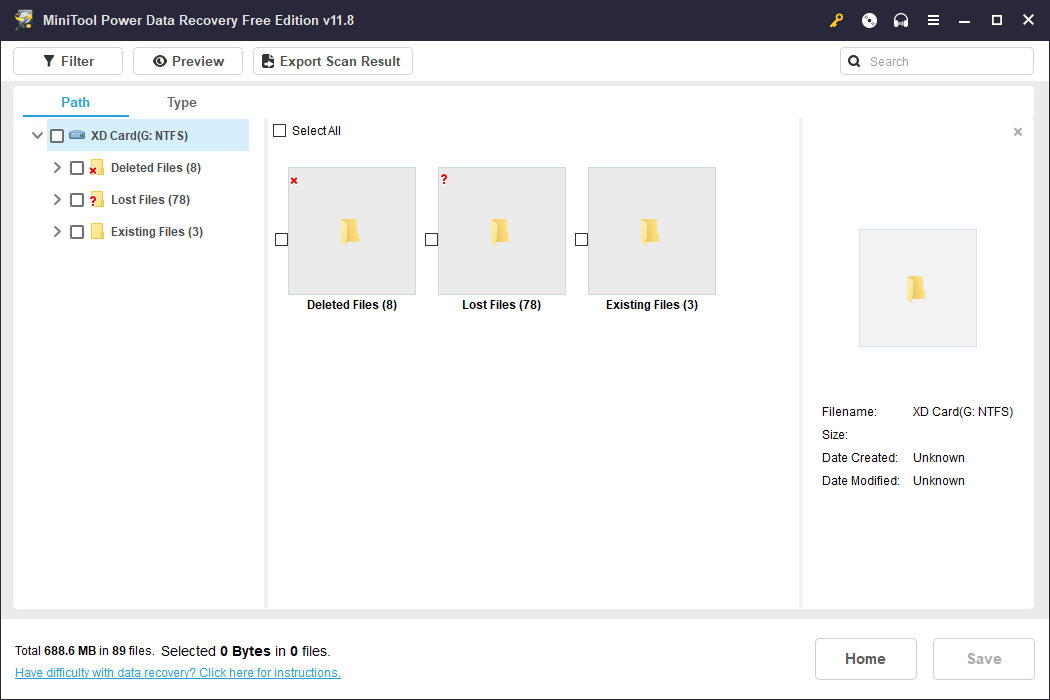
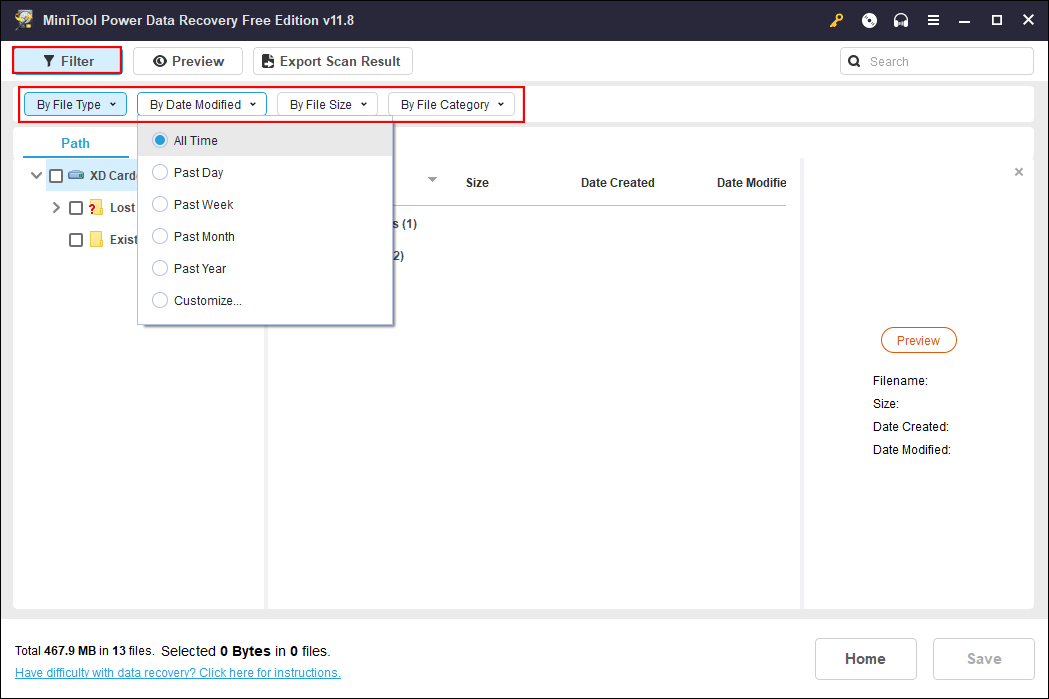
Since there should be piles of pictures, you can make use of these features to narrow down the file list to locate your wanted RAF photos.
- Filter: To filter out unwanted files, you can set filter criteria by clicking the Filter button at the top toolkit. Select file size, file type, file category, and file modified date to find pictures that meet all the requirements.
- Search: This feature is designed to find a specific file using its file name. Type its name into the search box and hit Enter to quickly locate the matched file.
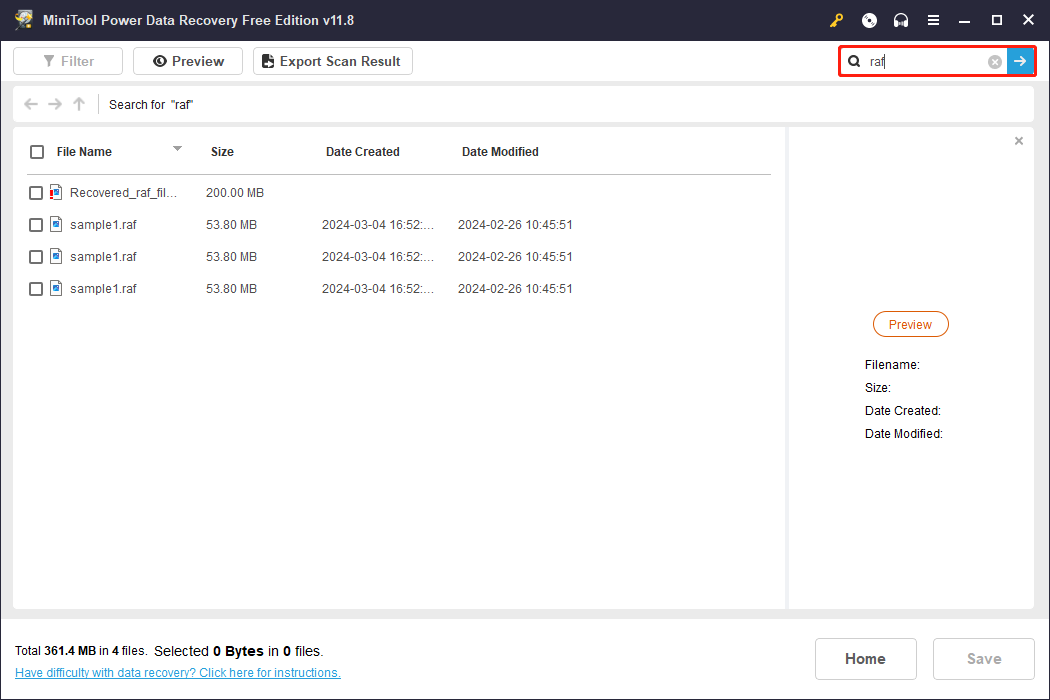
Thirdly, tick all the needed pictures and click on the Save button. In the prompt small window, you should choose a proper storage path for the chosen files. Note that do not save them to your XD card as new files will overwrite deleted data, leading to data recovery failure.
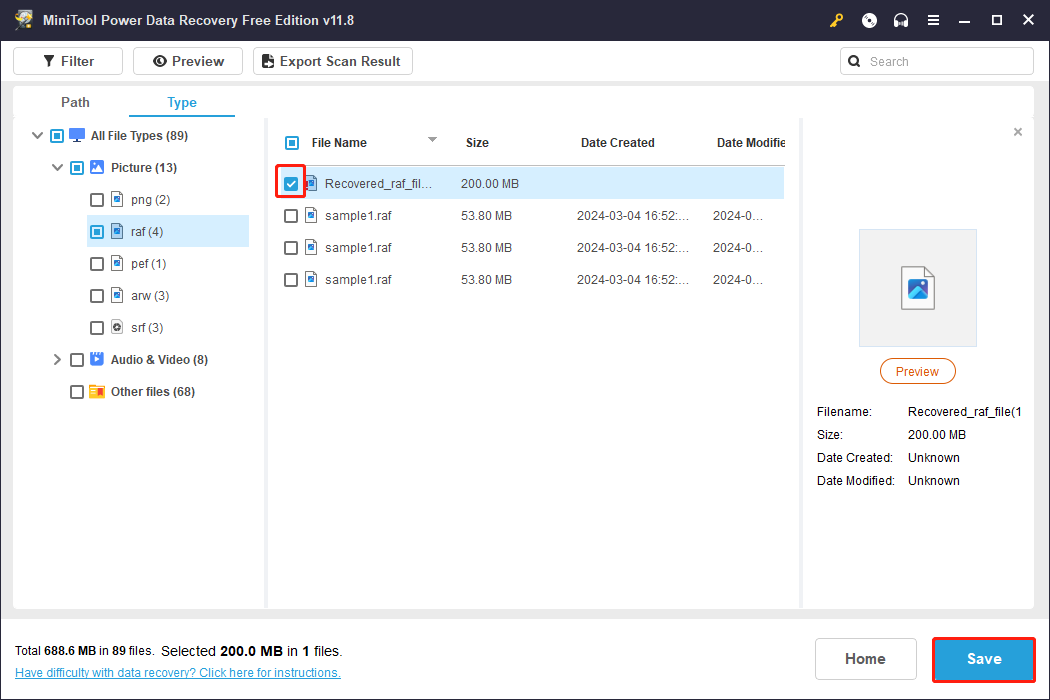
After this step, you have completed the Fujifilm RAW RAF image recovery. Since you are running the free edition right now, there is only 1GB of free data recovery capacity. To break the limit, you need to update to a premium edition.
Recover RAF Images Using File History
This method works if you have transferred files to the computer and backed them up using File History. But this backup utility is not enabled by default. If you want to use File History to back up files, read this post to learn how to enable this feature. You can set backup folders and backup periods based on your requirements.
If files are backed up, the steps below are working to recover deleted photos on Fujifilm.
Step 1: Type Control Panel into the Windows search bar and hit Enter.
Step 2: Select Large icons from the dropdown menu of View by. Then, you can find and choose File History from the list.
Step 3: Opt for the Restore personal files choice at the left pane.
Step 4: Browse the backup versions to find one that contains your lost RAF photos. Select the wanted RAF photo and click the green restore button to restore the file.
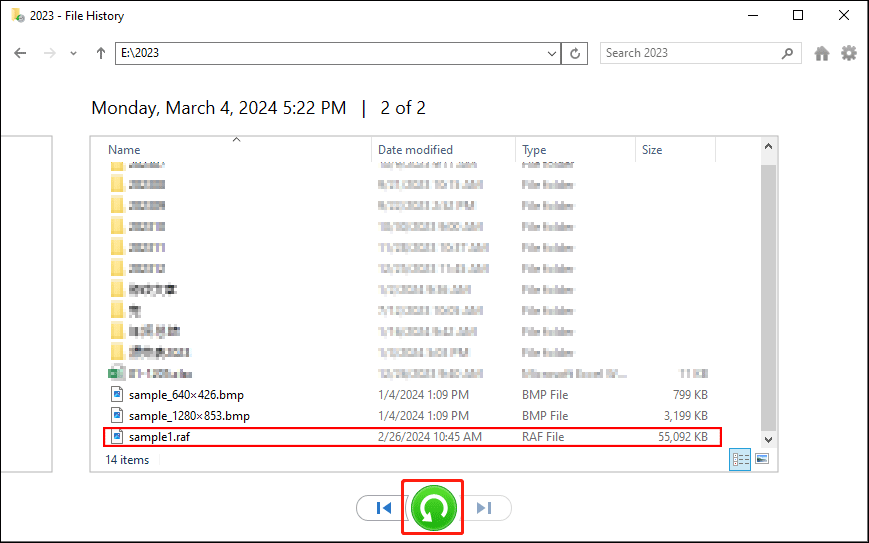
The chosen image will be restored to the original path. If you want to save the recovered photo to a new location, click on the gear icon button instead. Select Restore to from the menu, then you can determine a new restore path.
Part 2: Things You Should Know to Safeguard RAF Photos
Data recovery is a risky task since no one promises 100 percent success. However, you can safeguard your data with confidence by making backups and operating the device properly. This part includes backing up RAF files and tips for operating the Fujifilm device.
#1. Back up RAF Images to Different Devices
Backing up is not only a way of protecting files but also a method of data recovery. You can easily recover lost files from backups, whereas most people don’t have a habit of backing up their crucial items. Here I’d like to introduce you to two methods to back up RAF files from the XD card to your computer.
Back up Files Using MiniTool ShadowMaker
MiniTool ShadowMaker is a comprehensive backup software that allows you to back up files, folders, disks, and partitions. To back up pictures from the XD card, you can use the Clone Disk feature to complete the process at one time. You can complete the process with MiniTool ShadowMaker Trial, provided with a 30-day trial.
MiniTool ShadowMaker TrialClick to Download100%Clean & Safe
Step 1: Connect your XD card with the computer and launch the software.
Step 2: Change to the Tools tab and select the Clone Disk feature.
Step 3: Before choosing the Source Disk, you can click on the Options button at the bottom left to choose the Disk Clone Mode and New Disk ID.
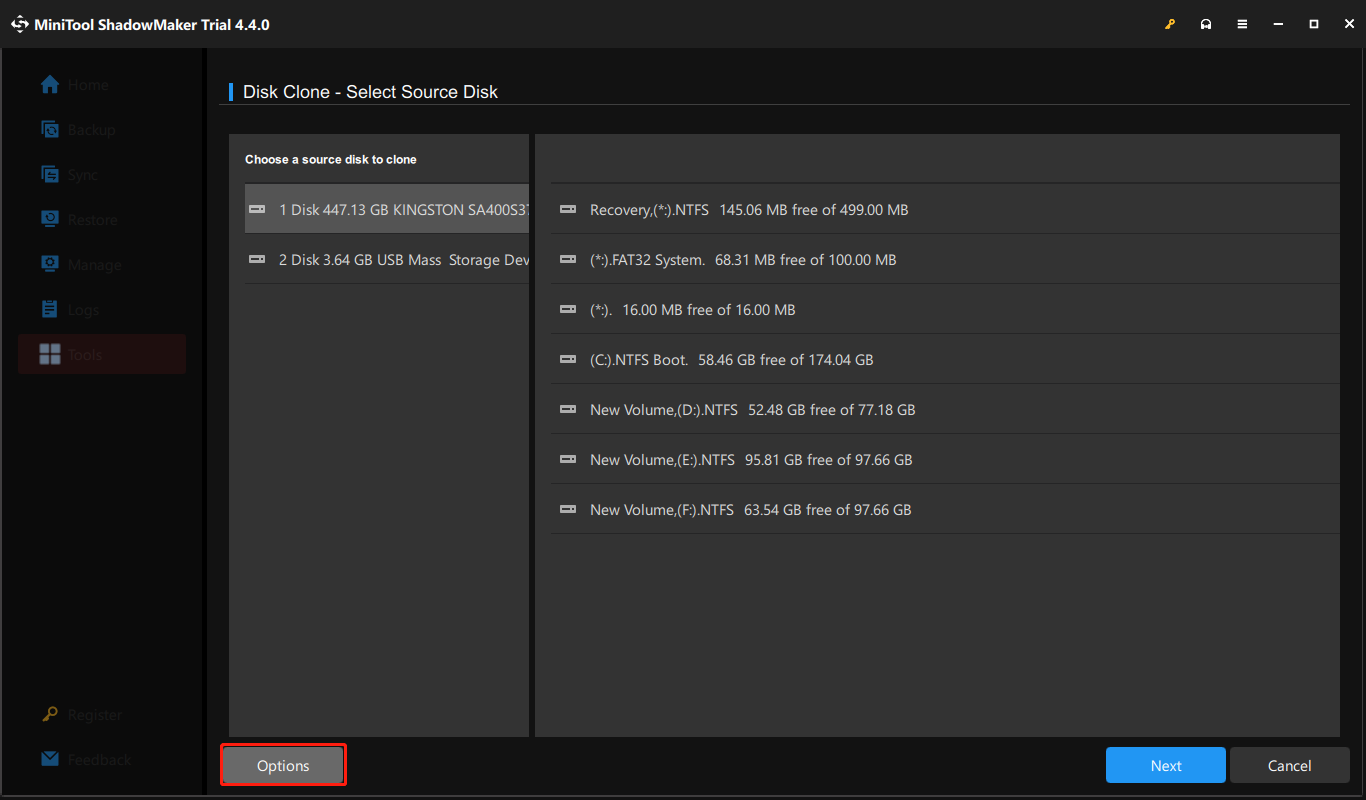
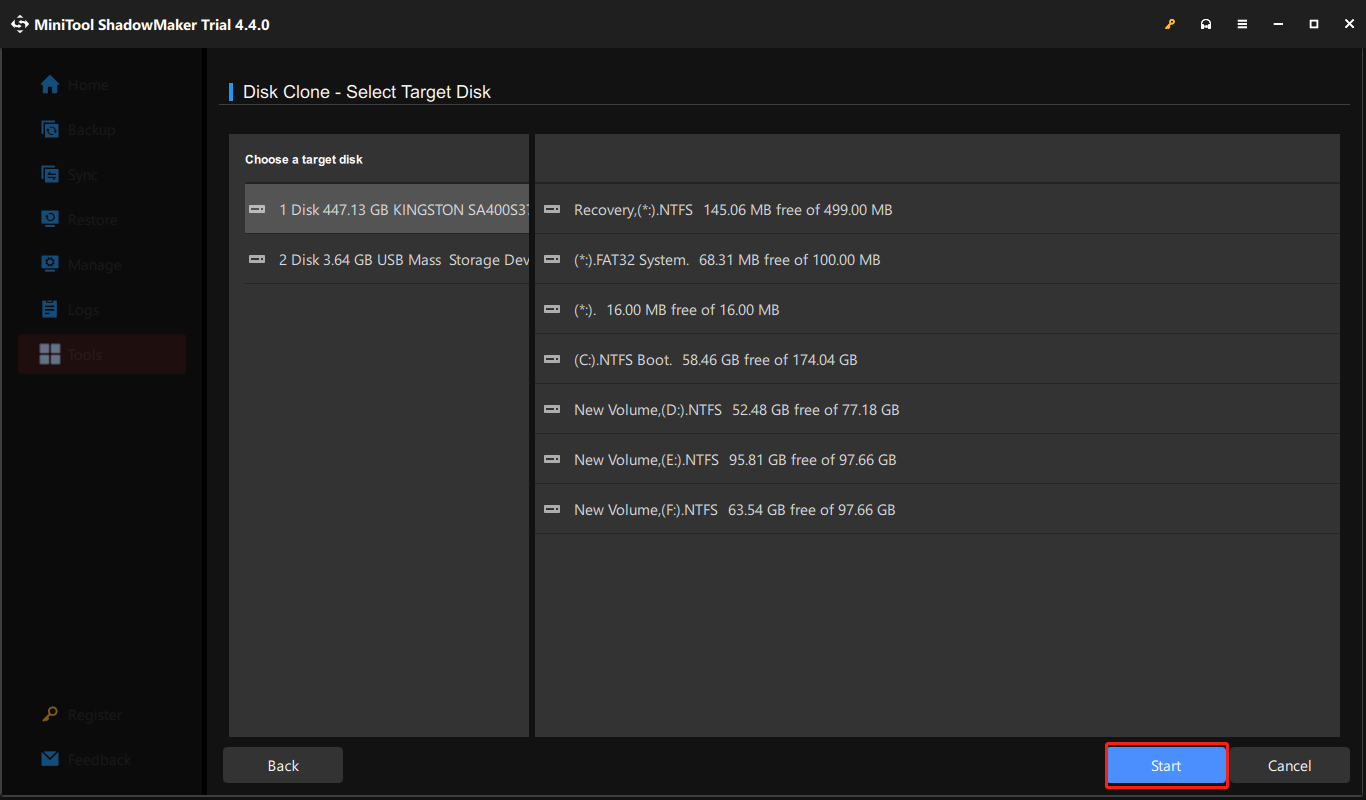
You should choose a Source Disk from the following window. Here you need to select the XD card and click Next to choose the Target Disk.
Step 4: Click Start to begin the backup process.
Back up Files Using MiniTool Partition Wizard
MiniTool Partition Wizard can be an alternative option to transfer RAF files from the XD card to another disk. This is an overall tool to manage partitions. In addition to the basic partition operations, you can run this software to recover lost partitions, copy disks, wipe disks, convert NTFS to FAT, and complete other operations.
You don’t need to worry about misoperations when using this software because changes will not be applied until you click the Apply button. Here is the tutorial to copy the XD card to another disk.
Step 1: You need to download MiniTool Partition Wizard by clicking the button below and install with the on-screen instructions.
MiniTool Partition Wizard FreeClick to Download100%Clean & Safe
Step 2: Connect your XD card to the computer and launch the software.
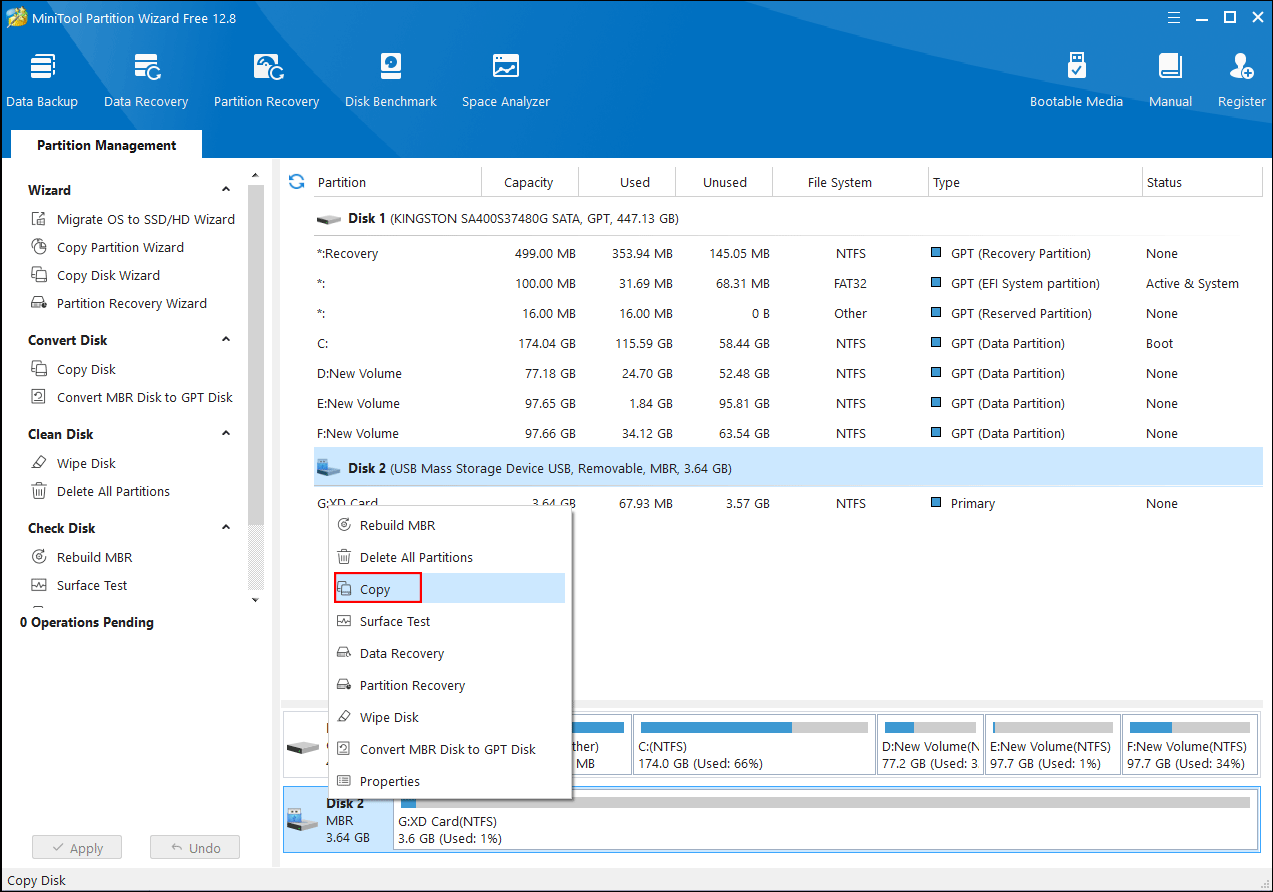
Step 3: Right-click on the XD card and choose Copy from the context menu.
Step 4: Choose the target disk in the following window and choose Next. Please note that all data on the target disk will be removed.
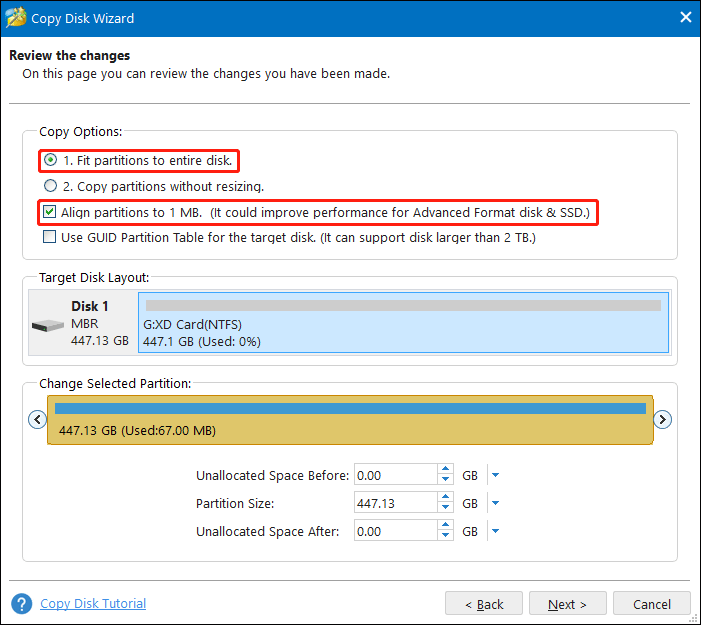
Step 5: On the Copy Wizard window, you need to choose Fit partitions to entire disk and Align partitions to 1MB. If you need to back up the XD card to a GPT disk, you can choose Use GUID Partition Table for the target disk.
Step 6: Click Next. You may get a prompt telling you to reboot the computer, just ignore it. Click Apply to validate all the changes.
#2. Avoid Operations Leading to RAF File Loss
Despite backing up files from the XD card periodically, you should also carefully use your Fujifilm camera to avoid data loss. Here are some tips for you:
- Do not eject the XD card during file transfer. Data loss happens frequently if the XD card is ejected during the transferring process, and causes file corruption even worse. You should disconnect the XD card safely when the process is completed.
- Check twice before deleting pictures. Mistaken deletion is the most common human cause that leads to data loss. You should make sure the chosen photo is the one you want to delete.
- Careful operation. Some people might lose all their pictures due to accidental formatting or other card errors.
- Keep your Fujifilm camera in a safe place. Sometimes, severe physical damage to your device will lead to data irrecoverable. You should keep the Fujifilm camera in a dust-free, low-humidity, and out-of-sunlight place, and avoid putting it in extreme temperatures.
Part 3: About RAF Images
#1. What Is an RAF File
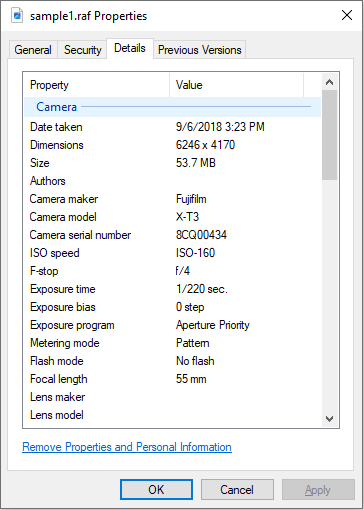
RAF is a kind of RAW image format, like ARW, NEF, CR2, etc. Fujifilm cameras save their images in this unique format to store uncompressed image data and make post-processing more flexible. This kind of format also stores information about the camera’s sensor.
#2. How to Open an RAF File
You may have trouble in opening some RAW format files. There are plenty of image viewers and editors can be used to open RAF files. But depending on your operating system, you should have different choices.
For Windows users, you can use Microsoft Photos with the Raw Image Extension to open the RAF files. Additionally, you can choose Adobe Photoshop Elements, File Viewer Plus, Corel PaintShop Pro, and other third-party software.
For Mac users, Apple Preview and Apple Photos can be good options. Other photo editing tools, like Fujifilm X RAW STUDIO, MacPhun ColorStrokes, and Adobe DNG Converter, can be used to open RAF files as well.
Part 4: Wrapping Up
This post shows you how to recover RAF files in two situations. You can run MiniTool Power Data Recovery to complete the RAF file recovery without any backups. Alternatively, if you have backed up RAF files earlier, you can use File History to restore them.
MiniTool Power Data Recovery FreeClick to Download100%Clean & Safe
Additionally, you should also know how to back up your Fujifilm XD card to your computer and learn some tips to prevent data loss in future daily use. Please feel free to let us know your puzzles when using MiniTool software via [email protected].
