Windows 10 Preparing Security Options stuck issue often happens when the computer is going to load the lock/log-on screen or the Task Manager. When you are bothered by this issue, you will not access your Windows successafully. Now, this MiniTool arctile can help you get rid of this issue.
Windows 10 Stuck on Preparing Security Options
Nothing is always perfect, and Windows 10 is the same. When running Windows 10, you may come across various kinds of issues.
For example, when your computer is trying to load the lock screen or the log-on screen, you may find that it is stuck on Preparing Security Options Windows 10 blue screen for a long time. Additionally, this issue can also happen when you are trying to load the Task Manager.
What does Windows 10 Preparing Security Options stuck mean? When this issue happens, you will be unable to use the keyboard and mouse in any way unless the process is done. However, sometimes, it doesn’t seem that it will end in a short period. Then, how to get rid of this Windows 10 error Preparing Security Options?
In this article, we summarize 10 different methods which are proved to be effective. You can try them one by one to help you out. Of course, if you are running Windows 7/8/8.1, you can also try these solutions to fix the issue.
Method 1: Disconnect the USB Devices
As per some real cases from the internet, the connected USB devices such as keyboards, mice, and Bluetooth/Wi-Fi adapters can cause Windows 10 Preparing Security Options stuck issue.
Why?
Some USB devices have been penetrated by keyloggers and spyware which is able to generate the error problem. To solve this issue, you should disconnect all the USB devices from your computer and then reboot your computer to see whether this error disappears.
Method 2: Use System Restore
If Windows 10 stuck on Preparing Security Options issue persists, you need to use other solutions to eliminate this error. If you have created a restore point when the computer was working normally, you can use System Restore to have a try.
Since the computer is unbootable, you need to go to the Windows Recovery Environment (WinRE) to perform a system restore.
Move 1: How to Enter WinRE?
1. Prepare a Windows installation disc.
If you don’t have one, you can go to the Microsoft Software Download site to download one to a normal working machine and then create a Windows installation medium.
2. Insert the Windows installation disc into your computer and then set the computer to boot from it.
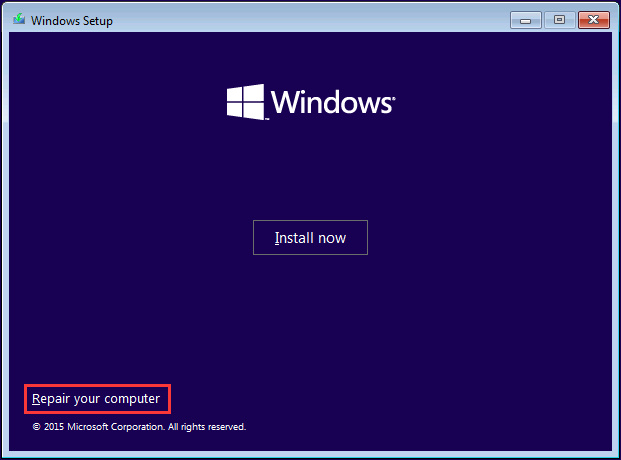
3. After entering the Install now screen, click on Repair your computer. Then, you will enter WinRE.
Move 2: Perform a System Restore
1. Go to Choose an option > Troubleshoot > Advanced options > System Restore.
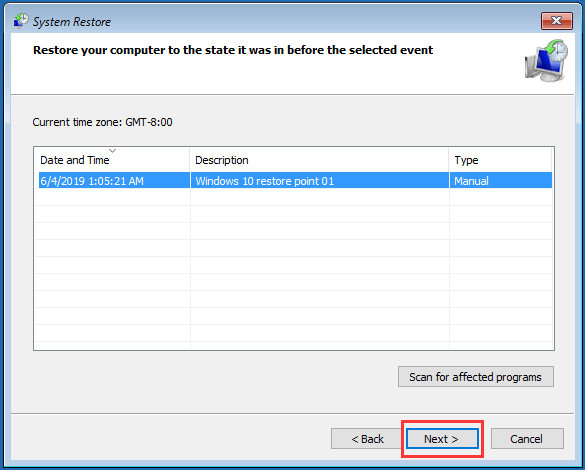
2. Press Next.
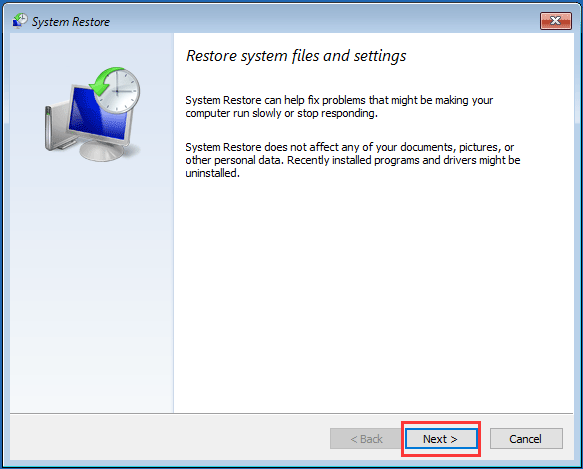
3. Choose the restore point you want to use and press Next.
4. After confirming the restore point, press Finish. Then, follow the instruction to start the system restore process.
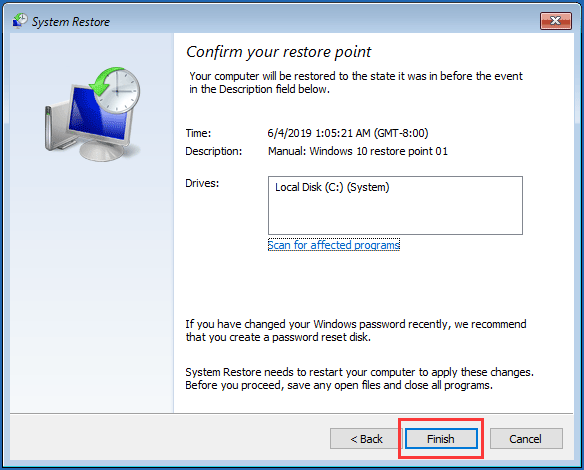
When the process ends, reboot your computer to see whether Preparing Security Options Windows 10 blue screen disappears.
Method 3: Uninstall Recently Installed Windows Updates
If the above method doesn’t work, you can uninstall the recently installed Windows updates to have a try. Since you can’t boot the computer successfully, you need to uninstall Windows updates in Safe Mode.
1. Enter Windows RE.
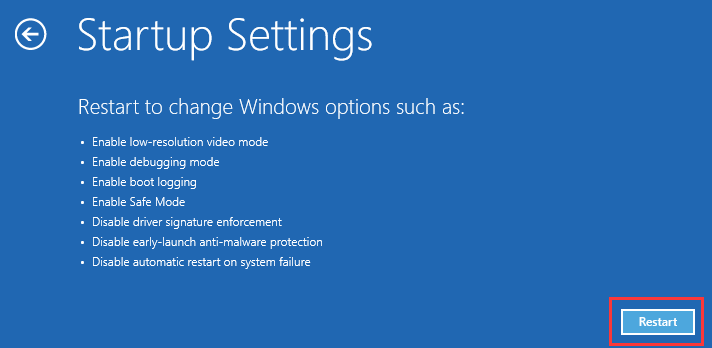
2. Go to Troubleshoot > Advanced options > Startup Settings.
3. Click Restart.
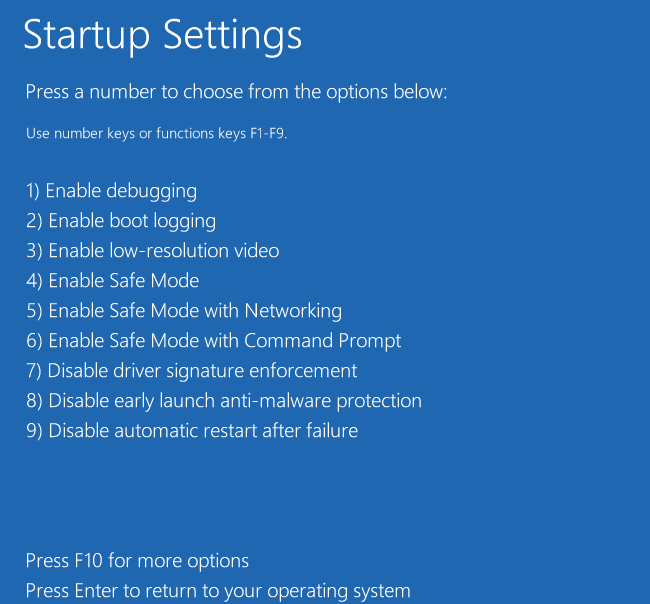
4. Press the F4 key on the keyboard to enable Safe Mode.
5. Press the Win and I keys to enter the Settings
6. Go to Update and Security > Windows Update > View installed update history > Uninstall updates.
7. There will be a list with all the installed Windows updates on your computer. Select the update you want to delete and then press the Uninstall button to uninstall it.
If this solution is unavailable, please move to the next one.
Method 4: Disable Fast Startup
To disable Fast Startup is another proved way to fix Windows 10 error Preparing Security Options issue. To do this job, you still need to boot your machine into the Safe Mode. After that, follow these steps to disable Fast Startup.
- Press the Win and R keys to open Run.
- Type in control and press OK to open the Control Panel.
- Go to Hardware and Sound > Power Options.
- Select Choose what the power buttons do from the left side list.
- Press Change settings that are currently unavailable.
- When seeing the following interface, uncheck the Turn on fast startup (recommended)
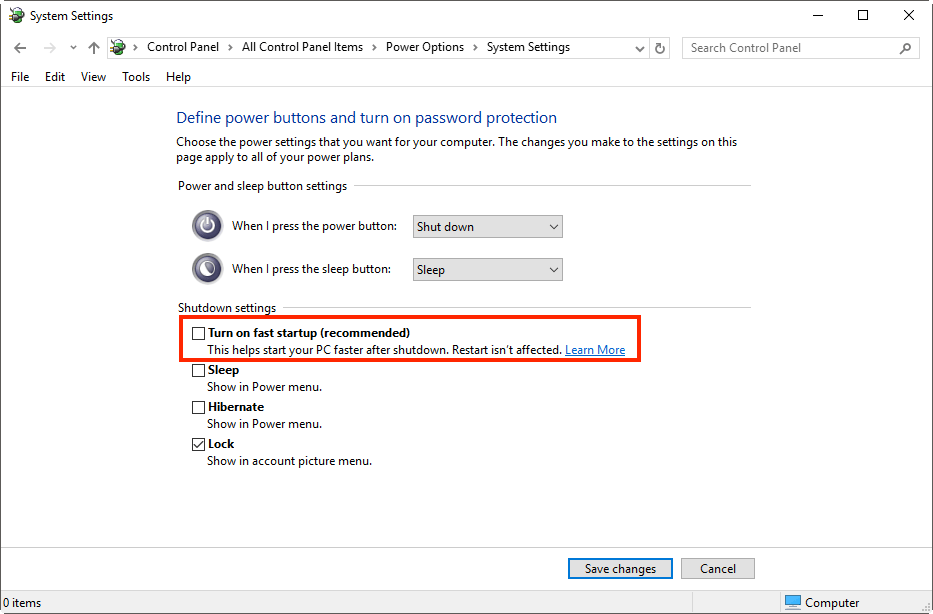
Reboot your computer to see whether the issue is fixed.
Method 5: Run SFC and CHKDSK
You can run System File Checker (SFC) & CHKDSK by using the Safe Mode or from WinRE.
1. Open Command Prompt.
- If you want to open it from WinRE, please go to Choose an option > Troubleshoot > Advanced options > Command Prompt.
- If you want to open it in the Safe Mode, please right-click on Win on your computer and choose Command Prompt (Admin).
2. Type in the following command line and press Enter to run System File Checker.
sfc /scannow

3. If the above command does not work, use the following command:
sfc /scannow /offbootdir=c:\ /offwindir=c:\windows
4. When the above process finishes, reboot your computer.
5. Repeat the first step to open Command Prompt, and then type in the following command line:
chkdsk c: /r /f
6. When the checking process ends, restart the computer to check whether Windows 10 stuck on Preparing Security Options issue goes away.
Method 6: Rename Software Distribution Folder
To do the job, please follow these steps:
1. Open Command Prompt as Administrator.
2. Type in the following commands and hit Enter after each line to rename SoftwareDistribution as bak:
net stop wuauserv
net stop bits
rename c:\windows\SoftwareDistribution SoftwareDistribution.bak
net start wuauserv
net start bits
Method 7: Rebuild BCD
If the above method doesn’t work, you can rebuild BCD to have a try.
1. Enter WinRE.
2. Go to Choose an option > Troubleshoot > Advanced options > Command Prompt.
3. Type in the following command lines and press Enter after each one.
bootrec.exe /fixmbr
bootrec.exe /fixboot
bootrec.exe /scanos
bootrec.exe /rebuildbcd
4. If the above commands don’t work, try the following commands. Don’t forget to press Enter after each command line.
bcdedit /export c:\bcd_backup
c:
cd boot
attrib bcd -s -h -r
ren c:\boot\bcd bcd.old
bootrec /rebuildbcd
5. Type in Exit to quit the Command Prompt window.
Reboot your computer and check whether the issue is solved.
Method 8: Check Some Windows Services’ Status
To do this job, please follow these steps:
1. Enter Safe Mode.
2. Press the Win and R keys to open Run.
3. Type in msc and hit Enter to enter the Services window.
4. Right-click on each of the following services and choose Properties to see whether the Startup Type is set as Automatic. If not, set it as Automatic.
- Background Intelligent Transfer Service (BITS)
- Cryptographic Service
- Windows Update
- MSI Installer
5. If the above services are not running, you need to right-click on the service and press Start.
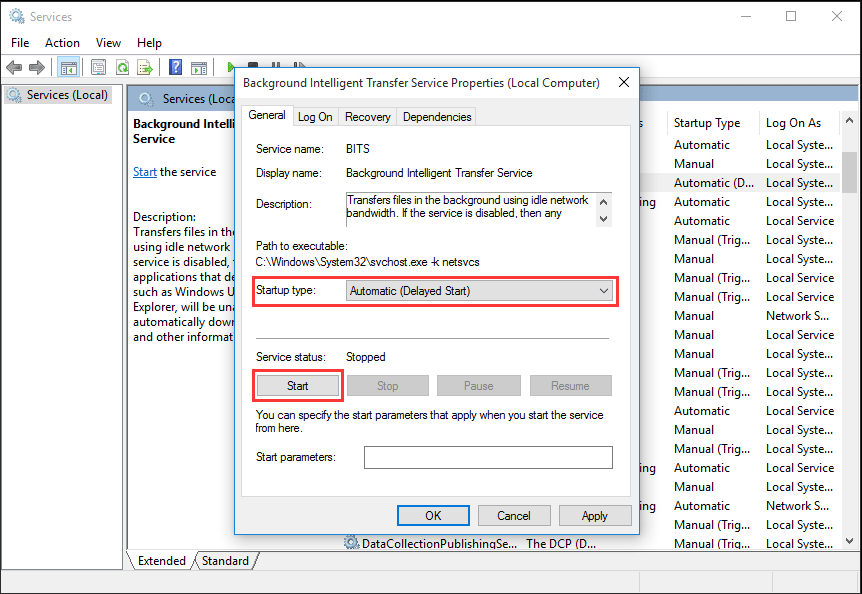
6. Right-click on Windows Update and choose Restart.
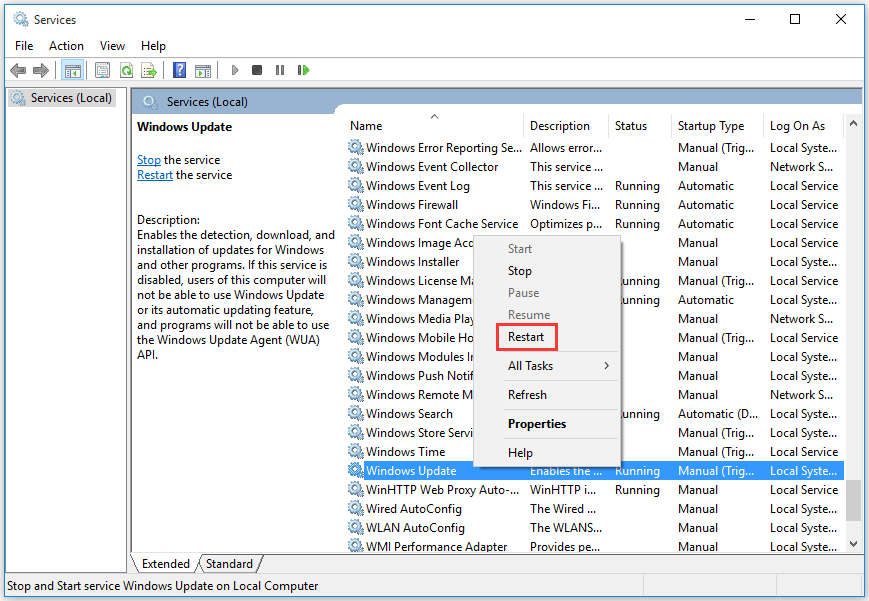
7. Reboot your computer to execute all the changes.
Method 9: Disable Credential Manager Service
You still need to enter the Safe Mode to disable credential manager service.
1. Repeat step 1 to step 3 in method 8 to enter the Services window.
2. Find Credential Manager Service, right-click on it and choose Properties.
3. Open the drop-down list in the Startup Type section, and set it as Disabled.
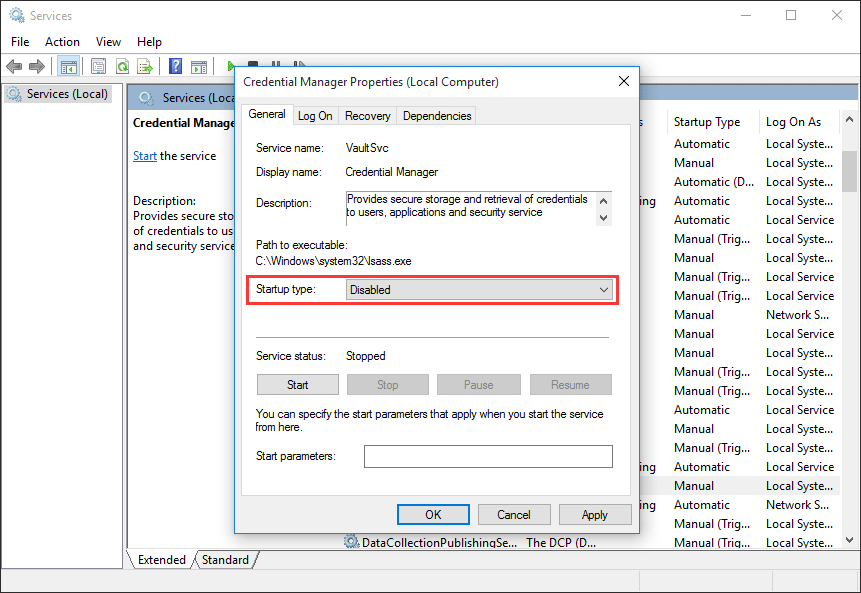
4. Click OK to keep the changes.
If all of the above solutions can’t help you out, you may need to reset your computer.
Method 10: Reset Windows 10
Choice 1: Reset Your PC from WinRE
1. Enter WinRE.
2. Go to Choose an option > Troubleshoot > Rest this PC.

3. Choose an option you want to use to continue.

4. Follow the instructions to reset your PC.
Choice 2: Reset Your PC in the Safe Mode
After entering the Safe Mode, follow these steps to reset your PC:
1. Press the Win and I keys at the same time to open Settings.
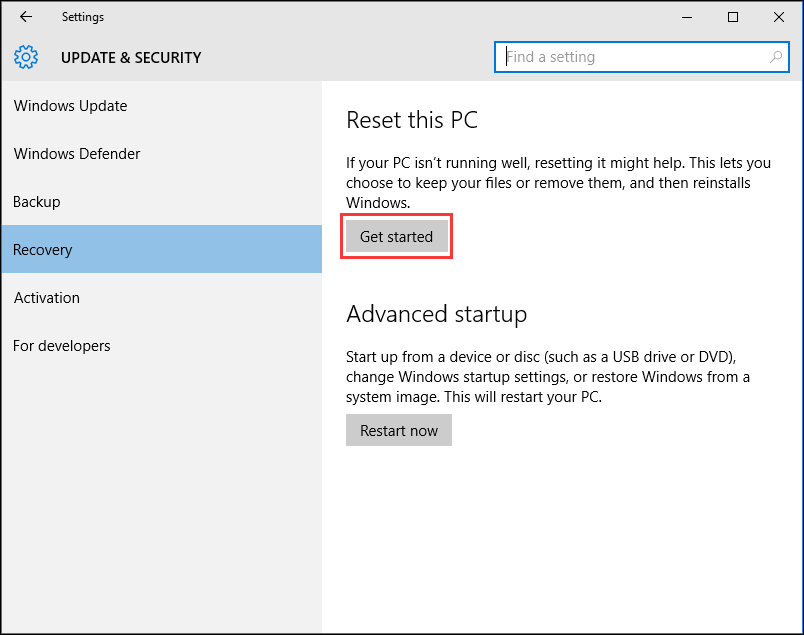
2. Go to Update and Security > Recovery.
3. Press the Get Started button under the Reset this PC
4. Choose one option according to your want to use and follow the instructions to start the reset process.
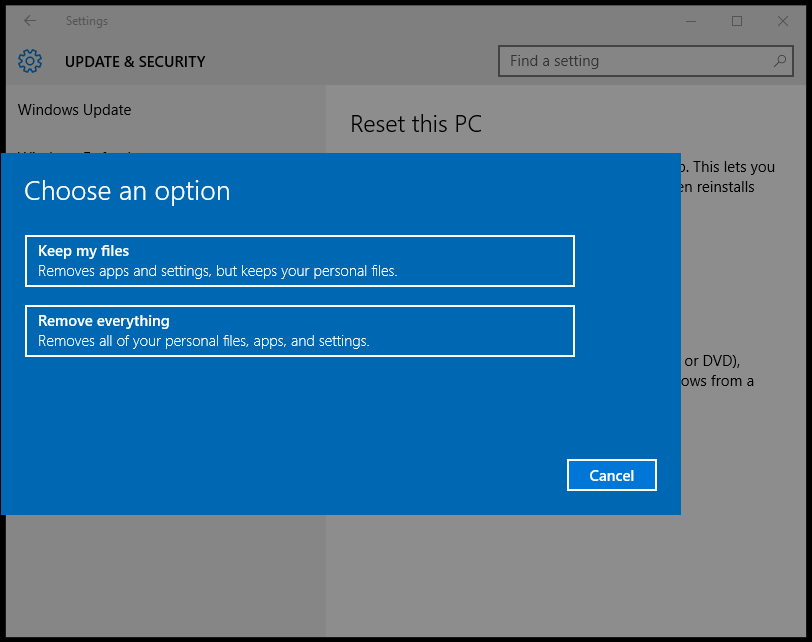
When the reset process ends, reboot your computer to see whether it can boot normally or not.
If Your Data Get Lost Finally, Use MiniTool to Restore Them
After using the above-mentioned methods, Windows 10 Preparing Security Options stuck issue should be fixed effectively. However, sometimes, these methods can cause data loss issue by accident.
For example, performing a system restore or using CHKDSK may delete some of your data on the machine if an error occurs during the operation. Even worse, if you choose to remove everything when resetting your PC, you will lose all your files on the computer.
Actually, as long as the lost files are not overwritten by new data, you can use this free data recovery software, MiniTool Power Data Recovery, to get them back.
You can first download and install the Trial Edition of this software on your computer to have a try. With it, you can check whether it can find the files you want to recover. Press the following button to get it now.
MiniTool Power Data Recovery TrialClick to Download100%Clean & Safe
In the following guide, we will walk you through the steps to recover data with this dedicated file recovery tool.
Step 1: Choose the Target Partition to Scan
1. Launch MiniTool Power Data Recovery Trial Edition
2. You will enter This PC module by default. Stay at this interface and choose the target partition which has contained the lost files.
3. Press Scan to start the scanning process.
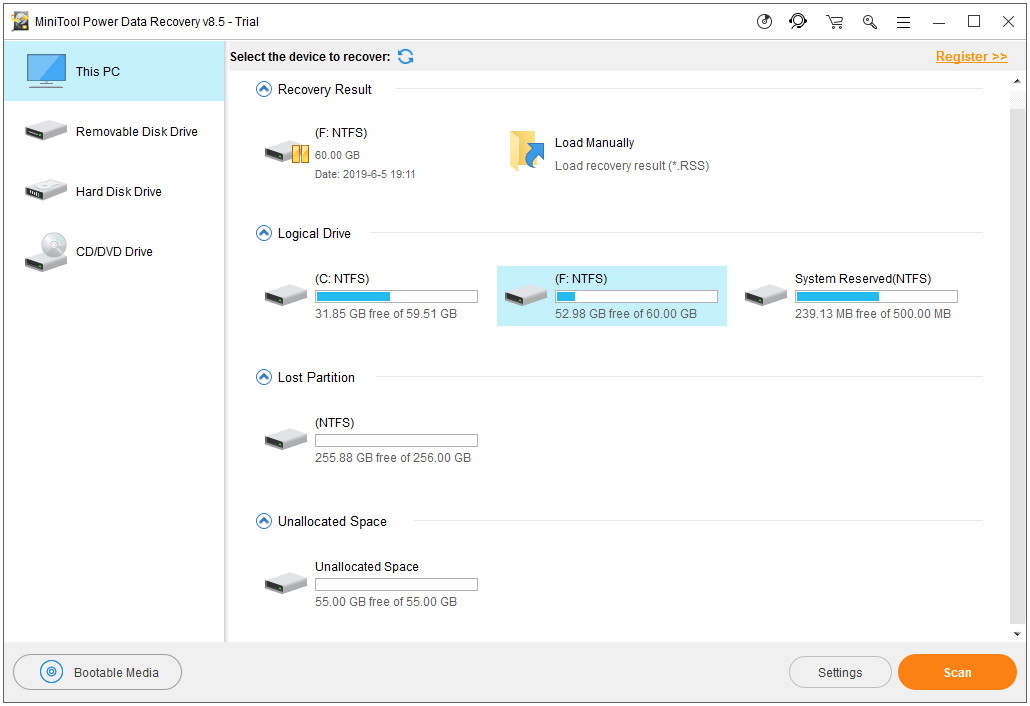
Step 2: Find the Files You Want to Restore
1. When the scanning process ends, you will enter the scan results interface where the scanned files are listed by path.
2. Open each path to find your needed files.
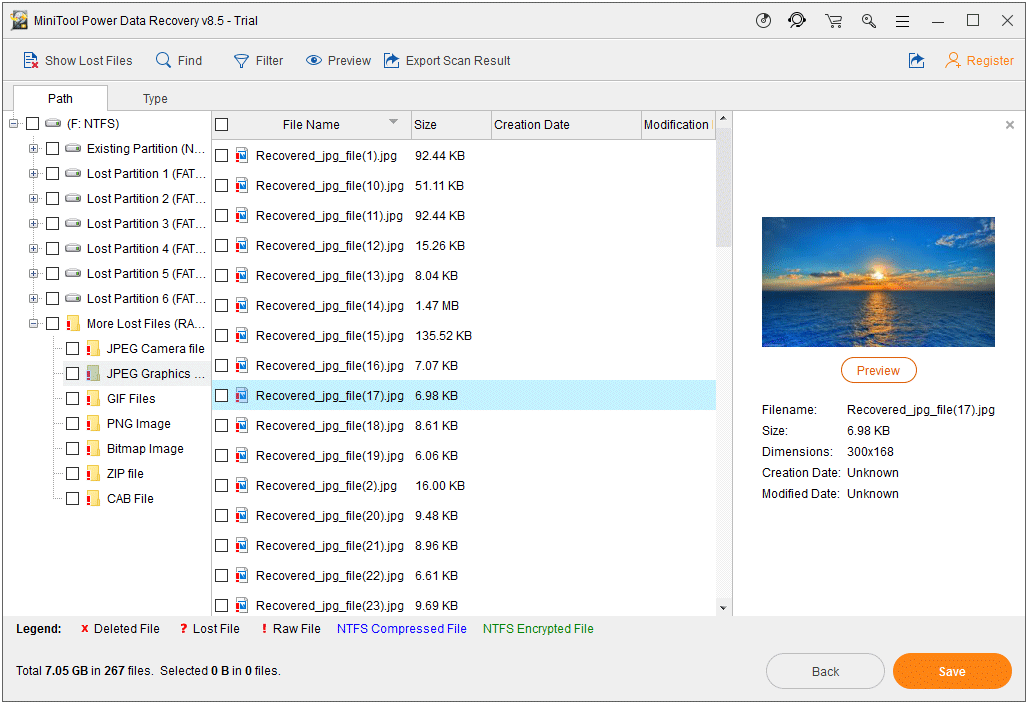
Additionally, you can also use the Type, Find, and Filter features to locate the target files easily and quickly. And now, this software supports previewing 70 types of files. With the Preview function, you can further check whether it is the file you need.
Step 3: Update the Software and Recover Your Data
If you want to retrieve your files with this MiniTool data recovery software, you need to update it to a full edition.
1. Go to the MiniTool store to get a full edition. If you are a personal user, the Personal Deluxe can fully meet your need.
2. Press the Register button on the software and copy &paste the license key to the input box.
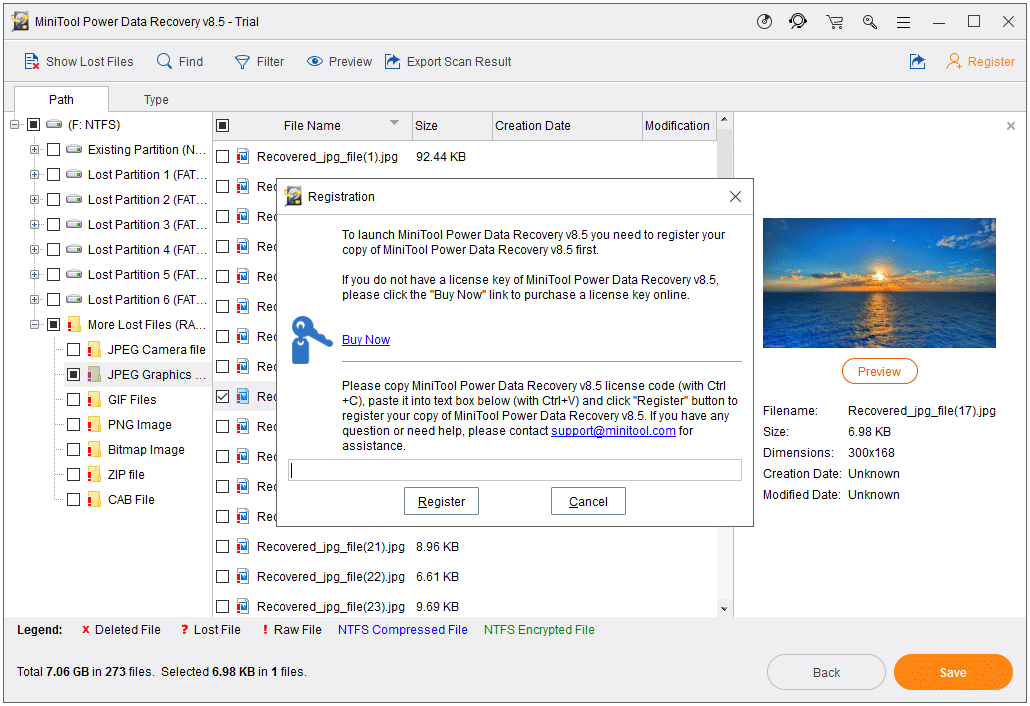
3. Press Register.
4. Check the files you want to recover and then click Save to choose a proper path to store the selected data.
Conclusion
Bothered by Windows 10 preparing security options stuck issue? Don’t worry! Just use the methods mentioned in this post to help you out. Additionally, a professional data recovery software, MiniTool Power Data Recovery, is also introduced here to solve the related data loss issue.
Should you have any questions when dealing with this issue, you can contact us via [email protected], or let us know in the comment.
Windows 10 Preparing Security Options FAQ
- If your computer can boot normally, you can go to Settings > Update & Security > Recovery > Restart now. Your computer will boot into WinRE. Then, you need to go to Troubleshoot > Advanced options > Startup Settings > Restart. After that, you can choose your computer to boot into Safe Mode.
- If your computer is unbootable, you can reboot the device and force shut it down three times in a row. Then, you can enter the WinRE automatically. Next, you can go to Troubleshoot > Advanced options > Startup Settings > Restart, and then choose your computer to boot into Safe Mode.


