Upgrading the CPU is a common operation for better computer performance. However, the problem is that the BIOS loop often occurs after the upgrade. If you’re worrying about this BIOS loop after CPU upgrade issue, this post from MiniTool can give you some helpful tips.
BIOS Loop After CPU Upgrade
I am stuck in a BIOS loop (keeps going back to BIOS regardless of settings) and unable to boot after I upgraded from 3900x to 5950x without changing anything else in the system.https://community.amd.com/
The processor upgrade can significantly enhance your computer’s performance in several ways. A newer CPU can process tasks more quickly and efficiently, which is beneficial for high-intensity computing tasks.
With a more powerful CPU, your system can handle multiple tasks and demanding applications more effectively. However, it is inevitable that problems will arise during the upgrade process, leading to BIOS loop after CPU upgrade.
Back up Files Without Booting into Windows
If your computer gets stuck in BIOS loop and fails to boot into Windows 11/10, the first thing is to back up your precious data. MiniTool ShadowMaker, a piece of professional backup software, enables you to back up the Windows system, files & folders, partitions & disks.
Now, it’s time to backup files without booting into Windows 11/10.
MiniTool ShadowMaker TrialClick to Download100%Clean & Safe
Step 1. After connecting a blank USB drive or external hard drive on a working computer and installing MiniTool ShadowMaker on it, open the program > head to Tools > choose Media Builder > click WinPE-based media with MiniTool plug-in.
Step 2. Choose the drive that you connect to create a bootable media. Then insert the media into the problematic PC and boot it from the created disc.
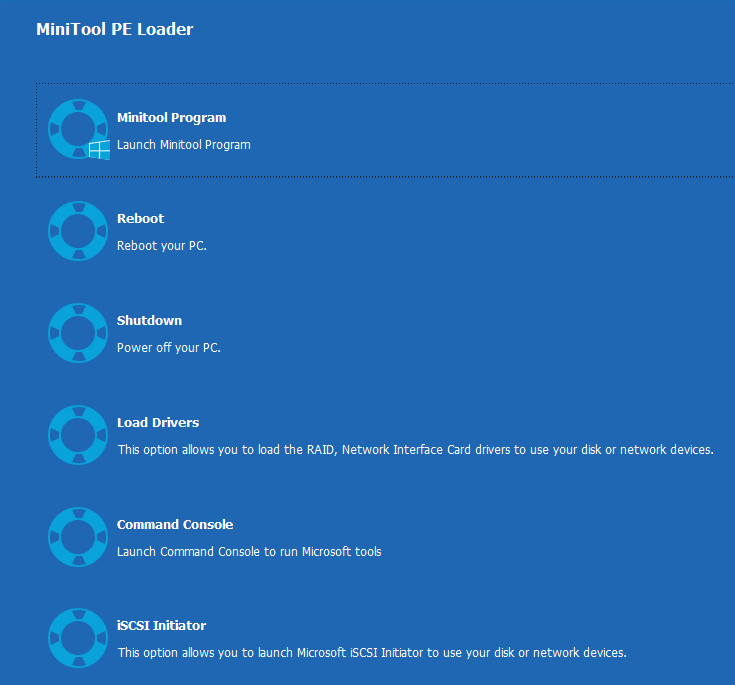
Step 3. In the MiniTool PE Loader interface, choose MiniTool Program > go to the Backup page > select the items you want to save in Source and specify a path in Destination > click on Back up Now.

How to Fix BIOS Loop After Upgrading CPU?
Method 1: Change the Boot Type from UEFI to CSM
CSM, also known as Compatibility Support Module, is a component of the UEFI firmware, which provides legacy BIOS compatibility by emulating a BIOS environment, allowing legacy operating systems and some option ROMs that do not support UEFI to still be used.
In this way, changing the BIOS mode to CSM mode may solve the loop issue. Here’s how to do it.
Step 1. Since you’re already in the BIOS setting, you are able to go to Advanced > Windows OS Configuration > select BIOS CSM/UEFI mode as CSM. After that, you have enabled CMS successfully.
Step 2. Restart your machine and check if CPU causing BIOS loop still exists.
Related article: CSM vs UEFI: What’s the Difference Between the Two Modes.
Method 2: Clear CMOS and Swap Back the Old CPU
CMOS (Complementary metal-oxide-semiconductor), is a small amount of memory on a computer motherboard that stores the Basis Input/Output system BIOS settings. Let’s see how to clear CMOS to fix BIOS loop after CPU upgrade.
Option 1. Via Battery
Step 1. Power off your computer and remove all peripheral devices and power connections.
Step 2. Open the computer cover and take off the battery for 1-5 minutes. Then reconnect it to the computer and put the cover back on.
Reboot your machine and check if you still can’t access the BIOS setup.
Option 2. Via Jumper
Step 1. Shut down the device and open its cover to see the motherboard.
Step 2. Read your motherboard manual and find out the CMOS jumper. In general, the jumper has three pins located near the battery.
Step 3. Move the jumper from the default position 1-2 to position 2-3 and then wait for 1-5 minutes to clear CMOS.
Step 4. Put back the CMOS to the default position and reboot your machine.
To Wrap Things Up
After reading this post, you’ll learn two troubleshooting fixes to solve the BIOS loop after CPU upgrade. What’s more important is you have to make a backup of your crucial files, preventing data loss from system issues. If the ways don’t work, you’d better seek help from experts.

