Usually, we prefer a higher refresh rate for better app performance and gameplay. However, some of you might encounter black screen after changing refresh rate. Why does it occur? Take it easy! This post from MiniTool will guide you through how to fix it in no time.
Black Screen After Changing Refresh Rate
Windows 10/11 itself doesn’t allow you to set the refresh rate to incompatible ones, but some third-party applications can. If you set a refresh rate that goes beyond the limit that your monitor supports, it will lead to display glitches or a complete screen blackout. What to do if you get a black screen after changing refresh rate?
In this post, we will demonstrate how to modify the graphics driver and refresh rate settings to address the black screen issue.
MiniTool ShadowMaker TrialClick to Download100%Clean & Safe
How to Fix Black Screen After Changing Refresh Rate on Windows 10/11?
Fix 1: Relaunch the Graphics Drivers
At first, you can press Win + Ctrl + Shift + B to solve black screen after changing resolution temporarily by refreshing or resetting the graphics drivers. If it does the trick, you can apply the following fixes. If not, you can enter Safe Mode or Windows Recovery Environment.
Fix 2: Enable Low-Resolution Video Mode
When you get stuck on black screen after adjusting display settings, consider reverting to the previous stable state. Here’s how to do it:
Step 1. Power off your computer > press the Power button to turn it on > press the Power button again when the Windows logo appears on the screen.
Step 2. Repeat the process for 2 or more times until your computer enter Preparing Automatic Repair.
Step 3. In the Automatic Repair screen, click on Advanced options to enter Windows Recovery Environment.
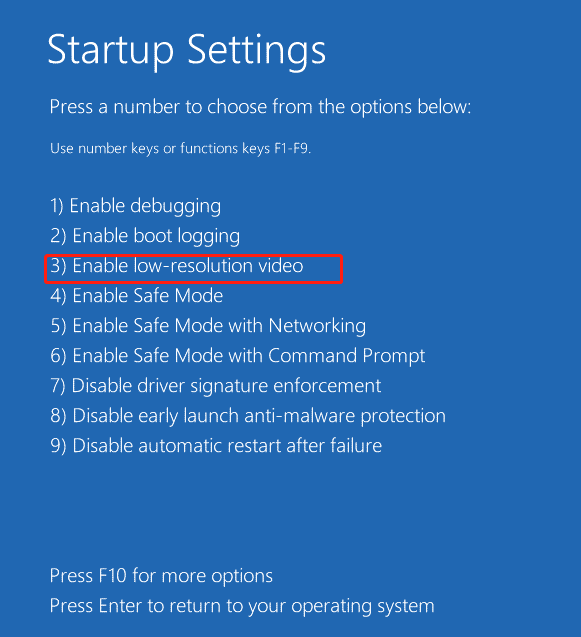
Step 4. Go to Troubleshoot > Advanced options > Startup Settings > Restart.
Step 5. After restarting, press 3 or F3 to enable low-resolution video.

Fix 3: Reinstall Graphics Driver
A faulty or outdated GPU driver is a common cause for display issues like black screen after changing refresh rate. In this case, it is a good option to reinstall the graphics driver.
Step 1. Enter Windows Recovery Environment.
Step 2. Navigate to Troubleshoot > Advanced options > Startup Settings > Restart.
Step 3. Press 4 or F4 to enable Safe Mode.
Step 4. In Safe Mode, right-click on the Start icon to choose Device Manager from the Quick Link menu.
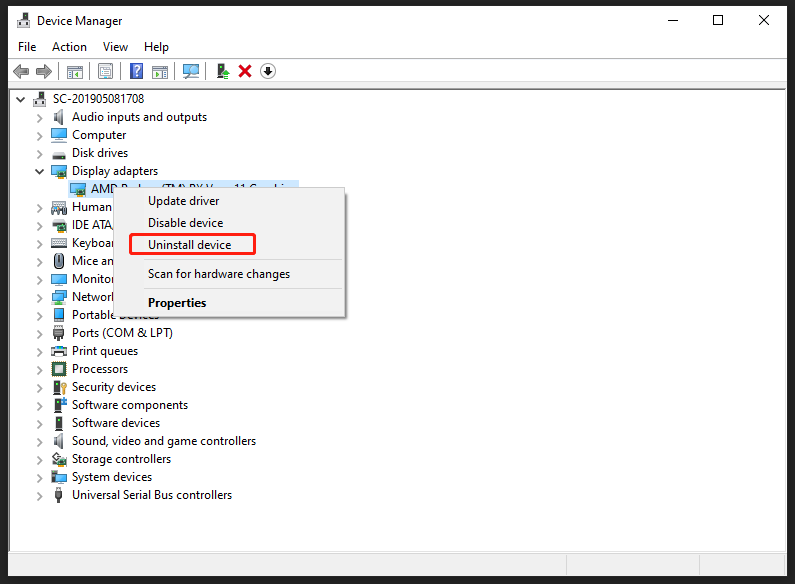
Step 5. Expand Display adapters and right-click on the graphics driver to choose Uninstall device. Your system will delete the driver and reinstall it on the next startup.

Fix 4: Disable G-Sync and V-Sync
Another solution is to disable G-sync and V-sync if the screen goes black when increasing refresh rate. Here’s how to do it:
Step 1. Open NVDIA Control Panel.
Step 2. In the left pane, click on Manage 3D settings.
Step 3. Under the Global Settings tab, find Vertical sync and turn it off.
Step 4. Under the Program Settings tab, select an app from the drop-down menu > expand Monitor Technology > select Fixed Refresh.
Step 5. Then, disable G-Sync for all applications.
Step 6. Save the changes.
Final Words
In a nutshell, the graphics driver, the display, or the connection are responsible for PC black screen after changing refresh rate. To avoid such an issue, you need to set a compatible refresh rate, update the GPU driver in time, or check the connections between the monitor and computer.

