The Windows camera is a default app on your computer. Sometimes, you will find there is a lock icon on your camera, which means the camera app is locked and you cannot use it. Now you can read this post on MiniTool to learn how to fix “camera showing the lock icon on Windows”.
Camera Showing the Lock Icon on Windows
The camera showing grey screen Windows 10 with a lock icon means you cannot do anything with the camera. Why is camera showing the lock icon on Windows? There are several possible causes for this problem. Maybe your antivirus program is blocking the camera, or you have configured your camera’s privacy settings incorrectly, and so on. You can use the following methods to fix it.
How to Fix Camera Showing the Lock Icon on Windows
Method 1: Check the Privacy Settings
If your camera is not working, it’s likely that the application is not granted permission to use the camera. So, you are supposed to check and change your privacy settings to give permission. Here are the steps.
Step 1: Right-click on the Start button and choose Settings to open it.
Step 2: In Settings, select Privacy. Under App permissions, click on the Camera option.
Step 3: Switch the Allow apps to access your camera option to On. Under Choose which Microsoft Store apps can access your camera, turn on the camera option and other applications you want to allow them to access your camera.
Read Also: You Should Check the Windows 10 Privacy Settings Right Now
Method 2: Run the Camera Troubleshooter
Running the troubleshooter can help you solve some common problems on your computer. You can try to fix the camera showing the lock icon on Windows issue by running the camera troubleshooter. Here’s how you can do it.
Step 1: Press the Win + I keys to open Settings, and choose Update & Security.
Step 2: In the left pane, click on the Troubleshoot option, and under Recommended troubleshooting, choose the Additional troubleshooters option.
Step 3: Find the Camera option, click on it, and hit the Run the troubleshooter button.
Method 3: Roll Back Camera Driver
When you update Windows, some drivers may be updated during this process. The driver of the camera may be one of them. That may cause the Windows 10 camera locked problem. In this case, you need to roll back the driver to a previous version. Here’s how to do it.
Step 1: Press the Win + S keys to open the Search box, type Device Manager, and press Enter to open your Device Manager.
Step 2: Find your cameraunder Cameras, lmaging devices or Sound, video and game controllers, right-click on it, and choose Properties.
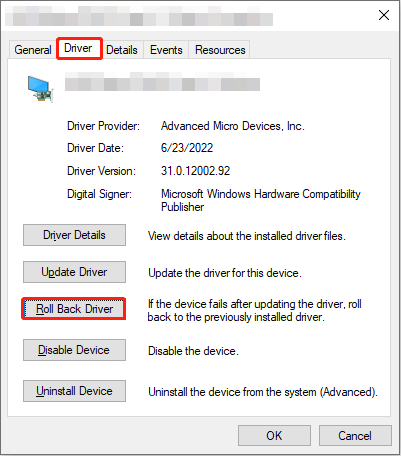
Step 3: Switch to the Driver tab, and click on the Roll Back Driver button.

Step 4: When the new window pops up, tick the first option – My apps don’t work with this driver under Why are you rolling back, and click on Yes.
Step 5: When finished, hit the OK button to close the window.
Method 4: Update Your Camera Driver
If the Roll Back Driver option is greyed out or the issue still exists after rolling back the camera driver, you can try updating or reinstalling the driver to see if this helps. The instructions are as follows.
Step 1: Open your Device Manager, find and right-click your camera device under Cameras, lmaging devices or Sound, video and game controllers, and choose Update driver. Click on the Search automatically for drivers option. If there is a newer driver, it will be installed right now. After that, restart your computer to see if your camera can work normally. If it doesn’t work, continue following the steps below.
Step 2: In Device Manager, right-click onyour camera device and choose Uninstall device.
Step 3: Restart your computer, and Windows will automatically install the missing driver on restart.
Method 5: Troubleshoot in a Clean Boot State
Some third-party applications automatically start when you start your system and continue running in the background. Such applications can sometimes conflict with Windows services and other applications, leading to problems. You can check that by troubleshooting in a clean boot state.
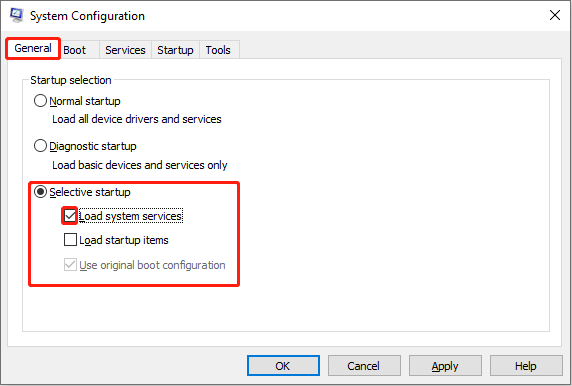
Step 1: Press the Win + R keys to open the Run dialog, type MSConfig in the box, and hit Enter.
Step 2: In the General tab, tick the Load system services and Use original boot configuration options.

Step 3: Switch to the Services tab, tick the Hide All Microsoft Services option, and click on Disable all.
Step 4: Switch to the Startup tab, click on Open Task Manager, disable all the Startup apps that normally load on your PC, and close the window.
Step 5: In the System Configuration window, click Apply > OK to apply your changes.
Step 6: Now you can check if the problem persists. If not, it means the cause for this issue is the apps you just disabled. Then you need to find which app is the main reason. Enable them one by one and restart your PC each time until the problem occurs again. When that happens, you are expected to disable the app that you just enabled or uninstall related software.
Final Words
After reading this essay, you may have a better understanding of how to fix the camera showing the lock icon on Windows issue. If you are facing this problem, use these methods to deal with it.

