The camera app is one of the essential functions of the computer. It is very powerful and can facilitate your work and communication. Have you ever encountered any errors when using it? If an error occurs, how to solve it? This article provided by MiniTool will help you fix 0xA00F425C camera error.
Camera App Error Code 0xA00F425C
Camera app is a built-in Windows application that allows you to use your computer’s internal or external camera device to take photos and videos. It offers a quick and convenient way to capture images and record videos without additional software.
The camera app error code 0xA00F425C usually indicates a problem with the system’s camera functionality. Multiple reasons, such as an older camera version, software conflicts, or system file corruption can cause this error. Other applications or services may be unable to access the camera due to the 0xA00F425C error, causing inconvenience in various situations.
How to Fix 0xA00F425C Camera Error
In this guide, numerous ways will be introduced to teach you how to fix 0xA00F425C camera error on Windows.
Method 1: Run the Camera Troubleshooter
An error code means that the camera has encountered a problem. At this time, you need to use the troubleshooting function to eliminate the problem and restore normal use of the camera. Here are the steps.
- Right-click on the Start button and choose the Settings option.
- Select Update & Security > Troubleshoot > Additional troubleshooters.
- Find the Camera and click on Run the troubleshooter.
- After the detection process is completed, click on Close.
After finishing these operations, you can open camera to see if this way can fix 0xA00F425C camera error.
Method 2: Create a Camera Roll Folder
The Camera Roll folder is the default folder where photos and videos are stored. If this folder is missing, it may render the photo capture file creation failed 0x80270200 or video capture file creation failed errors. So, you can create a Camera Roll folder to check if the camera app can work normally. Here’s how you can do it.
- Press the Win + E keys to open File Explorer.
- Locate the Pictures folder from the left pane and click on it.
- Right-click on the blank area of the right pane, and choose New > Folder.
- Type Camera Roll and press Enter.
MiniTool Power Data Recovery FreeClick to Download100%Clean & Safe
Method 3: Change the Storage Location
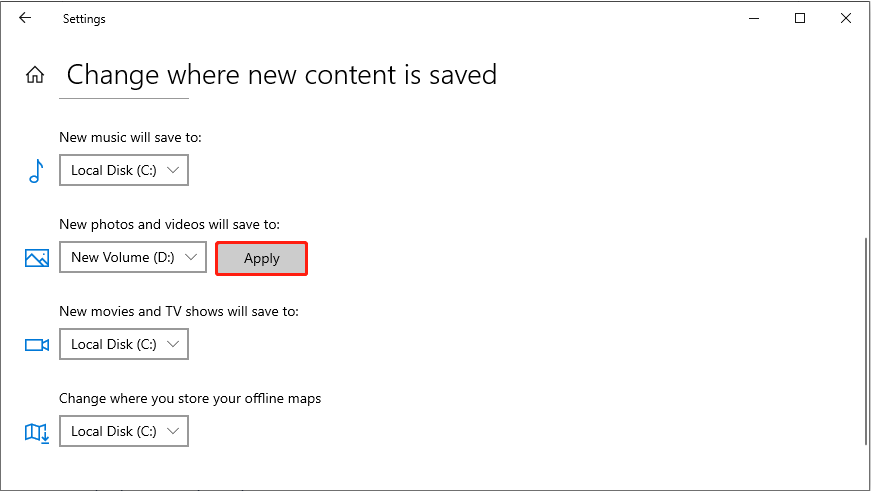
If there is a problem with the original storage location of photos and videos, it may also cause an error code. To solve it, you can change the storage location. The operations are as follows.
Step 1: Press the Win + I keys to open Settings.
Step 2: Choose System > Storage. Under More storage settings, click on the Change where new content is saved option.
Step 3: Find the New photos and videos will save to option, and select the location where you want to store them.
Step 4: Finally, click on the Apply button.
Method 4: Update Camera Driver
If the camera driver version is too low and incompatible with the computer, an error code will be generated, causing the camera to work improperly. Here are the steps to update the camera driver.
Step 1: Right-click on the Start button and choose Device Manager.
Step 2: Find and click on Cameras, Imaging devices, or Sound, video and game controllers.
Step 3: Right-click on your camera and choose Update driver.
Step 4: Click on Search automatically for drivers. Then follow the onscreen instructions to complete the process.
Method 5: Reset the Camera App
A corrupted application may also cause an error code. In this case, you can choose to reset the camera app to its default to fix the corruption.
- Click on the Search icon in the taskbar and type Camera in the box.
- Right-click on it and choose App settings.
- Scroll down until you find the Reset button and click on it to reset camera.
Once you completed these steps, you can open your camera to check if it can work normally.
Method 6: Re-register the Camera App
You can try re-registering the camera app. It will update camera settings to fix some issues. The operations are as follows.
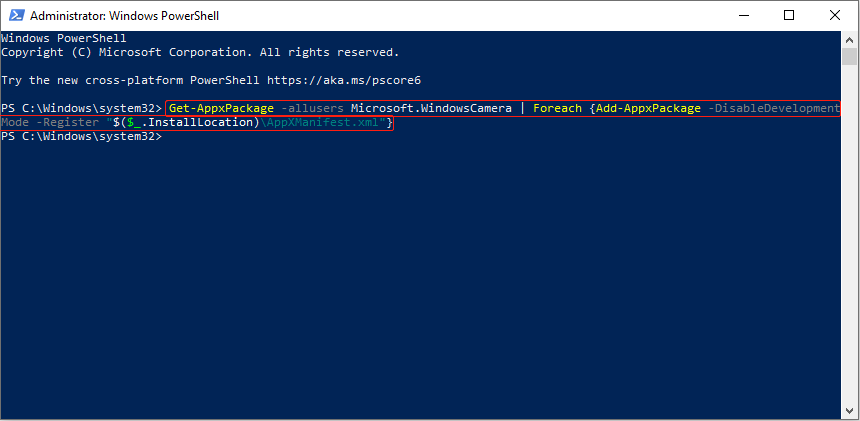
Step 1: Right-click on the Start button and select Windows PowerShell (Admin).
Step 2: When prompted by UAC, choose Yes.
Step 3: Type the following command and press Enter.
Get-AppxPackage -allusers Microsoft.WindowsCamera | Foreach {Add-AppxPackage -DisableDevelopmentMode -Register “$($_.InstallLocation)\AppXManifest.xml”}
Step 4: After this process is completed, close the window.
See Also: How to Run PowerShell Script on Windows 10? [Full Guide]
Bottom Line
With the help of these methods listed in this essay, you may be able to fix 0xA00F425C camera error effectively.
