Do you know what Memory Compression is? Do you have any idea how to enable or disable Memory Compression? In this article from MiniTool, you can learn detailed information about Windows Memory Compression.
What Is Memory Compression
Before learning how to enable or disable Memory Compression in Windows 10, you need to have a basic understanding of Memory Compression.
Memory Compression, as the name suggests, is used to compress your data memory so that your RAM can store more data than normal, so as to ensure the normal running speed of the computer.
When not using memory compression, your PC stores additional data on the page file on the hard drive storage. However, the computer can read data from the hard drive significantly slower than RAM, which can cause your computer to run significantly slower.
How to Enable Memory Compression
Now let us see how to enable Memory Compression in Windows 10.
Step 1. Type PowerShell in the Windows search box and right-click Windows PowerShell to select Run as administrator.
Step 2. Select Yes in the pop-up UAC window.
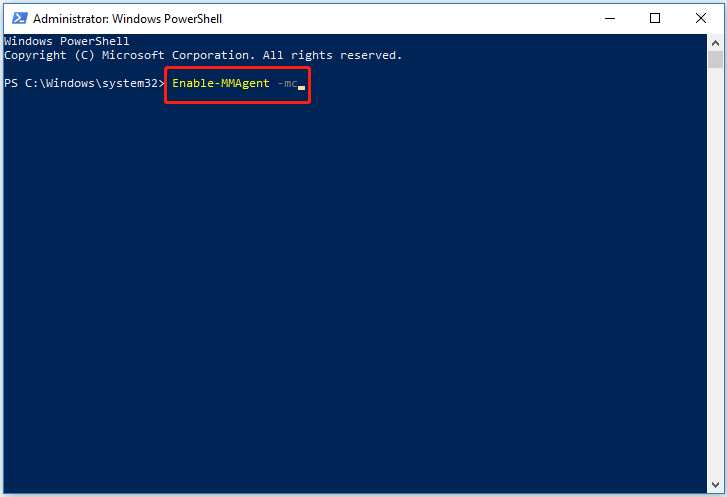
Step 3. In the new window, type Enable-MMAgent -mc and press the Enter key on your keyboard.

Step 4. After the command line is executed, you can restart your computer.
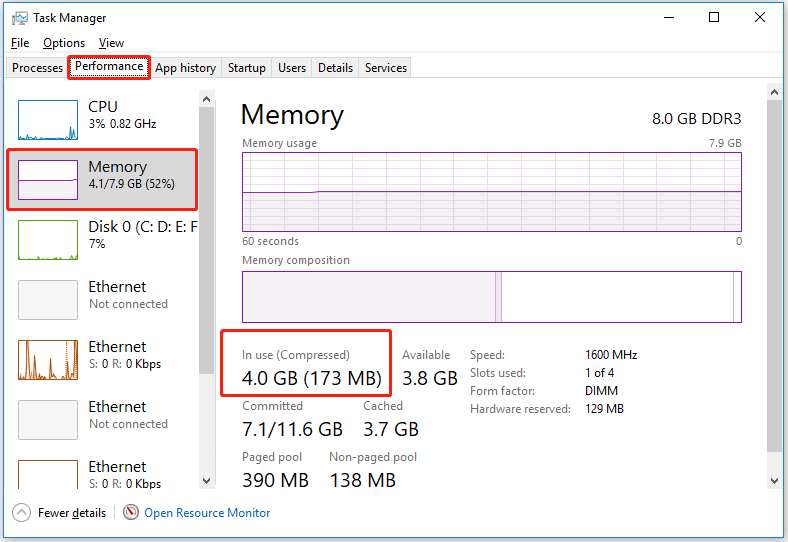
To check whether the Memory Compression has been turned on successfully and see how much memory Windows has compressed, you can do the following steps:
First, right-click the Windows logo key and select Task Manager.
Second, under the Performance section, move on to the Memory tab, then you can see the compressed memory in the “In use (Compressed)” part.

How to Disable Memory Compression
Now you should know how to enable Memory Compression. However, you may ask: Should I disable Memory Compression or keep it turning on?
As mentioned earlier, Memory Compression aims to improve system performance by storing parts of memory pages in compressed form in RAM. Therefore, it is generally not recommended to disable Memory Compression. However, when this memory management process consumes high CPU resources, you may consider turning it off.
Step 1. Run Windows PowerShell as administrator.
Step 2. Input Disable-MMAgent -mc in the command window and press Enter to execute the command line.
Now the feature of Memory Compression has been disabled.
Does Deleting Files Reduce RAM Usage
Searching in Google, you will find that many users are wondering if deleting personal files can reduce RAM usage. Deleting files will only reduce storage usage, but not RAM usage. To reduce RAM usage, you can try restarting your computer, quitting running programs, uninstalling unwanted applications, and scanning for viruses.
For more information about reducing memory usage, you can refer to this post: How to Fix Windows 11 High Memory Usage? Here Are Easy Fixes.
However, what if you have deleted some files by mistake? Can you recover deleted files without bringing any damage to the original data? Fortunately, the answer is positive.
Here the best data recovery software – MiniTool Power Data Recovery is recommended. It is an easy-to-use file restore tool designed for recovering files (documents, pictures, emails, videos, etc.) in various data loss situations, such as OS crash, accidental deletion, viruses attack, and so on.
It supports recovering files from USB flash drives, internal hard drives, external hard drives, CDs/DVDs, and other file storage devices. And it is fully compatible with all Windows systems, such as Windows 11, Windows 10, Windows 8, and Windows 7.
MiniTool Power Data Recovery Free Edition can help you recover up to 1 GB of data totally for free. So, you can click the button below to download it and have a try.
MiniTool Power Data Recovery FreeClick to Download100%Clean & Safe
Final Words
In a word, this article introduces how to enable and disable Memory Compression and how to recover deleted or lost files using the professional data restore tool – MiniTool Power Data Recovery.
If you have any suggestions for MiniTool data recovery software, please feel free to contact us via [email protected].


