Sometimes, you may find that you have issues with network performance or bandwidth utilization, which may be related to the MTU settings. If that affects your efficiency, you can consider changing MTU on your computer. This post in MiniTool will teach you how to change MTU in several ways.
MTU (Maximum Transmission Unit) is a necessary parameter which defines the maximum size of a packet that can be transmitted over a network. Therefore, by changing the MTU, you can enhance your network performance. In this way, you can browse the website more efficiently and smoothly.
Larger MTU are associated with reduced overhead. Smaller MTU values can reduce network latency. In many cases, the MTU depends on the underlying network capabilities and must be adjusted manually or automatically to avoid exceeding those capabilities. The MTU parameter may be associated with a communications interface or standard. Some systems may determine the MTU at connection time, such as using path MTU discovery.
How to Access MTU Settings on Windows
Before you change MTU, you need to access it to check its value and the network adapter settings. Here’s how to access MTU settings.
Access MTU value.
Firstly, you should click on the Search icon in the taskbar. Type Terminal in the box. If it appears in the search list, right-click on it and choose Run as administrator to open it. If there is nothing about it, probably you don’t install it. You can go to the Microsoft Store to download and install Windows Terminal. When finished, repeat the operations.
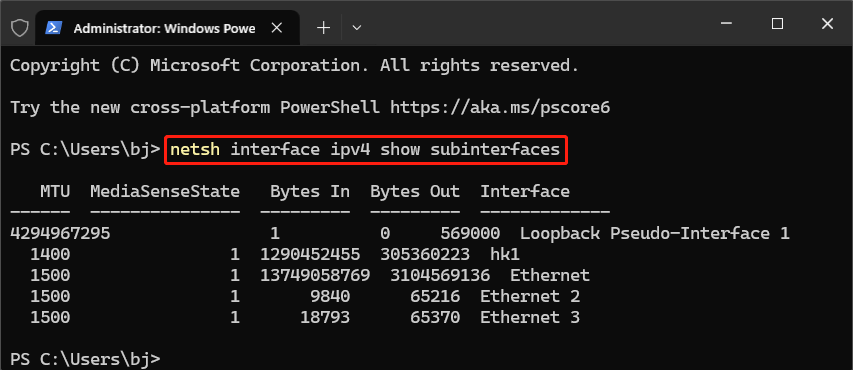
Secondly, type this command: netsh interface ipv4 show subinterfaces and press Enter to run it.
Lastly, wait for the process to complete, and you can see the MTU value of different networks under the MTU tab.
There is also an alternative option, which is to check the MTU value through the network adapter settings. To get started, you need to follow the below instructions:
Access MTU network adapter settings
Firstly, you need to press the Win + R keys to launch the Run window. Type ncpa.cpl in the Open box and press Enter, and you can see a list of different network adapters.
Secondly, right-click on any adapters of which you want to check the MTU and then choose Properties.
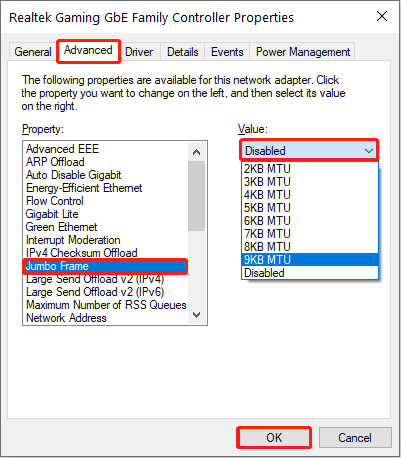
Lastly, click the Configure… button to open the adaptor connection properties. Switch to the Advanced tab and select Jumbo Frame under Property. Then you can see the value from the Value list on the right. Then click OK to close the window.
How to Change MTU on Windows
If the MTU value is not proper, the network may function slowly. Here are two ways for you to change the MTU value.
Method 1: Changing MTU With Windows Terminal
Not only can you use Windows Terminal to check the MTU value, you can also use it to change the value. Here are the steps to change it.
Step 1: Press the Win + S keys to open the Search window.
Step 2: Input Terminal in the box, right-click on it, and choose Run as administrator.
Step 3: When prompted by UAC, click on Yes to continue.
Step 4: Type this command: netsh interface ipv4 show subinterfaces and press Enter.

Step 5: Until the previous step is finished, continue to type this command: netsh interface ipv4 set subinterface <subinterface name> mtu=9000 store=persistent and press Enter.
Once you have done these steps, close the window and restart your computer.
Method 2: Changing MTU From Network Adapter Settings
Using Network Adapter Settings to change MTU value is also a good option. Some operations are as follows.
Step 1: Right-click on the Start button and choose Settings.
Step 2: In Settings, select the Network & Internet option, and then click on Ethernet.
Step 3: In the right pane, click on Change adaptors options under the Related settings option.
Step 4: Right-click on any adapter you want to change and choose Properties.
Step 5: In the Ethernet Properties window, click on the Configure… button.
Step 6: On the new page, switch to the Advanced tab, and select Jumbo Frame under Property.
Step 7: Expand the Value drop-down triangle to choose the MTU value you want and click on OK to close the window.

After finishing these instructions, reboot your computer to save these changes.
MiniTool System Booster TrialClick to Download100%Clean & Safe
Final Words
So that was all for how to change MTU on Windows. Believe you have a better understanding of MTU settings. If you are in such a need, you can refer to one of the ways above according to your preferences to perform an MTU settings change.

