Integrated Graphics
Integrated graphics cards also called iGPUs, are graphics chips that are integrated within the system. They can work for some casual games. Compared with dedicated graphics, they are cheaper and less power-consuming. Is it safe to disable integrated graphics? The answer is yes. If you have installed a dedicated graphic card on your computer, you need to disable the integrated card to avoid conflicts between the two graphics cards.
How to Tell Integrated Graphics and Dedicated Graphics?
You can tell which one is integrated graphics or dedicated graphics by checking where you plug the card in. An integrated card is part of the motherboard and it connects to the motherboard directly. However, a dedicated card plugs into your monitor and it occupies an expansion slot.
How to Disable Integrated Graphics Windows 10?
There are two ways to disable integrated graphics. One is to turn it off through Windows Device Manager, the other is to disable it from BIOS. What is also worth noticing is that not all BIOS has the option to turn off an installed integrated graphics card and you should operate depending on the circumstances.
How to Disable Integrated Graphics from Device Manager Windows 10
Step 1. Type device manager in the search bar and tap on Enter to launch Windows Device Manager.
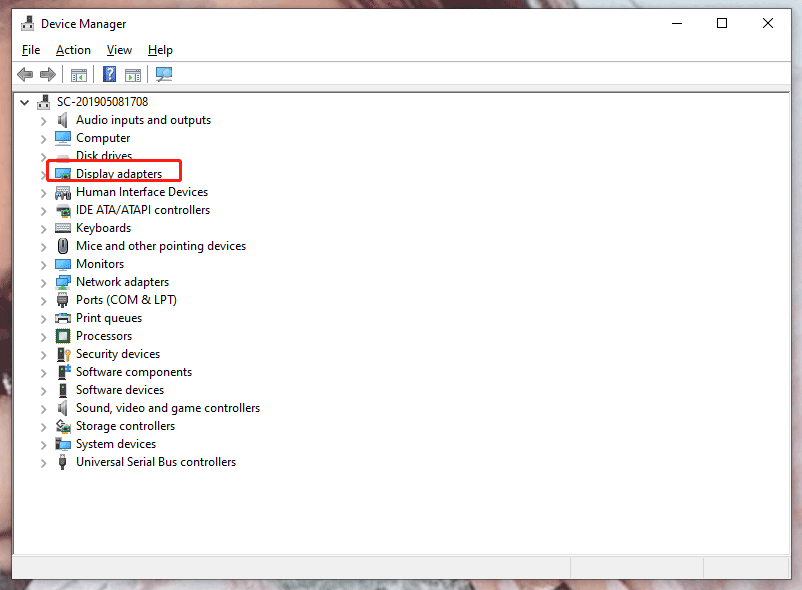
Step 2. In the new window, click Display adapters to show your graphics card.

Step 3. Right-click the integrated graphics and choose Disable device from the menu.
Step 4. There will be a popping-up warning which informs you that this action will stop the relevant function. Click Yes.
How to Disable Integrated Graphics from BIOS Windows 10
This method might be more difficult for the beginner because the BIOS menu shown on the screen may vary from device to device. What’s more, you may not find the menu related to disabling the integrated graphics on laptops since they are heavily stripped of the basic settings. Therefore, we recommend you to disable integrated graphics through Device Manager.
Move 1: Access BIOS
Step 1. Press Win + I to open Settings.
Step 2. Scroll down to click Update & Security.
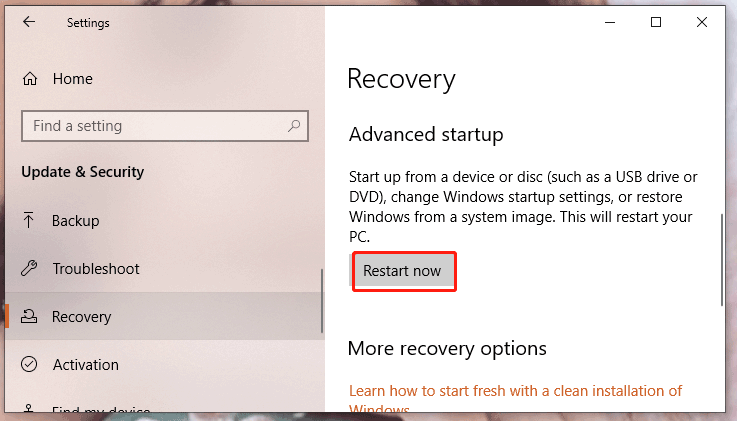
Step 3. In the Recovery tab, click Restart now under Advanced startup and then your computer will enter the Windows recovery environment.

Step 4. Press UEFI Firmware Settings to boot your PC into UEFI BIOS.
Move 2: Disable Integrated Graphics
Step 1. Look for a setting with onboard, integrated video, VGA under Integrated Peripherals, Onboard Devices or Built-in Devices.
Step 2. Change integrated graphics into disable or off by hitting Enter.
Step 3. According to the on-screen instructions, press the corresponding F-key to save your changes and click Y to confirm your action.
Final Words
By now, you must master how to tell integrated graphics & dedicated graphics and how to disable integrated graphics Windows 11/10. Please feel free to contact us if you have any ideas or problems about your computer.
