How to Get Copilot in Windows 11?
Copilot has been released amidst long calls. If you want to use it, you can use one of the following ways:
- Install Windows 11 KB5030310 or newer update.
- Go to Windows Update to install the latest Windows 11 version. You need to enable the Get the latest updates as soon as they’re available toggle in Windows Update.
- Join the Release Preview Channel and install the latest version of Windows 11 23H2.
If unfortunately, you cannot see Copilot in Windows 11 even you have installed the above updates, how can you enable Windows Copilot in Windows 11?
I find a method: using ViveTool.
In the next part, I will show you how do I install Copilot in Windows 11 with the help of ViveTool.
Tip: Recover Your Lost and Deleted Files Using MiniTool Power Data Recovery
MiniTool Power Data Recovery is specially designed to recover data from hard drives, SSDs, SD cards, memory cards, USB flash drives, and more. You can use this software to recover files like images, documents, videos, audio files, and more.
It can work in these situations:
- File deletion.
- Partition deletion.
- Drive formatting.
- Drive inaccessible.
- Hard drive failure.
- OS crash.
You can first try the free edition of this software and see if it can find and recover the needed files.
MiniTool Power Data Recovery FreeClick to Download100%Clean & Safe
How to Enable Windows Copilot Using ViveTool in Windows 11 23H2?
You need to first download ViveTool and then run special commands in Command Prompt to install or enable Windows Copilot in Windows 11.
Move 1: Download ViveTool
Step 1. Go to https://github.com/thebookisclosed/ViVe/releases, then download the latest version of ViveTool in Windows 11.
Step 2. The downloaded folder is a compressed folder. You need to unzip it and then rename it ViveTool.
Step 3. Copy and paste the ViveTool folder to C Drive. The route should be C:/ViveTool.
Move 2: Run Winget Command to Enable Copilot in Windows 11
Step 1. Run Command Prompt as administrator.
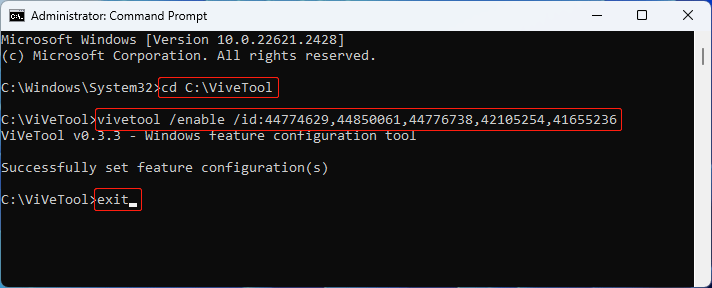
Step 2. Copy and paste this command into Command Prompt: cd C:\ViveTool, then press Enter.
Step 3. Copy and paste this command into Command Prompt: vivetool /enable /id:44774629,44850061,44776738,42105254,41655236, then press Enter. This will enable Windows Copilot in Windows 11 23H2.
Step 4. Input exit and press Enter to close Command Prompt.

Move 3: Update Microsoft Edge to the Latest Version
Step 1. Open Edge.
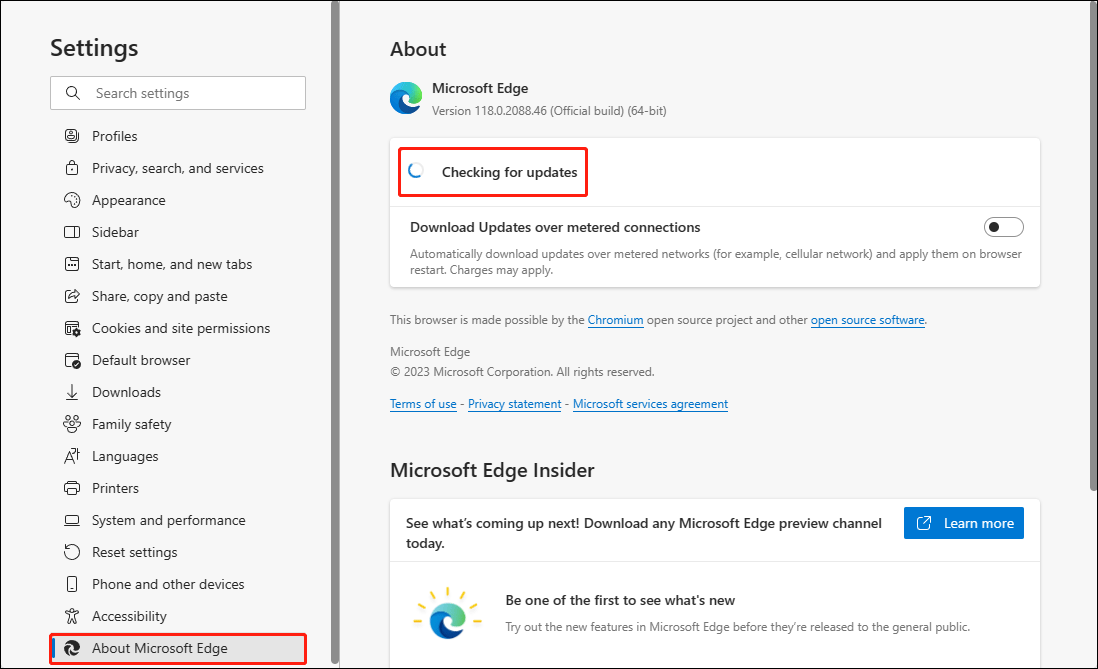
Step 2. Click the 3-dot menu and select Settings.
Step 3. Switch to About Microsoft Edge and let the auto update run.
Step 4. Close Edge.

After these steps, the Copilot icon should appear in the taskbar. Or you can press Windows + C to call it out.
How to Unhide/Hide the Copilot Icon in the Taskbar?
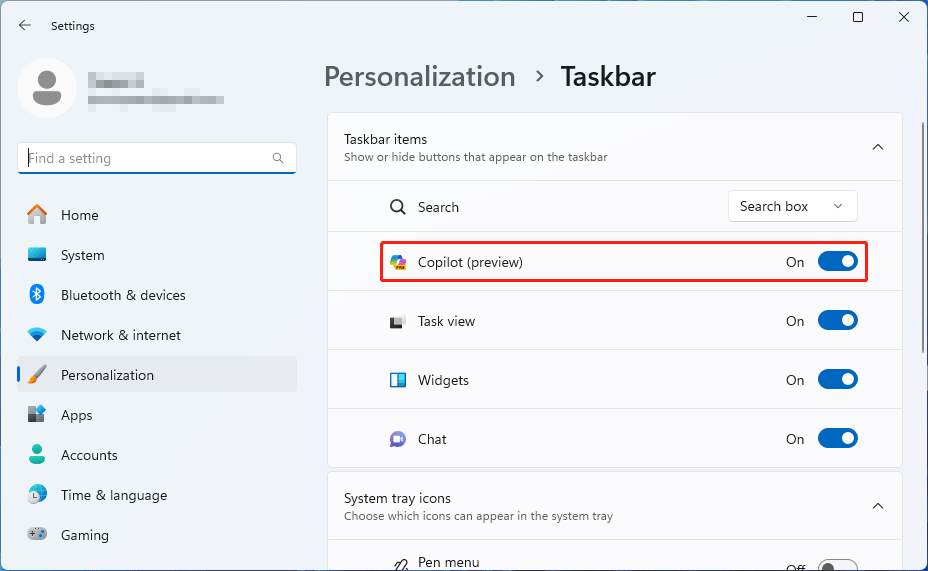
If you cannot see the Copilot icon in the taskbar, you can right-click the taskbar, select Taskbar Settings, and then turn on the button next to Copilot. However, if you want to hide the icon, you can turn off the button.

Bottom Line
You can see it is not difficult to enable Windows Copilot in Windows 11 by using ViveTool. If the Windows 11 update doesn’t bring you Copilot, you can just try Copilot to get it.
![How to Use Copilot in Windows 11? [FULL GUIDE]](https://mt-test.minitool.com/images/uploads/2023/10/how-to-use-copilot-in-windows-11-thumbnail.png)