Microsoft Excel is the most commonly used spreadsheet editor, allowing you to customize it to better suit your individual needs. However, over time, you may want to undo these customized settings, and the easiest way is to restore Excel to its default settings.
But how to reset Excel to default settings? You can complete this task by using the Windows registry, Windows PowerShell, and reinstalling Office suites. See details below.
How to Reset Excel to Default Settings Windows 10
Method 1. Reset Excel to Default Settings Registry
First, we will guide you through how to reset Excel by editing the Windows registry.
Step 1. Press the Windows + R key combination to wake up the run window. Then type regedit in the text box and press Enter.
Step 2. When you see the User Account Control window, select the Yes option to continue.
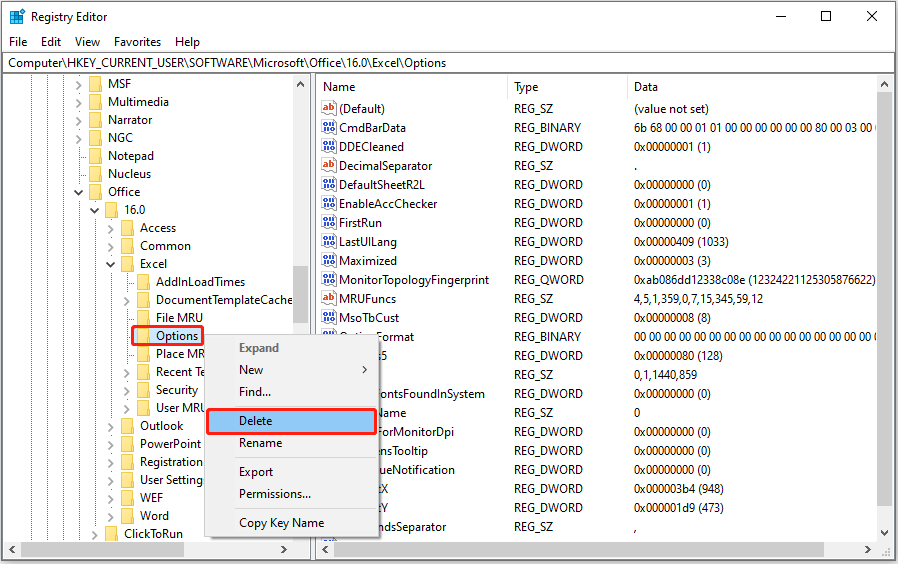
Step 3. In Registry Editor, navigate to the following location depending on the Office version:
- Excel 2016/2019: Computer\HKEY_CURRENT_USER\SOFTWARE\Microsoft\Office\16.0\Excel
- Excel 2013: Computer\HKEY_CURRENT_USER\Software\Microsoft\Office\15.0\Excel
- Excel 2010: Computer\HKEY_CURRENT_USER\Software\Microsoft\Office\14.0\Excel
Step 4. In the left panel, right-click the Options key and click Delete from the context menu.

Step 5. In the Confirm Key Delete window, select the Yes option to complete this task.
Method 2. Reset Excel to Default Settings PowerShell
PowerShell is a scripting language for automated system management that can perform many functions. Likewise, you can also use it to reset Excel to default settings. Here are the major steps.
Step 1. Open Windows PowerShell by using the Windows search box.
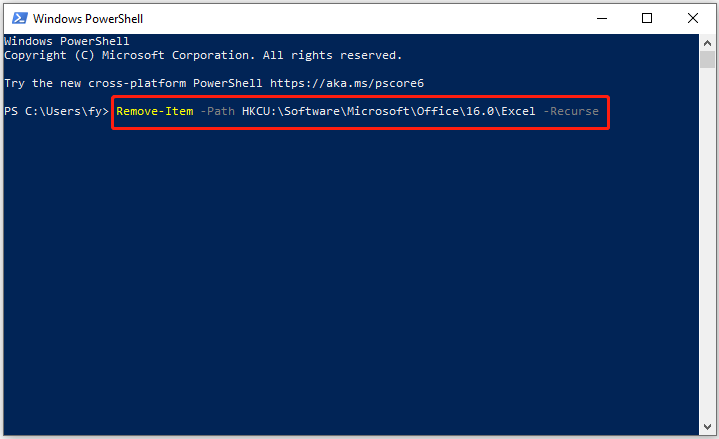
Step 2. In the command line window, type the following commands based on your Office version and press Enter:
- Excel 2016/2019: Remove-Item -Path HKCU:\Software\Microsoft\Office\16.0\Excel -Recurse
- Excel 2013: Remove-Item -Path HKCU:\Software\Microsoft\Office\15.0\Excel -Recurse
- Excel 2010: Remove-Item -Path HKCU:\Software\Microsoft\Office\14.0\Excel -Recurse

Step 3. Exit PowerShell and open an Excel file to check whether the Office application is restored to its default state.
Method 3. Reinstall Office
The last way to restore Excel to its default settings is to reinstall Office.
These posts show you how to reinstall different Office versions on your Windows PC in detail:
- How to Download & Install Office 2021 for PC/Mac
- How to Download and Install Office 2019 on Windows for Free
- Microsoft/Office 365 Download/Install/Reinstall on Win 10/11
Further Reading:
Sometimes, Office files may be lost due to accidental deletion, system crash, or virus attack. If you need to recover deleted Excel files, Word documents, PPTs, OneNote files, etc., you can use MiniTool Power Data Recovery. It is professional file recovery software that is good at recovering Office files, pictures, videos, audio files, and more.
First, you can use MiniTool Power Data Recovery Free to scan and preview the files and recover 1 GB of items for free. Second, if you need to recover files of more than 1 GB, you can upgrade the free edition to an advanced edition.
MiniTool Power Data Recovery FreeClick to Download100%Clean & Safe
Bottom Line
This tutorial describes how to reset Excel to default settings with detailed steps. You can choose the preferred method to complete this task.
If you have any concerns about MiniTool Power Data Recovery, please do not hesitate to send an email to [email protected]. We are ready for help.

