Windows 11, the latest operating system for now, has been updated the version, 24H2 with many AI features and improvements to keep it safer and more reliable. To have a good experience, you plan to install this system on your PC. Perhaps you need to manage multiple devices but don’t want to use a physical USB drive or DVD to install Windows 11 one by one.
Here comes a question: can you install Windows 11 on multiple computers? Of course, you can. Below are detailed steps on how to install Windows 11 over network with iVentoy.
Also read: How to Fix Ventoy Not Booting from USB? Here Are 4 Ways
About iVentoy
iVentoy is a network boot tool that allows you to boot and install OS on multiple computers at the same time through the network (in the same LAN). It is easy to use since you only need to put the ISO image of the system in the specified location and perform the PXE boot. Whether you use Windows, Linux, VMware, or others, iVentoy works well as long as your PC supports PXE.
MiniTool ShadowMaker TrialClick to Download100%Clean & Safe
To install Windows 11 over network in multiple computers, let’s get started.
Move 1: Prepare a Custom Windows 11 ISO File
iVentoy doesn’t support the default Windows 11 ISO, so you should custom one first.
Step 1: Download a Windows 10 ISO and Win11 ISO from Microsoft.
Step 2: Right-click on the Windows 11 ISO file and choose Mount. Go to the sources folder, locate install.wim, and copy it to the desktop.
Step 3: Download, install, and launch AnyBurn, then click Edit image file and tap on the Browse icon to choose Windows 10 ISO.
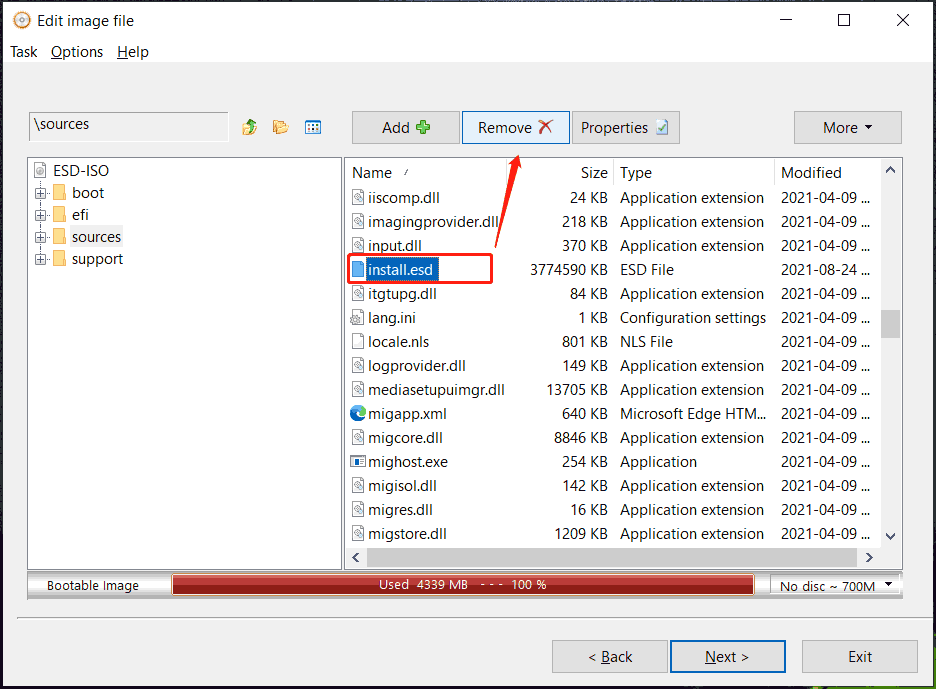
Step 4: Move to the sources folder, locate install.esd, and hit Remove.

Step 5: Hit Add to add the install.wim file of Windows 11 and then click Create Now. You will get a custom ISO to install Windows 11 over network with iVentoy.
Move 2: Set up iVentoy on Your PC
It’s time to implement the setup task.
Step 1: Visit the website of iVentoy, download this utility, extract all the contents to a folder called iventoy, and open it on your PC.
Step 2: Put the custom Windows 11 ISO into the iso folder under iventoy.
Step 3: Allow iVentoy to go through Windows Firewall in the popup. Or go to search for Windows Defender Firewall > Allow an app or feature through Windows Defender Firewall > Change settings > Allow another app to find iventoy to add it to the list. Ensure it has the necessary permissions for both Private and Public.
Step 3: In the iVentoy window, go to Image Management, and you will see the ISO file has been detected.

Step 4: Under Boot Information, click the Start button to launch iVentoy and make it ready to allow other computers to connect to it over the network.
Move 3: Install Windows 11 Over Network Using iVentoy on Another PC
Step 1: Start the PC where you want to install Windows 11, press a boot key to enter the BIOS menu, and boot from network. Then, save the settings.
Step 2: The PC connects to iVentoy over the network and the tool will allocate an IP address to the computer.
Step 3: In the new menu, choose the custom Windows 11 ISO you have prepared beforehand and start installing the OS. The steps are the same as installing the system from a bootable USB drive.
Step 4: Complete the installation depending on the on-screen prompts.
To install Windows 11 on multiple computers, repeat all the steps in Move 3 on each client computer.
Final Words
That’s all the information on how to install Windows 11 over network with iVentoy. Following the given instructions, you can easily and effectively deploy Windows across multiple machines.


