The Settings app is not unfamiliar to you. It is a critical and useful application on your computer that can be used to manage and modify some computer settings to optimize the device or fix errors. The built-in search function can help you quickly and accurately find the settings you need. What if search is not working in the Settings app? How to fix Settings search bar? Read this essay in MiniTool to get rid of the Settings search bar not working issue.
Settings Search Bar Not Working on Windows
Windows Settings app is a built-in tool in the Windows operating system. It provides a collected place to manage and customize various aspects of your computer. This app replaces the traditional Control Panel and offers a more streamlined and user-friendly interface for configuring settings on Windows devices.
One of the main advantages is the Search feature. With it, you can type the keywords and phrases in the search box to find the specified settings quickly. However, sometimes you may find that search is not working in the Settings app. It means you cannot search in the Settings app. Whenever you search for something in the Settings app no results are shown.
To fix this issue, you can try to restart your system first and check if the problem persists. If that does not work, you can refer to the following methods to fix the Settings app search bar not working issue.
How to Fix Settings Search Bar Not Working
Method 1: Reset the Settings App
You can troubleshoot whatever is causing the search issue in the Settings app by resetting or repairing it. It does not delete your data. Here is how you can reset the Settings app.
Step 1: Press the Win + S keys to open the Search bar and type Settings in the box.
Step 2: Choose App settings in the right pane.
Step 3: Scroll down the page until you find the Reset button, and then click on it to reset your app.
After you have completed these steps, open your Settings to see if the search bar can work normally.
Method 2: Run Search and Indexing Troubleshooter
The Search and Indexing troubleshooter is a built-in tool that helps diagnose and fix common problems related to the search feature and file indexing on your computer. Here is how to run it.
Step 1: Right-click on the Start button and choose Settings to open it.
Step 2: In Settings, select Update & Security > Troubleshoot > Additional troubleshooters.
Step 3: Under the Find and fix other problems, locate Search and Indexing and click it, and then click on the Run the troubleshooter button.
Now relaunch your Settings to check if this problem still exsits.
Method 3: Enable Advanced Indexing Option
Enable indexing for the LocalState folder can help you solve the problem. Here are some operations.
Step 1: Open your File Explorer, click This PC to expand it, right-click the C: drive, and then select Properties.
Step 2: Under the General bar, check the Allow files on this drive to have contents indexed in addition to file properties box, and click on Apply > OK.
Step 3: Input the following path in the address bar and press Enter:
C:\Users\<username>\AppData\Local\Packages\windows.immersivecontrolpanel_cw5n1h2txyewy\LocalState
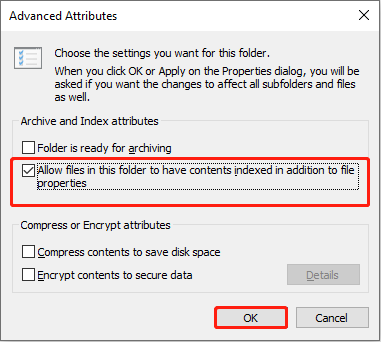
Step 4: Right-click on the Indexed folder, and select Properties.
Step 5: Under the General bar, click on the Advanced button.
Step 6: Check the Allow files in this folder to have indexed in addition to file properties box, and click on OK.

Step 7: Restart your computer and see if it has helped.
Method 4: Rebuild the Search Index
The search index may be corrupted, which will lead to mistakes in displaying search results. You can rebuild search index to repair this issue. The operations are as follows.
Step 1: Open your Control Panel, change the View by to Large icons or Small icons, and choose Indexing Options.
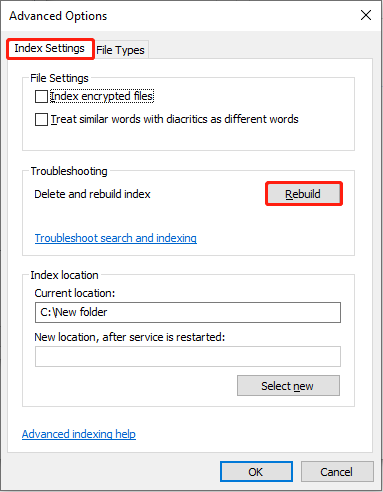
Step 2: In the Indexing Options page, click on the Advanced button.
Step 3: Under the Index Settings bar, click on the Rebuild button next to Delete and rebuilt index.

Step 4: When prompted by a new window, click on OK. It will take a long time.
When it is finished, open your Settings and search for something to see if it has helped.
Method 5: Install the Latest Windows Updates
Besides new features, Windows updates are meant to improve performance by fixing issues impacting your PC. If you see there’s a new version in the Settings app, you should install the latest Windows updates to see if it fixes the issue.
MiniTool Power Data Recovery FreeClick to Download100%Clean & Safe
Wrapping Things Up
This problem – search is not working in the Settings app, is not scary and complicated. Try the above methods to fix it according to your preferences.


