How do I make Steam run faster? How to fix the error of Steam lagging? This post from MiniTool shows you reliable solutions. Read this post to learn some detailed solutions to the error of Steam running slow.
Some Steam users reported that their Steam is slow and they are unable to play games on it. It also consumes a lot of CPU resources and causes your system to heat up. So, they wonder whether it is possible to solve the Steam lagging issue. The answer is positive.
So, in this post, we will show you how to solve the issue of Steam lagging.
10 Solutions to Steam Lagging
In this section, we will show you how to fix the error that Steam is slow.
Way 1. Clear Steam Cache
If your Steam browser accumulates so much data in its cache and cookies that there isn’t much space left, you may come across the error of Steam lagging.
So, in this situation, you can choose to clear Steam cache. Now, here is the tutorial.
- Right-click the Steam client and choose Run as administrator.
- Then click the Steam on the client and click Settings from the drop-down menu.
- Then navigate to the Web browser present on the left side of the screen.
- Then you will see two options: Delete Web Browser Cache and Delete Web Browser Cookies.
- Click them one by one to delete the caches of Steam.
Once all steps are finished, restart your Steam and check whether the issue of Steam lagging is fixed.
Way 2. Clear the Download Cache
In order to fix the issue that Steam is slow, you can also cleat the download cache.
Now, here is the tutorial.
- Right-click the Steam client and choose Run as administrator.
- Then click the Steam on the client and click Settings from the drop-down menu.
- Navigate to the Download tab.
- Then you will see the button of Clear download cache and click it.
When all steps are finished, reboot Steam and check whether the issue of Steam lagging is fixed.
Way 3. Enable Automatically Detect Settings and Disable LAN Settings
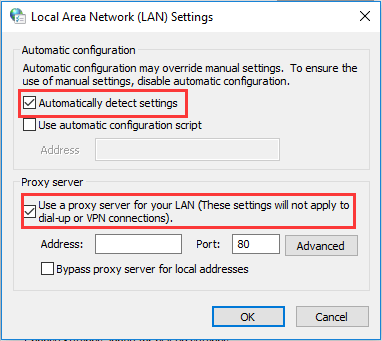
Having a proxy active on your computer can cause Steam to do extra work. So, in order to fix the issue of Steam running slow, you can choose to enable automatically detect settings and disable LAN settings.
Now, here is the tutorial.
- Open Google Chrome.
- Then click the three-dot button and click Settings.
- Then click Open your computer’s proxy settings under System section.
- In the pop-up window, click LAN settings.
- Then check the option Automatically detect settings.
- And uncheck the option Use a proxy server for your LAN.
- At last, click OK to save the changes.

Once all steps are finished, reboot your Steam and check whether the issue of Steam lagging is fixed.
Way 4. Repair Steam
If there are corrupted system files on the Steam, you may also come across the error of Steam lagging. In this situation, you need to repair the Steam.
Now, here is the tutorial.
- Press Windows key and R key together to open Run dialog.
- In the dialog, type the address of Steam directory, followed by bin, then the exe and finally followed by a space and a /repair, such as C:\Program Files (x86)\Steam\bin\SteamService.exe /repair
- When you launch the Steam, a command prompt will appear. Please do not close it until it is finished.
Once all steps are finished, reboot your computer and check whether the issue of Steam running slow is fixed.
Way 5. Verify Integrity of Game Files
If your games files are corrupted or missed, you may also come across the error that Steam is slow.
In this situation, you need to verify the integrity of game files.
Now, here is the tutorial.
- Open your Steam client and click the Library present on the top.
- Then select the game that Steam fails to open.
- Right-click it and choose Properties.
- Browse to the Local files tab and click on the option which says Verify Integrity of Game Files.
- Then Steam will start to verify all the files present according to the main manifest it has. If there are any corrupted or missing files, Steam will download them again and replace it.
- Then click Settings again.
- You will see a box written Steam Library Folders.
- All your Steam contents will be listed here. Right-click on it and choose Repair Library Folder.
Once all steps are finished, reboot your Steam and check whether the issue of Steam lagging is fixed.
Way 6. Disable Unwanted Programs
Running programs on the computer will cost some CPU resources and make computer run slow. So, in order to make Steam run faster, you can choose to disable some unwanted programs on your computer.
For more detailed instructions, you can read the post: 2 Ways – How to Stop Apps from Running in the Background
Way 7. Upgrade Display Driver
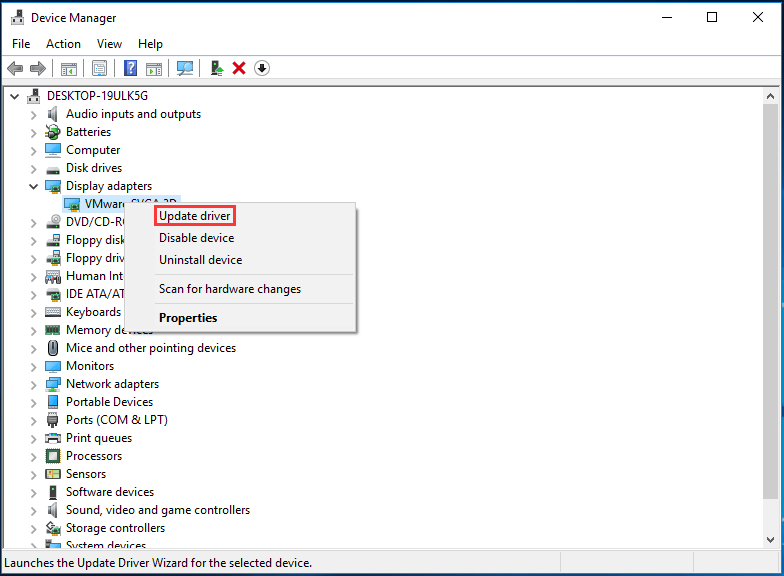
If the display driver on your computer is out of date, you may also come across the error Steam lagging when running the game. In this situation, you can choose to update display driver.
Now, here is the tutorial.
- Press Windows key and R key together to open Run dialog.
- Type devmgmt.msc in the box and click OK to continue.
- In the Device Manager window, expand the Display adapter.
- Right-click the driver on your computer and choose Update driver to continue.
- Then click Search automatically for updated driver software to continue.

Once all steps are finished, reboot your Steam and check whether the error of Steam slow is fixed.
Way 8. Change Power Plan
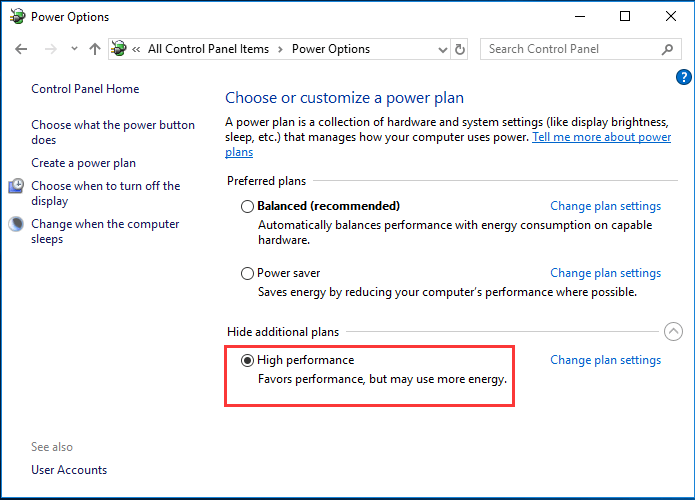
In order to fix the issue of Steam lagging, you can choose to change power plan. Now, here is the tutorial.
- Open Control Panel.
- Choose Power Options.
- Check the option High performance.

Then reboot your Steam and check whether the issue of Steam running slow is fixed.
Way 9. Change Priority
To fix Steam lagging, you can try changing the priority.
Now, here is the tutorial.
- Open Task Manager.
- In the Task Manager, navigate to Details.
- Then right-click Steam and choose Set priority > High to continue.
After that, you have changed the priority of Steam to high. When all steps are finished, reboot your Steam and check whether the issue of Steam lagging is fixed.
Way 10. Delete HTML Cache
In order to delete HTML cache, you can try deleting the HTML cache.
Now, here is the tutorial.
- Press Windows key and R key together to open Run dialog.
- Type %temp% in the box and click OK to continue.
- Select all files in the folder and press Shift + Delete to continue.
- Then open Run dialog again.
- Type %appdata% in the box and click OK to continue.
- Select all files in the folder and press Shift + Delete to continue.
- Then right-click the shortcut of Steam on desktop and choose Open File location.
- Click App cache folder and delete it.
- Then navigate to the AppData/local/steam on your computer and delete HTML cache from it.
After that, run Steam again and check whether the issue of Steam lagging is fixed.
Final Words
To sum up, this post has shown 10 solutions to Steam lagging. If you have any better solutions to fix it, you can share it in the comment zone.
![2 Ways – How to Set Priority Windows 10 [Step-by-Step Guide]](https://mt-test.minitool.com/images/uploads/2020/09/how-to-set-priority-windows-10-thumbnail.png)