The Windows operating system has a built-in firewall. If logging is enabled for the firewall, files named “pfirewall.log” will be generated in a specific directory. This MiniTool post is for you if you want to learn the location of Windows Firewall logs and how to manage them to ensure better security.
Windows Firewall has developed over the years to improve security and safeguard against new threats and unauthorized entries. It also produces logs and offers visibility into its operations, allowing you to supervise and address security issues. To manage Windows Firewall logs, you may want to know the location of Windows Firewall logs.
By default, the firewall doesn’t log network traffic, but it can be set up to do so, allowing for retrieving logs that detail both allowed and denied traffic. If the logging feature is enabled, these logs can offer valuable information such as source and destination IP addresses, port numbers, and protocols, helping users analyze and respond to security incidents. The Windows Firewall log file can also monitor TCP and UDP connections and blocked packets.
The location of Windows Firewall logs varies depending on the Windows version. Did you know where are Windows Firewall logs stored? If not, you are in the right place. Keep reading to get more details.
What Is the Location of Windows Firewall Logs on Windows 10/11
When it comes to the location of Windows Firewall logs, the location is specific to a computer. If you want to know where are Windows Firewall logs located, there are 3 ways to get them.
#1. Using the Event Viewer Tool
The default location where Windows Firewall logs are stored varies depending on your Windows version. On most Windows operating systems, such as Windows 7, Windows 8, Windows 10, Windows 11 and Windows Server editions, you can find the logs in a directory called “Windows Firewall with Advanced Security” within the Windows Event Viewer. To access the logs, please follow the steps below:
Through the Windows Log Folder
Step 1: Press Win + R together to open the Run command line, type eventvwr.msc in the box, and press Enter.
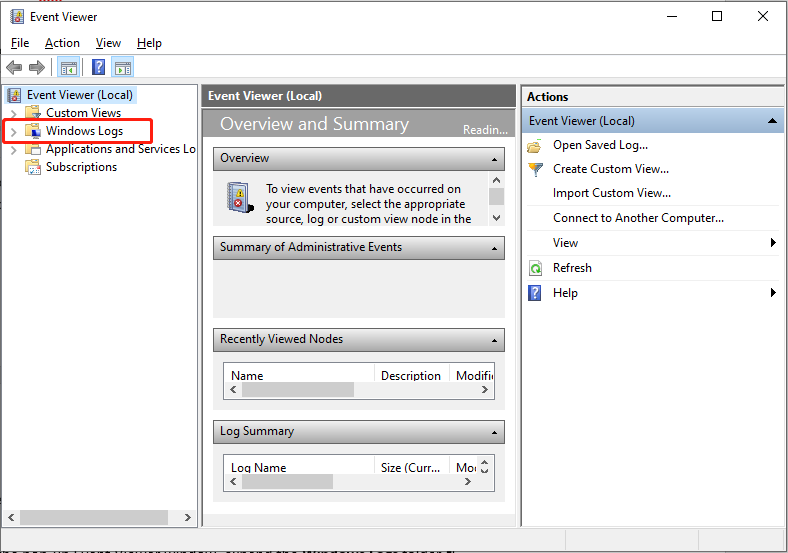
Step 2: In the pop-up Event Viewer window, expand the Windows Logs folder.

Step 3: Select the Security option to view the firewall logs.
Through the Applications and Services Logs Folders
Step 1: Press Win + R together to open the Run command line, type eventvwr.msc in the box, and press Enter.
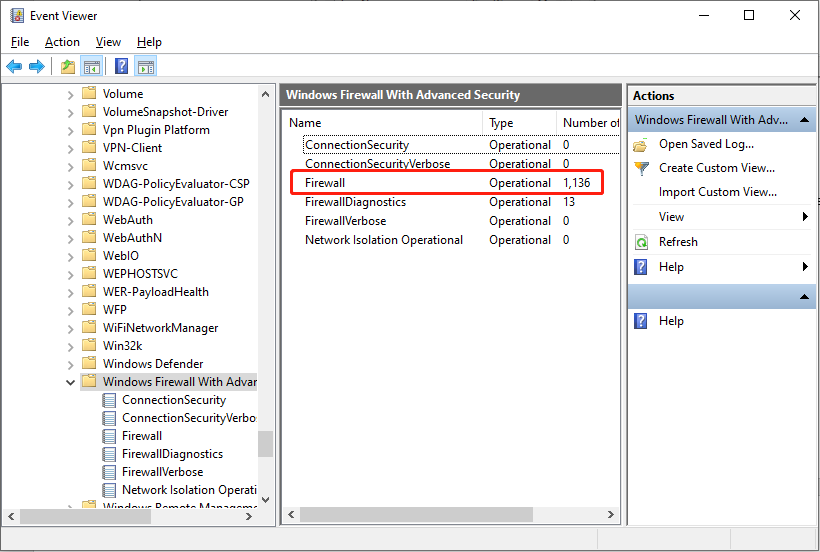
Step 2: Navigate to Applications and Services Logs > Microsoft > Windows > Windows Firewall with Advanced Security.
Step 3: Here, you will find various log categories, including Firewall, Connection Security, and IPsec Operational. Double-click the Firewall option to check its logs.

#2. Using the Windows File Explorer
As a file, the Windows Firewall log can be checked in the File Explorer. Just follow the steps to find the location of Windows Firewall logs:
Step 1: Press Win + E simultaneously to open the File Explorer.
Step 2: Go to the system drive; in most cases, it is the C drive.
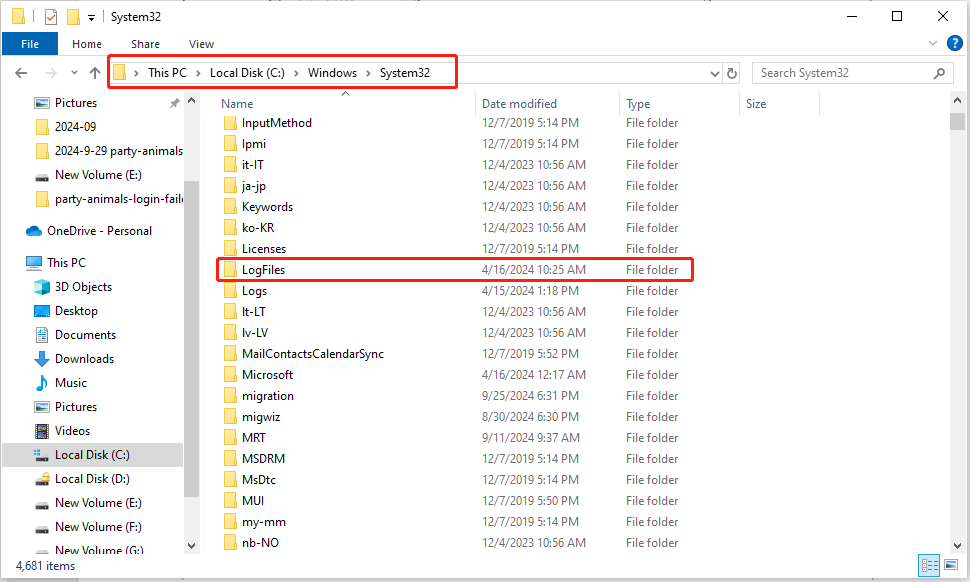
Step 3: Navigate to Windows > System32 > LogFiles > Firewall.

Step 4: Find and click pfirewall.log.
#3. Using the Windows Firewall with Advanced Security
In addition, the Windows Firewall log file is stored in a folder called “Windows Firewall with Advanced Security”. Therefore, you can follow the steps to find this folder to check your firewall logs:
Step 1: Press the Win + R key combination to launch the Run dialog box, type wf.msc, and press Enter to open the Windows Defender Firewall with the Advanced Security window.
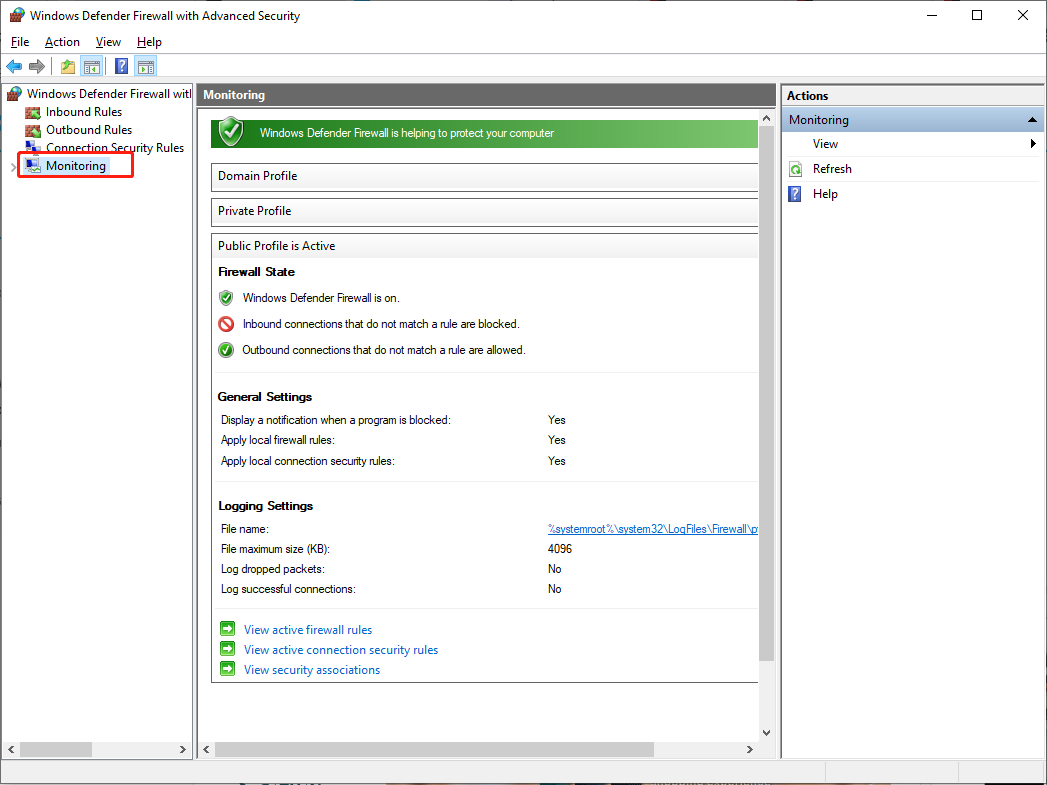
Step 2: Click Monitoring on the right pane, and locate the Logging Settings section on the left panel.

Step 3: You will see a path with a hyperlink after the File name; click the hyperlink to open the log file location.
Modifying the Storage Location of Windows Firewall Logs
Sometimes, there may be a need to alter the default storage location of Windows Firewall logs. The graphical user interface (GUI) in Windows Firewall settings does not provide a built-in feature to facilitate this modification. However, it is possible to adjust the storage location by making changes to the Windows Registry.
MiniTool ShadowMaker TrialClick to Download100%Clean & Safe
This process necessitates administrative privileges and careful attention. The following are the sequential steps to modify the storage location of Windows Firewall logs:
Step 1: Press the Win + R key combination to launch the Run dialog box, type regedit, and press Enter to open the Windows Registry Editor.
Step 2: In the pop-up UAC prompt, click Yes.
Step 3: Navigate to the following registry key: HKEY_LOCAL_MACHINE\SOFTWARE\Microsoft\WindowsFirewall
Step 4: Find the LogFilePath value under the WindowsFirewall key.
Step 5: Double-click on LogFilePath and enter the desired path for the new storage location of the logs
Step 6: Click OK to save the changes
In Summary
After reading, you must know the location of Windows Firewall logs and how to modify the location of the firewall logs. Hope you can have a good experience!

