To save the power of your computer, you might configure USB power settings properly. However, what do you do when USB Power Setting is missing on your Window machine? In this guide from MiniTool Website, we offer you some useful advice to you.
USB Power Setting Missing Windows 10/11
Microsoft allows you to control power management for connected USB peripherals like mice, keyboards, webcam, and mass storage drives. These devices can draw power from your computer, so you might choose to enable USB Selective Suspend Settings to save power. However, some of you might find USB Power Setting missing from Control Panel.
MiniTool ShadowMaker TrialClick to Download100%Clean & Safe
How to Fix USB Power Setting Missing on Windows 10/11?
Fix 1: Disable and Re-enable USB Devices
The first easy fix for USB Power Management Setting missing is to disable and then re-enable the problematic device via Device Manager.
Step 1. Right-click on Start icon to select Device Manager from the drop-down menu.
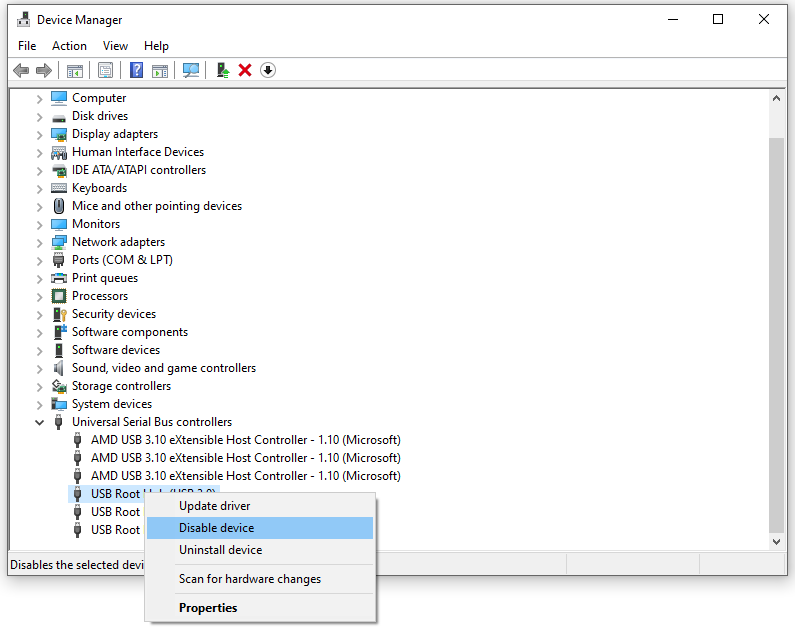
Step 2. Expand Universal Serial Bus controllers and right-click on USB Root Hub (USB 3.0) to choose Disable device. Repeat this step for all Root Hubs.

Step 3. After they are all disabled, right-click on USB Root Hub (USB 3.0) and choose Enable device.
Fix 2: Update USB Drivers
Make sure that your device driver is the most up-to-date. Here’s how to update it:
Step 1. Open Device Manager.
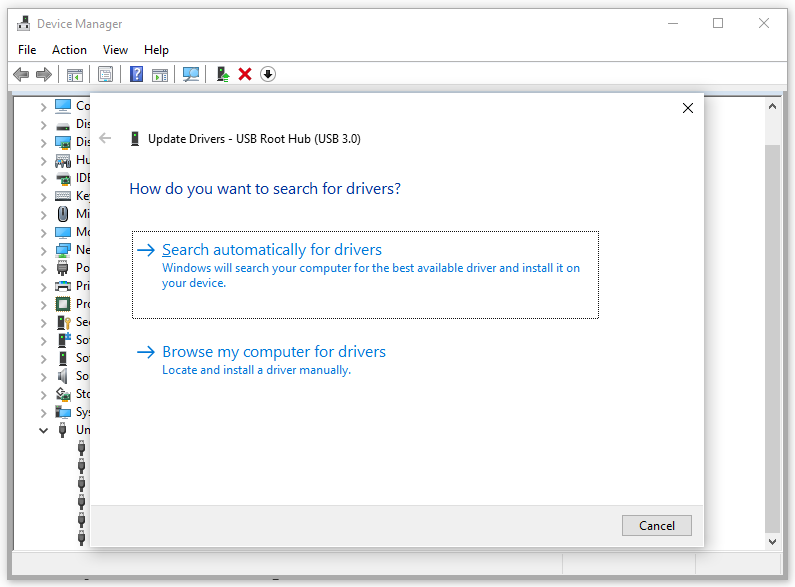
Step 2. Expand Universal Serial Bus controllers and right-click on USB Root Hub (USB 3.0) and select Update driver.
Step 3. In the driver update screen, hit Search automatically for drivers and follow the on-screen guidelines to complete the process.

Fix 3: Reinstall USB Drivers
If your USB flash drive is malfunctioning, you can consider reinstalling the drivers to check if it does the trick for USB Power Setting missing.
Step 1. Launch Device Manager.
Step 2. Expand the Universal Serial Bus controllers category and right-click on USB Root Hub (USB 3.0) to choose Uninstall device. Repeat the step for all listed USB Root Hubs.
Step 3. Quit Device Manager and reboot your system. Once your system restarts, it will automatically scan for hardware changes and reinstall the required drivers for you.
Fix 4: Create a New Power Plan
Creating a new power plan is proven fruitful to fix USB Power Setting not showing Windows 10/11. Here’s how to do it:
Step 1. Type control panel in the search bar and hit Enter.
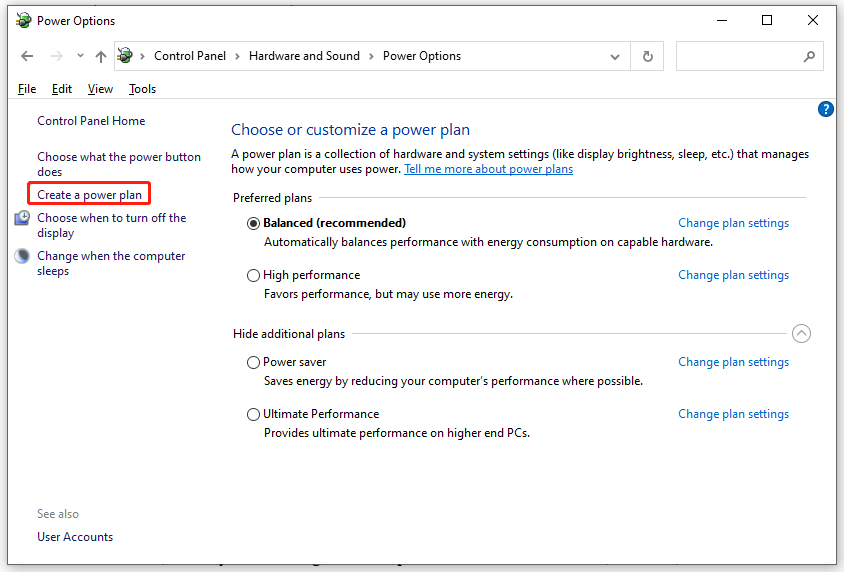
Step 2. Go to Hardware and Sound > Power options > Create a power plan.

Step 3. Selected a power plan and rename it.
Step 4. In the next screen, hit Create.
Step 5. Tick your custom power plan and click on Change plan settings beside it.
Step 6. Press Change advanced power settings.
Step 7. Expand USB settings > USB selective suspend settings > set Settings to Enabled or Disabled as desired.
Step 8. Save the changes.
Fix 5: Run DISM Scan
Sometimes, some system files might be corrupted due to installed software, malware, or aborted Windows updates. These corrupted system files might lead to USB Power Setting missing
Step 1. Press Win + S to open the search bar.
Step 2. Type cmd in the search bar to locate Command Prompt and right-click on it to select Run as administrator.
Step 3. In the command window, run the following command one by one to scan and repair corrupted system files.
Dism /Online /Cleanup-Image /ScanHealth
Dism /Online /Cleanup-Image /CheckHealth
Dism /Online /Cleanup-Image /RestoreHealth
Step 4. Reboot your computer.

![[3 Ways] How to Disable USB Selective Suspend Settings Win 10/11?](https://mt-test.minitool.com/images/uploads/2023/06/how-to-disable-usb-selective-suspend-settings-thumbnail.png)