When you want to prevent strangers from accessing your Internet connection, but you find that your Wi-Fi won’t ask for password. You are in the right place. This post offered by MiniTool Solution will show you some workable methods to fix this error. You can try them all. Hope they are useful to you.
If you want to prevent strangers from accessing your Internet connection, it’s crucial for you to set a Wi-Fi password. In this way, you can control who and when uses your bandwidth.
However, your modem or router could not work normally sometimes and fail to ask you for a password when you attempt to access your Wi-Fi connection.
If you find that Wi-Fi won’t ask for password, don’t worry. It is a common problem and not hard to fix.
Method 1: Restart Your Modem/Router
The first method for you is to restart your modem/router. It is quite simple to do that.
Firstly, you need to unplug the power cable from the electrical outlet and then wait a few minutes. Next, plug your modem back. Finally, press the power button to turn on your device.
After that, you should restart your modem successfully. Then, you can check if the “Wi-Fi won’t ask for password” error persists.
Method 2: Update Your Computer
If you are running outdated software versions, you are likely to find that Wi-Fi won’t ask for password. Hence, you need to make sure that you are running the latest Windows 10 OS version and driver updates. Here is a quick guide on how to update your computer.
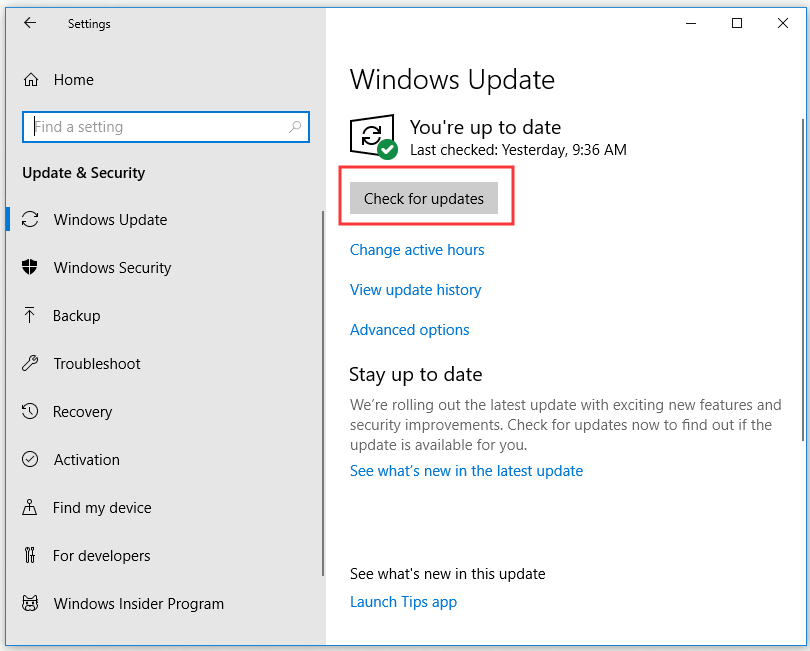
Step 1: Press the Win key + I key, click Update & Security and then click Windows Update from the left side.
Step 2: Click Check for updates from the right side. All available updates will be downloaded and installed automatically.

Step 3: Restart your PC.
Now, you should fix the “Wi-Fi won’t ask for password” error successfully.
Method 3: Change Your Wi-Fi Password
Changing your Wi-Fi password may help you fix this problem. Here’s how to do that in Control Panel.
Step 1: Type control panel in the Search bar, navigate to Control Panel and click Open.
Step 2: Click Network and Sharing Center, then click Change adapter settings from the left pane.
Step 3: Right-click on your wireless network and then go to Status > Wireless Properties > Security.
Step 4: Now, change your password.
After you manage to change your Wi-Fi password, check if the error is solved.
>> Related articles:
Method 4: Delete Your WLAN Profile
If the network profile is stored by the WLAN auto-configuration service, you may encounter that Windows 10 won’t prompt you for credentials for your Wi-Fi connection. In this case, you can try to delete the stored profile.
Step 1: Type Command Prompt in the Search bar, navigate to it and then click Run as administrator.
Step 2: Now, type the following commands and press Enter after each:
netsh wlan show profile
netsh wlan delete profile name=”profile name”
Change profile name in “profile name” to the name of the network you wish to delete.
If you want to delete all profiles, execute this command: netsh wlan delete profile=*.
Step 3: Restart your computer.
Now, check if Wi-Fi asks for password.
Method 5: Temporarily Turn off Antivirus and Firewall
To fix this error, you can also try to disable antivirus and firewall software. To disable Windows Defender temporarily, you can refer to this post: 3 Ways to Disable Windows Defender Antivirus on Windows 10.
After you temporarily disable Windows Defender, wait for a few minutes. Then try to connect to your Wi-Fi network and check if the “Wi-Fi won’t ask for password” error is solved.
Bottom Line
After reading this post, hope that these quick solutions can help you fix Wi-Fi not asking for password.

