Encountering the “Zenless Zone Zero stuck at checking resource integrity” issue when you try to launch and play this action role-playing game? We identified potential causes and provided solutions that have been proven effective by multiple users. Check this MiniTool tutorial for detailed guidance.
Zenless Zone Zero Stuck at Checking Resource Integrity
Zenless Zone Zero is a free-to-play sci-fi role-playing game developed and published by miHoYo. It was released on July 4, 2024, for multiple platforms, including Windows, iOS, Android, and PlayStation 5. The game is set in an urban jungle and features a unique style and a fluid real-time combat system.
Before the game was released, many users were eager to experience it. However, many users encountered the Zenless Zone Zero stuck at checking resource integrity problem when trying to play the game after it was released. This is a true example:
“I got stuck with checking resource integrity at 0% in ZZZ. Like the title, no matter what I did, it just stuck at 0% there. What I have done is: “Repair the game” button, change the game location, and repair again. I use SSD. My CPU and SSD usage percent is always pretty low, like the game is not doing anything at all, SSD is like 2 or 3% usage.”reddit.com
Why does this issue happen? How can you resolve this problem and start to enjoy this game? Try the solutions below.
How to Fix ZZZ Checking Resource Integrity Stuck
Listed below are some methods for the ZZZ checking resource integrity stuck issue. You can try them one by one until you can play the game.
Solution 1. Make Changes to the Persistent Folder
The game publisher has not yet provided a solution to the problem of “Zenless Zone Zero stuck at checking resource integrity”. However, third-party technicians have developed a solution and obtained test results from multiple users who encountered this problem, proving that the solution is effective.
Here is the tutorial:
Step 1. Close the game.
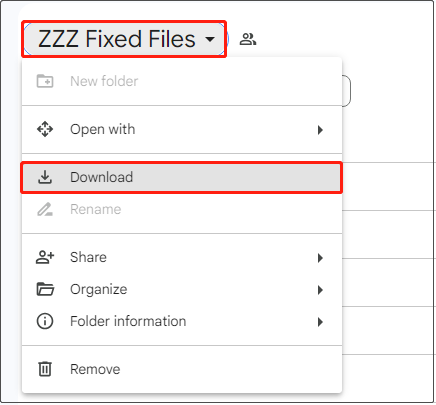
Step 2. Click this link. When a Google Drive window appears, click the ZZZ Fixed Files and then choose the Download button to download the fix folder.

Step 3. In ZZZ, go to Game Settings > Basic Information, and then click Open Directory to open the game folder.
Step 4. Navigate to this location: \ZenlessZoneZero Game\ZenlessZoneZero_Data\Persistent. Delete all files marked with remote, such as audio_version_remote, data_version_remote, res_version_remote, and silence_version_remote.
Step 5. Move the downloaded fix folder from the Downloads folder to the Persistent folder. Then right-click on the fix folder and extract its files here.
Step 6. Now it is time to change the unique number in each revision file, as each revision file is integrated with the corresponding persistent file. Note that the unique number may change with game patch updates.
As of July 11, 2024, the latest numbers are:
- audio_revision: 3294259
- data_revision: 3324532
- res_revision: 3324532
- silence_revision: 3324532
You need to open each revision file with Notepad and then change its value to the latest one.
MiniTool Power Data Recovery FreeClick to Download100%Clean & Safe
Solution 2. Check if You Are Using a 2-Core CPU
According to many user experiences, Zenless Zone Zero does not work on low-core processors with only 2 cores. The minimum system requirement for the CPU for this game is 7th Gen Intel Core i5.
To check your processor information:
- Press the Windows + R key combination to open Run.
- Type msinfo32 and press Enter.
If you confirm that the game is stuck at checking resource integrity due to hardware limitations, then you can only consider whether you can upgrade your CPU. Please ask your computer manufacturer for more information.
Solution 3. Switch the Game Servers
Some users have reported that switching the current server to another server and then back again can help get rid of the Zenless Zone Zero stuck at checking resource integrity issue. So, you can have a try. ZZZ supports America, Europe, and Asia servers.
Bottom Line
To sum up, the “Zenless Zone Zero stuck at checking resource integrity” issue can be resolved by modifying the Persistent folder or upgrading the CPU. Hope the information we provide is helpful to you.

