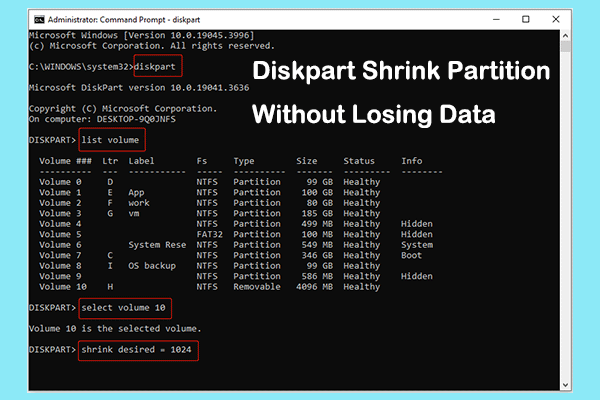
Due to some reasons, users sometimes need to shrink volume in Windows Server. What should you do? To reduce the size of partitions easily, here from this MiniTool post, we strongly recommend you use the professional partition manager MiniTool Partition Wizard.
Sometimes, for some reason, you need to shrink volume to make room for other uses. Some users choose Disk Management to shrink the size of a volume, while others choose third-party software to shrink the size of a volume.
Let’s learn how to shrink volume in Windows Server 2012/2016/2019/2022, and how to solve the problem of being unable to shrink volume in Windows Server.
How to Shrink Volume in Windows Server
In this section, we will show you how to reduce the size of a volume in Windows Server. For more details on how to do this step by step, please continue reading.
#1. Use Disk Management
Disk Management is a built-in tool in Windows that helps you perform basic operations such as creating, deleting, and formatting volumes. However, this tool has some limitations. For versions before Windows Server 2008 (including Server 2000 and Server 2003), Disk Management does not provide the Extend Volume and Shrink Volume options.
In addition, other conditions should be met to shrink the volume using Disk Management. Otherwise, the Extend Volume will be grayed out. Here are the reasons:
- Microsoft stipulates that the Extend Volume feature in Disk Management is only applicable to RAW partitions or NTFS partitions.
- The Extend Volume feature of Disk Management only extends the volume to the unallocated/free space to the right of the target partition.
It can be seen that there are certain limitations to using Disk Management to shrink volume in Windows Server. Let’s take a look at how to shrink a volume in Disk Management when the shrink volume is not grayed out. Here are the detailed steps:
Step 1: Right-click the Windows Start menu and choose Disk Management to open.
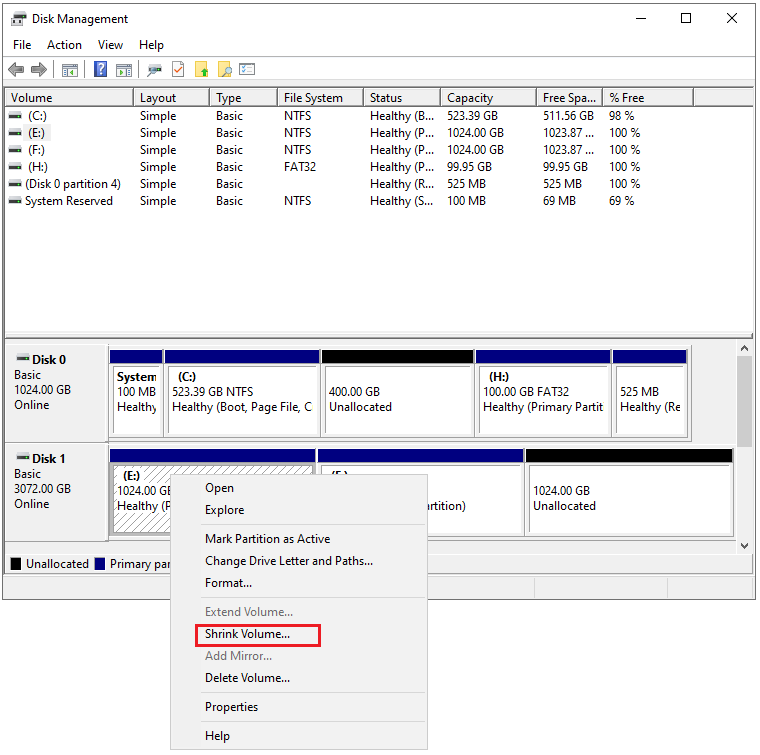
Step 2: Right-click the partition you want to shrink and choose the Shrink Volume option to reduce the partition size.
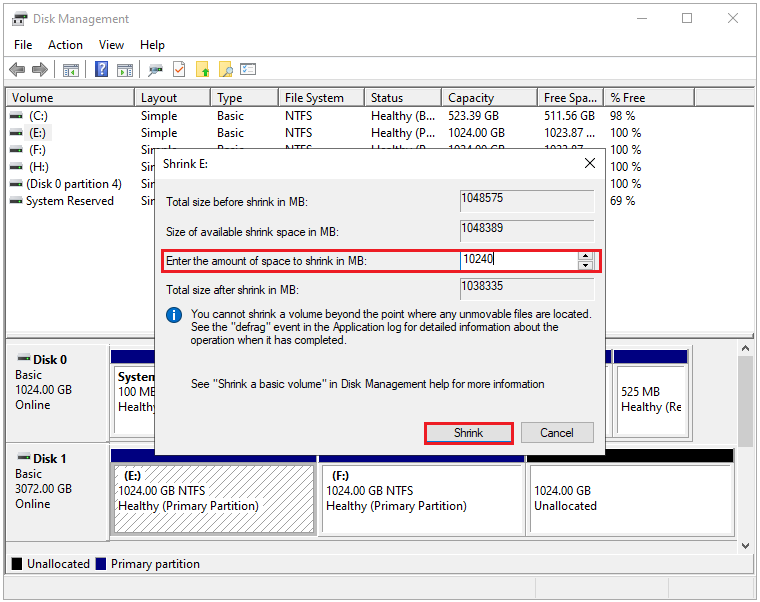
Step 3: Enter the amount of space that you want to shrink in MB. Then click Shrink.
#2. Use Command Prompt
Command Prompt is a command line interpreter that can help you reduce the size of a volume in Windows Server, delete a partition, etc. through special command characters.
Here are the detailed steps to shrink volume.
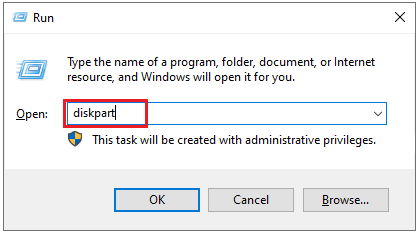
Step 1: Press the Windows logo key + R to open the Run box. Type diskpart and press Enter.
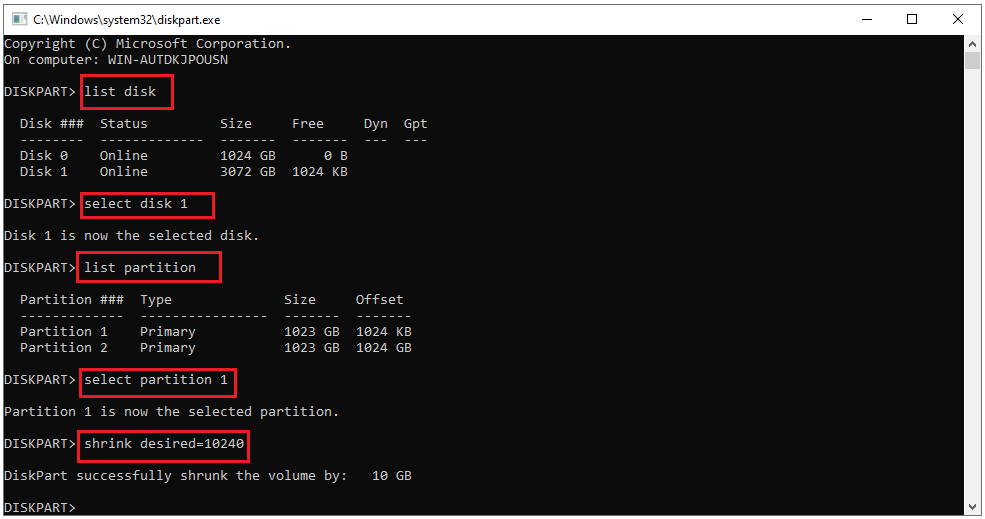
Step 2: In the Command Prompt window, input the following commands one by one and press Enter after each to execute them:
- list disk
- select disk * (replace * with the disk number which you want to shrink)
- list partition
- select partition * (replace * with the partition number which you want to shrink)
- shrink desired=* (* is the size you want to shrink in MB)
Sometimes when you encounter unmovable files on your hard drive, you may not be able to shrink the partition using the above methods. Just like what happened to this forum user.
My c drive is 1 TB I want to shrink it different volumes but it will get and it will show "You can't shrink a volume beyond the point where any unremovable files are located see the defrag event in application log for detailed information about the operation when it has completed."https://answers.microsoft.com/en-us/windows/forum/all/my-disk-drive-is-not-shrink-beyond-the-point/b2108d53-fc52-420a-bf8c-33594372660c
So how do you solve the “Unable to shrink volume in Windows Server” problem? Here are two methods to help you overcome all difficulties and successfully shrink the volume in Windows Server 2012/2016/2019/2022.
How to Solve Unable to Shrink Volume in Windows Server
To address the issue, you can either disable unremovable files or utilize a different partition shrinking tool.
Method 1: Disable Unremovable Files
Unremovable files are files such as page files, hibernation files, etc. If you are unable to shrink the volume in the Windows Server due to unremovable files, you can try disabling unremovable files. Here are the steps below:
#1. Disable Hibernation Mode
1. Press the Win + R key to open the Run box.
2. Input cmd and hit Enter to open the Command Prompt window.
3. At the Command Prompt window, type powercfg.exe /hibernate off, and then press Enter.
#2. Disable Page File
1. Click the File Explorer icon to open and right-click This PC to select Properties.
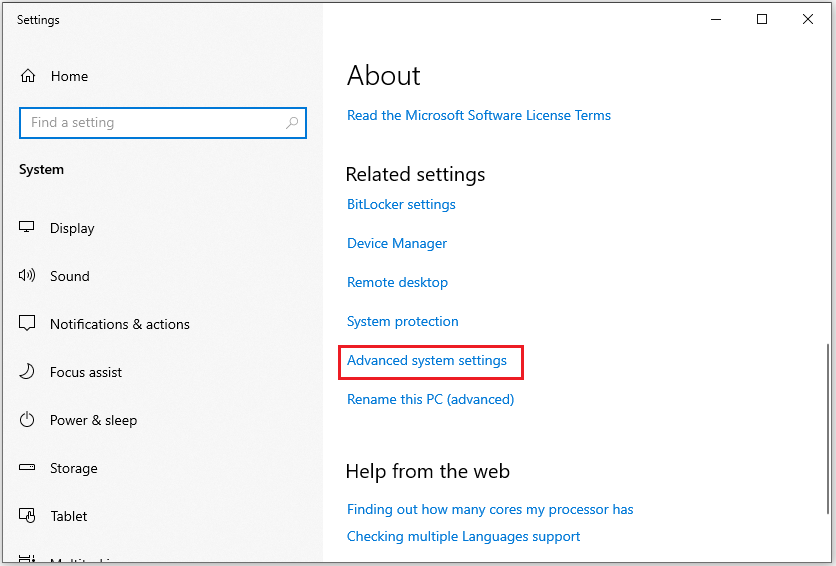
2. Click on Advanced system settings under Related settings from the right panel.
3. In the Advanced tab, click on the Settings button under Performance.
4. Select Advanced tab from the top and click on Change button under Virtual memory.
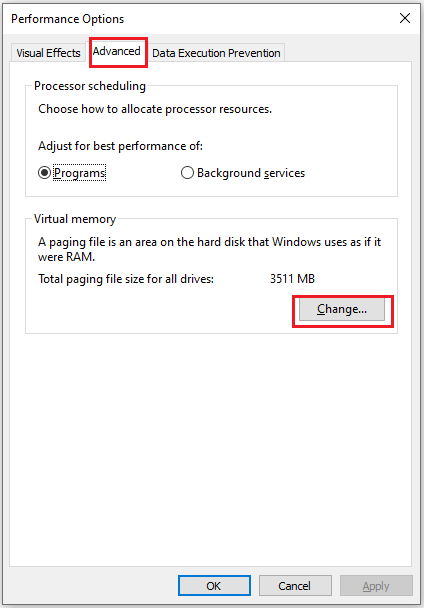
5. Uncheck the Automatically manage paging file size for all drives.
6. Check the No paging file option and click Set. Then, click on Yes to confirm.
7. Click on the OK button to save the changes.
#3. Disable System Protection
1. Type system restore in the Search box. Then, click Create a restore point from the results to open it.
2. In the System Protection tab, click Configure.
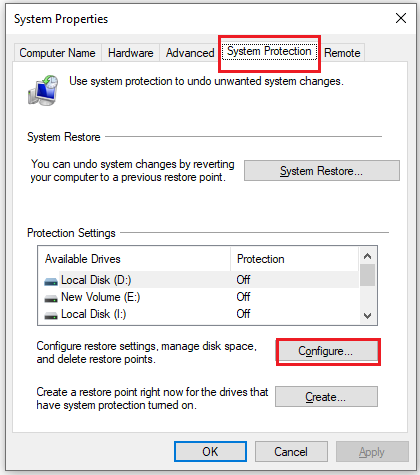
3. Under Restore Settings, check the Disable system protection option and click Apply.
Method 2: Use Alternative Volume Shrink Tool — MiniTool Partition Wizard (Recommend)
MiniTool Partition Wizard is developed by MiniTool Software Ltd. It is a simple and easy-to-use partition manager. With this powerful partition manager, you can complete many complex disk or partition operations.
With this tool, you can manage your disks well. It not only can help you create/format/split/wipe/delete/merge partitions but also can help you clone a hard drive, hard drive recovery, convert MBR to GPT, etc.
Many users use this partition manager to resize partitions to get more disk space. Now let’s see how to use the Move/Resize Partition feature of this partition manager to help you shrink volume in Windows Server 2012/2016/2019/2022 without losing any data.
Step 1: Click the button below to download MiniTool Partition Wizard Free Edition. Install it on your computer and launch it to get the main interface.
MiniTool Partition Wizard DemoClick to Download100%Clean & Safe
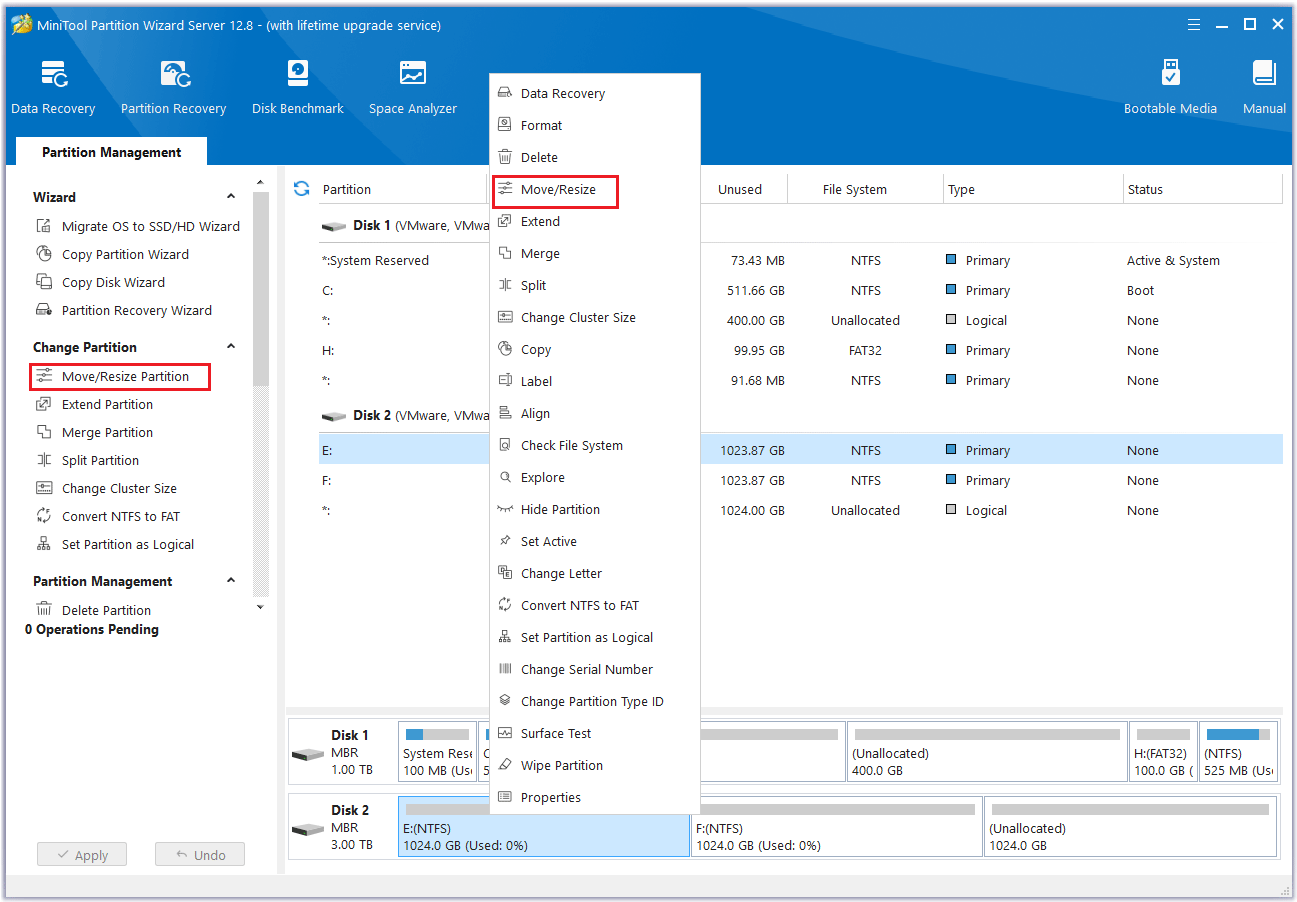
Step 2: In the main interface, you can view the disk and partition distribution on your computer. Select the desired partition, then choose one of the options below to begin the shrinking process.
- Choose Move/Resize Partition from the left action panel.
- Choose Move/Resize from the pop-up menu after right-clicking on the target partition.
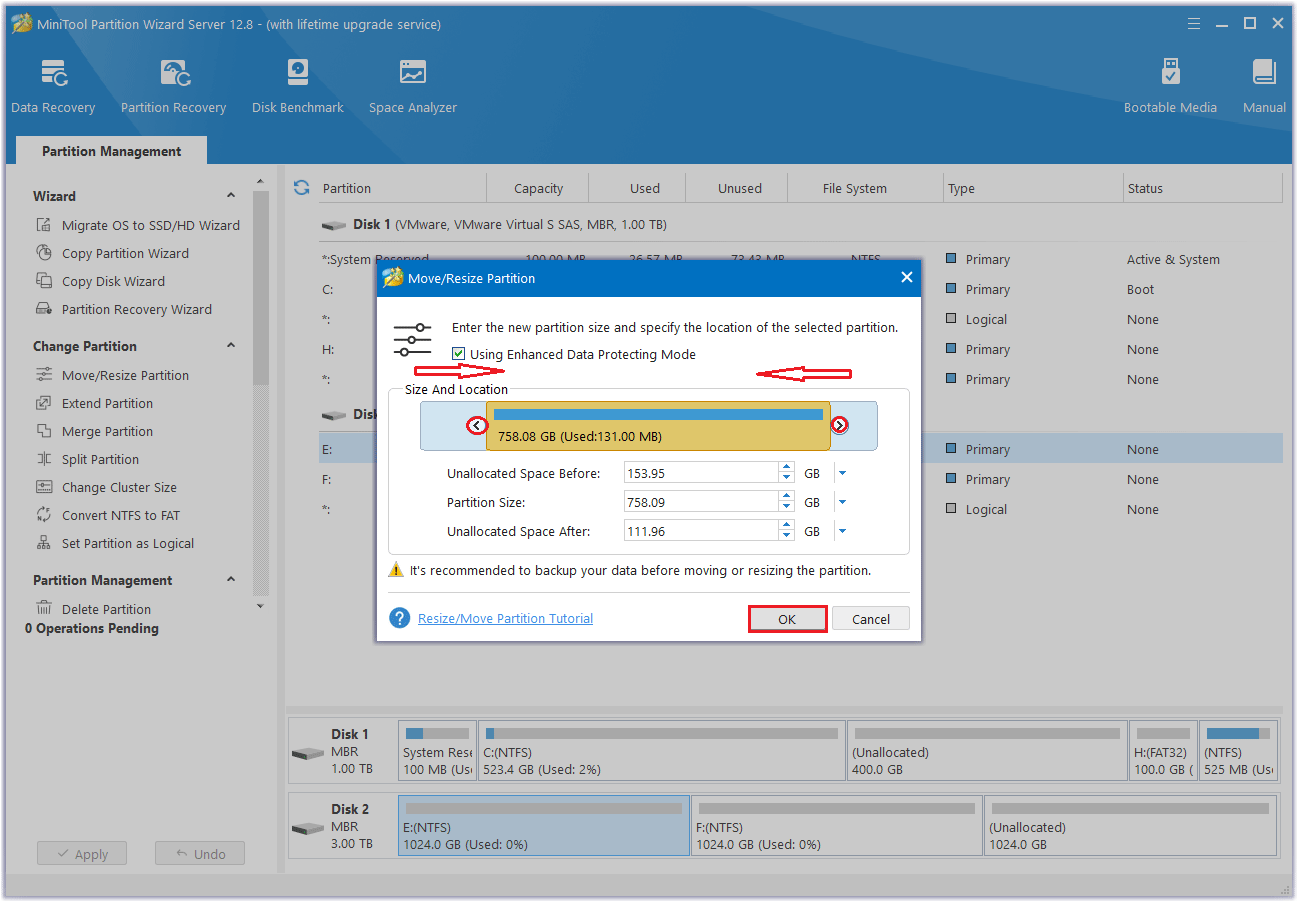
Step 3: On the Move/Resize Partition window, you should drag the left triangle rightward or drag the right triangle leftward to free up space for the target partition in this window. Alternatively, you can manually specify the size you want to reduce. Then click OK.
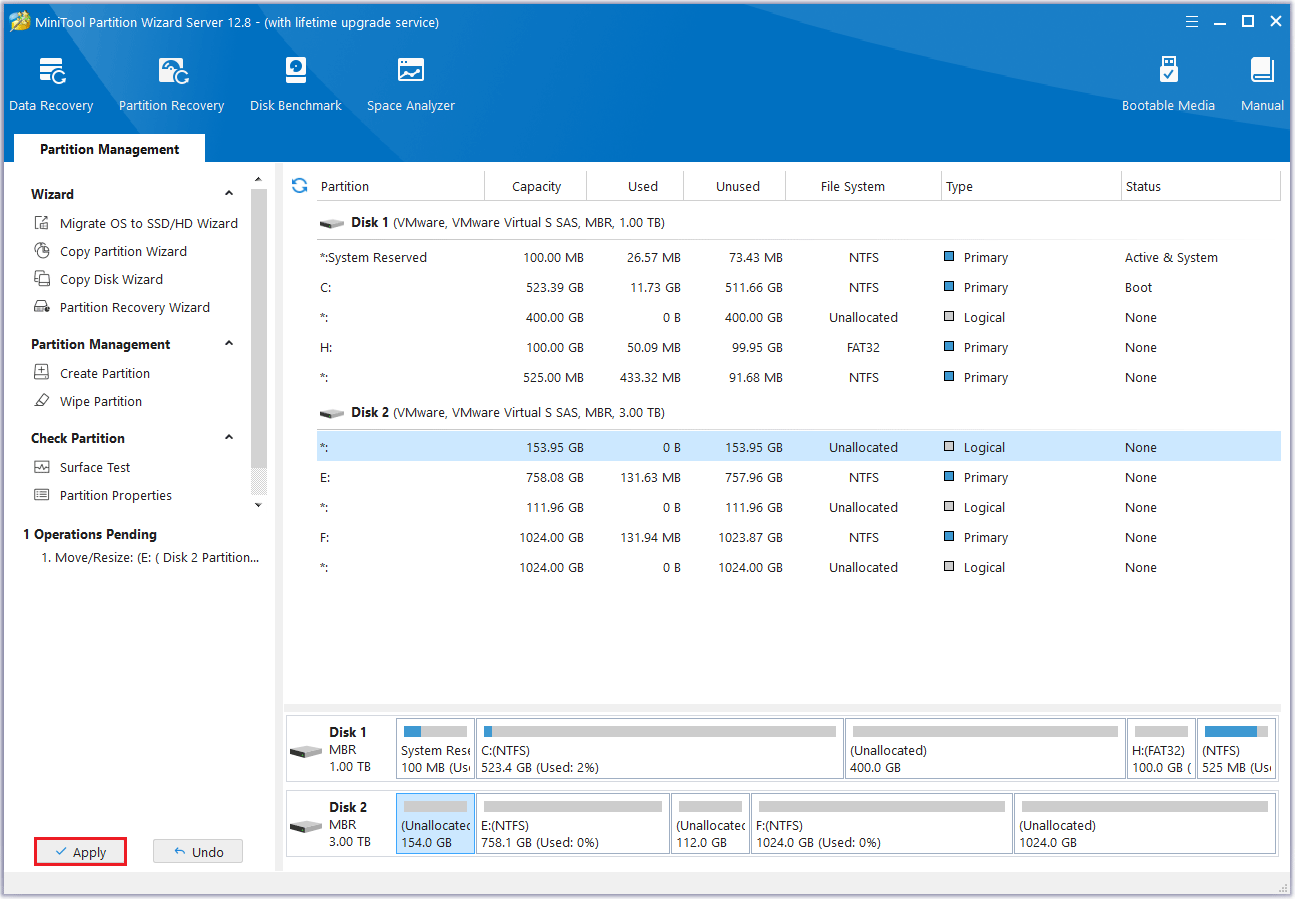
Step 4: The software will return to its main interface, showing that the size of the selected partition has changed. Consequently, there will be unallocated space both before and after the target partition. However, this is just a preview, you need to click Apply to execute these changes and actually complete the partition shrinking process.
What to Do After Shrinking Volume in Windows Server
After shrinking the volume, you will get new unallocated space. What can you do with this unallocated space?
Actually, you can use this unallocated space to create a new partition or extend a partition. It only takes a few steps to do this with MiniTool Partition Wizard. Below we will provide you with the detailed steps for this operation.
MiniTool Partition Wizard DemoClick to Download100%Clean & Safe
#1. Extend Partition
This Extend Partition feature directly uses free space from any existing partitions or unallocated space on the same disk to expand a partition.
Step 1: Launch MiniTool Partition Wizard to its main interface. Then right-click the partition to be extended and select Extend. And you can also select Extend Partition from the left action panel.
Step 2: Click the down arrow from “Take Free Space From” and select the partition to get expansion space. You can drag the sliding handle to decide how much of the available space it takes up. Then click OK to return to the main interface.
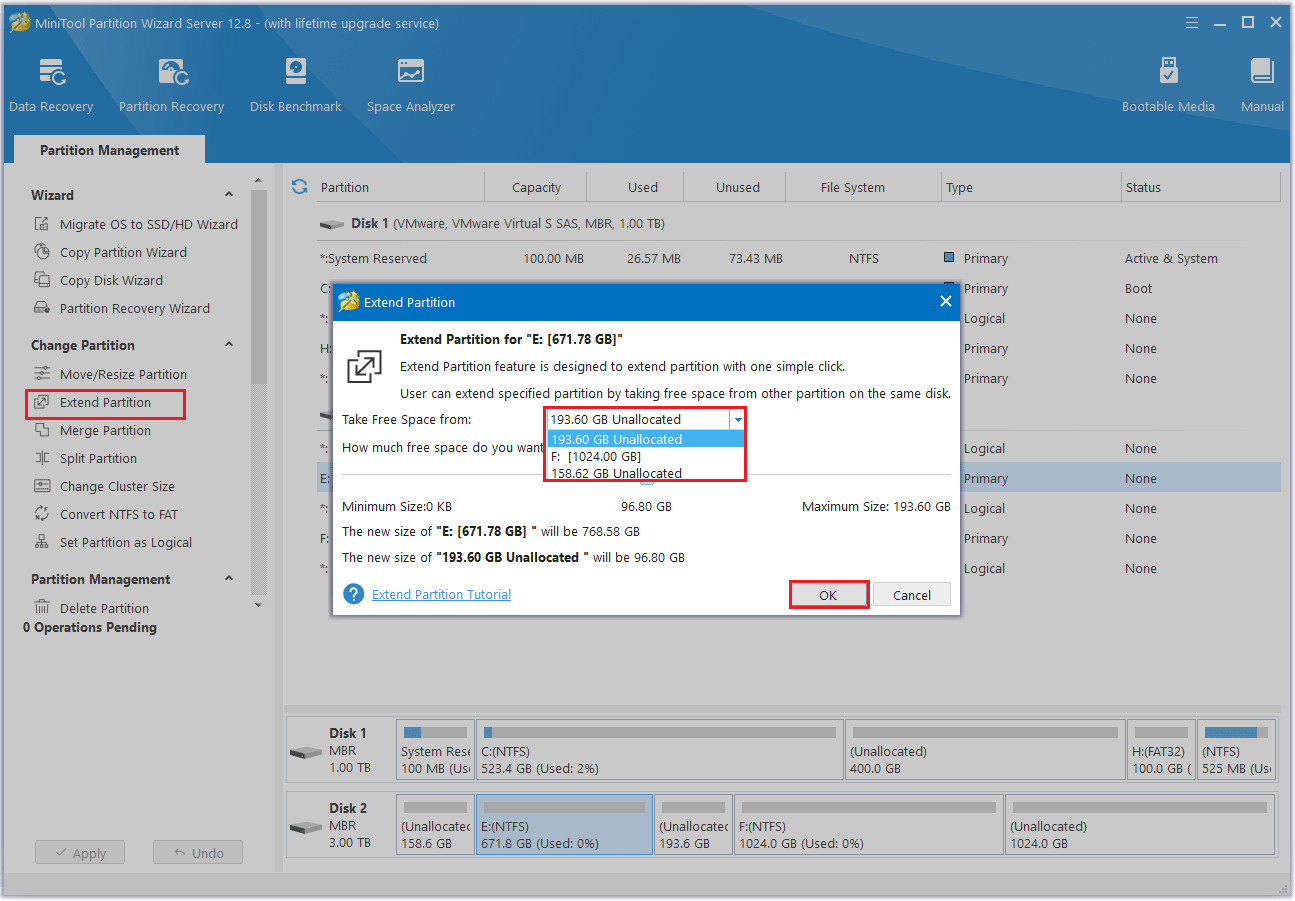
Step 3: You can see that the partition has been enlarged, but it has not been applied to the computer yet. Then you need to click the Apply button to perform all changes.
#2. Create Partition
The Create Partition feature allows users to create a new volume with specified unallocated space. Sometimes you want to create a new partition to manage your data, such as a partition for movie resources, file data, etc. In this case, this feature can easily manage various data by category.
Creating partitions in Windows Server is relatively easy, but there are some conventional rules that you need to understand to avoid errors in the process of creating partitions.
The detailed rules are as follows:
- On an MBR disk, you can create up to four primary partitions or three primary partitions and one extended partition. Multiple logical partitions can be created in an extended partition.
- On a GPT disk, you can create up to 128 partitions. Disks larger than 2TB are generally initialized as GPT disks.
Therefore, before creating a partition, you need to check whether you have a GPT disk or an MBR disk. If it is an MBR disk and more than 4 primary partitions are created, an error message “There are no MBR slots on the disk” will appear.
Below are the detailed steps to create partitions using MiniTool Partition Wizard:
Step 1: On the MiniTool software’s interface, select the unallocated space and then choose the Create Partition option from the left side. Or you can right-click on the unallocated space and choose the Create option from the drop-down menu.
Step 2: On the Create New Partition window, confirm the parameters including drive letter, file system, cluster size (optional), and partition size. After that, click the OK button.
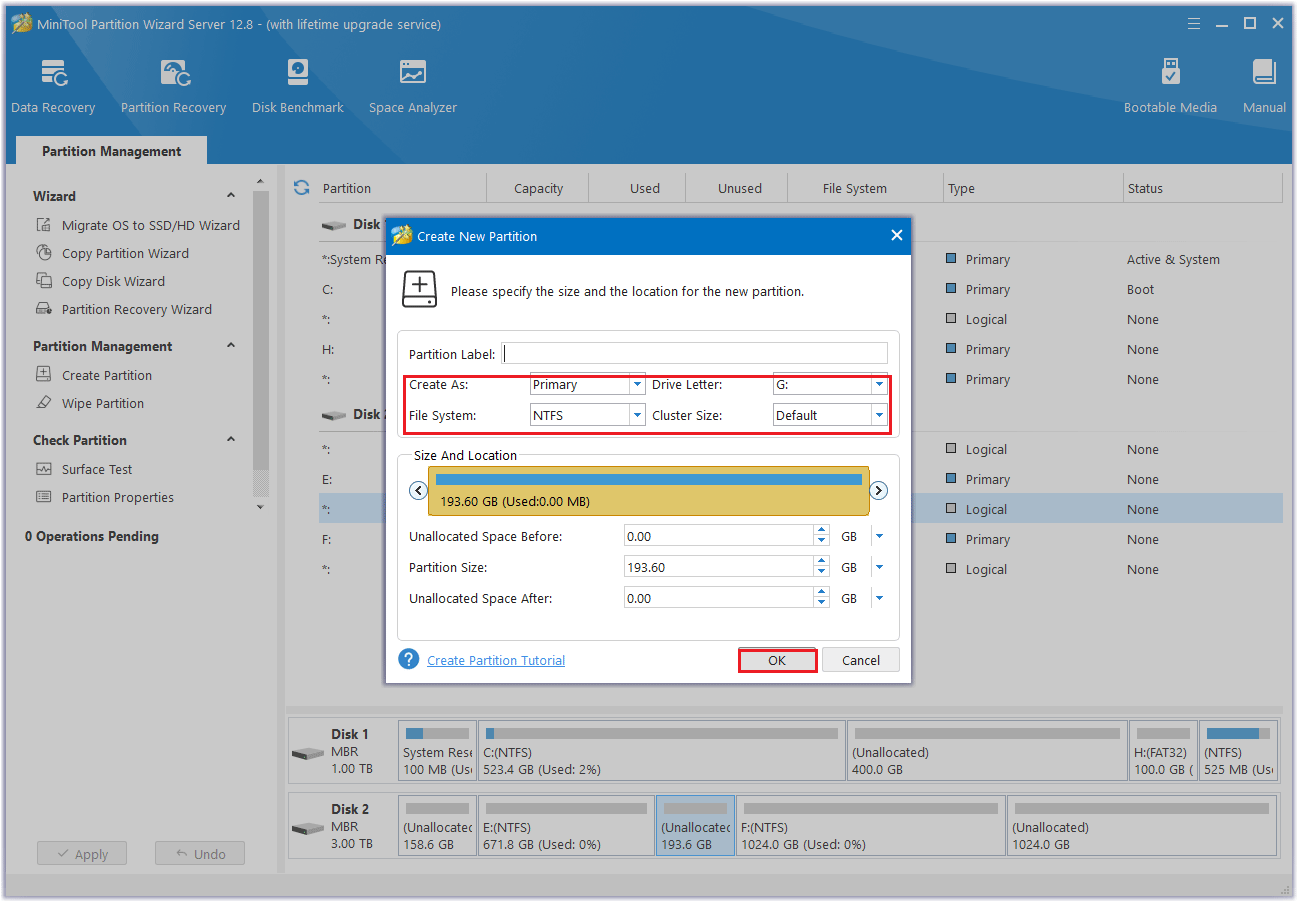
Step 3: Review the creation results and then click the Apply button.
Bottom Line
After reading this article, you will get several free ways to shrink volume in Windows Server. We also introduced the problems you may encounter and how to solve them. You will find that MiniTool Partition Wizard is a relatively better choice.
In addition, we also introduced how to use unallocated space to improve space utilization after shrinking the partition. For example, create a new partition or extend the partition. Based on this, you can try it.
If you have any questions or suggestions while using the MiniTool Partition Wizard, you can contact us via [email protected] to get a quick reply.
