Reasons for Partition Missing
Generally speaking, you will create one or more partitions on the storage device before using it. Sometimes, you may find partitions disappear suddenly. The lost partitions can’t be seen at all in File Explorer, while it will appear as extra unallocated space in Disk Management.
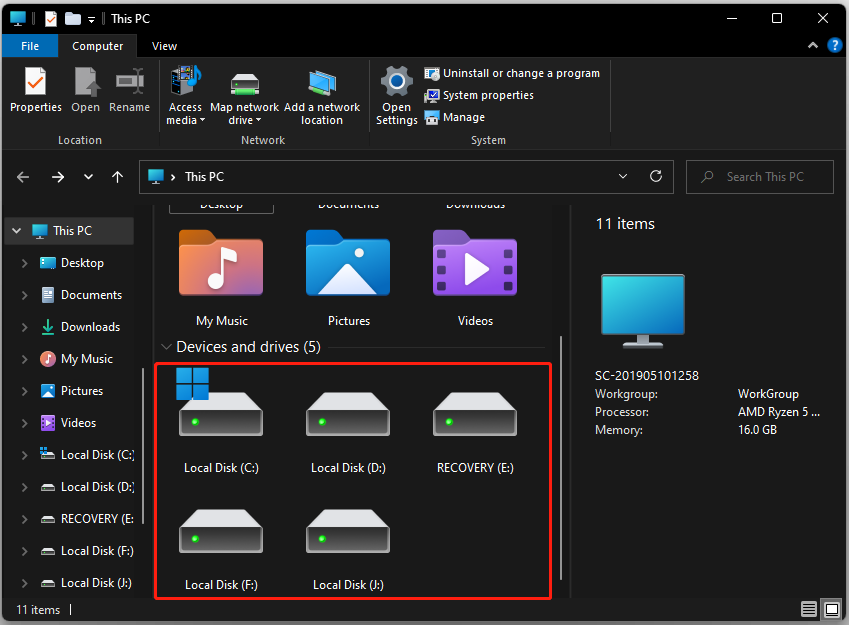
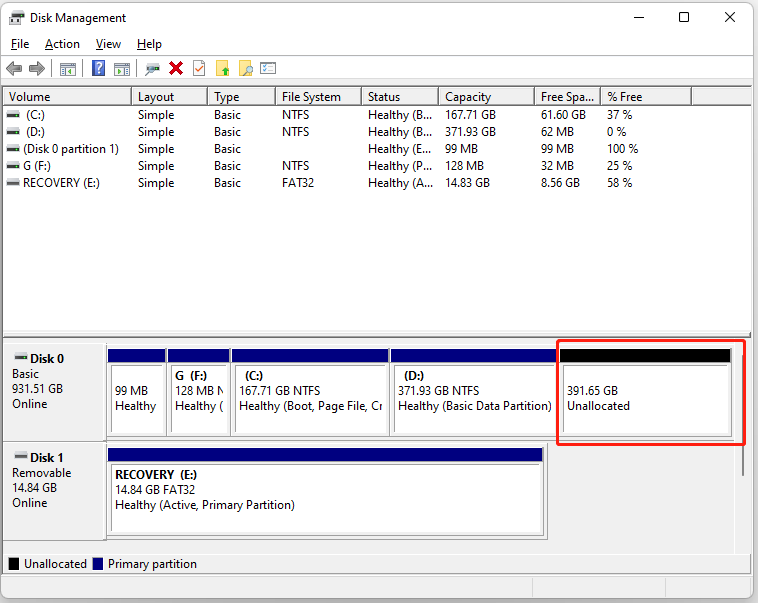
What causes partition missing?
Partitions on your computer can get lost because of multiple reasons. A common cause for the partition loss is accidental deletion.
Other factors like hard drive corruption, virus attacks, malware activities, improper system shutdown, accidental drop of laptops, hard disk damage, bad sectors on the hard drive, power surge, improper format, partition table damage, wrong ghost, and incorrect partitioning can also cause partition deletion on Windows 11.
As you see, partitions will be missing due to various reasons. Fortunately, you can undelete Windows 11 partitions with ease by utilizing the following methods.
What need you notice after partitions disappear?
After your partitions disappear, you can’t do operations below on this hard drive. Otherwise, you can’t recover deleted partition Windows 11 and may suffer from further data loss.
- Stop any operations on the hard drive.
- Don’t reformat the hard drive.
- Don’t add new items to the partition.
- Don’t rebuild the partition table.
Recommended reading: Fix the Windows 11 Black Screen Error & Recover Data After It
How to Undelete Windows 11 Partition
In this part, three approaches to recovering Windows 11 partitions will be illustrated. The first one method is to undelete Windows 11 partition is to use partition recovery software (MiniTool Partition Wizard), the second one is to execute command lines, and the third one is to perform a system restore.
Check the details now!
Way 1: Use MiniTool Partition Wizard
MiniTool Partition Wizard is a multifunctional partition manager, which allows you to create/format/extend/move/resize/align/merge/split/delete/recover partitions. Moreover, it also enables you to migrate OS to SSD/HD wizard, convert MBR to GPT, rebuild MBR, analyze disk space, perform disk benchmark, convert FAT32 to NTFS without data loss, and so forth.
If you receive errors like Loadlibrary failed with error 87, PS4 not working, and CRC failed 7Zip, you can use MiniTool Partition Wizard to fix them as well. This program is considered as a great duplicate file finder, junk file remover, SD card formatter, fast copy tool, Windows migration program, and SSD health checker because of its outstanding features.
Here we would illustrate how MiniTool Partition Wizard works as a Windows 11 partition recovery tool.
Step 1: Download and install MiniTool Partition Wizard by clicking the button below.
MiniTool Partition Wizard DemoClick to Download100%Clean & Safe
Step 2: Launch MiniTool Partition Wizard to enter its main interface.
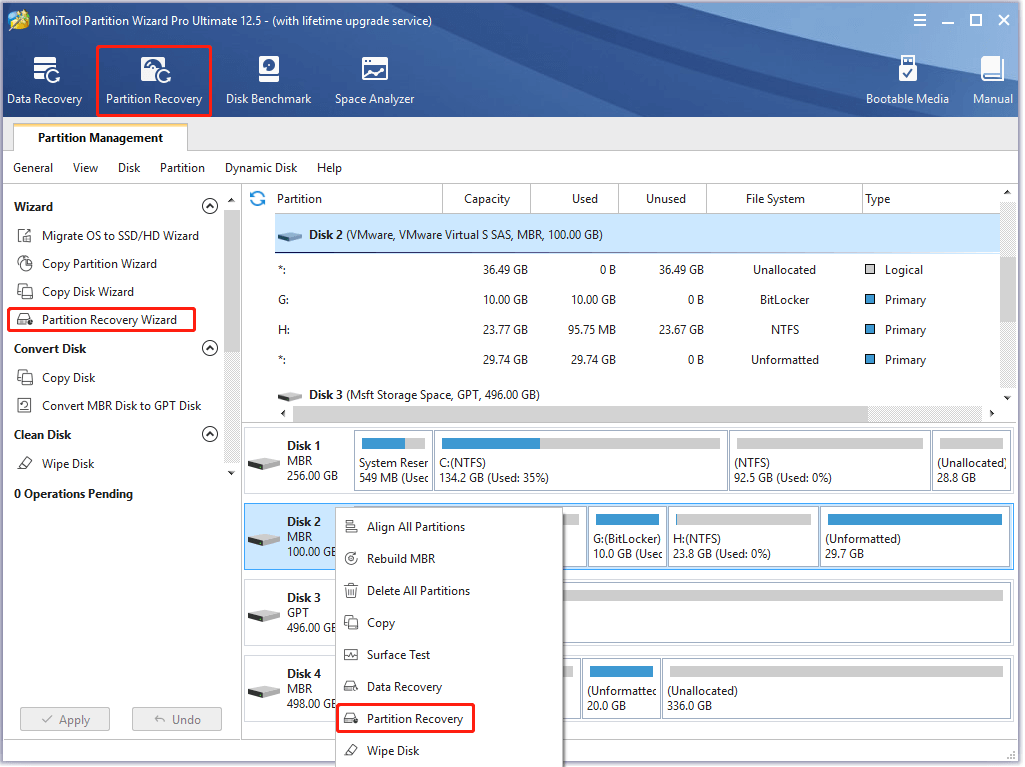
Step 3: Right-click on the disk where your partitions disappear and select the Partition Recovery option in the context menu. Alternatively, you can also directly click on Partition Recovery or Partition Recovery Wizard in the main interface and then follow the on-screen instruction to continue.
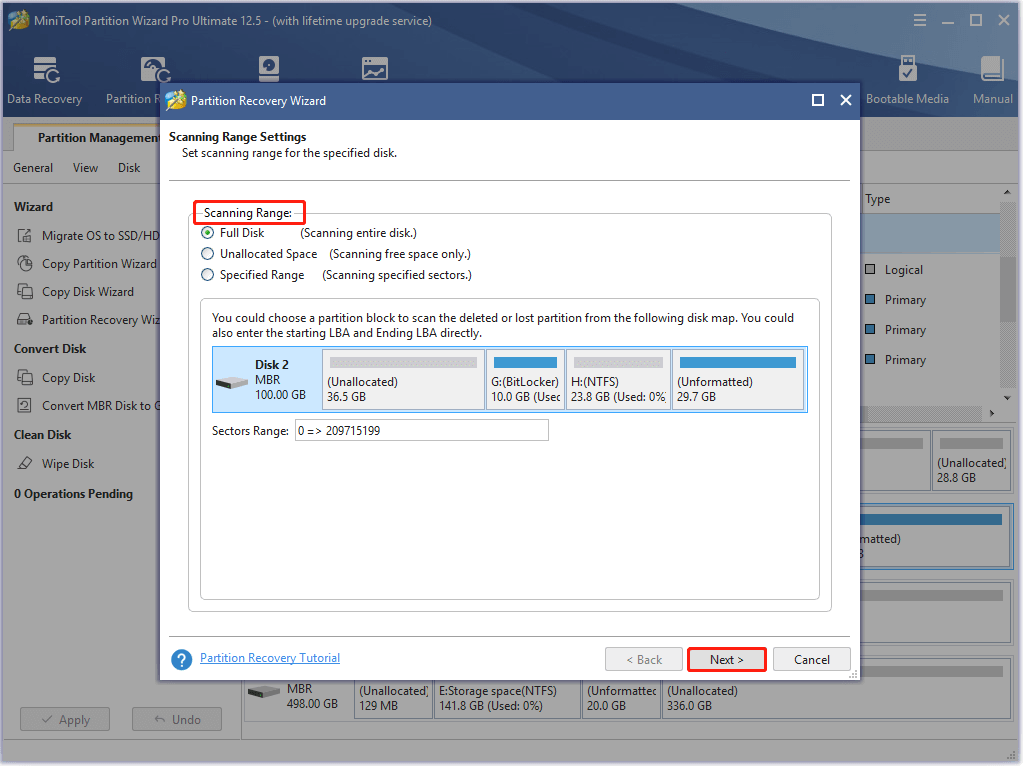
Step 4: You need to choose a scanning range from given options in the next window and click Next.
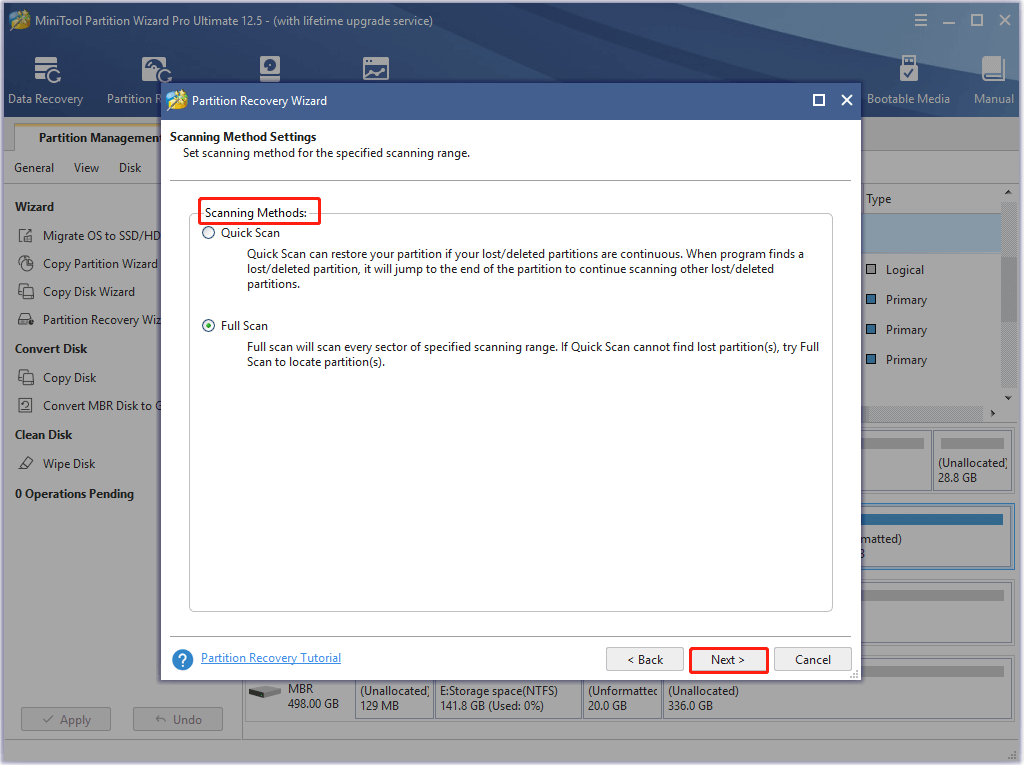
Step 5: In this window, you are asked to pick a scanning method from the two options. Then click the Next button to move forward.
- Quick Scan: It restores continuous lost/deleted partitions. This partition recovery software will jump to the end of the partition to keep scanning other lost/deleted partitions when it detects a lost/deleted partition.
- Full Scan: This scanning method scans every sector of the selected scanning range. If Quick Scan doesn’t find missing partitions, try this option.
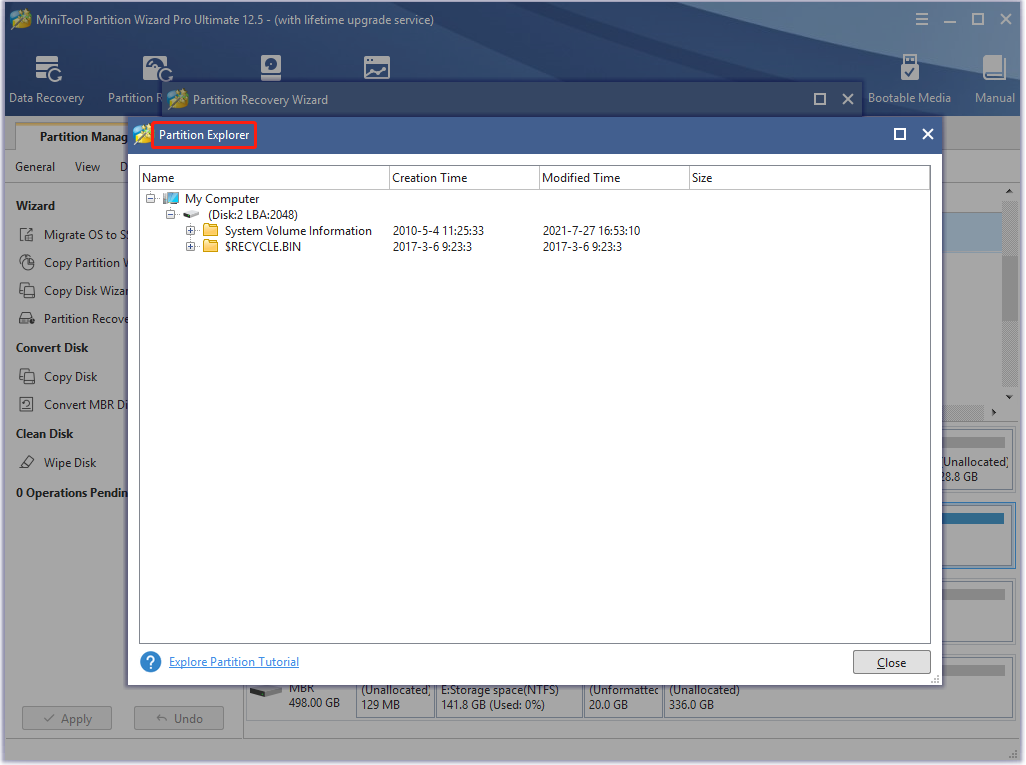
Step 6: After clicking on the Next button, MiniTool Partition Wizard will automatically recover the lost partition on the hard drive. All partitions will be listed after the scanning process ends. Once you confirm that the recovered partition is the lost one, close Partition Explorer and check the recovered partition. Finally, click Finish.
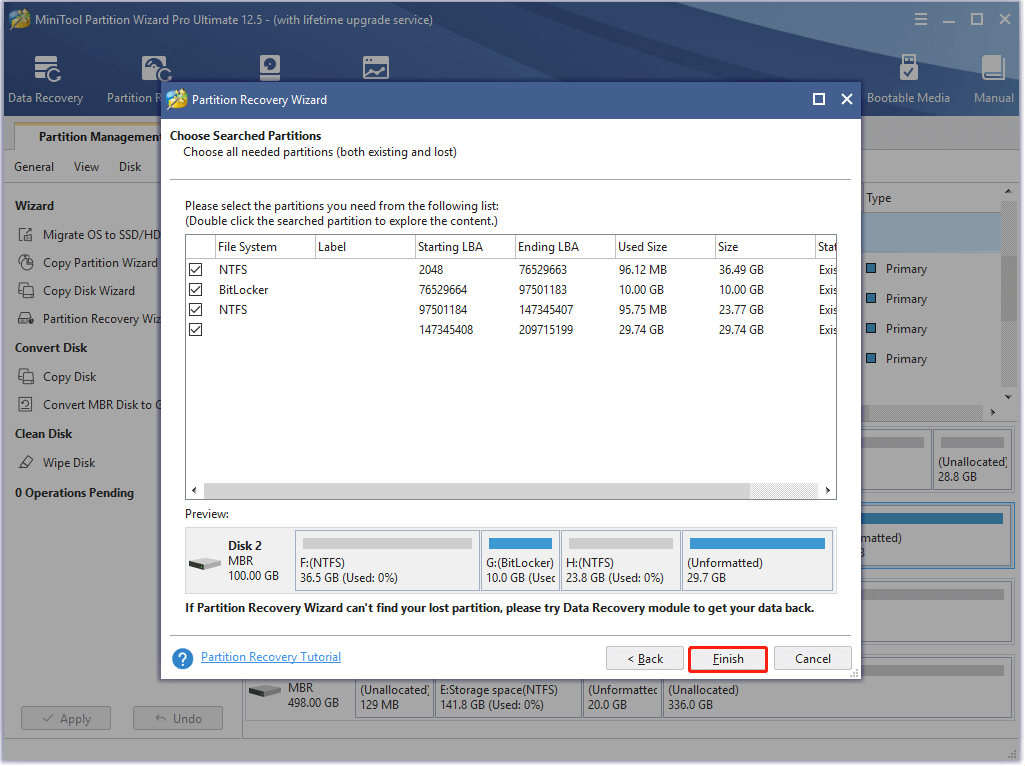
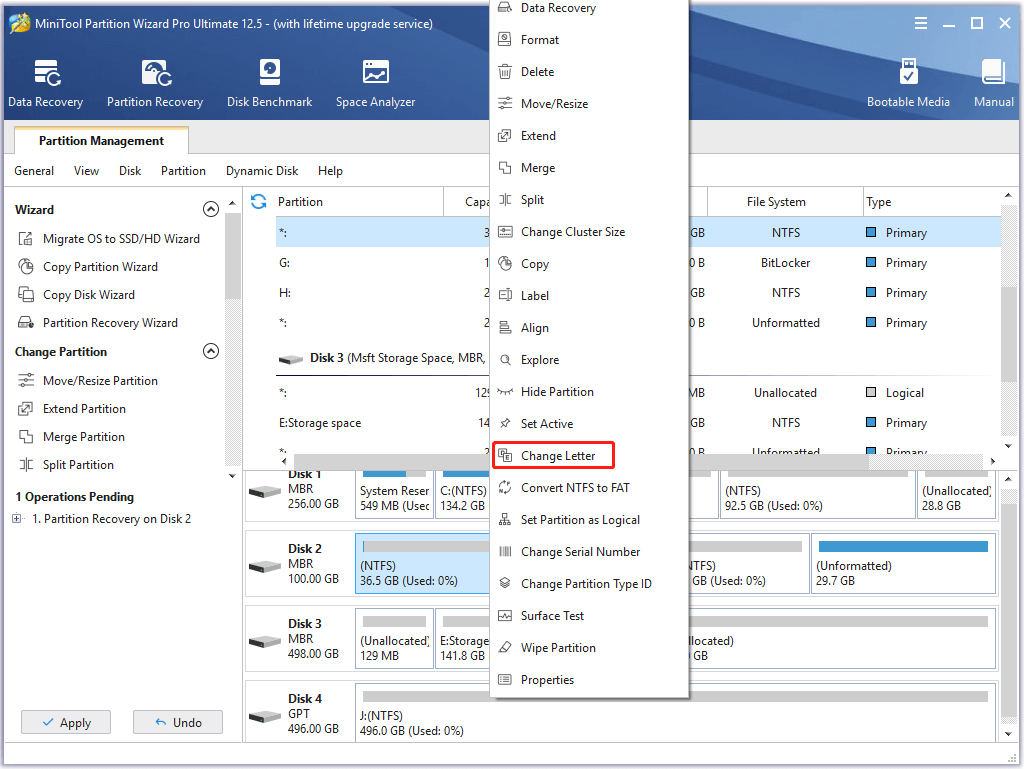
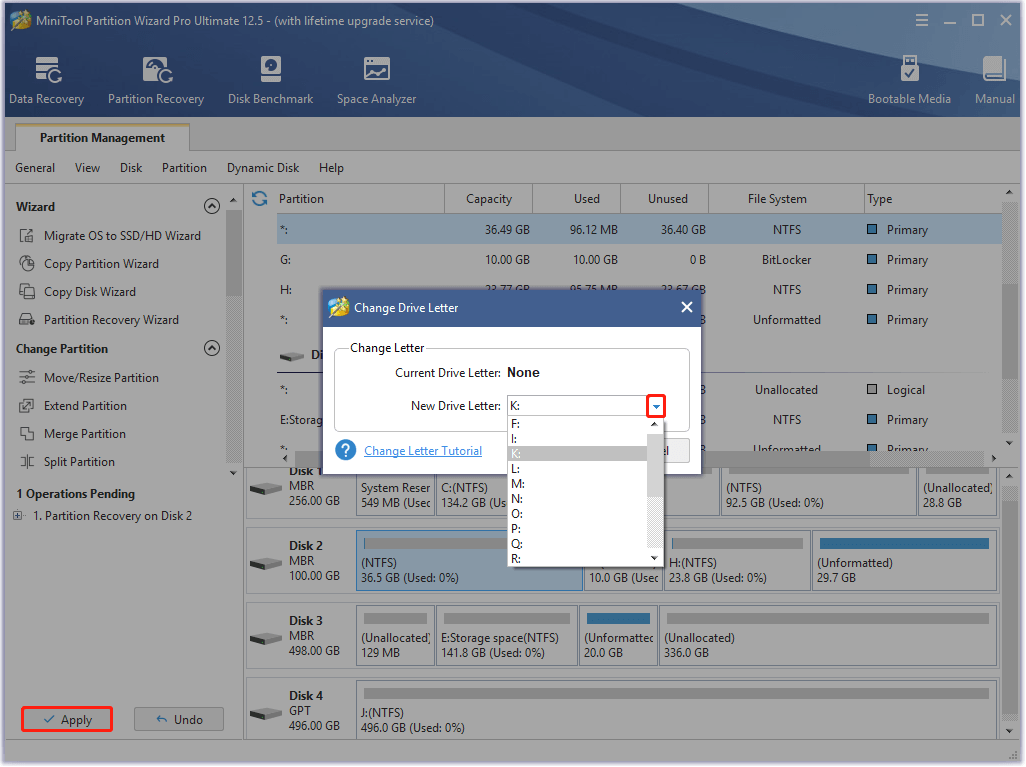
Step 7: As you see, the drive letter of the recovered partition has gone. To get the partition usable, you need to assign a drive letter for it. For that, right-click on the recovered partition and choose Change Letter from the pop-up menu.
Step 8: Choose a drive letter from the drop-down menu of the Change Drive Letter window and click OK to save the changes. After backing to the main interface, click Apply to carry out the pending operations.
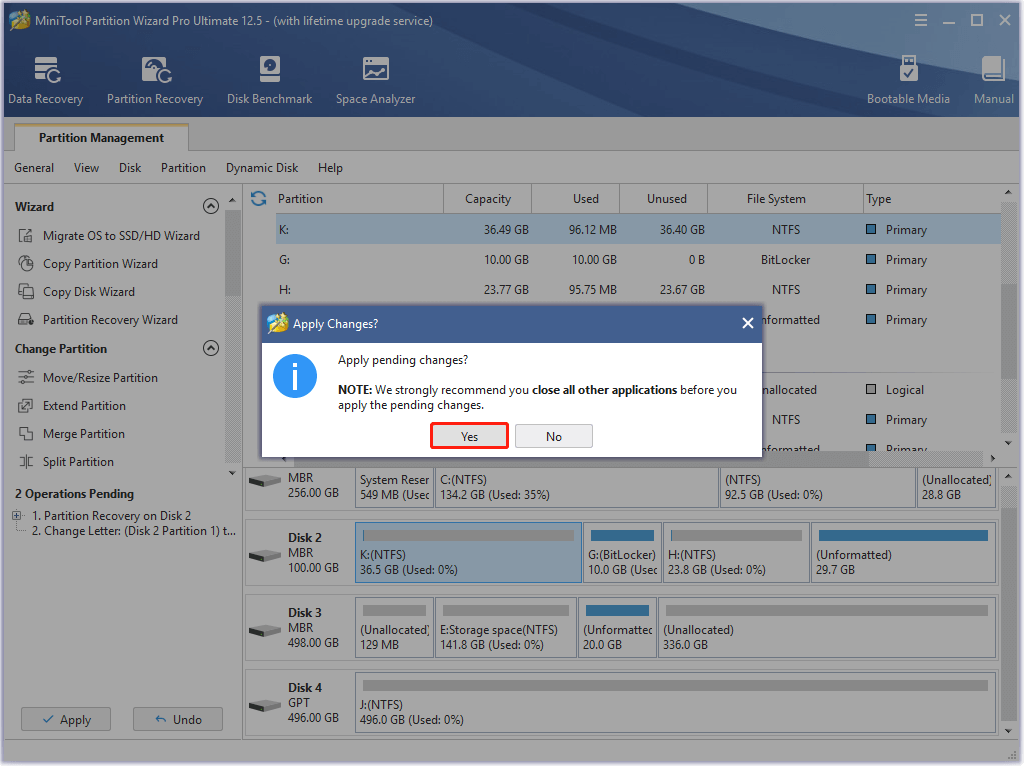
Step 9: If you are prompted with the window below, click Yes to confirm the operation. Then wait for the finish of the process.
Way 2: Recover Lost Partitions via CMD
Attention: This method is only effective when the partitions loss issue occurs because of the loss of the volume label, drive letter, and partition name.
Step 1: Find the lost partition in Disk Management. As mentioned before, the deleted partition will be marked as Unallocated in Disk Management. So, open Disk Management and find the deleted partition. Besides, you also need to remember the size of this partition.
Step 2: Type cmd in the search box, and then right-click on Command Prompt under Best match and click Run as administrator.
Step 3: In the elevated window, type and following commands and hit Enter after each to execute them.
- diskpart
- list disk
- select disk * (* represents the number of the hard drive where partition disappears)
- list volume
- select volume # (# stands for the number of the lost partition)
- assign letter=k (you can replace k with other available drive letters)
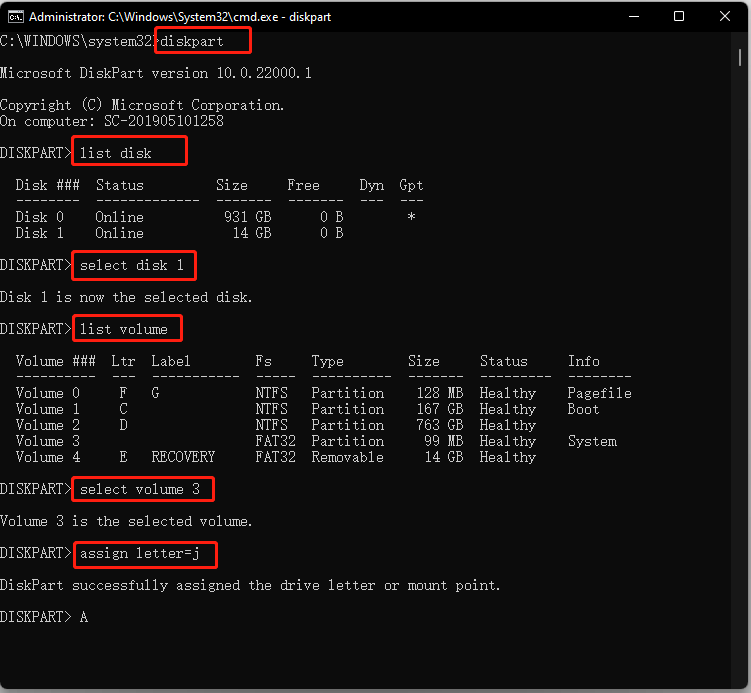
Step 4: After executing these commands, exit this window and open File Explorer (press Windows and E keys) to check if you can access that partition
Way 3: Perform a System Restore
System Restore is an embedded feature in Windows that allows you to create a snapshot of the computer’s current working state that is saved as a restore point. When you encounter any issues after that, you can restore to this state where your computer runs properly.
Note: After restoring to the previous state, changes you’ve made to your computer since that will be cancelled. It means that you may lose some programs and data.
If you have created a system restore point before, use the steps below to perform a system restore. By doing so, you can recover deleted partition Windows 11.
Step 1: Type create a restore point in the search bar and then click on this option from the search results.
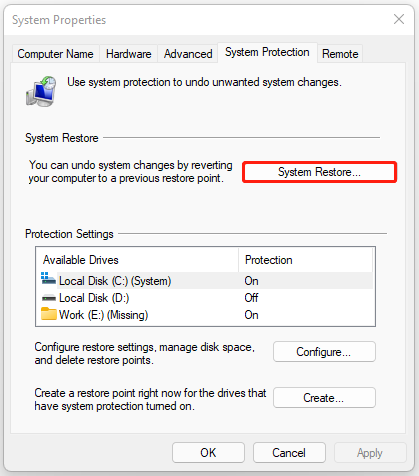
Step 2: Click on System Restore in the System Properties window.
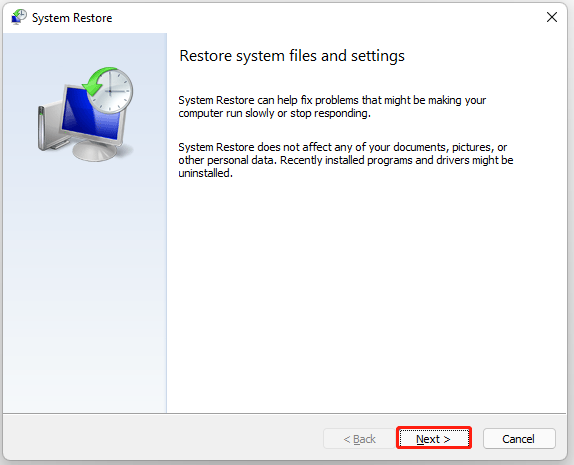
Step 3: Click the Next button in the System Restore window to continue.
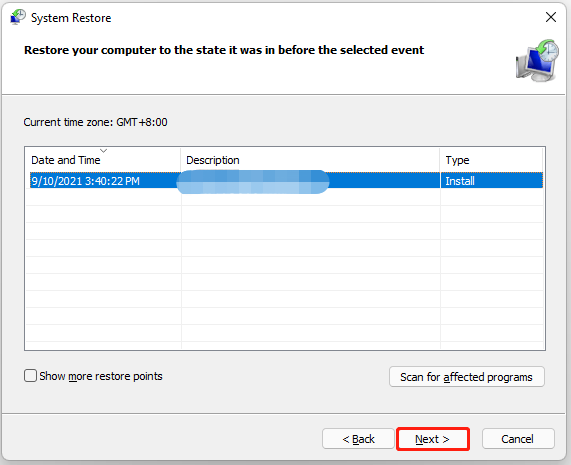
Step 4: In the next window, choose a restore point and click Next.
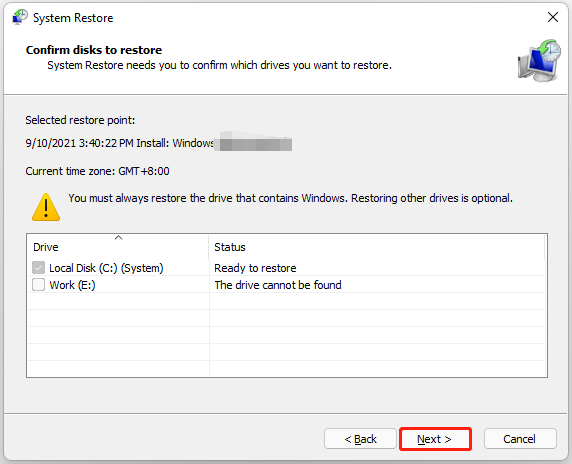
Step 5: Confirm the disk to restore and click Next.
Step 6: You can see the specific apps that will be removed after restoring by clicking the Scan for affected programs link. After confirming that, click Finish to end the process.
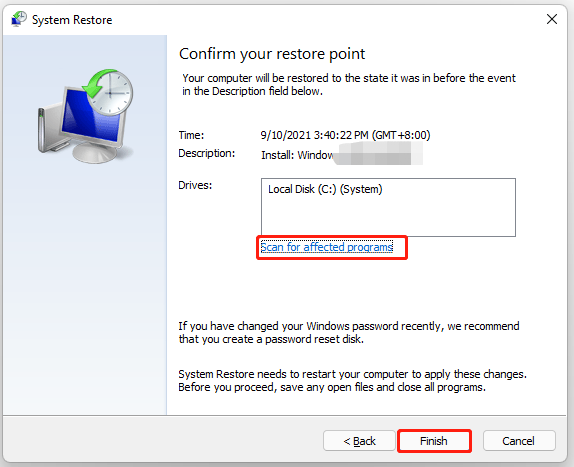
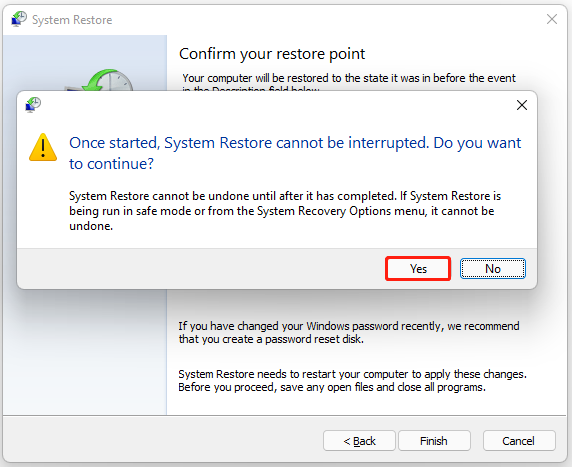
Step 7: Then you will get a warning window stating that system restore can’t be interrupted once started. Click Yes and then wait for the finish of the restoring process. After the process ends, you will see the disappeared partition again.
Also read: Chromebook Recovery Utility: How to Create and Use It
Tips for Preventing Partition Missing
To avoid losing partitions again, we would like to offer you some tips. You can try your best to get rid of partition loss by following the given tips.
- Be cautious while deleting partitions to make sure that partitions to be deleted doesn’t have important data.
- Run antivirus programs periodically to kill virus and malicious software.
- Perform a disk check regularly.
- Partition hard drives correctly.
- Put your computer to a safe place.
To further protect your computer and partitions, you can make some other efforts. For instance, create a system image, USB recovery drive, or repair disk. You can also directly make a backup for your computer.
For that, you can refer to the two posts below.
- [Guide] How to Back up Your Computer to an External Drive
- How to Back up Windows to Safeguard Your Computer? Try MiniTool
Wrap Up
Well, this post shows you how to undelete Windows 11 partition with third-party partition recovery software (MiniTool Partition Wizard) and Windows built-in recovery features (Command Prompt and System Restore) respectively.
In addition to that, the guide also offers you some tips for preventing partition missing in the feature. With these suggestions, you can avoid the partition loss issue to a large extent.
If you have any thoughts on Windows 11 partition recovery, you can share themwith us in the comment area. For any issues or doubts while using MiniTool Partition Wizard, directly send us an email via [email protected]. We will back you as soon as possible.
![Best Free File Undelete Software Windows 10/8/7 [Easy, Fast]](https://mt-test.minitool.com/images/uploads/2019/07/free-file-undelete-software-windows-10-thumbnail.jpg)