Want to improve the performance of your Surface Pro 4 computer? If so, you can do a Surface Pro 4 hard drive upgrade. Although it is not a simple operation, you can avoid the trouble of reinstalling the system and software. Please continue reading this article on MiniTool, which will give you detailed steps on how to upgrade SSD in Surface Pro 4.
About Surface Pro 4
Surface Pro 4 is a high-performance 2-in-1 tablet released by Microsoft in 2015. It combines the portability of a tablet with the functionality of a laptop. Its hard disk storage ranges from 128GB to 1TB SSD, with fast read and write speeds and large storage space.
Usually, some users choose the Surface Pro 4 SSD with smaller storage when they first choose the solid-state drive. However, over time, the computer can store fewer files and the computer’s response speed also decreases. If users want to solve this problem but don’t want to buy a new computer, what should they do?
Obviously, performing a Surface Pro 4 SSD upgrade is a good choice. Here is a way to upgrade hard drive in Surface Pro 4 without reinstalling the system.
How to Choose an SSD for Surface Pro 4
It is necessary to choose a suitable SSD for your Surface Pro 4 computer, and you need to consider the following aspects.
- Interface type: Surface Pro 4 uses M.2 PCIe NVMe SSD, which has faster data transfer speed than SATA interface SSD.
- Storage capacity: The storage options provided by Surface Pro 4 usually range from 128GB to 1TB. If you are just doing basic office work, 128GB or 256GB should be enough. If you need to store a large number of documents, photos, videos, games, etc., or engage in video editing, then choosing a 512GB or 1TB version is more suitable for you.
- Performance: The performance of SSD is usually measured by its sequential write/read speed. Generally speaking, the read speed of M.2 PCIe NVMe SSD can reach 2000MB/s to 3500MB/s, and the write speed is between 1000MB/s and 3000MB/s. For Surface Pro 4, choosing an SSD with high read and write speeds can ensure faster system startup and application loading speeds.
- Compatibility and size: The SSD of Surface Pro 4 uses the M.2 2280 size. Make sure the SSD you choose is M.2 2280 (80mm long and 22mm wide). If the size does not match, the SSD will not be installed correctly in the device.
- Data security: If you need to ensure the security of your computer data, it is important to choose an SSD that supports hardware encryption (such as AES 256-bit encryption). Surface Pro 4 supports BitLocker encryption technology, and using an SSD that supports hardware encryption can enhance data security.
How to Upgrade SSD in Surface Pro 4
Generally speaking, when you upgrade hard drive in Surface Pro 4, you need to prepare in the following 4 aspects.
Part 1: Prepare the Necessary Tools
Replacing the SSD of your Surface Pro 4 is a relatively complex process that requires some specific tools:
- Appropriate screwdriver: The back of the Surface Pro 4 is secured by a set of small screws, which are usually removed with a Torx T3 or T4 screwdriver.
- Plastic spudger: When disassembling the Surface Pro 4, the body shell and screen may be held together by adhesive. Use a plastic spudger to easily open the device.
- Electrostatic discharge (ESD) wrist strap: When replacing the SSD, static electricity can damage sensitive electronic components inside the device. Use an ESD wrist strap to prevent static discharge.
- Small screw box: Using a small screw box to store removed screws can help you keep the screws tidy and avoid losing them.
Part 2: Initialize a New SSD
A newly purchased SSD is usually unformatted, which means it has no file system assigned to it. Therefore, the operating system cannot use it directly to store data. The initialization process ensures that the SSD is properly identified and prepared for data storage. Here is how to initialize a new SSD:
Step 1: Connect your new SSD to your Surface Pro 4 PC via an M.2 to USB adapter.
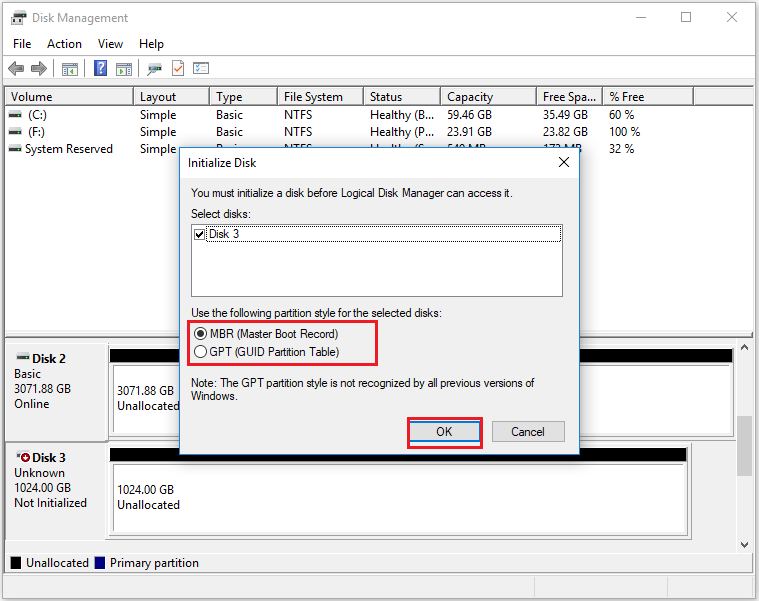
Step 2: Right-click the new SSD and select Initialize Disk.
Step 3: Set the partition style the same as the source SSD (MBR or GPT) and click OK to confirm.
Part 3: Clone Data to the New SSD
To clone data to a new SSD, you’ll need to use third-party software such as MiniTool Partition Wizard, which allows for a smooth and secure cloning process.
The Migrate OS to SSD/HD feature of the software can help you migrate OS to SSD without reinstalling OS, and the Copy Disk feature can help you clone all data without data loss.
This software not only can help you clone the hard drive but also help you partition hard drives, format FAT32, rebuild MBR, change cluster size, convert MBR to GPT without data loss, recover hard drive data, etc.
Well, in this section, I will demonstrate two methods for cloning data to a new SSD. You can select the method that best suits your situation.
MiniTool Partition Wizard DemoClick to Download100%Clean & Safe
#1. Use Migrate OS to HDD/SSD Feature
If you just don’t want to reinstall the operating system, then you can just move the operating system to another drive. MiniTool Partition Wizard’s Migrate OS to SSD/HD feature can help you do it. This migration method also saves time. The steps are as follows:
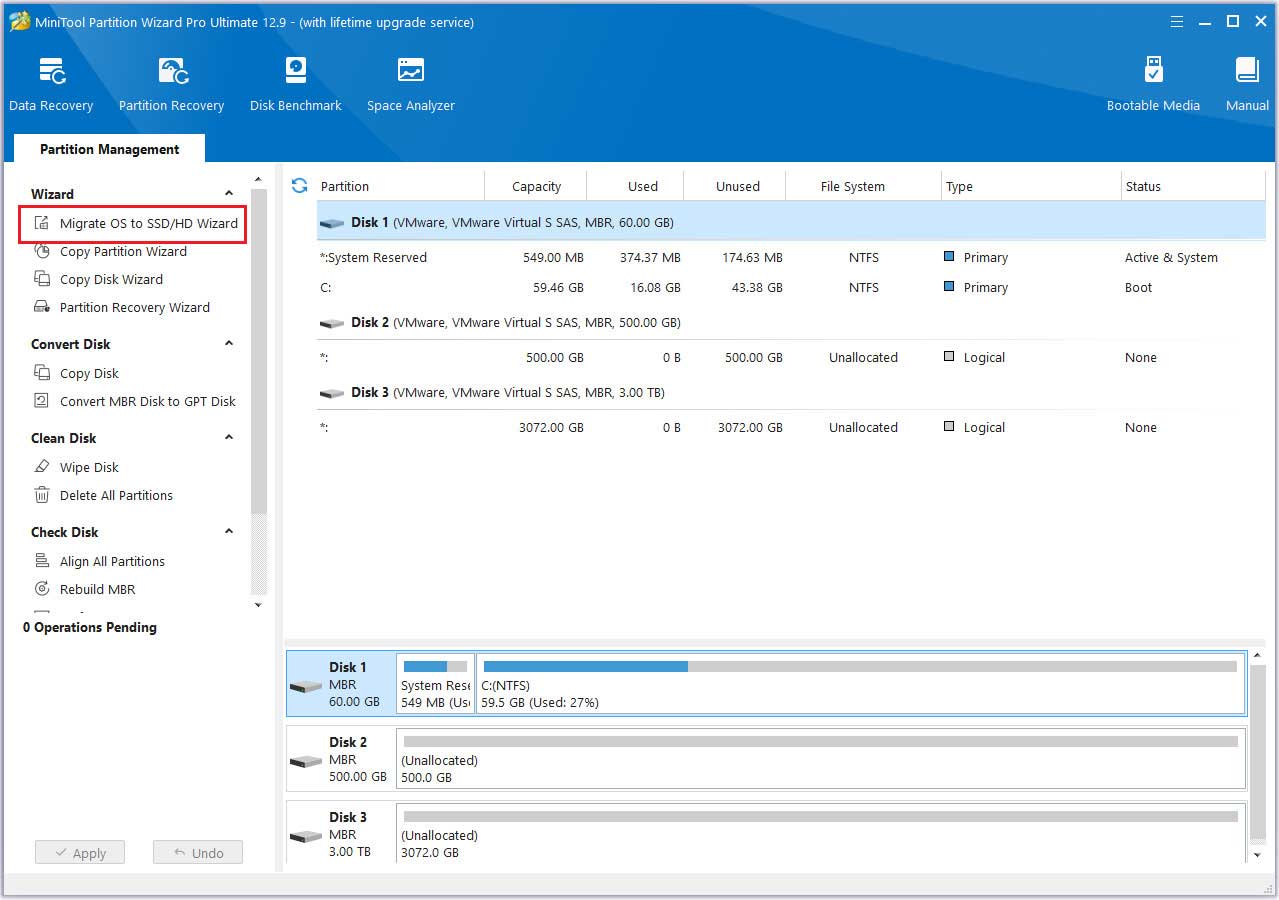
Step 1: Connect the new SSD to your Surface Pro 4 PC via an M.2 to USB adapter, then launch MiniTool Partition Wizard to its main interface. Click on the Migrate OS to SSD/HD Wizard feature from the left action panel.
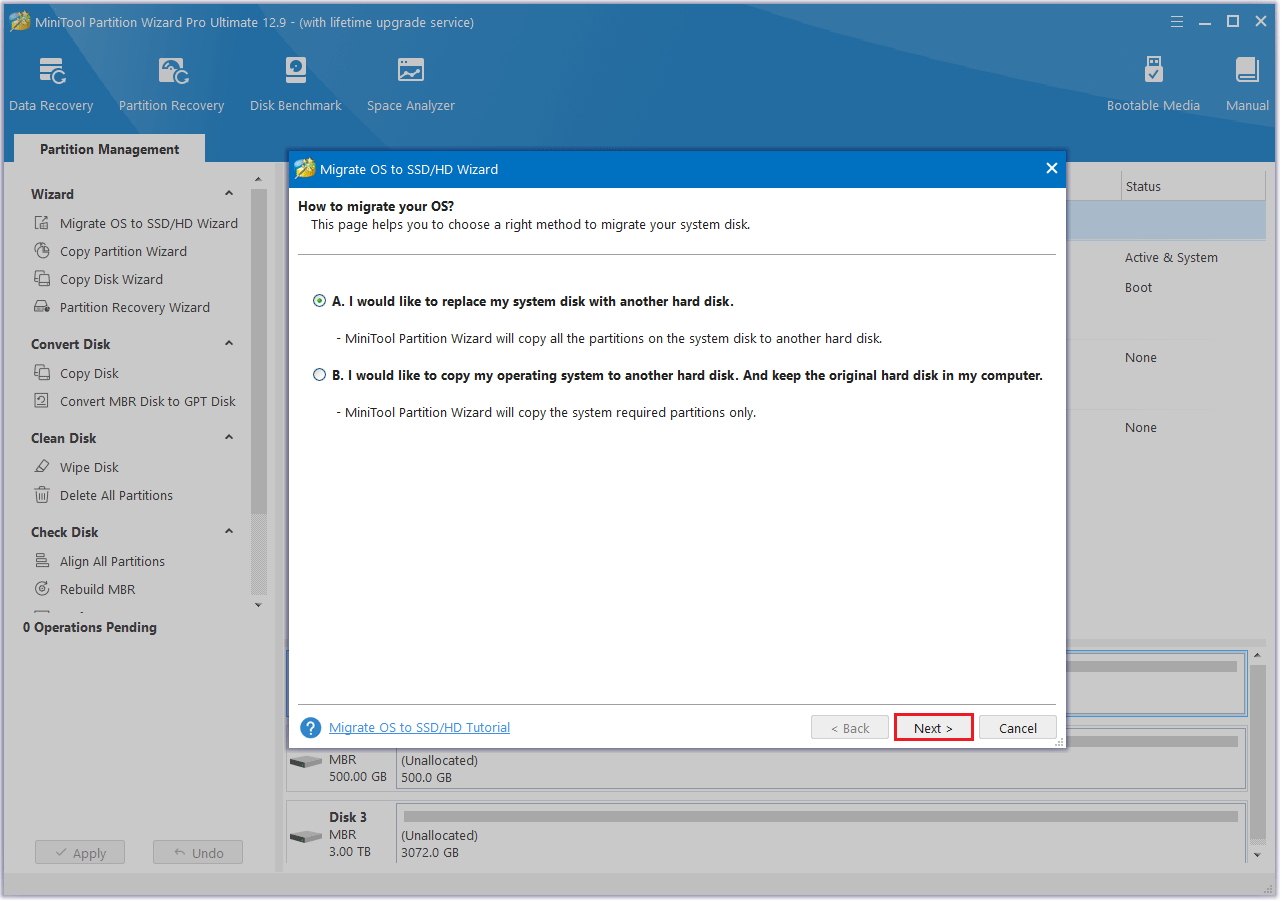
Step 2: In the pop-up window, select the option that suits your needs for migrating the OS, then click Next.
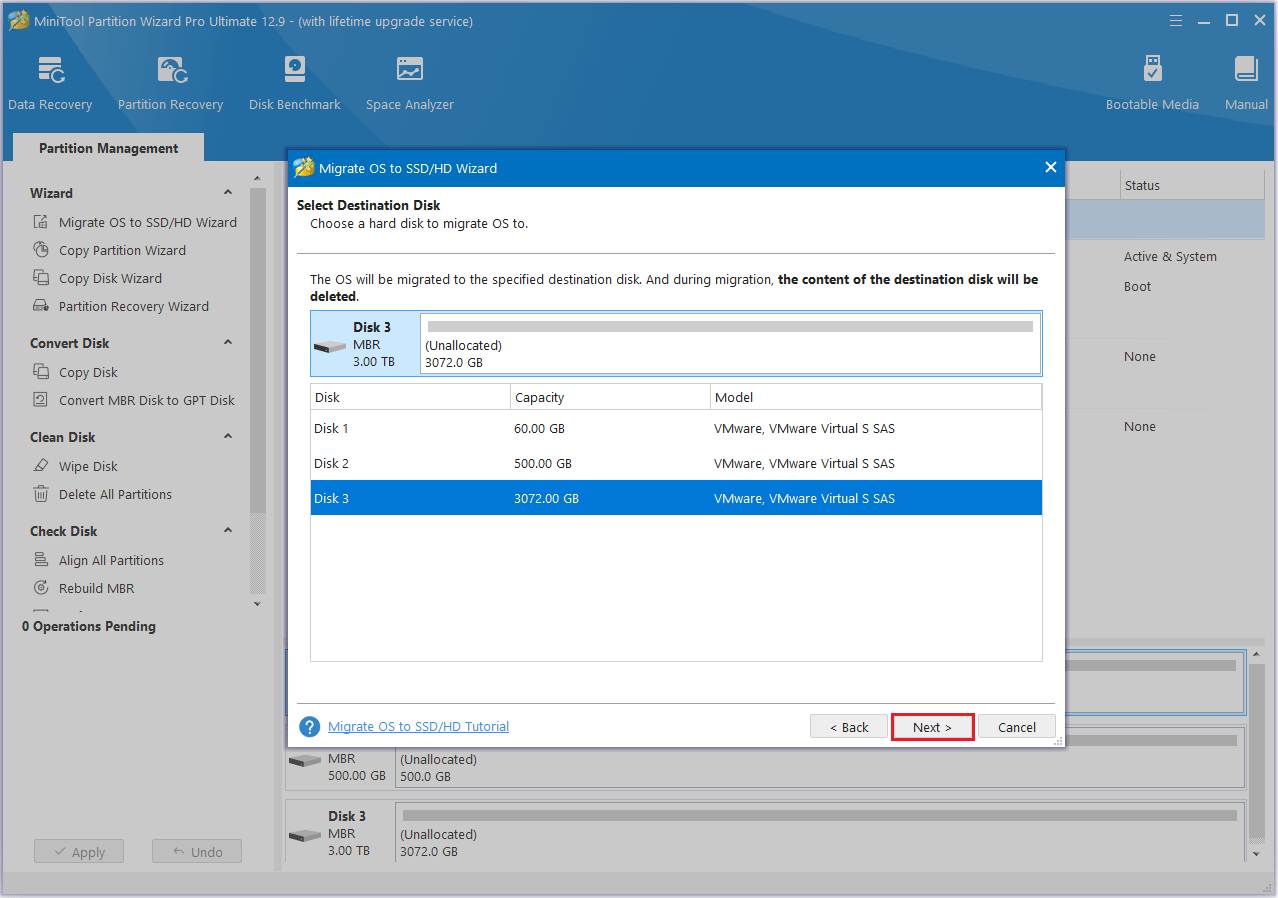
Step 3: Choose the new SSD as the destination disk, then click Next. A warning message will appear, read it and click Yes to proceed.
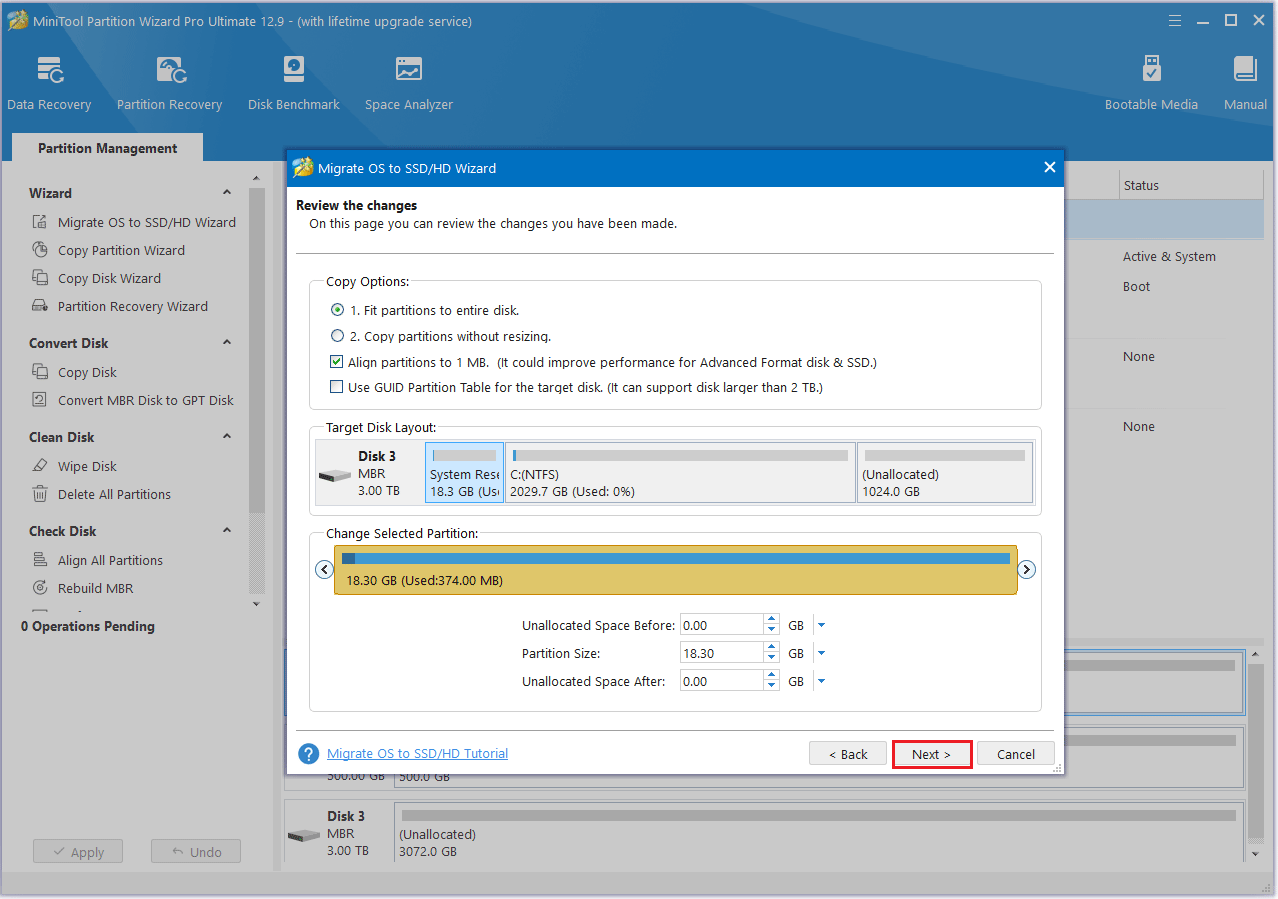
Step 4: Modify the disk layout in the Review the Changes window and then click Next.
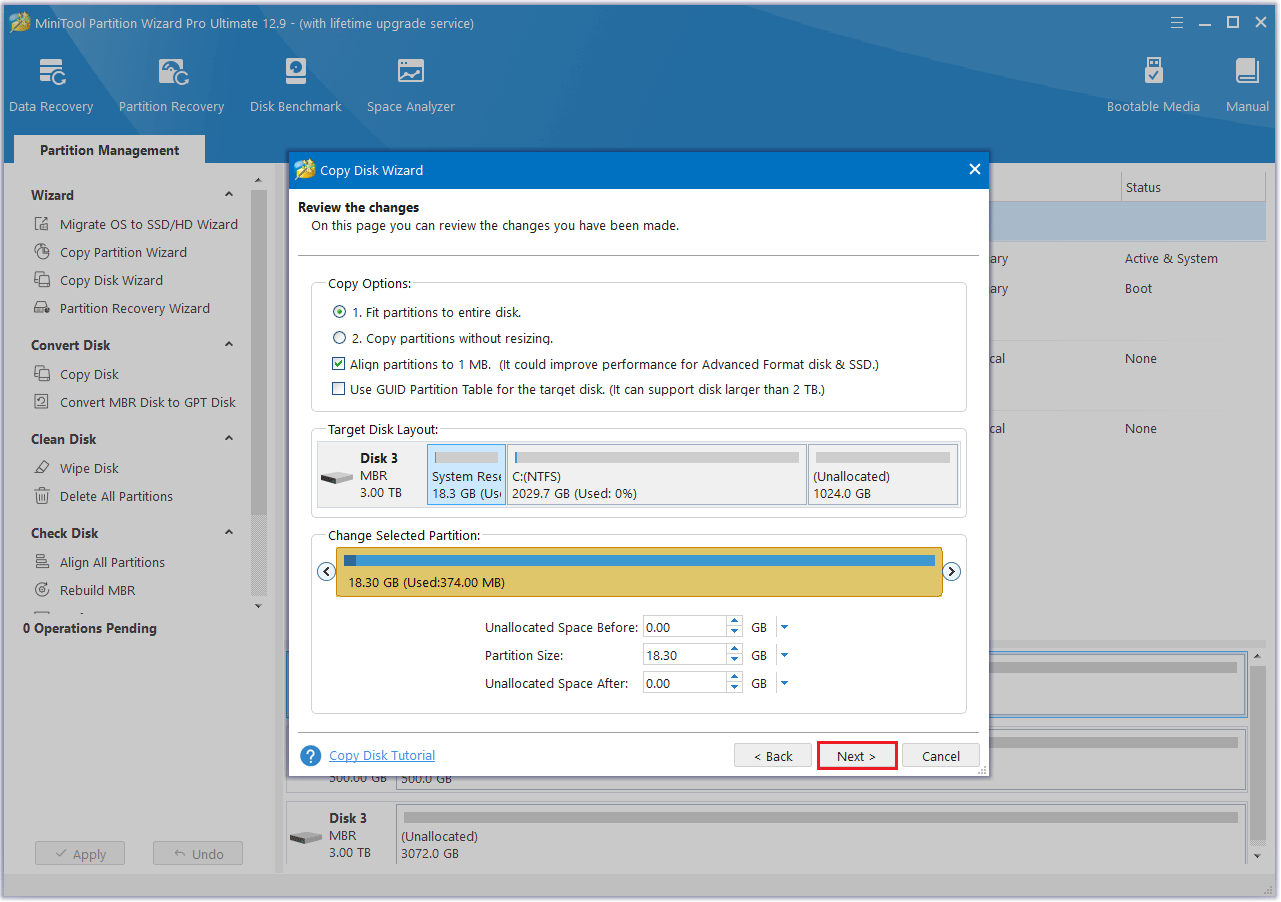
- Fit partitions to entire disk: The partitions on the source disk will be extended by an equal proportion to fill the entire new SSD.
- Copy partitions without resizing: All the partitions on the source disk are copied into the new SSD without changes in size or location.
- Align partitions to 1 MB: The Align partitions to 1 MB option will apply 4K alignment on the SSD.
- Use GUID partition table for the target disk: The Use GUID partition table for the target disk option will apply GPT on the SSD, but it only appears when the source disk is an MBR disk.
- Change Selected Partition: You can resize or move the partition according to your needs.
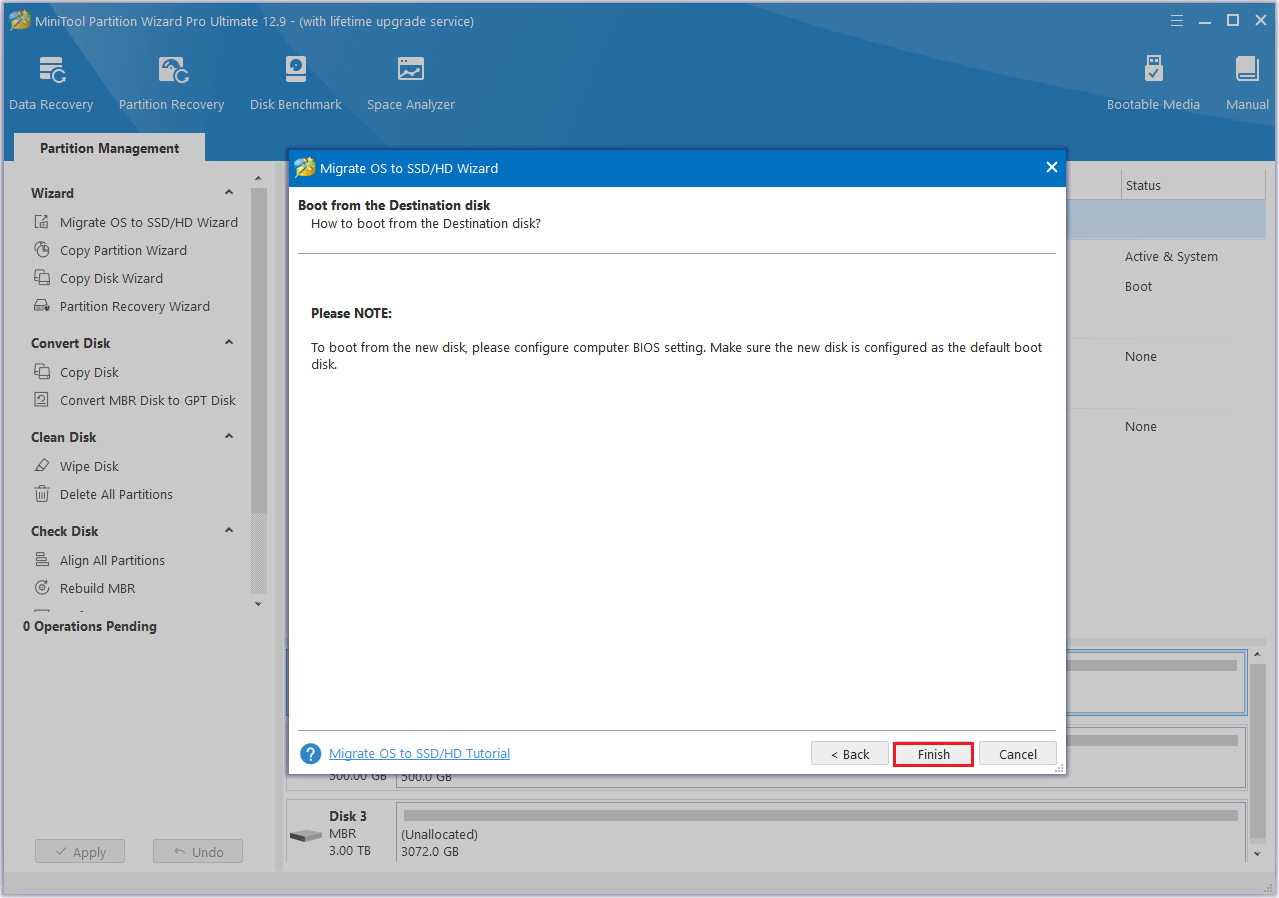
Step 5: Read the NOTE information and then click Finish.
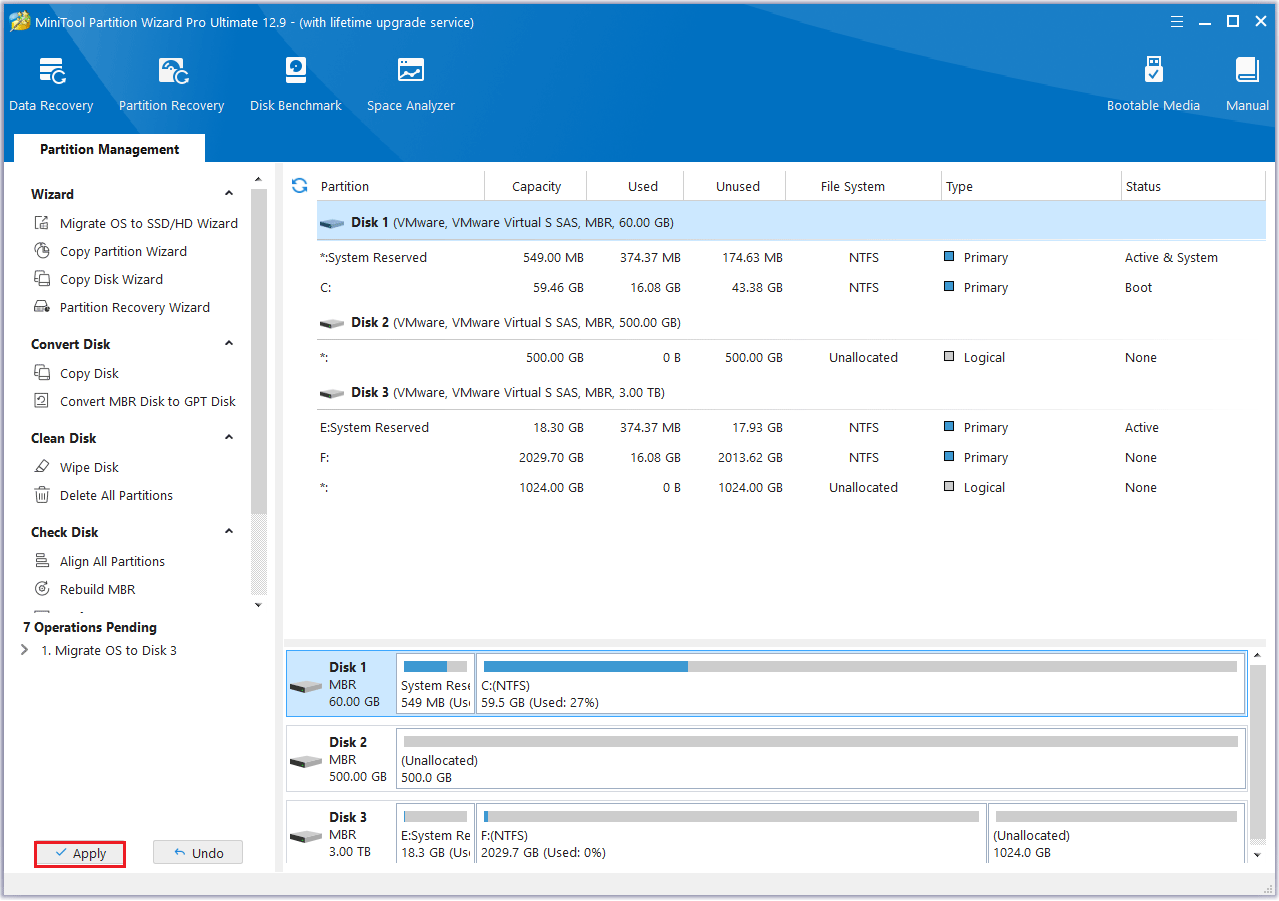
Step 6: Then, click the Apply button to execute the pending operation.
#2. Use Copy Disk Feature
Step 1: Connect the SSD to your computer via a USB adapter.
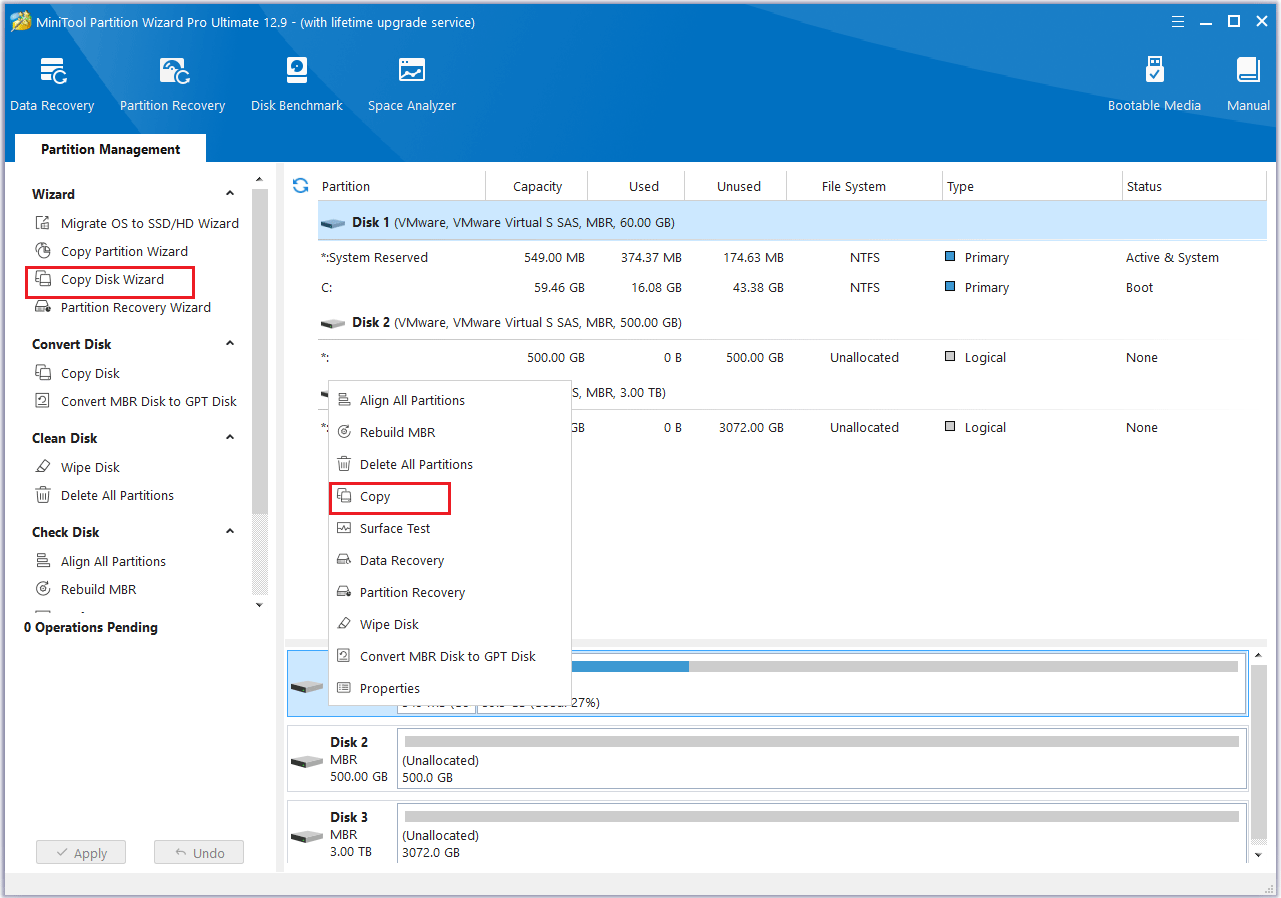
Step 2: Launch MiniTool Partition Wizard to its interface. Right-click the disk and then select Copy from the menu. Also, you can click the Copy Disk feature from the left action panel.
Step 3: On the pop-up window, select new SSD as the target disk and then click Next. Click OK when it asks you whether you are sure to continue. Note that all data on the target disk will be destroyed.
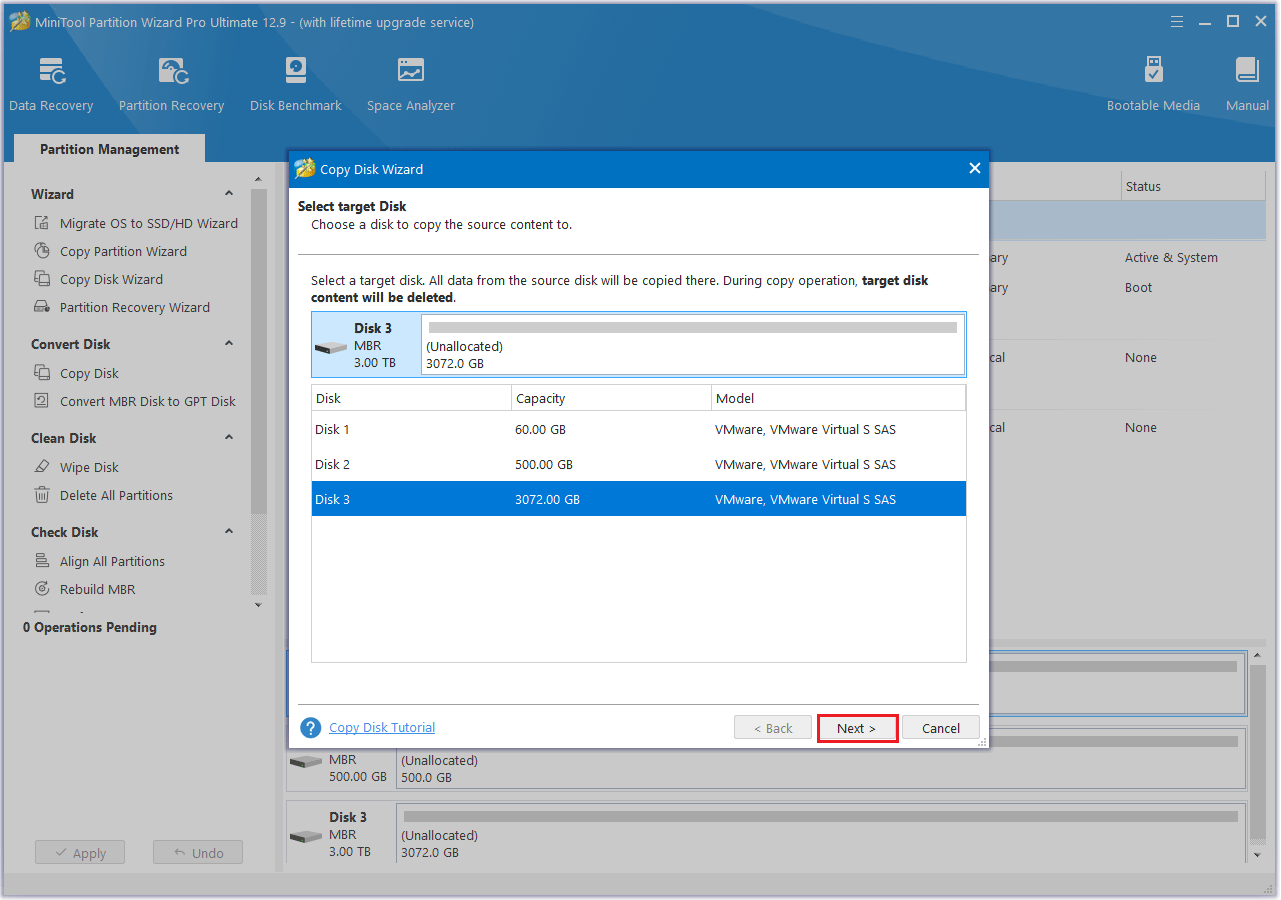
Step 4: Review the chosen Copy Options and Target Disk Layout. If everything looks correct, click Next.
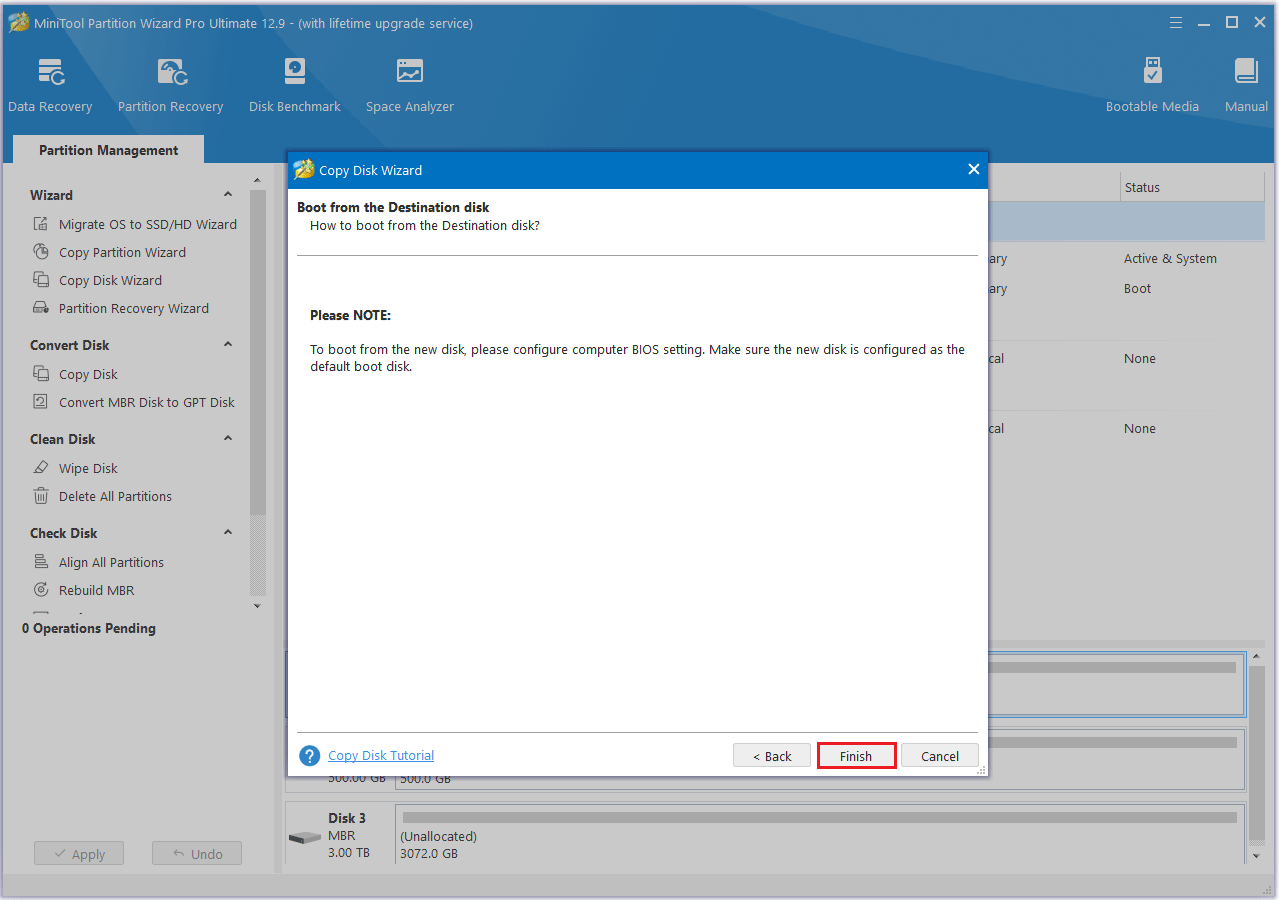
Step 5: Carefully review the note for instructions on how to boot from the target disk, then click Finish to go back to the main interface.
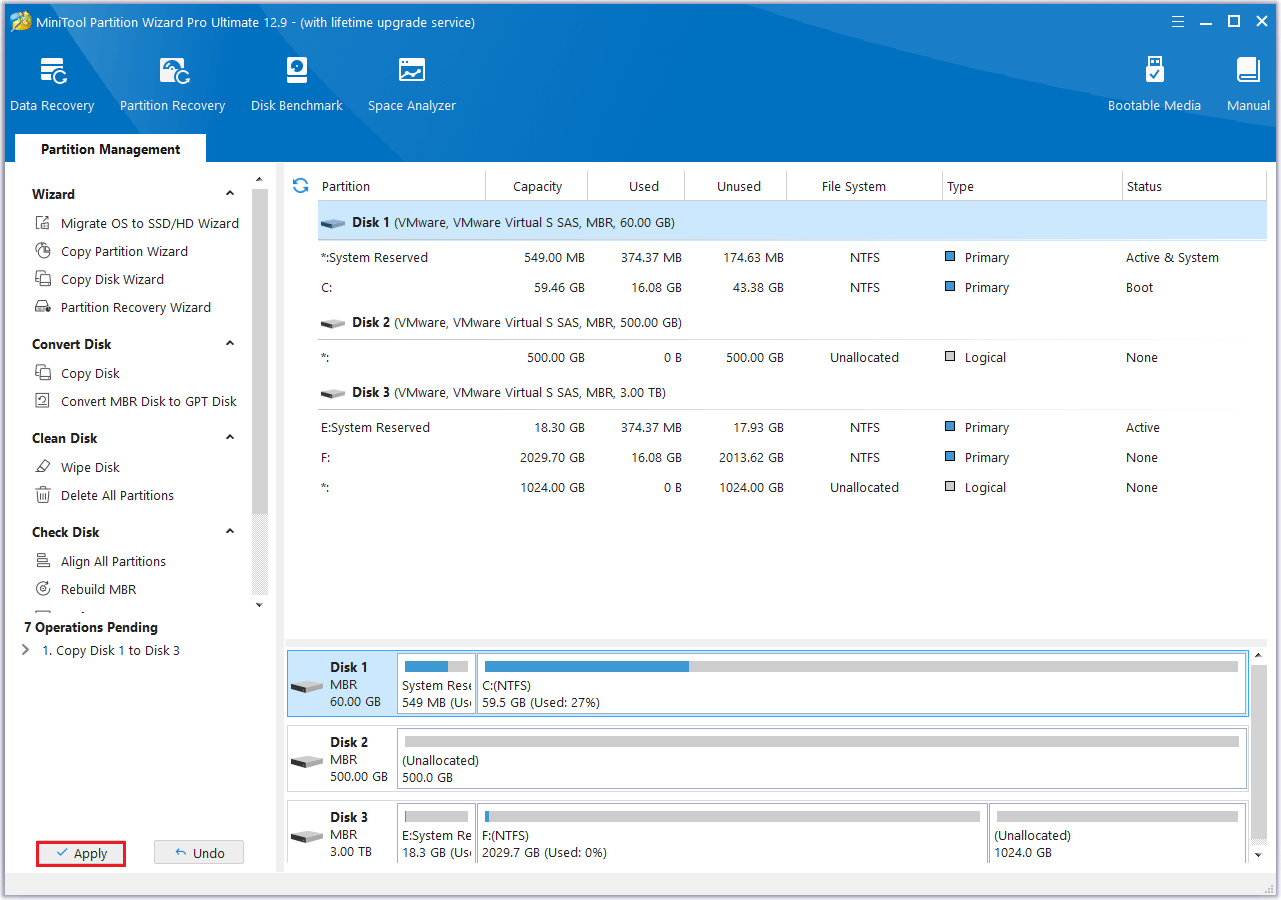
Step 6: Click the Apply button to initiate the pending operation and wait for the cloning process to finish.
Part 4: Replace Surface Pro 4 SSD
After you have finished migrating the OS and data to the new SSD, you can proceed with the Surface Pro 4 SSD replacement. You can refer to the steps below.
Step 1: Disconnect the power cable of the Surface Pro 4 and turn off your computer.
Step 2: Turn the bottom of the laptop upwards and use a screwdriver to remove all the screws on the back of the laptop.
Step 3: Use a plastic spudger to remove the bottom cover of the computer, if possible, wear an ESD wrist strap while doing this to ensure the safety of the device.
Step 4: Use a screwdriver to remove the screws that are fixed on the SSD, then tilt the computer and carefully remove the SSD.
Step 5: Install the new SSD and then secure it.
Step 6: Now you need to put the cover of the SSD back in place and install all the screws as they were.
What to Do with the Replaced Surface Pro 4 SSD?
What to do with the replaced Surface Pro 4 SSD? If your SSD is still in good working condition, but its storage space is a little small for you, then you can consider selling it or donating it to someone who may need it.
Before donating or selling it, you need to clear the data on it. How to do it? It still needs the help of third-party tools – MiniTool Partition Wizard to complete it.
MiniTool Partition Wizard FreeClick to Download100%Clean & Safe
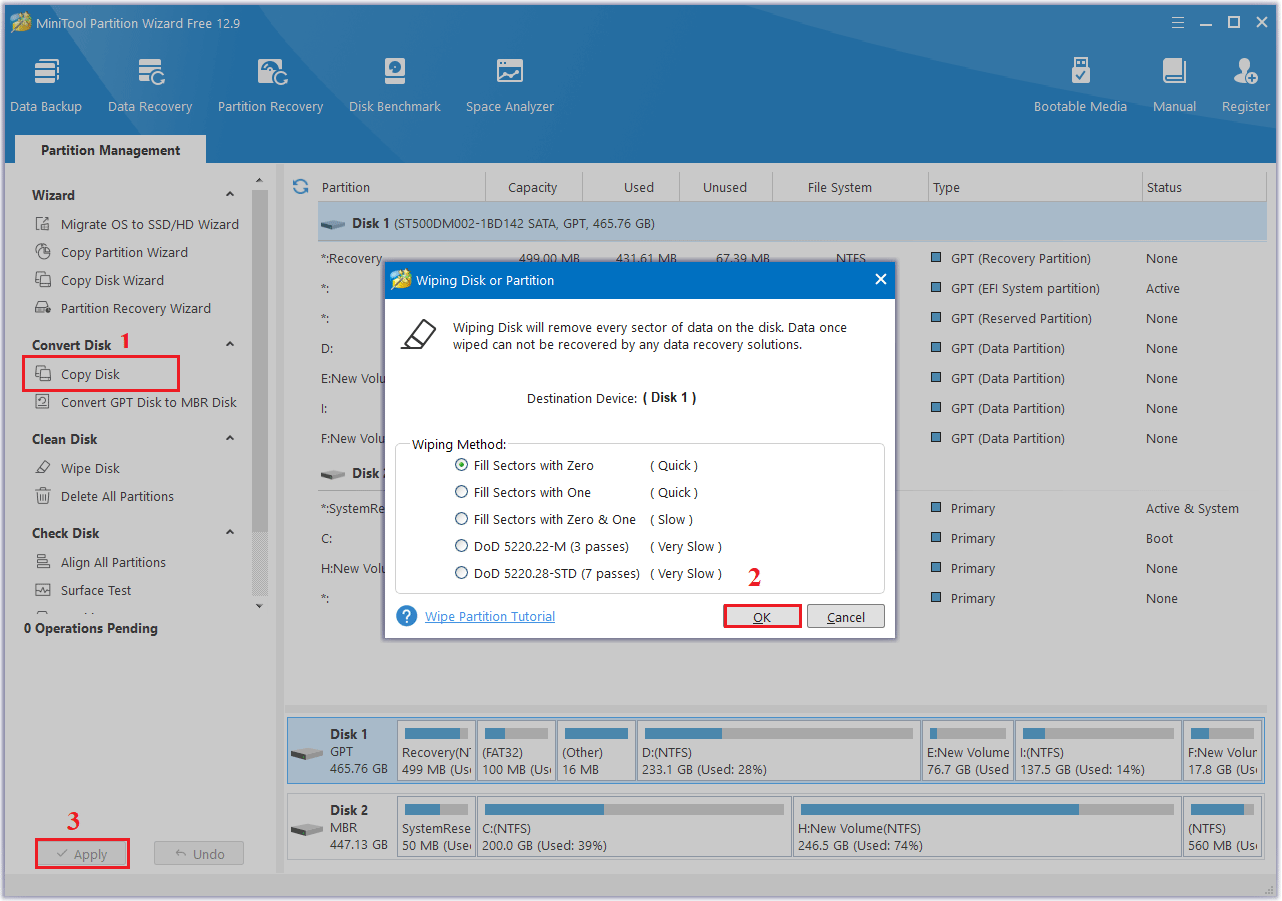
Step 1: In the main interface of MiniTool Partition Wizard, select the old drive and click the Wipe Disk feature from the left action panel.
Step 2: Select one of the five wiping methods shown in the pop-up window and click OK. The longer the process takes, the greater the level of security it provides.
Step 3: Click Apply to initiate the operation. The wiping process will begin automatically, and all you need to do is wait patiently for it to complete.
Bottom Line
Interested in learning how to do a Surface Pro 4 hard drive upgrade without reinstalling Windows? If so, this article is worth checking out. It covers everything you need to know about Surface Pro 4 SSD replacement and provides a step-by-step guide.
If you have any questions or suggestions while using the MiniTool Partition Wizard, you can contact us via [email protected] to get a quick reply.
