Windows 11 is the latest Windows version released by Microsoft. Some people want to try its new features but fear that the OS is buggy and unstable. In this case, creating a Windows 11 virtual machine is a good choice. This post from MiniTool will show you how to do that.
Windows 11 VM Requirements
As we all know, the Windows 11 requirements are as follows:
- CPU: 1GHz or faster with two or more cores on a compatible 64-bit processor or system on a chip (SoC).
- RAM: at least 4GB.
- Storage: at least 64GB available storage.
- Security: TPM version 2.0, UEFI firmware, Secure Boot capable.
Therefore, to create a Windows 11 VM, your PC should meet the above requirements, especially the CPU and RAM. What’s more, to make the Windows 11 virtual machine run smoothly, you should ensure the RAM is at least 6GB. As for the TPM requirement, this is not necessary because there are ways to work around this issue.
To check whether your PC meets the above CPU and RAM requirements, please refer to this post: How to Check PC Full Specs Windows 10 in 5 Ways.
Before Get Started
Before you start creating a Windows 11 VM, please go to the Microsoft website to download the Windows 11 installation media creation tool. Then, use this tool to create an official Windows 11 ISO file.
After that, please create a separate partition for the VM so that you can manage it better. To do that, I recommend you use MiniTool Partition Wizard, which can help you make a partition more easily. Please follow the steps below:
MiniTool Partition Wizard FreeClick to Download100%Clean & Safe
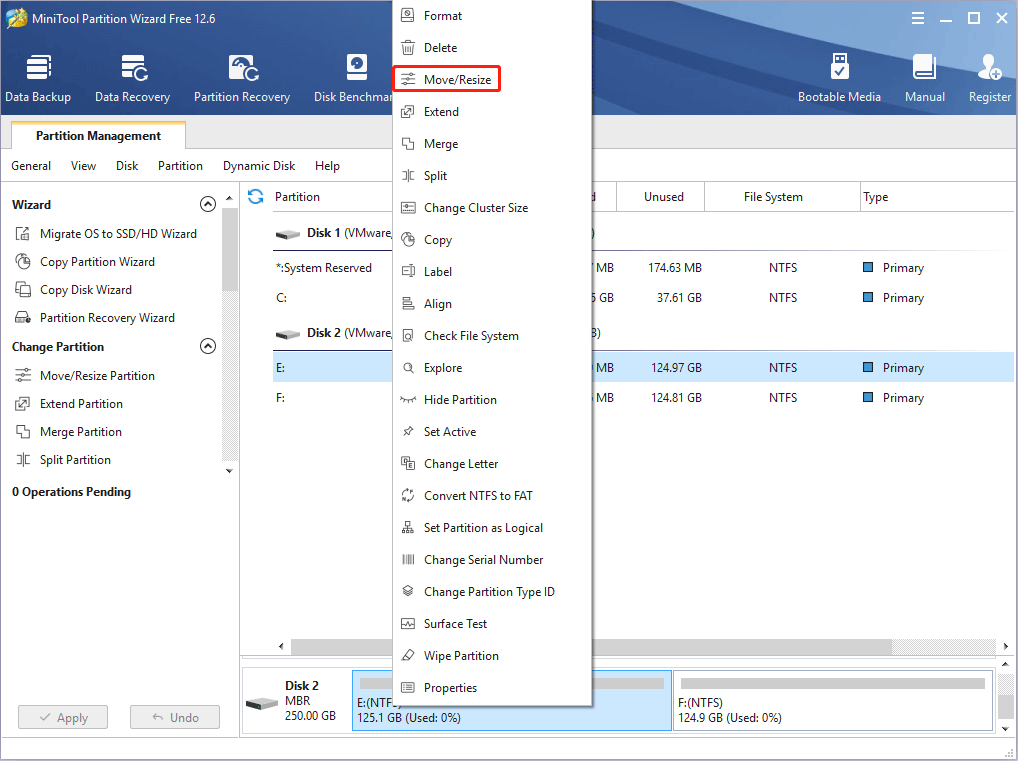
Step 1: Launch MiniTool Partition Wizard and go to its main interface. Right-click a partition and choose Move/Resize.
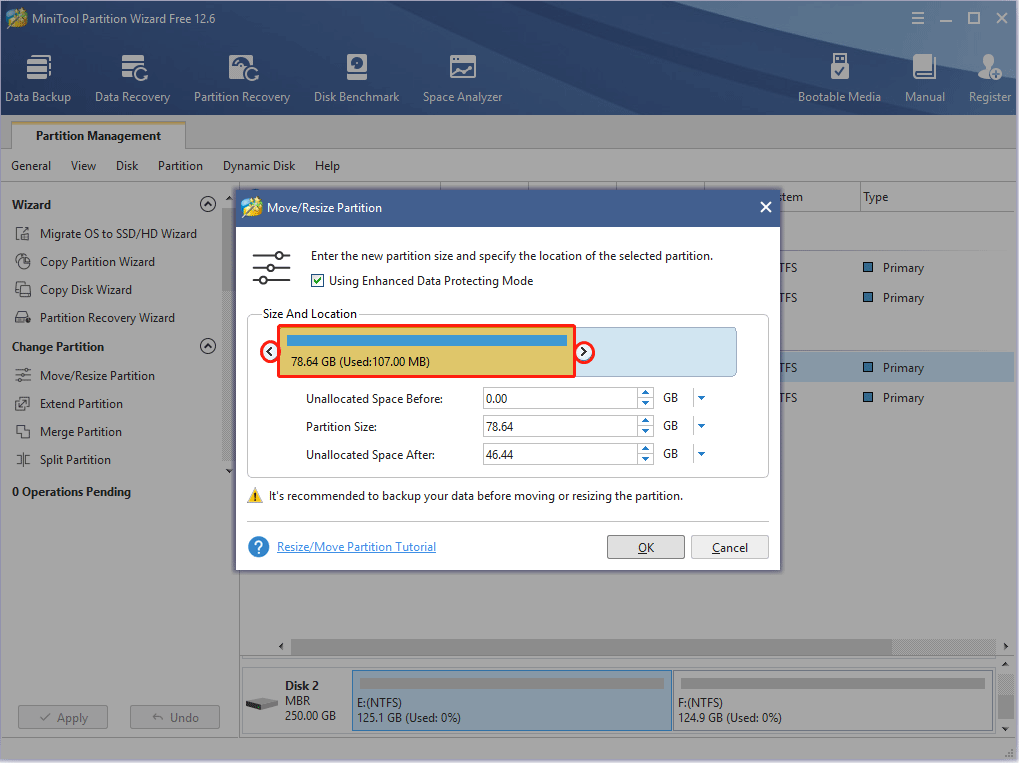
Step 2: Drag the arrow icon to decide how much space you want to shrink. Click the partition block and drag it to decide the location of the unallocated space. Then, click the OK button.
1. If one partition doesn’t have enough free space, you can use this way to take space from other partitions.
2. Although the newly-created Windows 11 VM file is just around 20GB, I still recommend you create a large partition, because the VM size will increase gradually.
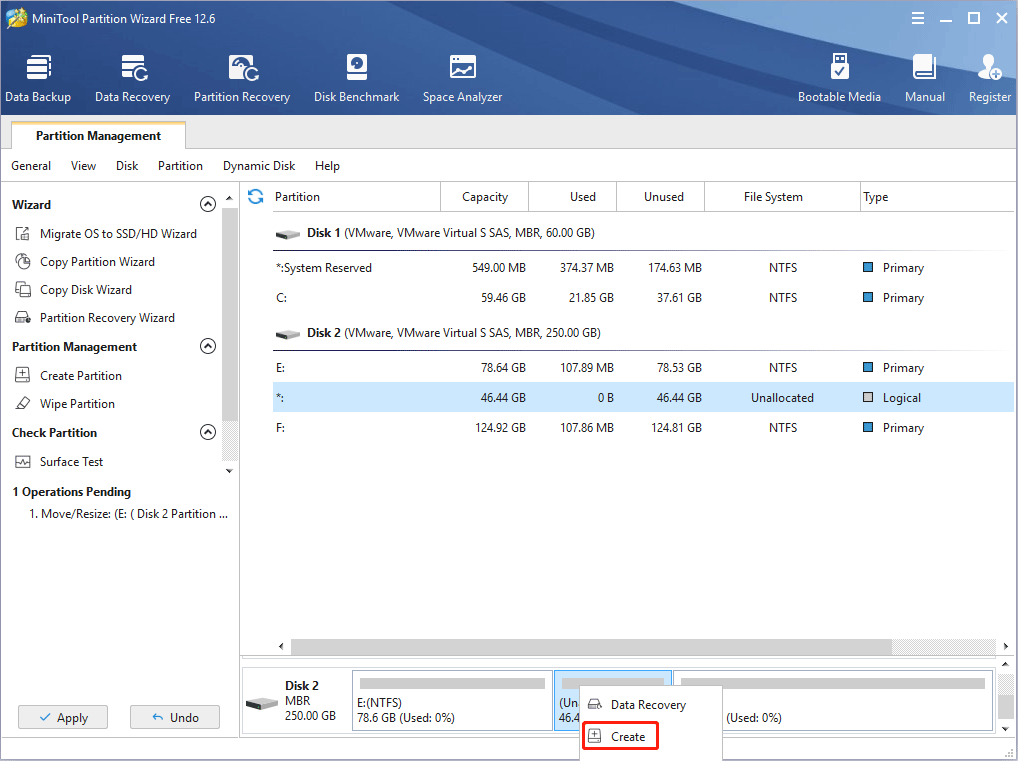
Step 3: Right-click the unallocated space and choose the Create button.
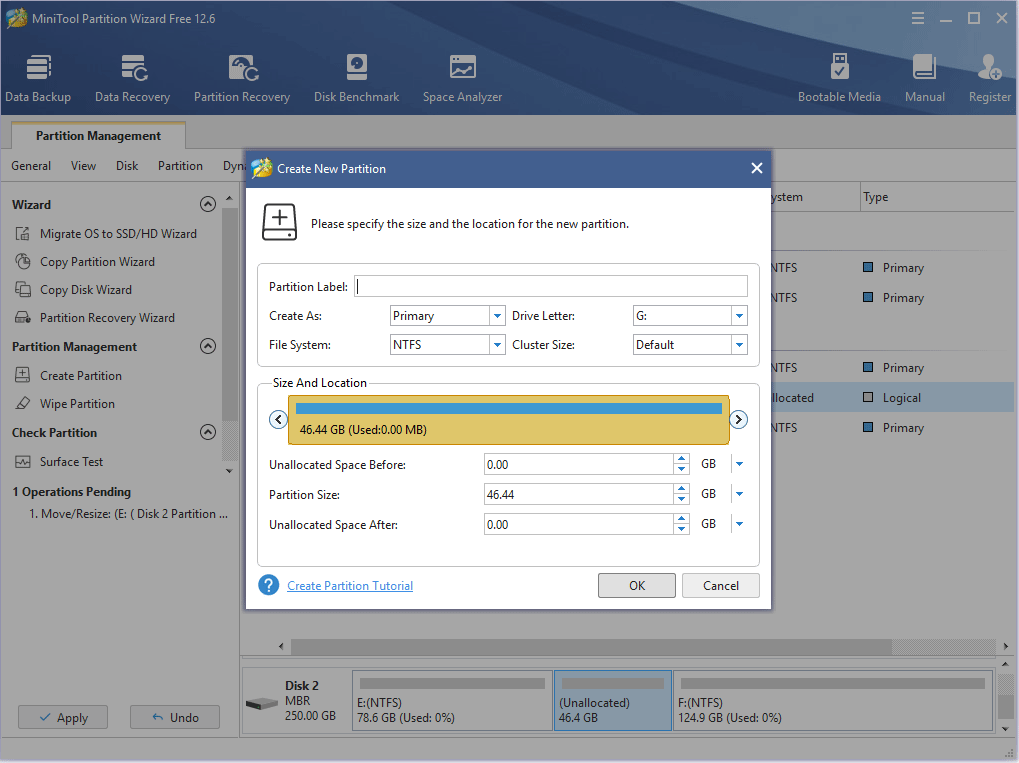
Step 4: Set parameters for the new partition. You can keep all of them to the default value if you don’t have specific demands. Then, click the OK button.
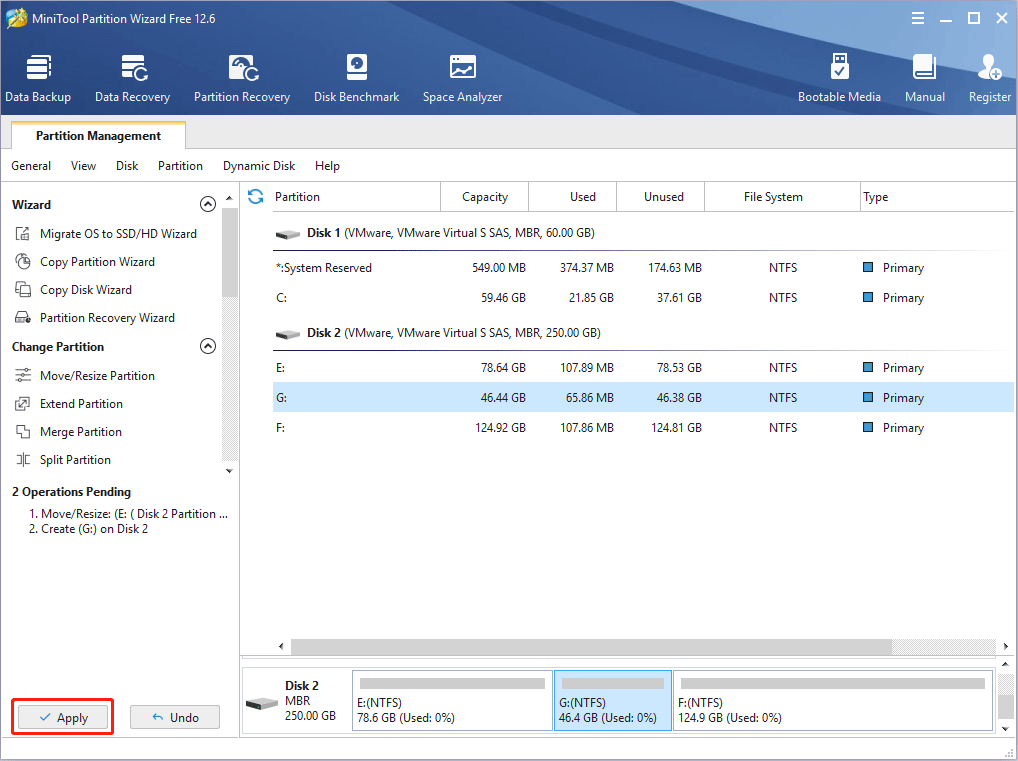
Step 5: Click the Apply button to execute pending operations.
How to Create a Windows 11 VM
To create a Windows 11 virtual machine on your Windows 10 PC, you can use Hyper-V, VMware Workstation, or VirtualBox. All of them can help you create a Windows 11 VM when your PC doesn’t meet the TPM 2.0 requirement. You can choose one tool according to your condition.
Use Hyper-V to Create a Windows 11 Virtual Machine
This method is only available on 64-bit Windows 10 Pro, Enterprise, and Education editions. In addition, you should use commands to check whether your PC meets the hardware requirements needed by the Hyper-V.
- Open and run Command Prompt as administrator.
- Type the command “systeminfo” and then press Enter. After the result comes out, please check the Hyper-V requirements Only when all Hyper-V requirements are Yes, you can run Hyper-V without problems.
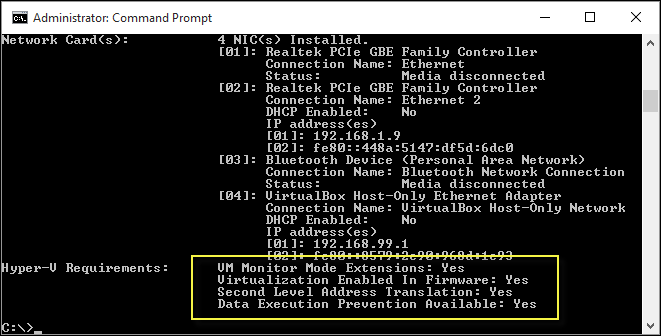
If your PC can’t run Hyper-V, you can use other methods introduced below. If your PC meets the requirements, please keep reading.
Step 1: Add the Hyper-V component to your PC.
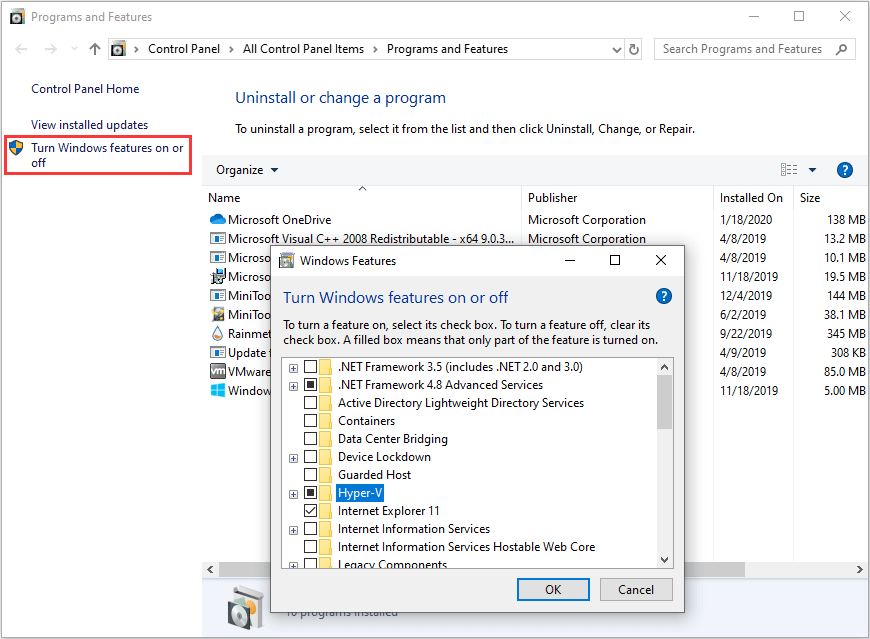
- Open Control Panel and make the View by to Large icons or Small icons.
- Click Programs and Features > Turn Windows Features on or off.
- On the Windows Features window, select Hyper-V and click OK. The PC will download and install the Hyper-V component automatically. In this process, you may need to reboot the PC.
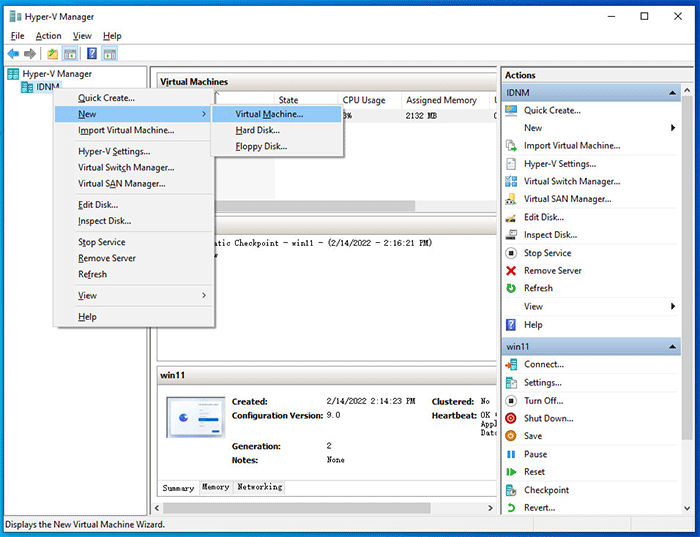
Step 2: Open Hyper-V Manager. Right-click on the item listed under the Hyper-V Manager directory in the left panel and then choose New > Virtual Machine. Follow the wizard to create a VM. In this process, you should note the following items:
- When you Specify Name and Location, please check Store the virtual machine in a different location, and then choose the partition you just created as the location.
- When you Specify Generation, please choose Generation 2 so that the VM has UEFI enabled.
- When you Assign Memory, please set 4096MB at least.
- When you are asked to choose Installation Options, please check Install an operating system from a bootable image file. Then, select the Windows ISO file you just created.
Step 3: After the Windows 11 VM is created, please back to the Hyper-V Manager. Right-click on the VM you just created in the middle panel and then choose Settings. You should adjust the following two items.
- Highlight the Security tab, and then check the Enable Trusted Platform Module option.
- Highlight the Processor tab, and then change the Number of Virtual Processors to 2 or more.
- Then, click the OK button.
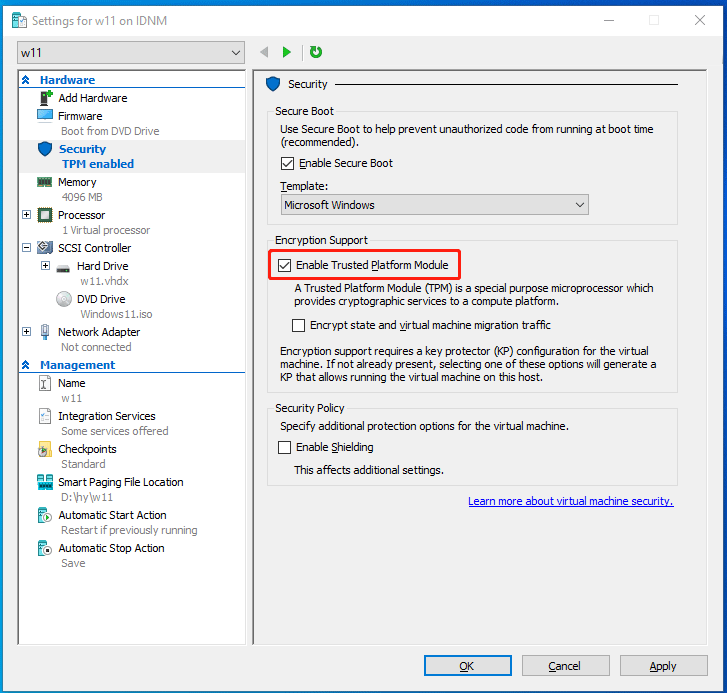
Step 4: After the settings are OK, you will be back to the Hyper-V Manager interface. Double-click the VM in the middle panel to run the VM. Press any key to boot from CD/DVD. Then, you should go through the complete Windows 11 installation process in this window.
Use VMware to Create a Windows 11 Virtual Machine
Step 1: Install the VMware Workstation. If possible, please install the latest version, because some old versions may don’t have the vTPM feature. In addition, the free version also lacks the vTPM feature. Please choose the PRO one.
Step 2: Launch VMware and then click File > New Virtual Machine. Please choose the Custom (advanced) option. Now, follow the wizard to create a VM. In this process, you should note the following items:
- In the Guest Operating System Installation interface, choose Installer disc image file (iso), and then browse to the Windows 11 ISO file you created before.
- When you select the Guest Operating System Version, please choose Windows 10 and later x64.
- When you select the Location of the VM, please choose the separate partition you created before.
- The Firmware Type should be UEFI, and the Secure Boot option should be also checked.
- In the Processor Configuration interface, you should make sure the number of the total processor cores is 2 at least.
- When you specify the memory for the VM, please set it to 4GB at least.
- When you specify the storage for the VM, please set it to around 100GB.
Step 3: Select the VM you just created, and then click Edit virtual machine settings. In the new window, click Options > Access Control. Click the Encrypt button to set a password for the virtual machine.
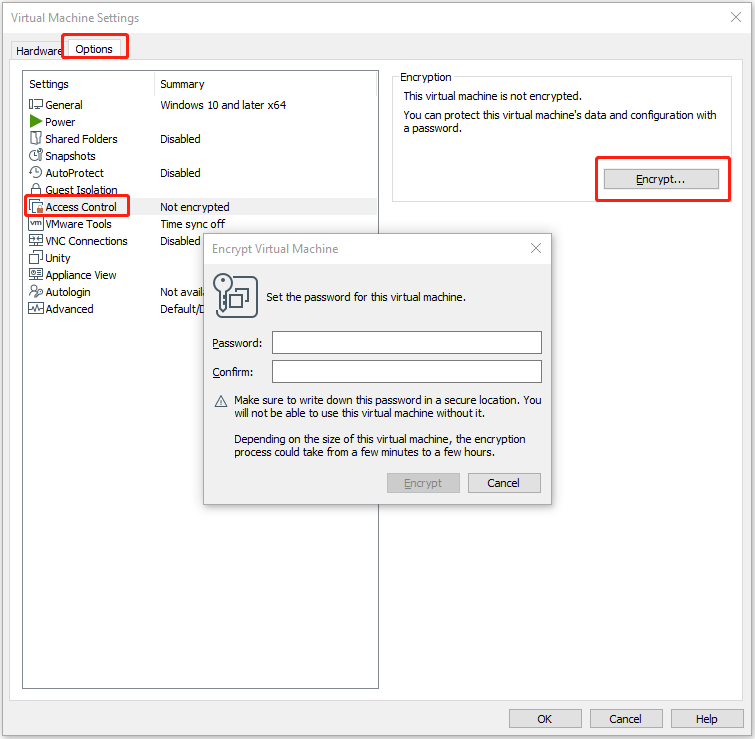
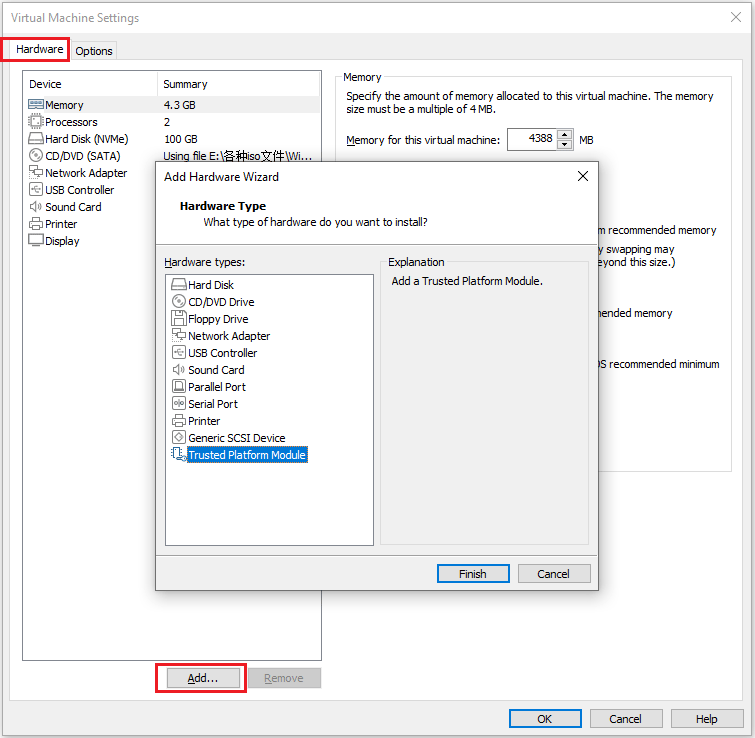
Step 4: After encrypting the VM, please skip to the Hardware tab and then click the Add button. Choose Trusted Platform Module and click Finish. Then, click the OK button the save changes.
Step 5: Back to the main interface, click the Start button to run the VM. Press any key to boot from CD/DVD. Then, you should go through the complete Windows 11 installation process.
How to Install macOS and Windows 11 Virtual Machines on Ubuntu
Use VirtualBox to Create a Windows 11 Virtual Machine
At the time of writing, VirtualBox doesn’t have the virtual TPM feature. To create a Windows 11 virtual machine using VirtualBox, you should bypass the TPM check. Bypassing the TPM check allows you to install Windows 11 on a device without TPM 2.0, but please note that Microsoft warns that this method may cause some compatibility issues.
Step 1: Download and install the latest version of VirtualBox. Launch this software and click the New button. Then, follow the wizard to create a VM. In this process, please pay attention to the following items:
- The Machine Folder should be located in the separate partition you created before.
- The OS Type and Version should be Microsoft Windows 11 (64-bit).
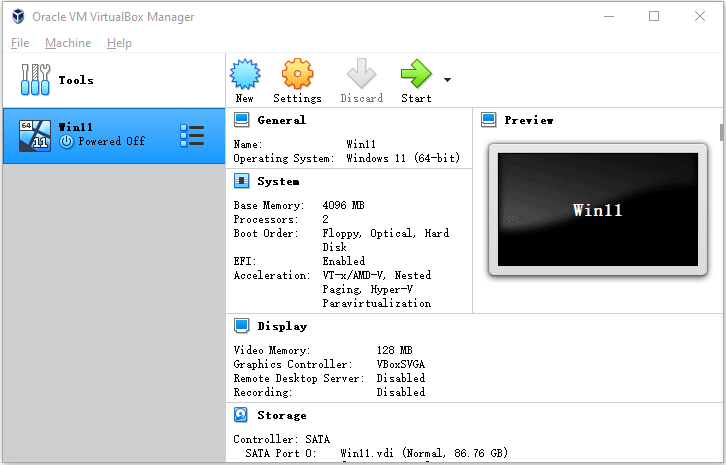
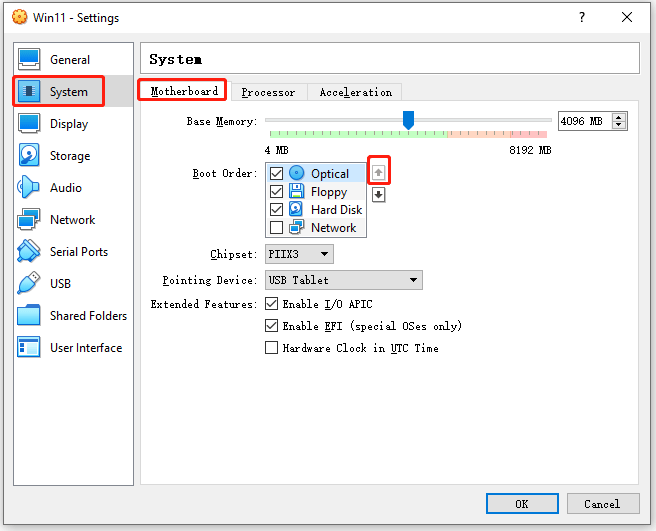
Step 2: Right-click the VM you just created and choose Settings. Go to System > Motherboard. In the Boot Order box, select the Optical option and click the Up arrow to move this option to the first place.
Step 3: Go to the Storage tab, highlight Empty, click the optical disk icon, and then click Choose/Create a Virtual Optical Disk. In the new window, click the Add button and select the Windows 11 ISO file you created before. Then, you can see the Windows 11 ISO file appears in the list. Select the Windows 11 ISO file and click the Choose button.
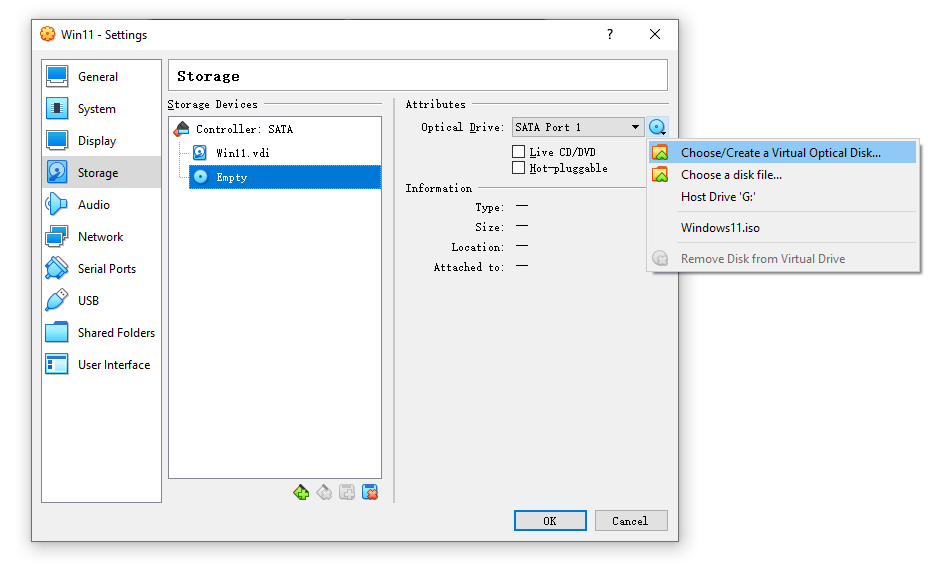
Step 4: Now, you will see the Empty is replaced by the Windows 11 ISO file. Then, click the OK button to save settings changes. Select the VM and click the Start button to run the VM. Similarly, press any key to boot from CD/DVD.
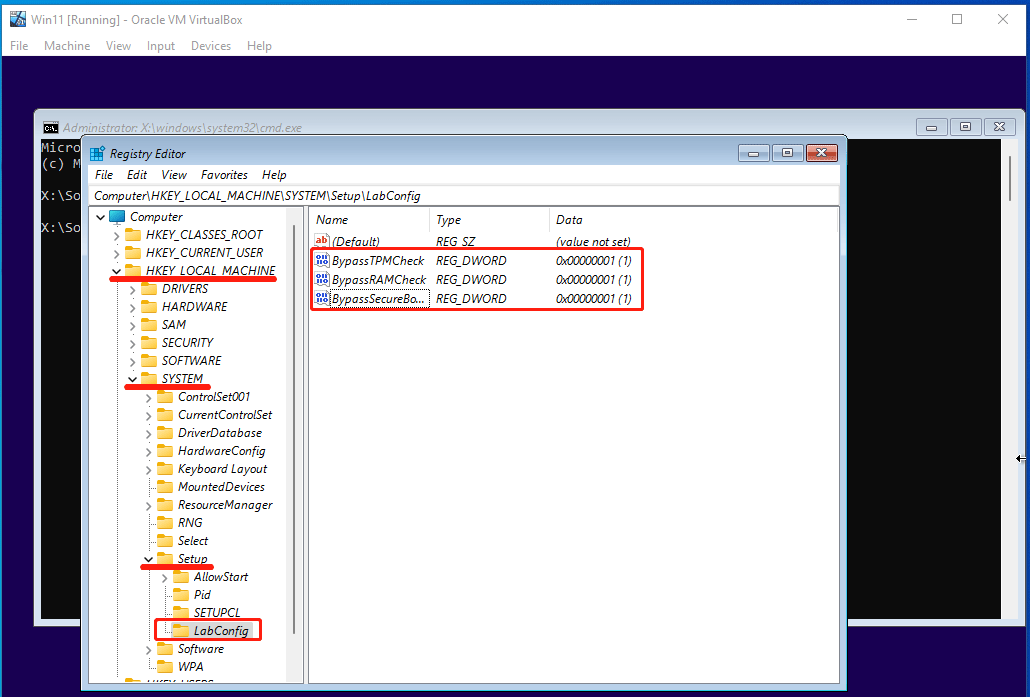
Step 5: Now, you will see the Windows Setup interface. Please click the Next button to show the Install Now button. Press Shift+F10 on your keyboard to launch a command prompt. Now, open Registry Editor and disable the TPM check.
- Type command “regedit” to open Registry Editor.
- Go to Computer\HKEY_LOCAL_MACHINE\SYSTEM\Setup.
- Right-click the Setup key and select New > Key. Name the key LabConfig.
- Right-click on the LabConfig key and select New > DWORD (32-bit) Value. Name the value BypassTPMCheck and set its data to 1. With the same steps, create the BypassRAMCheck and BypassSecureBootCheck values and set also their data to 1.
- Exit Registry Editor and Command Prompt. You will go back to the Install Now interface.
Step 6: Click the Install Now button and go through the complete Windows 11 installation process.
How to Deal with Win10 PCs Incompatible with Win11 After 2025
Bottom Line
Is this post useful to you? Have you encountered problems when using Hyper-V, VMware, or VirtualBox to create a Windows 11 VM? Do you have other ideas about how to create a Windows 11 VM? Please share them with us in the following comment zone.
In addition, if you have problems with MiniTool Partition Wizard, please contact us via [email protected]. We will get back to you as soon as possible.
![[Graphic Guide]: What’s Windows 11 & How to Install Windows 11?](https://mt-test.minitool.com/images/uploads/2021/06/install-windows-11-thumbnail.png)