Many users complain Windows Server 2022 cannot extend volume. What causes this issue? How to fix it? In this post, MiniTool provides effective troubleshooting methods in different situations. If you are one victim of the issue, you can have a try.
About Windows Server 2022 Cannot Extend Volume
Windows offers a built-in partition disk tool – Disk Management – to help you easily create/format/extend/shrink/delete volumes, mark partitions as active/inactive, change drive letters, etc. It’s such a useful tool to deal with basic partition/disk tasks.
However, sometimes Disk Management may trigger you with certain problems. For instance, you may randomly find Windows Server 2022 Extend Volume greyed out while trying to extend C or other drives on your PC.
Why is Windows Server Extend Volume greyed out? What if Windows Server 2022 cannot extend volume? If you wonder about those, focus on the following content. Below, this post delves into possible cases in which Windows Server 2022 cannot extend C drive and corresponding solutions.
Case One: There Is No Adjacent Unallocated Space
Disk Management supports extending a partition with contiguous unallocated space on the right side. So, if there is no adjacent unallocated space following the target partition, Windows Server 2022 cannot extend volume. As for this, we collect several methods you can try to solve the issue.
Way 1: Move Unallocated Space to Right Next to the Partition
If the unallocated space on the disk is not right adjacent to the target partition, you should move it to the proper place. To do this, you may need to take advantage of MiniTool Partition Wizard.
It’s a professional partition manager that enables you to create/format/delete partitions, move/resize partitions, wipe/clone a hard drive, migrate Windows 10 to SSD/HDD, format USB to FAT32/NTFS/exFAT, and more.
Here’s how to move unallocated space with MiniTool Partition Wizard.
Step 1: Download and install MiniTool Partition Wizard on your PC. Then launch it to enter the main interface.
MiniTool Partition Wizard DemoClick to Download100%Clean & Safe
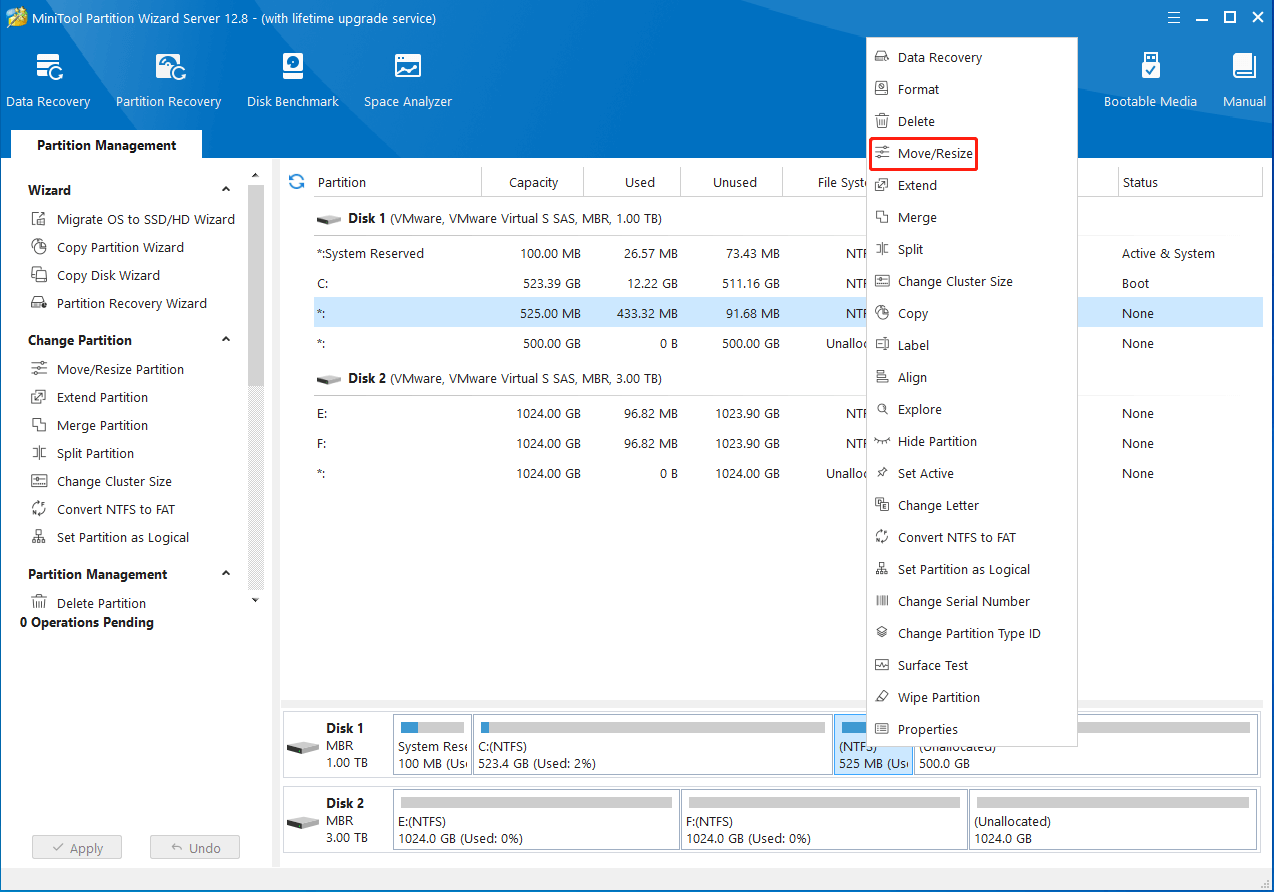
Step 2: Right-click the partition separating the unallocated space and the partition you want to extend. Then select Move/Resize from the context menu.
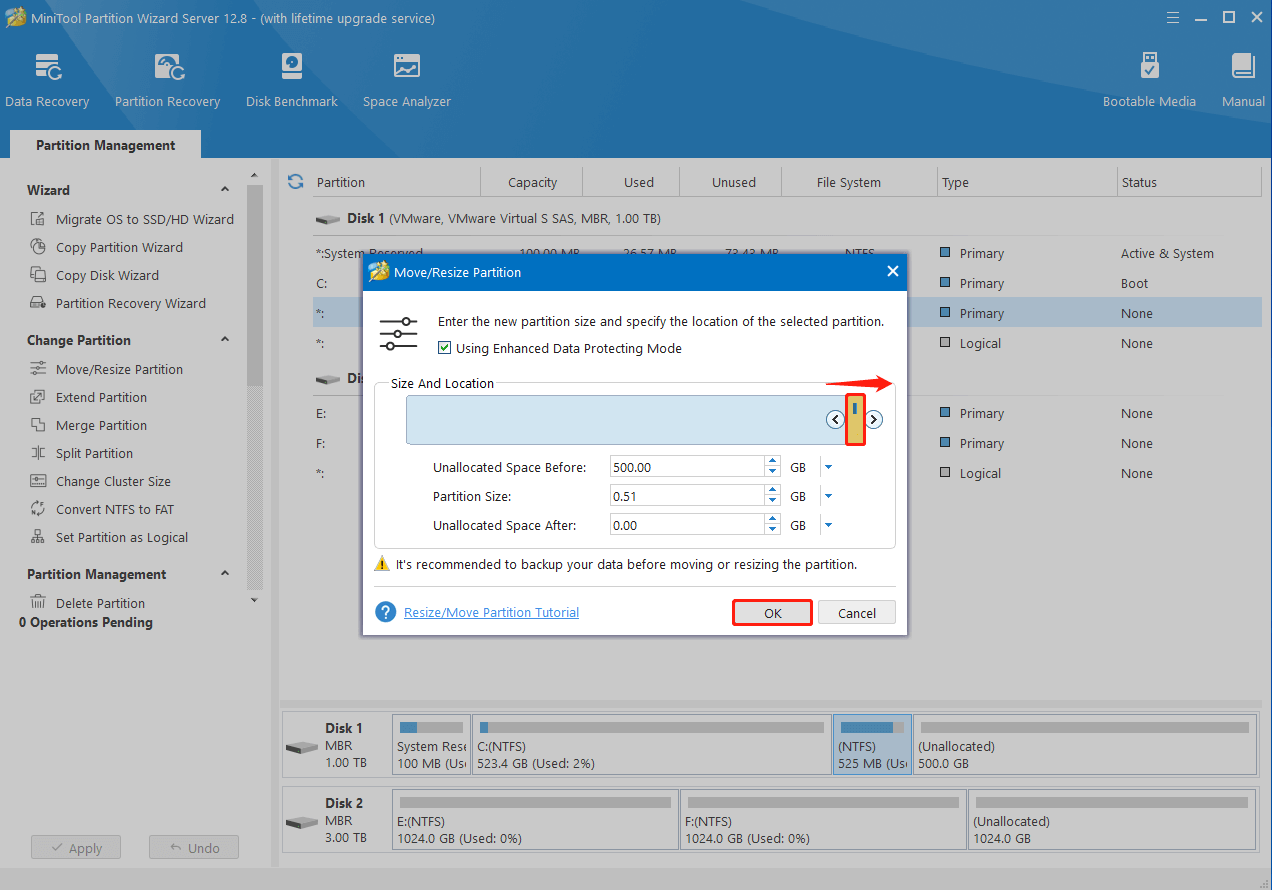
Step 3: If the unallocated space is at the right, drag the partition bar to the rightmost. Otherwise, you should move the partition to the leftmost. Once done, click OK.
Step 4: Finally, click Apply to execute the operation.
Way 2: Shrink Partition to Get Unallocated Space
Certainly, the “Windows Server 2022 extend C drive greyed out” issue may show up if there is no unallocated space on your disk. To solve it, you need to get unallocated space by shrinking other partitions. You can free shrink Windows partitions with the following steps.
Step 1: Right-click the Start icon and select Disk Management.
Step 2: In Disk Management, right-click the partition you want to shrink and select Shrink Volume.
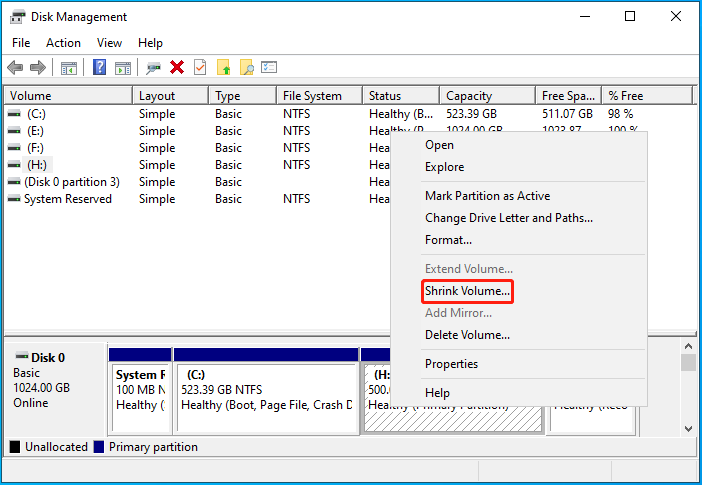
Step 3: In the Shrink window, enter the amount of space to shrink in MB. Then click Shrink. Make sure you shrink enough space for partition extending.
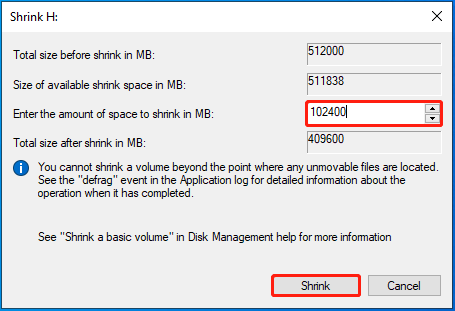
Once you get unallocated space, follow the steps in Way 1 to make it adjacent to the partition to extend.
Way 3: Extend Partition Using MiniTool Partition Wizard
If you want to extend your partition without additional work, we’d like to recommend you use MiniTool Partition Wizard. It enables you to extend a partition from non-contiguous unallocated space or free space on other partitions. To extend the partition using this tool, you can follow the given steps.
Step 1: Download and install MiniTool Partition Wizard on your PC. Then get into its main interface.
Step 2: Highlight the partition you want to extend and then select Extend Partition from the left action panel.
Step 3: In the pop-up window, select unallocated space or another partition to take space from. Then drag the sliding handle to decide the amount of space you want to take.
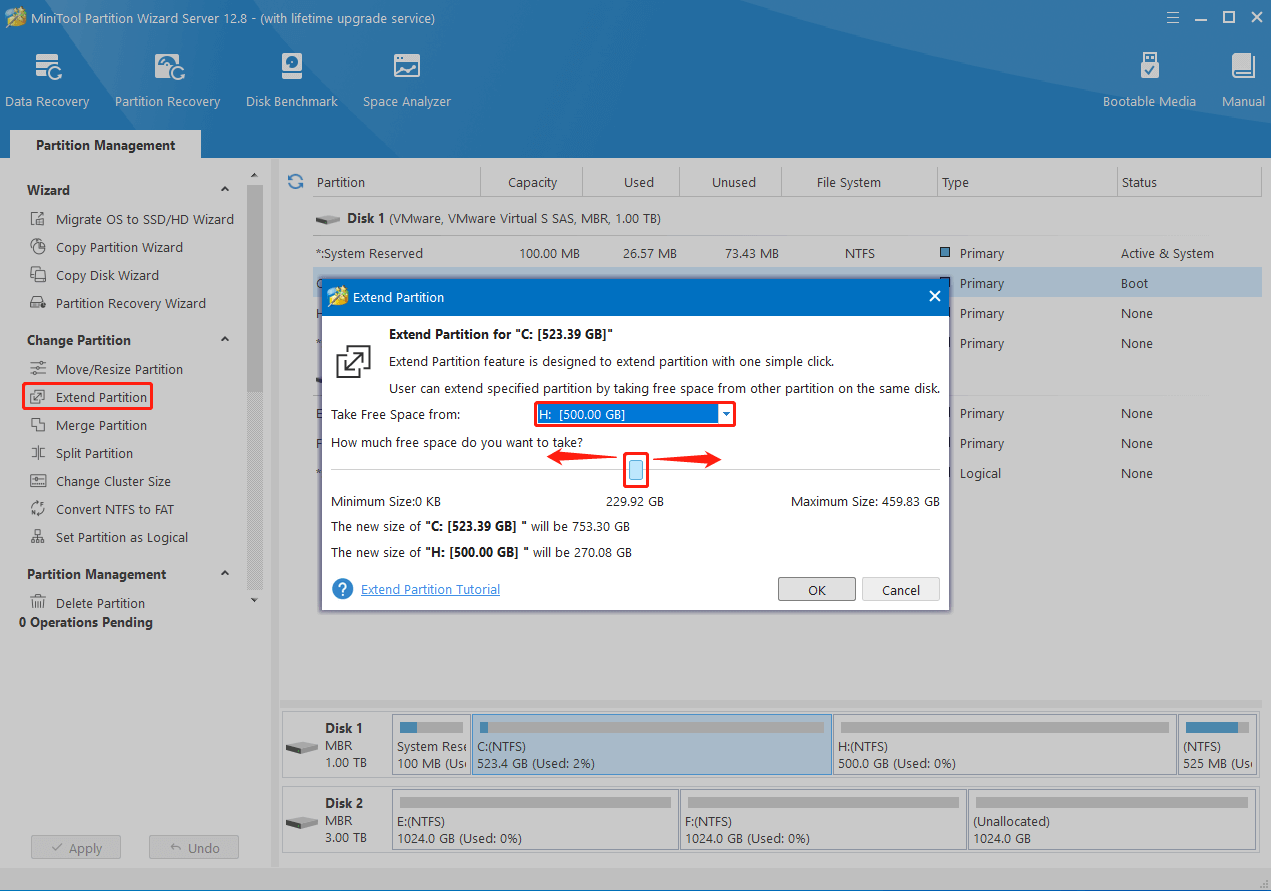
Step 4: After that, click OK > Apply to save the change.
Once you get enough contiguous unallocated space, you can successfully extend the partition without the “Windows Server 2022 Extend Volume greyed out” issue.
Case Two: The Partition’s File System Is Unsupported
You can easily extend a partition through Windows native tools on the condition it’s an NTFS, REFS, or RAW partition. But if your partition is formatted to an incompatible file system, the issue that Windows Server cannot extend volume happens. To extend the partition successfully, you ought to reformat it to a suitable file system.
This post summarizes two ways to convert the partition to the NTFS file system. Pick one according to your needs.
Way 1: Convert FAT32 to NTFS
If the current file system of the partition is FAT32, you can convert FAT32 to NTFS without losing data. You can refer to the following instructions to finish the operation.
Step 1: Press Windows + R to open the Run dialog.
Step 2: Type cmd in the text box and then click OK.
Step 3: In the Command Prompt window, type convert X: /fs:ntfs and press Enter. Replace X with your drive letter.
Way 2: Format the Partition to NTFS
Another way to change the partition’s file system is to perform a format. You can format the specific partition to NTFS with both Disk Management and Diskpart. The following are detailed steps.
#1. Via Disk Management
Step 1: Right-click the Start icon and select Disk Management.
Step 2: Right-click the target partition and select Format.
Step 3: In the next window, choose NTFS from the File system drop-down menu. Then tick the Perform a quick format option and click OK.
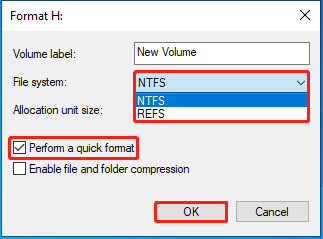
Step 4: When prompted, click OK to confirm the operation.
#2. Via Diskpart
Step 1: Open the Run dialog. Then type cmd in the box and press Enter.
Step 2: After you enter Command Prompt, type the following commands and press Enter after each.
- diskpart
- list disk
- select disk N (N represents the number of the disk including the partition to format)
- list partition
- select partition n (Replace n with the number of the partition you want to format)
- format fs=ntfs quick
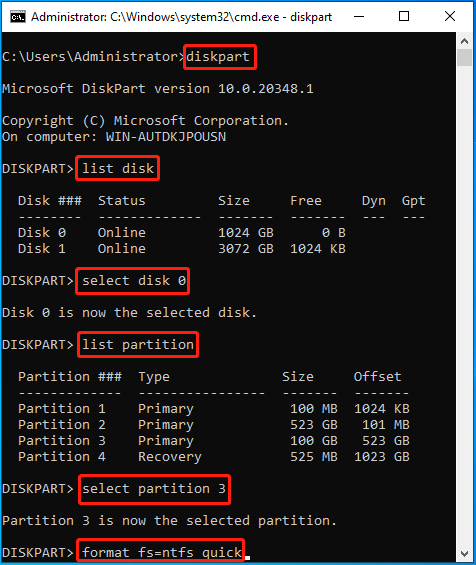
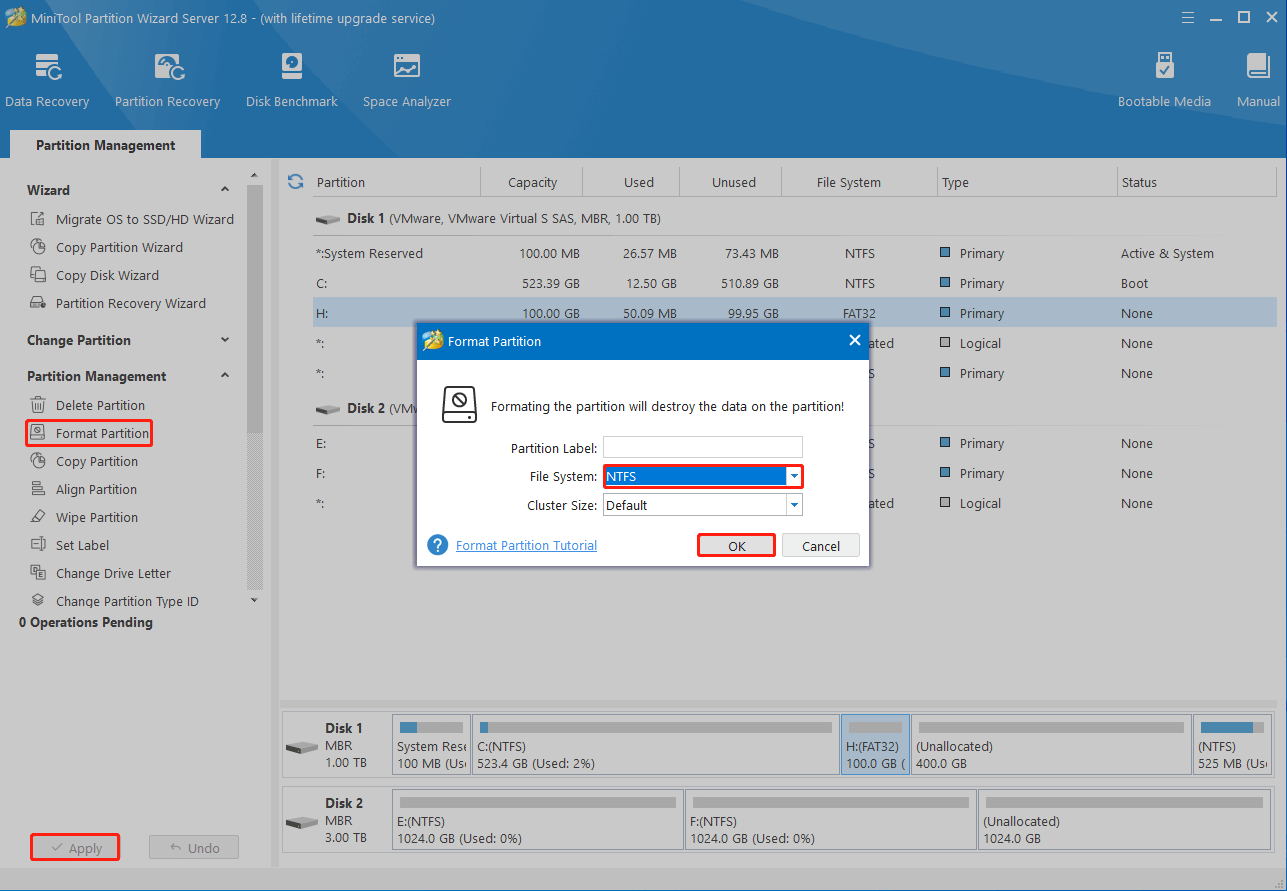
If you suffer from the “Disk Management Format option greyed out” or “Diskpart format stuck at 0” issue, you can use MiniTool Partition Wizard to proceed with the formatting process. Here’s how to do this.
- Access MiniTool Partition Wizard on your PC.
- Locate the partition to format. Then choose Format Partition from the left panel.
- In the Format Partition box, set the File System to NTFS and click OK.
- Once done, click Apply to format the partition.
Case Three: The Disk Is an MBR Disk
As is known, an MBR disk has a partition limit of 2TB. To be specific, only the first 2TB capacity is usable on the MBR disk. If the size of your partitions has reached 2TB, you may find Windows Server Extend Volume greyed out. To enlarge a partition on this occasion, it’s recommended that you convert MBR to GPT.
Way 1: Use Diskpart
To convert MBR to GPT with Diskpart successfully, you need to open Command Prompt as an administrator and then execute the following commands one after another.
- diskpart
- list disk
- select disk N
- clean
- convert gpt
Way 2: Use MiniTool Partition Wizard
MiniTool Partition Wizard enables you to convert disk from MBR to GPT without losing data. Read on to get the details.
Step 1: Download, install, and launch MiniTool Partition Wizard on your PC.
MiniTool Partition Wizard DemoClick to Download100%Clean & Safe
Step 2: In the main interface, right-click the target disk and select Convert MBR Disk to GPT Disk.
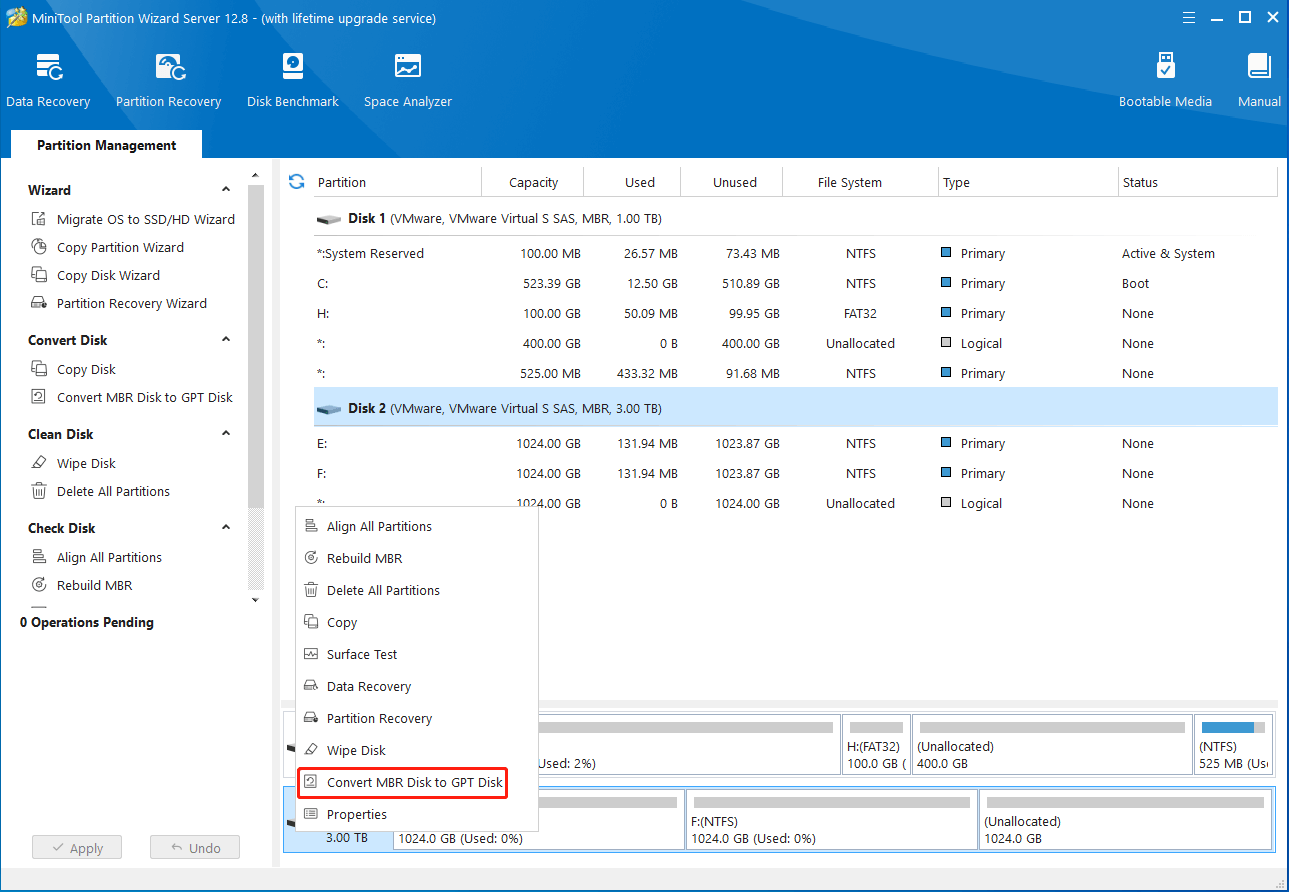
Step 3: At last, don’t forget to click Apply to save the pending operation.
Case Four: The Partition Is Blocked by Recovery Partition
Sometimes, the “Windows Server 2022 extend C drive greyed out” issue occurs because the recovery partition is in the way. In this situation, you can try to solve it by moving the recovery partition to another place or directly deleting the partition.
For further information, you can keep an eye on this guide: Windows 10 Can’t Extend Volume Recovery Partition in the Way. If you are not sure whether you can delete the recovery partition or not, read this post: How to Delete Recovery Partition Windows Server 2022 [Tutorial].
Bottom Line
This post explores the reasons why Windows Server 2022 cannot extend volume and offers workable solutions based on different causes. When your Windows Server cannot extend volume, get through this post to figure out the culprit and then apply suitable ways to solve it.
If you get stuck in any issues while using MiniTool Partition Wizard, please feel free to contact us via [email protected]. We’ll send a reply to you as soon as possible.
