AMD OverDrive is a software utility from the CPU manufacturer that helps you with overclocking and fan control. However, some people encounter AODDriver2.sys error when using this software. This post from MiniTool provides you with multiple solutions to fix the error.
AODDriver2.sys
AODDriver2.sys is a useful utility for people who use ADM CPU because it enables them to extract maximum performance from the hardware. However, any conflict with AMD OverDrive software can cause Aoddriver2.sys error in Windows PC.
Many people have reported that aoddriver2.sys error is resulting in BOSD(Blue Screen of Death) from Windows 7 to Windows 10. AODDriver2.sys is a Windows driver that allows the computer to communicate with hardware or connected devices.
In this case, AODDriver2.sys can directly access the inside of the Windows operating system, then your computer will be shut down by the conflict between the driver and the hardware, and the AODDriver2.sys BSOD error message will appear.
In addition, AODDriver2.sys error makes your computer extremely difficult to restart and diagnose because of the frequent shutdowns.
What causes the AODDriver2.sys blue screen error? It can be caused by several reasons and the installed AMD OverDrive software with incompatible CPU is one of the reasons. Here are the most common AODDriver2.sys error messages as follows.
SYSTEM_SERVICE_EXCEPTION AODDriver2.SYS
SYSTEM_THREAD_EXCEPTION_NOT_HANDLED AODDriver2.SYS
In this next part, I will introduce how to fix the AODDriver2.sys error on Windows.
How to Fix the AODDriver2.sys BSOD Error
- Uninstall AMD OverDrive
- Run System File Checker
- Perform System Restore
- Uninstall the AMD OverDrive program in Safe Mode
- Perform System Image Recovery in WinRE
- Perform a Clean Install
How to Fix the AODDriver2.sys BSOD Error
There are multiple solutions to this error. You should try them to fix AODDriver2.sys blue screen depends on your case since this error may cause your PC can’t boot normally. Thus, if your PC can boot, go to case 1. If cannot, go to case 2.
Case 1: Your PC Can Boot Normally
Fix 1: Uninstall AMD OverDrive
First, if you haven’t uninstalled the AMD OverDrive software yet, now you should do that. Follow the instructions below:
Step 1: Search for Control Panel in the Search box to open it.
Step 2: Navigate to the Programs and Features section and click it.
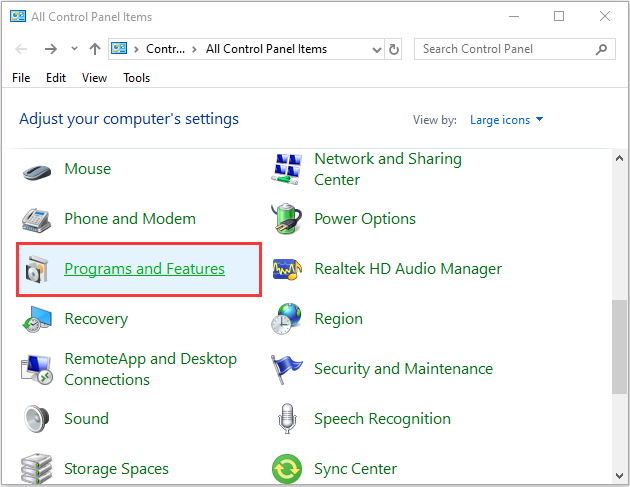
Step 3: Find AMD OverDrive in the list and right-click it to choose Uninstall/Change.
Step 4: Follow the on-screen instructions to uninstall it.
After the uninstallation is complete, restart the PC and check if the issue has been fixed.
Fix 2: Run System File Checker
If the problem persists, continue to the next method: use System File Checker. Sometimes, AODDriver2.sys BSOD is caused by the corrupted Windows system files. Here are the steps to fix it:
Step 1: Input command prompt in the Search box. Then right-click Command Prompt and select Run as administrator to open the command window.
Step 2: Type the command sfc /scannow and then press Enter.
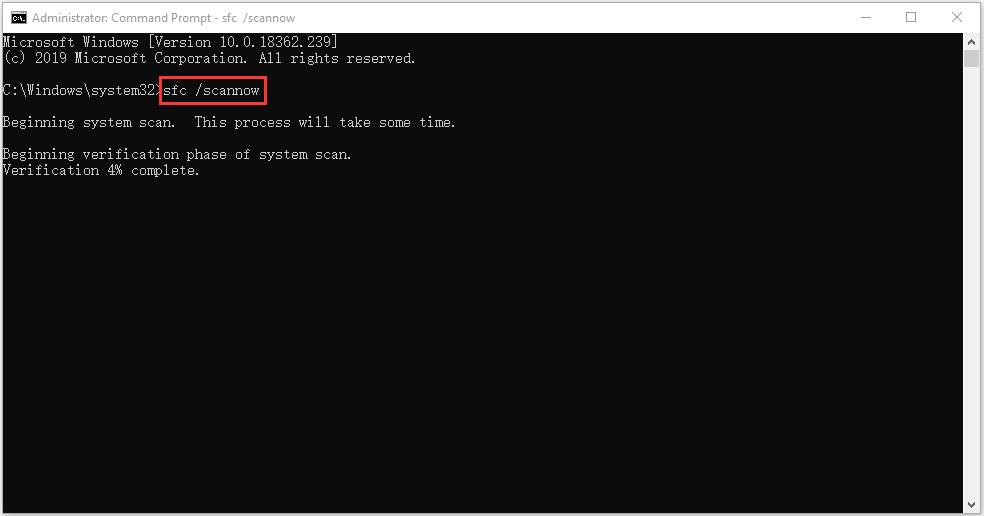
Wait patiently until the verification process 100% completes. Then reboot the computer to see whether the AODDriver2.sys error still exists.
If the sfc /scannow command is unable to fix AODDriver2.sys on Windows 10, you can run DISM to fix the Windows system image. So, type the correct command.
Dism /Online /Cleanup-Image /CheckHealth
Dism /Online /Cleanup-Image /ScanHealth
Dism /Online /Cleanup-Image /RestoreHealth
After that, you can check whether you still encounter the issue.
Fix 3: Perform System Restore
If you have created a system restore point or system image backup with Windows snap-in tools, you can try using the restore point to restore your computer. This may help you fix the AODDriver2.sys error.
Step 1: Search for control panel in the Search box, then open it.
Step 2: Click Recovery to continue. Choose Open System Restore in the pop-up interface to continue.
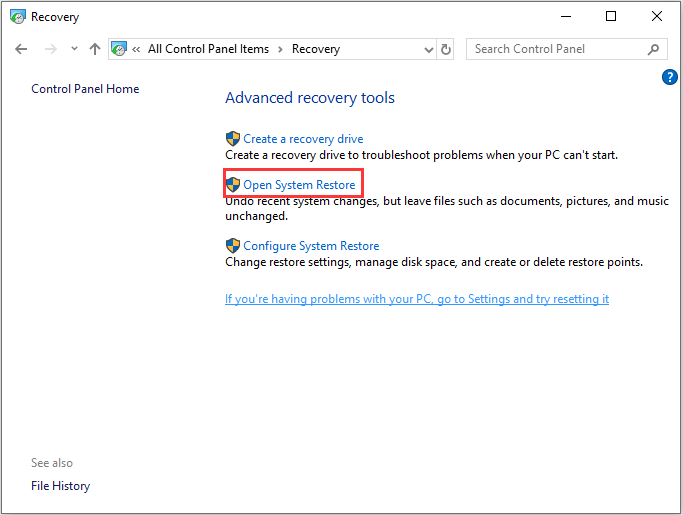
Step 3: In the Restore system files and settings interface, you can click Next to continue.
Step 4: Choose a time point to restore your computer to the state it was in before the selected event and click Next to continue.
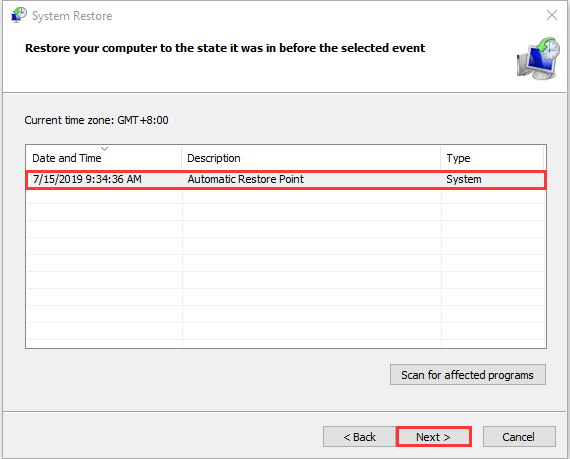
Step 5: You need to confirm the restore point and click Finish.
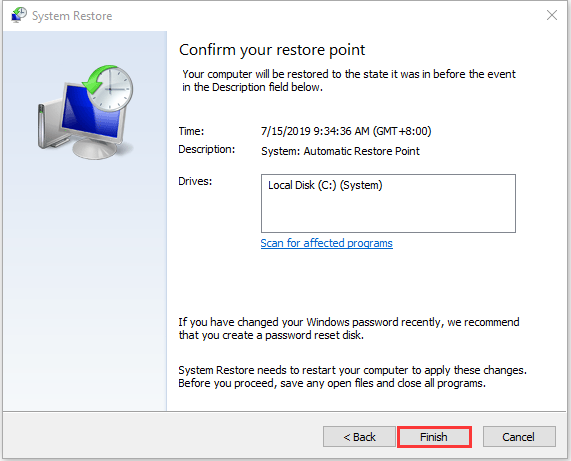
When the system restore process is finished, you can reverse your computer to a previous state. Then you can check if the error has gone.
Case 2: Your PC Cannot Boot Normally
If your PC cannot boot normally because of the AODDriver2.sys error, booting your PC into Safe Mode is the first thing you should do. Then you can start to fix the error.
Safe Mode is a built-in diagnostic mode of Windows 10 (7, 8, etc.) computer operating system. If you start Windows 10 PC in Safe Mode, it will only allow starting up basic system programs and services in the booting process.
When your computer can’t boot, you should restart your PC several times to boot to WinRE(Windows Recovery Environment) to enter into Safe Mode. You can also use Windows 10 recovery bootable media like a DVD/USB bootable drive to enter WinRE. Here are the steps:
Step 1: Insert your Windows installation CD/DVD or USB bootable drive to your computer, and start the computer.
Step 2: Enter the BIOS. If you don’t know how to do that, read this post – How to Enter BIOS Windows 10/8/7 (HP/Asus/Dell/Lenovo, any PC).
Step 3: Choose the DVD or USB flash drive as the first boot device and boot the Windows 10 PC from the device.
Step 4: Click Repair your computer to enter into WinRE successfully.
Now, you can continue to enter Safe Mode.
Step 1: From the Choose an option screen, click the Troubleshoot option. Next, click Advanced Options.
Step 2: Click the Startup Settings option.
Step 3: Click the Restart button.
Step 4: Then you will see multiple options for startup. Press the F4 key to enable Safe Mode.
Now your PC will restart in Safe Mode.
Fix 1: Uninstall the AMD OverDrive program in Safe Mode
If the AMD OverDrive program is making the system crash, you can uninstall it in Safe Mode.
Step 1: Go to Control Panel > Programs and Features.
Step 2: Find and uninstall the AMD OverDrive software.
Step 3: Get out of the Safe Mode and restart your PC.
Fix 2: Perform System Image Recovery in WinRE
If the previous method doesn’t work, you should perform system image recovery via Safe Mode. Here is how to do that:
Step 1: Enter WinRE.
Step 2: You should choose Troubleshoot in Choose an option, and then choose Advanced options.
Step 3: Choose System Image Recovery in Advanced options to get a new window.
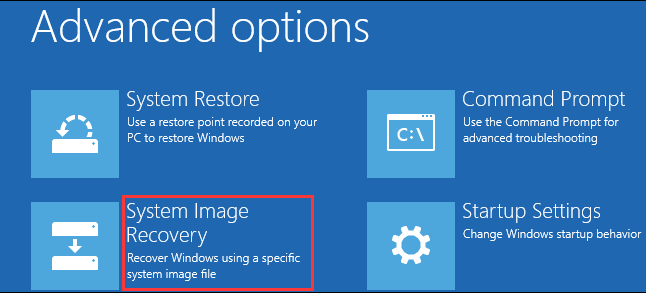
Step 4: Choose the latest system image and then click Next.
Step 5: Follow the guidance to restore your PC. When a warning window for formatting pops up during the process, you need to click Yes.
Fix 3: Perform a Clean Install
Finally, if none of the above solutions can fix the AODDriver2.sys error, there is only one solution left – reset your Windows 10. This is more like a refresh of the system than reinstalling.
Step 1: Enter the WinRE. Then go to Choose an option > Troubleshoot > Reset this PC.
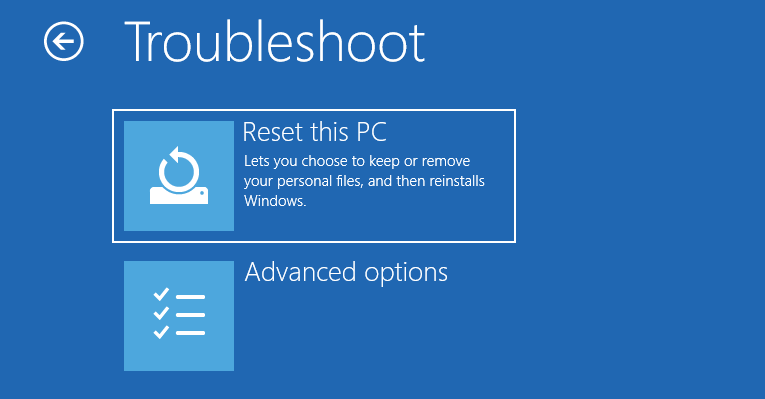
Step 2: Choose Keep my files and continue with the resetting process.
Useful Suggestion: Back up Your System
After you fix the AODDriver2.sys error, I have a suggestion for you. In case of something wrong with your system, it is recommended to back up your system in advance. Now, I will introduce a piece of free backup software for you – MiniTool ShadowMaker.
MiniTool ShadowMaker provides a one-click system backup solution. It supports backing up your system drive completely, including system partition, system reserved partition and EFI system partition. And you can image all of your data including computer settings, applications, drivers, system files and boot files.
The system backup is bootable. When the system crashes, you can restore your computer to a normal state. This post – How to Restore Computer to Earlier Date in Windows 10/8/7 (2 Ways) may be the one you need.
MiniTool ShadowMaker provides a Trial edition that gives you a 30-day free trial for all backup features. You can purchase its Pro Edition to use it permanently.
Now you can download MiniTool ShadowMaker Trial Edition to back up your system.
MiniTool ShadowMaker TrialClick to Download100%Clean & Safe
Now, let’s see how to back up your Windows system.
Step 1: Decide a Backup Mode
- Launch MiniTool ShadowMaker and keep using the trial edition.
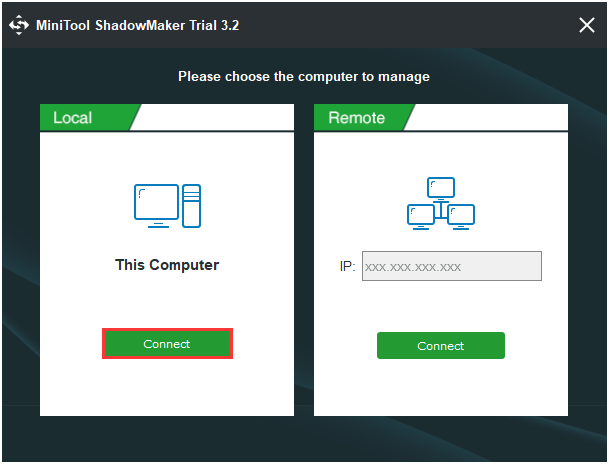
- Please choose the computer to manage and click Connect in the Local section to enter the main interface.
Step 2: Choose Backup Source
- Go to the Backup page.
- This software selects the system partition and system reserved partition by default.
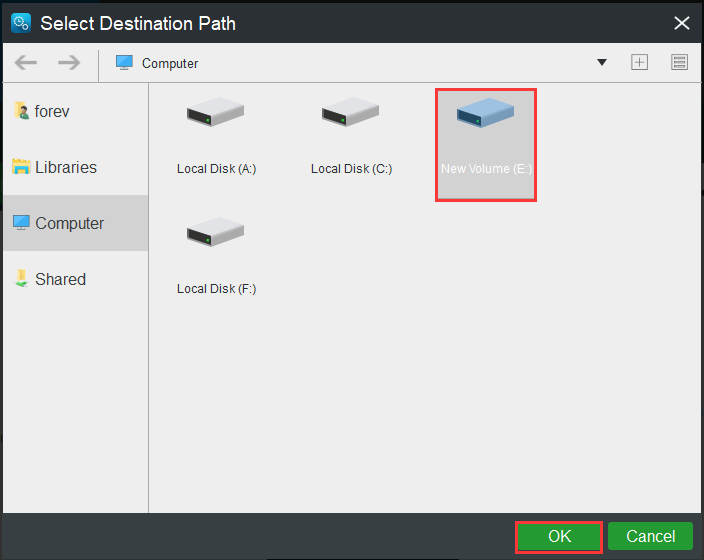
Step 3: Choose a Destination Path to Store Your System.
- You can back up your system to an external hard drive, USB flash drive, NAS and more.
- Then choose a destination path to store your system and click OK. Here I take the New Volume (E) as an example.
1. Please do not save a volume image file to the volume being backed up.
2. The destination that used to store the system must have enough storage space.
Step 4: Start to Back up
- Go back to the following interface.
- You have two options: click Back up Now to start the backup process immediately or click Back up Later to delay the backup process.
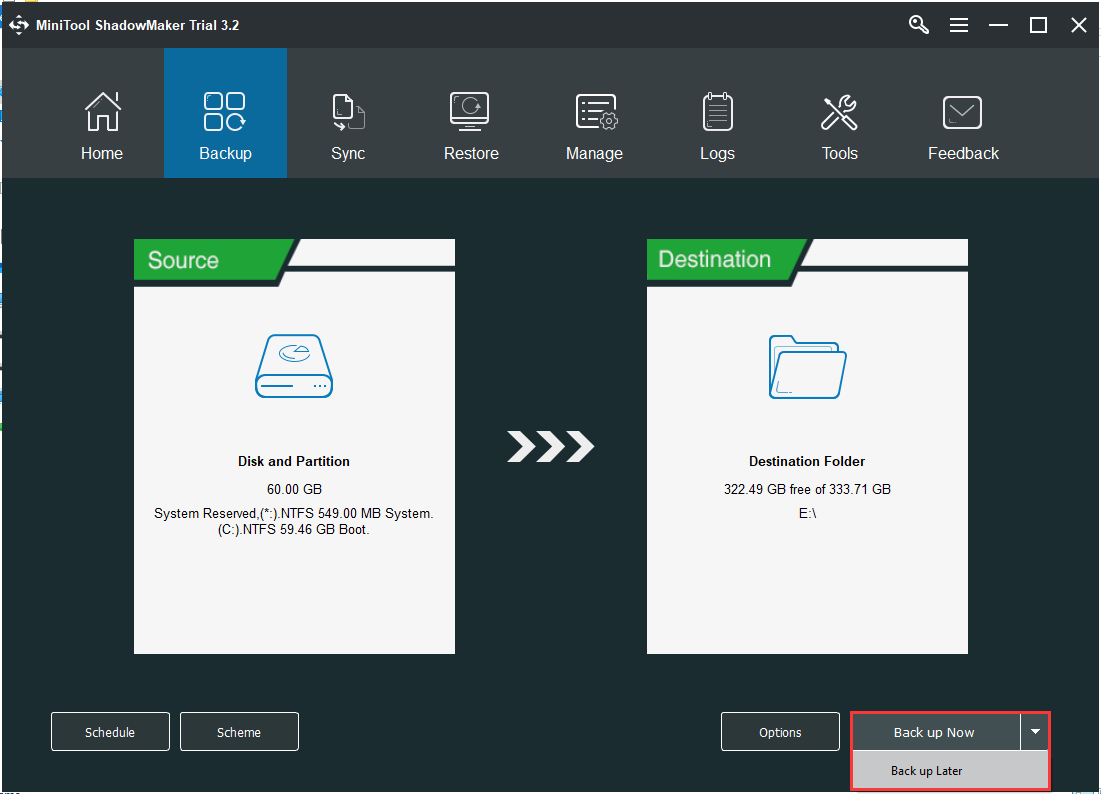
Here are all the steps of using MiniTool ShadowMaker to back up your system.
Bottom Lines
To sum up, this post tells you how to fix the AODDriver2.sys error. If your PC is affected by the error, this post will help you diagnose and fix the issue by yourself.
In addition, it is recommended to create a system image with the professional backup software to better safeguard your computer. Thus, if you have any problem with MiniTool ShadowMaker, please feel free to contact us via the email [email protected] and we will reply to you as soon as possible.
AODDriver2.sys FAQ
- Enter the BIOS.
- Once in the BIOS, navigate to your CPU frequency. If the CPU Frequency is different to the turbo speed of your CPU, then the CPU has been overclocked.
