If your computer suddenly runs into a black screen after disk cleanup or your Windows won’t boot with a dark screen, do you know what the reason is and how to deal with it? This post from MiniTool will introduce some effective methods to solve it, as well as a better way to safeguard your PC.
Issue: Black Screen After Disk Cleanup
When you want to free up more storage space on the drive, you might perform a disk cleanup. Generally speaking, it is a safe action that can make your computer run faster and respond more quickly. However, your PC may encounter a black screen after disk cleanup. It appears probably when critical system files or files responsible for booting Windows inadvertently get deleted during the process.
When facing a black screen, try these things first:
- Wait and verify whether the cleanup utility is still running.
- Check the connection between the display and your computer.
- Disconnect all non-critical peripherals, leaving just the mouse and keyboard, and then restart the computer.
Solutions to Deal with Black Screen After Disk Cleanup
If you perform these basic troubleshooting above but they can’t work. The following methods might be useful, you can take them and try them out.
Preparation – Boot Your PC into Windows Recovery Environment
For all those solutions, it is necessary for you to boot the computer into Windows Recovery Environment (WinRE). To do that, follow the steps:
- Press and hold the Power button on your PC for about 10 seconds to turn it off.
- Then turn on the computer by pressing the Power button.
- Press the Power button to shut it down again as soon as the Windows logo appears.
Repeat the same process to turn off and on your PC three times. When the PC is turned on for the third time, the computer should enter into the Automatic Repair window. If not, follow the same steps until the Automatic Repair screen shows on your computer. When you see Automatic Repair couldn’t repair your PC, click Advanced options to boot into WinRE.
Fix 1: Run Startup Repair
In case your computer appears a black screen after disk cleanup, you can access WinRE and run Startup Repair to fix this problem.
Step 1: After entering WinRE, click Troubleshoot > Advanced options > Startup Repair.
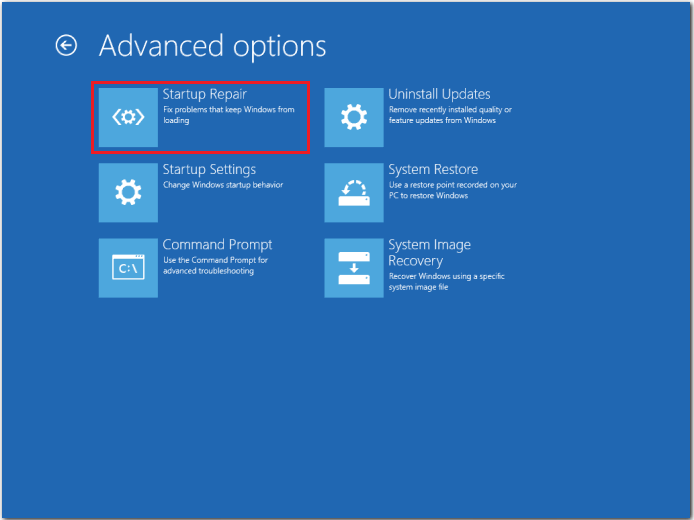
Step 2: Choose your account, enter the password and then click the Continue button.
Then, this tool will start scanning, detecting, and fixing any problems that may hinder your PC from booting correctly.
Fix 2: Run System File Checker
Sometimes, the corrupted system files can contribute to a black screen after disk cleanup. Thus, you can run System File Checker (SFC), a built-in tool on Windows, to repair them and fix your problem.
Step 1: Hit Troubleshoot > Advanced options > Command Prompt.
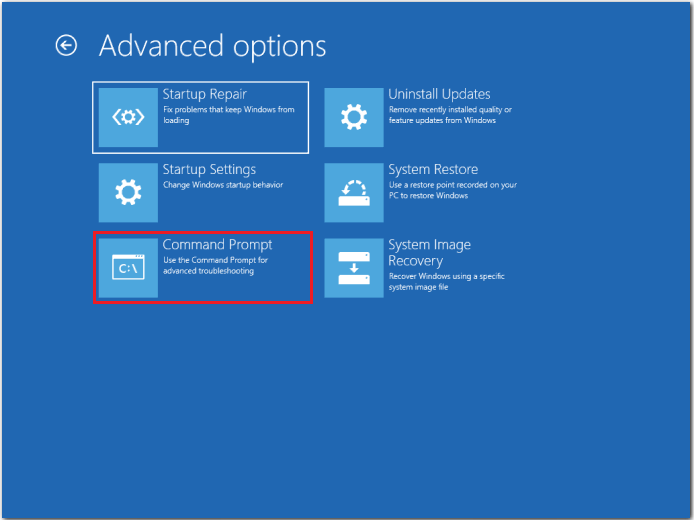
Step 2: Input sfc /scannow in the pop-up window and press Enter to start the scan.
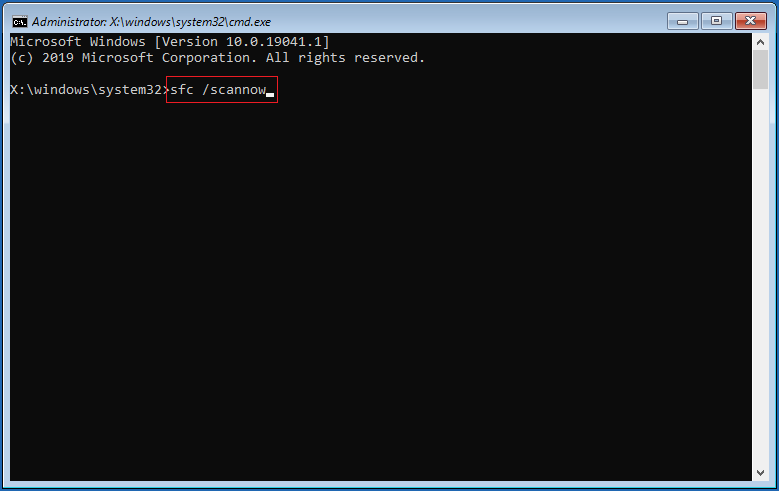
Step 3: It will take a while, so you need to wait patiently until the message Verification 100% complete appears.
Then restart your computer to check whether the black screen disappears.
Fix 3: Perform DISM Scan
If the SFC scan doesn’t work when your PC shows a black screen after deleting temporary files, you should try to perform the DISM scan. To do so, follow the instructions:
Step 1: Launch Command Prompt with the step above.
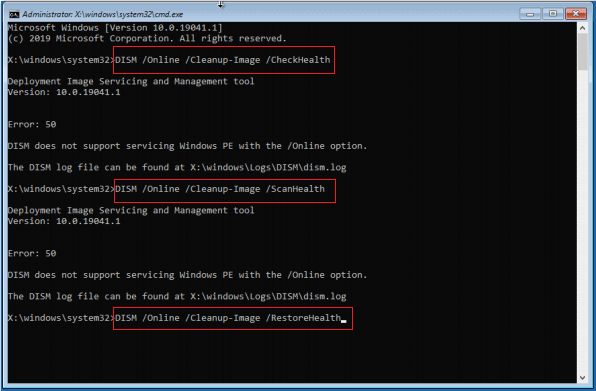
Step 2: Type the following commands individually and hit Enter after each:
DISM /Online /Cleanup-Image /CheckHealth
DISM /Online /Cleanup-Image /ScanHealth
DISM /Online /Cleanup-Image /RestoreHealth
Fix 4: Check Disk
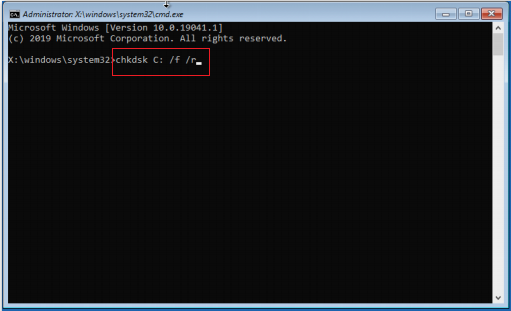
The logical and physical errors might be one of the reasons why there is a black screen after cleaning the PC. In this case, you should run the CHKDSK scan to check the file system of a drive for logical integrity. To do so: launch Command Prompt in WinRE, input chkdsk C: /f /r and hit Enter. You can replace C: with your target drive letter.
Fix 5: Perform System Restore
System Restore is a tool to undo the changes to important parts of Windows with the restore point you have created. What’s more, it doesn’t delete your data or documents, so you don’t need to worry about data loss. Therefore, running System Restore is such a good choice to fix the black screen after cleaning up disk.
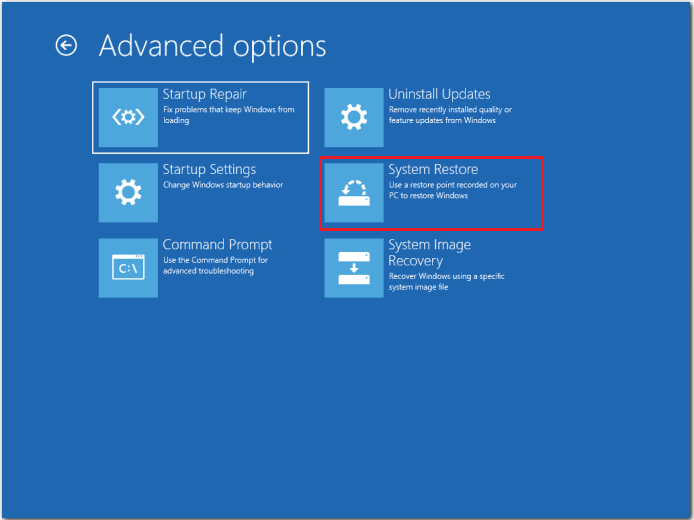
Step 1: Click Troubleshoot > Advanced options > System Restore after entering WinRE.
Step 2: Wait for System Restore to initialize, and then click on Next.
Step 3: Choose a restore point created before the disk cleanup process and click Next.
Step 4: Finally, verify the restore details and click on Finish.
Here is a related article about how to create a system restore point: What Is System Restore Point and How to Create It? Look Here.
Fix 6: Reset the Computer
A factory reset is an effective method to fix all kinds of complex issues such as Windows won’t boot after disk cleanup. It is equivalent to an automatic reinstallation of Windows and you don’t have to do it manually. Here are some details to do that.
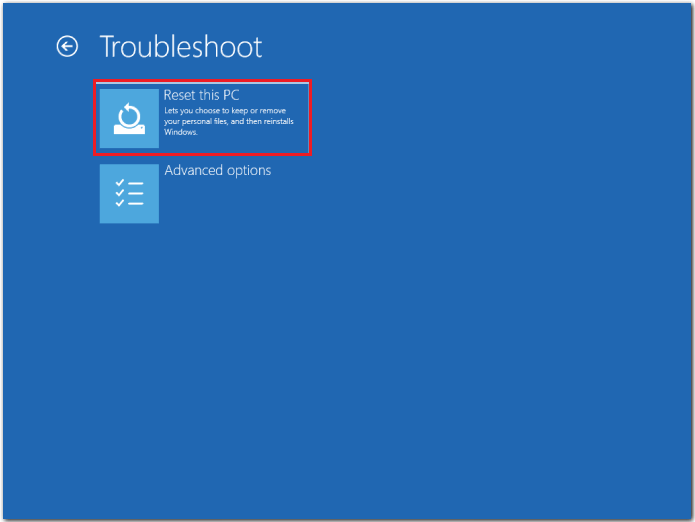
Step 1: On the WinRE screen, choose Troubleshoot > Reset this PC.
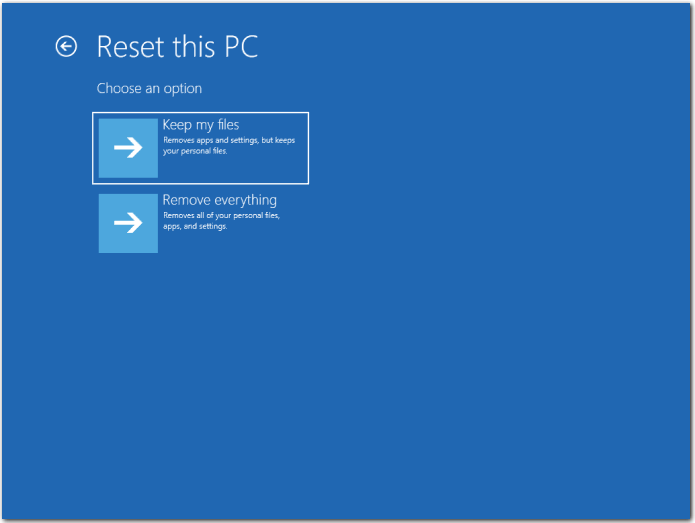
Step 2: Select Keep my files or Remove everything according to your situation.
MiniTool ShadowMaker TrialClick to Download100%Clean & Safe
Step 3: Follow the on-screen instructions to complete the process and check for improvements.
Fix 7: Manually Reinstall Windows
If you cannot access Windows Recovery Environment and other solutions fail to work, try to reinstall Windows. It is quite straightforward, given you go with the default configuration. To do that, you have to download the media creation tool on another working computer from Microsoft’s official website.
- Open the downloaded installation media and select Create installation media for another PC.
- Then create a bootable USB drive. This process will take a few minutes, please wait patiently.
- Connect the USB drive to the PC with a black screen and boot through the media.
- Run Windows Setup and follow the on-screen instructions to complete the reinstallation.
Fix 8: Reflash the BIOS
Sometimes, a BIOS update is installed when the disk cleanup utility is running. It leads to BIOS corruption, resulting in a black screen and a boot failure. In this situation, you have to reflash BIOS. Since the process varies for each PC, I recommend you to check the official sources for the exact steps.
Useful Suggestion – Back up the Operating System
Although you can look for solutions to the black screen after cleaning the PC issue online, it is quite complex and you may encounter other troubles. Therefore, we recommend you to back up the operating system with MiniTool ShadowMaker after solving this issue. With the backup image of the system, you can restore the computer to its previous normal state rather than ruling out the problems one by one.
It is a PC backup software designed to backup files, folders, disks, partitions, and even the operating system. The schedule settings allow you to make an automatic and regular backup. What’s more, it supports syncing files and folders and moving Windows to another drive.
MiniTool ShadowMaker has a free trial edition, which allows you to experience almost all features for free within 30 days. If you want to get an advanced one, just click here.
MiniTool ShadowMaker TrialClick to Download100%Clean & Safe
Now we will give you the details about how to back up the system with MiniTool ShadowMaker:
Step 1: Launch this backup software and enter its main interface.
Step 2: Go to the Backup tab, you can see the operating system is checked by default in SOURCE.
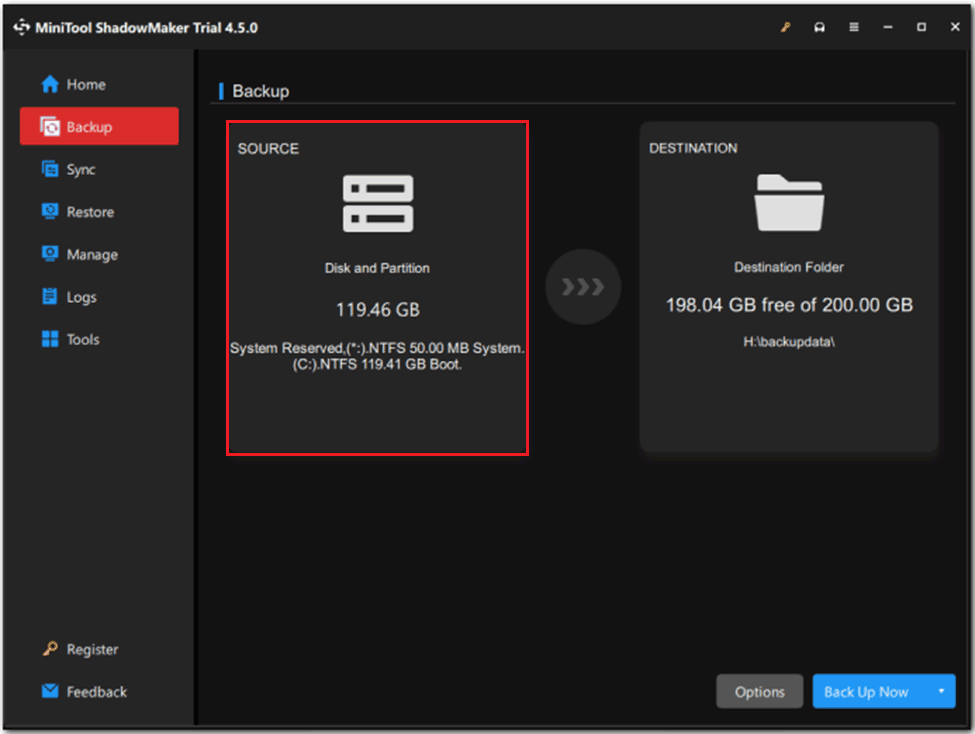
Step 3: Click DESTINATION to choose a target place to save the system image. It’s best to choose a USB flash drive or an external hard drive. Then click OK to continue.
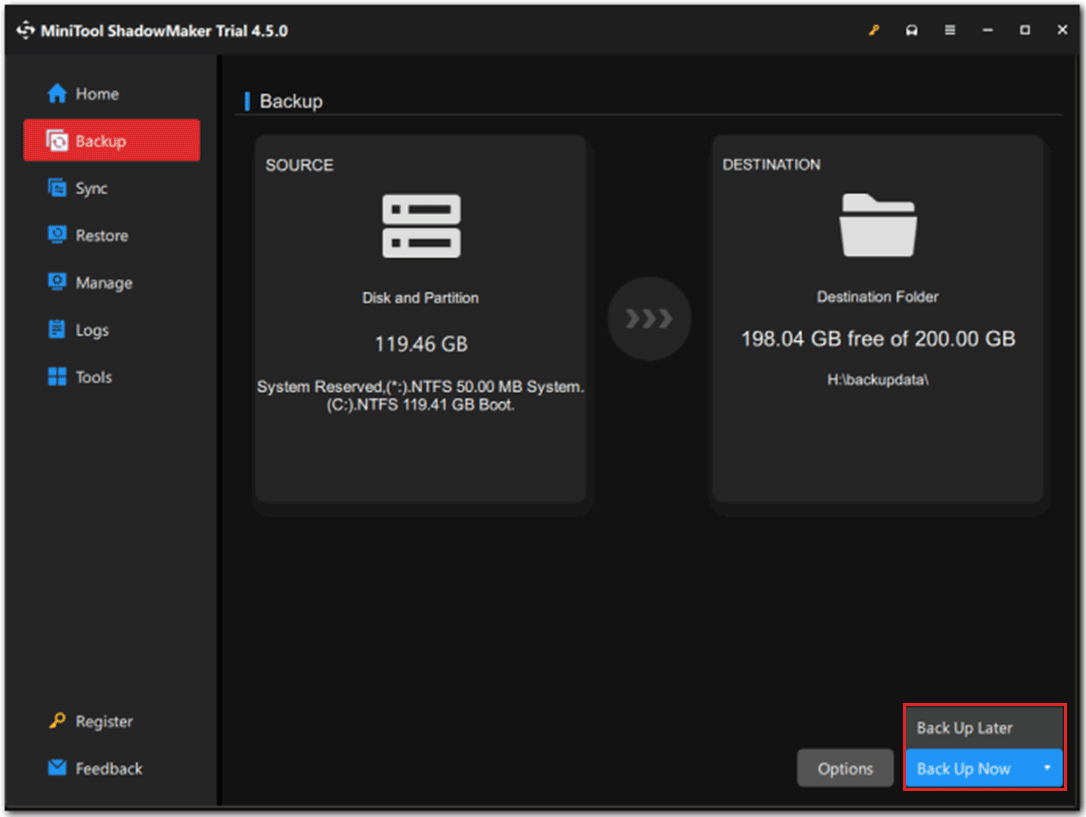
Step 4: Select Back Up Now to start the task immediately or Back Up Later to delay the task. You can go to the Manage tab to check the delayed task.
After these steps are finished, you have successfully backed up your Windows 10/11 system. To better safeguard the PC, you can create a bootable USB media. To do that, go to Tools > Media Builder > WinPE-based media with MiniTool plug-in > choose a USB flash drive. Next time your PC fails to boot or has crucial system issues, connect the USB to it and boot it from the USB media. Then enter MiniTool Recovery Environment to restore the system.
Final Words
What to do when your computer runs into a black screen after disk cleanup? You should know the answer after reading this article. Hope you can take one solution that works best for you and get rid of the black screen issue. If you have other problems using MiniTool ShadowMaker, please don’t hesitate to contact us via [email protected] and we will reply to you as soon as possible.
Black Screen After Disk Cleanup FAQ
1. An outdated or malfunctioning application or driver.
2. Wrong computer configuration.
3. Internal components and peripheral devices work improperly.
4. A malware infection.
5. Faulty Windows updates or corrupted system files.
1. Run Startup Repair
2. Run the SFC scan
3. Perform the DISM scan
4. Execute the CHKDSK command
5. Reset your computer
