- How to update BIOS in my Windows 10 ASUS computer?
- Should you update your BIOS?
- How to check BIOS version in Windows 10?
What Is a BIOS?
BIOS, short for Basic Input / Output System, controls your computer boot process. When you start your computer boot, BIOS starts the power-on self-test (POST) and passes the control over to the boot loader that boots your computer OS.
BIOS is a low-level system software and it is stored on a chip on your motherboard, unlike the operating system which is stored on computer hard drive.
Some newer computers come with UEFI firmware instead of the tradition BIOS. Its function is the same as BIOS, and it is also a low-level system software.
Also read: Discover the essential steps for successful hard drive recovery in this informative article.
BIOS Update – Do You Need to Update Your Computer’s BIOS?
Generally you shouldn’t update BIOS of your Windows 10 computer, but sometimes you may update it.
When You Shouldn’t Update BIOS
Normally BIOS updates are small updates. They may fix a bug or add support for a new model of CPU or graphics card. If your computer works well, you probably don’t need to update your BIOS and won’t see any difference after a BIOS update.
In some circumstances, updating BIOS may even bring more new problems to your computer. So it’s advised you go to your computer manufacturer site to find your computer model and check carefully the update details of new BIOS versions, thus, to determine if there is a need to update your computer BIOS.
Besides, updating BIOS is a risky practice. Be careful with BIOS update, it may cause your computer freeze, crash or lose power in the update process, and the BIOS/UEFI firmware may be corrupted. This may lead to your computer unbootable (Related: Solve PC Not Booting after BIOS Update)
When You Can Update BIOS Windows 10
We don’t know for sure whether updating BIOS can make your computer faster and run better, e.g. reduce boot time, improve computer overall performance, fix compatibility issues. In some cases, a BIOS update may fix a motherboard issue for your computer and make your computer perform better than before, but it’s not always the case.
If you are experiencing bugs in your computer that are fixed in a newer version of the BIOS after you check the BIOS update log from the manufacturer website, you may choose to update BIOS to fix those bugs. In addition, if you contact a professional tech support from your manufacturer, and they also advise you to do a BIOS update to repair Windows 10 problems, you may have a try.
In short, it’s not advised to update your BIOS/UEFI firmware unless you do find something specific you need in the newer versions of BIOS updates.
If you decide to perform a BIOS update, you have some ways to go, we’ll cover them below. If you don’t know your current BIOS version yet, you can also follow the guide below to check BIOS version at first.
One-stop Way to Back up Your Computer System, Files and Folders before BIOS Update
As stated above, updating BIOS is a risking task since it may cause your computer unable to boot or run abnormally.
Therefore, it’s highly suggested that you back up your Windows computer system and important data/files on your PC before you learn how to update BIOS in Windows 10. This can help keep your data safe, and easily restore your Windows 10 system if you meet problems in BIOS update.
To back up Windows system, files and folders, partition or disk, MiniTool ShadowMaker is professional and easy-to-use.
Key Features of MiniTool ShadowMaker:
1. Backup and restore Windows OS: Enable you to easily back up Windows 10 system to USB drive, external hard drive, etc. And restore your system to a previous healthy state from USB or external hard drive by using a previous system image backup.
2. Backup individual files and folders on PC: This free Windows backup and recovery tool also allows you to freely choose individual files and folders to back up to USB or external hard drive at fast speed.
3. Backup partition or disk: If you’d like to back up a specific partition or the whole hard disk, MiniTool ShadowMaker also allows you to do it by selecting a partition to back up, or choose the Clone Disk function under Tools tab.
4. File sync: It is also a file sync program, allowing you to sync files to other locations on local computer, other computers, external USB or hard drive, network drive, etc.
5. Advanced backup features: Schedule automatic backup, incremental backup scheme, and more.
6. Bootable media builder: Allow you to create a bootable USB/disk drive to boot your Windows computer into WinPE, and use MiniTool ShadowMaker in WinPE to backup data without booting or perform a system restore.
Free download and install this professional PC backup software – MiniTool ShadowMaker – on your Windows 10/8/7 computer, and follow the steps below to back up your system or files before you update BIOS. (MiniTool ShadowMaker Editions Comparison)
MiniTool ShadowMaker TrialClick to Download100%Clean & Safe
Step 1. Enter into main UI of MiniTool ShadowMaker
You can launch MiniTool ShadowMaker, and click Keep Trial button to use the Trial Edition.
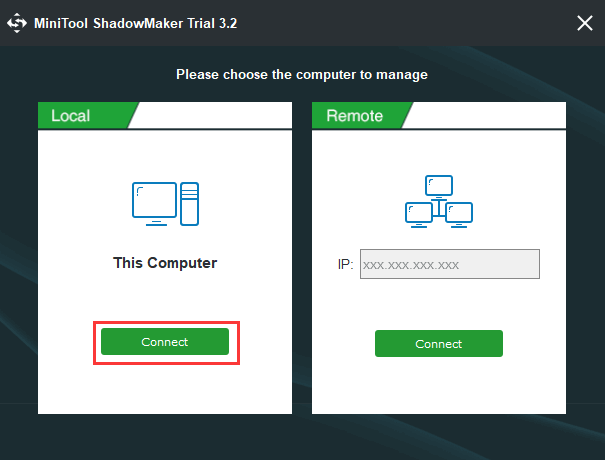
After you see the screen below, you can click Connect button under This Computer, and this will bring you to the main interface of MiniTool ShadowMaker.
Step 2. Choose the backup mode
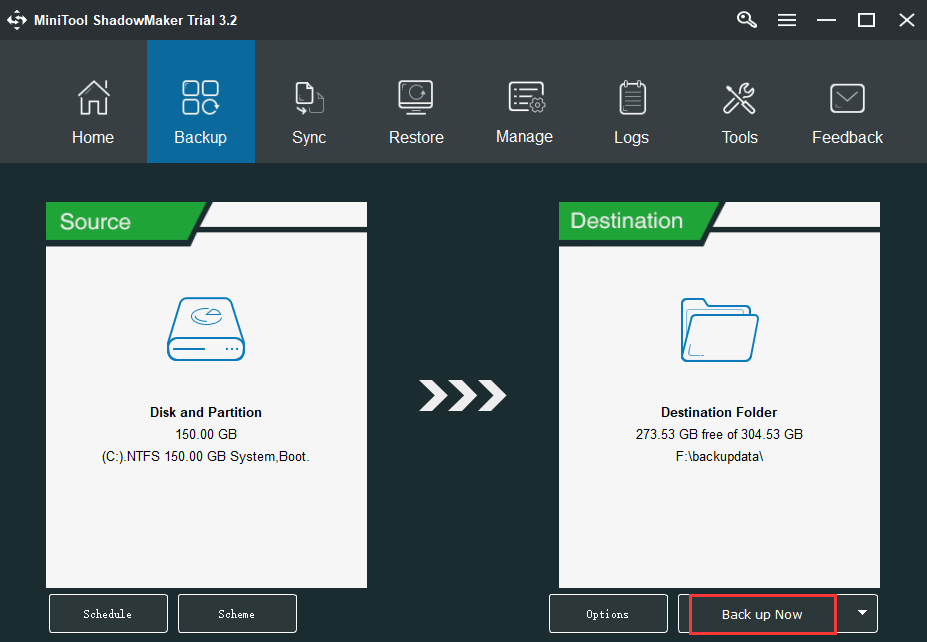
Next you can click Backup icon at the toolbar. This software has chosen the system and boot partitions as the backup resource. If you want to back up Windows 10 system, you can just leave it.
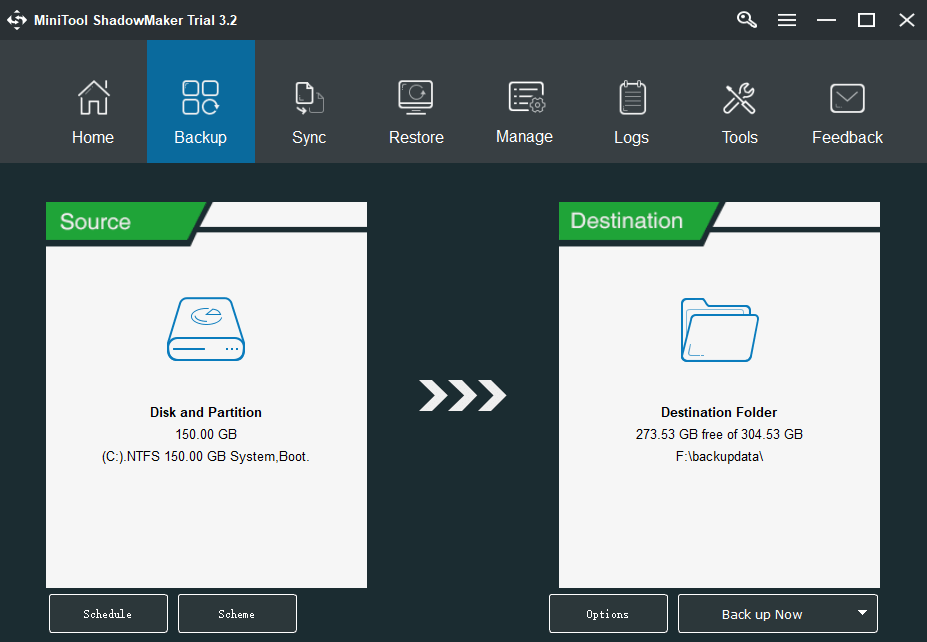
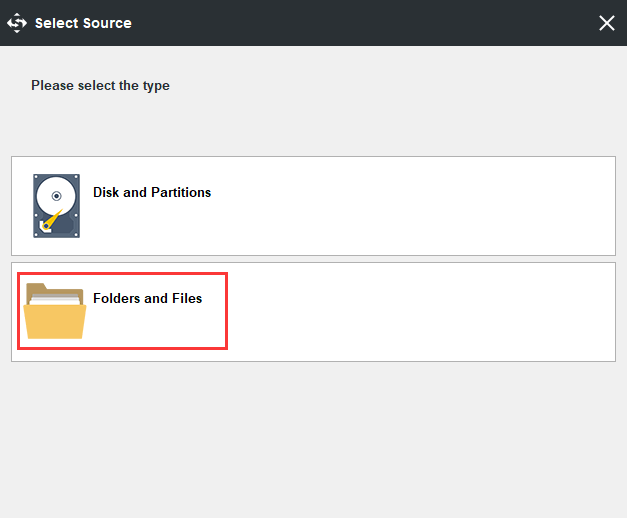
However, if you want to back up files and folders, you can click Source section, and click Folders and Files option.
Step 3. Choose destination path
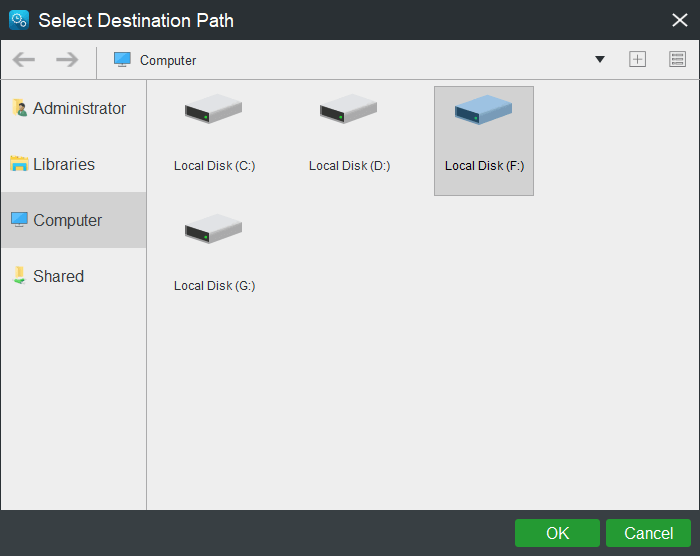
After you’ve selected the source data and files, you can click Destination section on the main UI to select a destination path to store the backup data and files.
The destination path could be other locations of computer, external USB flash drive or hard drive, etc.
Step 4. Start to back up system or files
When everything is done, you can click Back up Now button on the main UI to start to back up Windows 10 OS, or backup files and folders at fast speed.
MiniTool ShadowMaker TrialClick to Download100%Clean & Safe
Now you have created a system image of your Windows 10 computer system and backed up needed files and folders, you can continue to check how to update BIOS now.
How to Check BIOS Version Windows 10?
Before you update BIOS in your Windows 10 ASUS, HP, Dell, Lenovo, Acer or other computers, you need to check the current BIOS version of your computer to see if it is already the latest version.
To identify the current version of the BIOS on Windows 10, you can check the 4 ways below.
Way 1. Check BIOS Version from System Information
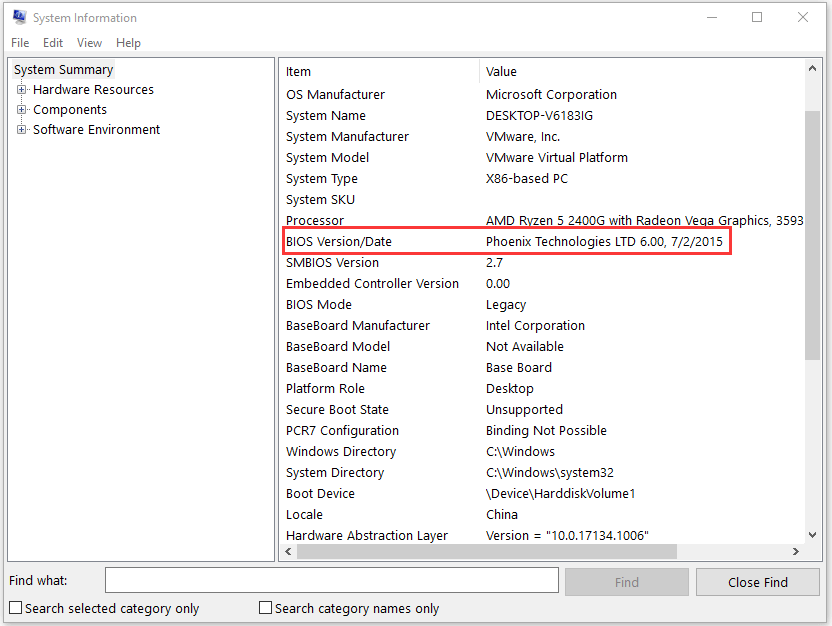
Step 1. You can press Windows + R to open Windows Run dialog, type msinfo32, and hit Enter button to open Windows System Information window.
Step 2. Next you can scroll down to find BIOS Version/Date item under System Summary. Check and note down your computer current BIOS version.
Way 2. How to Check BIOS Version with CMD
You can also check BIOS version using Windows Command Prompt.
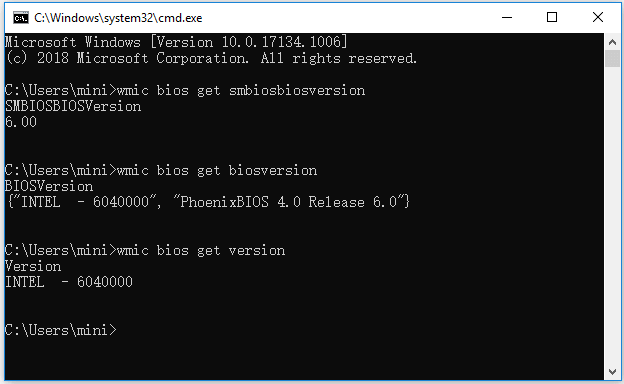
Step 1. You can also press Windows + R simultaneously to open Run window, type cmd, and hit Enter to open Command Prompt Windows 10.
Step 2. In Command Prompt window, you can type the following command line to get the BIOS version of your computer.
- wmic bios get smbiosbiosversion
- wmic bios get biosversion (this command line can get the detailed information of your current BIOS incl. BIOS version and date)
- wmic bios get version
Way 3. How to Check BIOS Version from Windows Registry
You can also find your current BIOS version in Windows Registry.
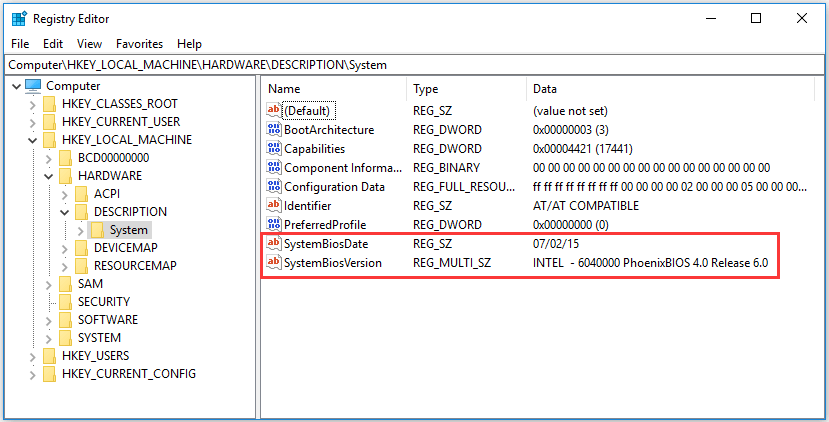
Step 1. You can press Windows + R, type regedit in Run box to open Registry Editor window.
Step 2. Next you can click as follows in Registry window to find the following key:
HKEY_LOCAL_MACHINE -> HARDWARE -> DESCRIPTION -> System
Step 3. After you click System, you can find the SystemBiosDate and SystemBiosVersion keys. You can note down your computer system BIOS version.
Way 4. Check BIOS Version from Startup
Step 1. You can enter BIOS in Windows 10 by pressing F12, DEL, F10 or any other required hotkey on Windows startup screen.
Step 2. Navigate in the BIOS setup window to find if there is BIOS version information.
How to Update BIOS Windows 10
- Check Your Computer’s Model Name
- Find the Latest BIOS Update from Manufacturer Website
- Download and Unzip the BIOS File
- Copy the BIOS File to a USB Flash Drive
- Restart Your Computer to Boot into BIOS Screen
- Back up Your Computer’s Current BIOS File
- Update BIOS in Windows 10
How to Update Your Computer’s BIOS (ASUS, HP, etc.) in Windows 10
After you know the current BIOS version of your computer, you can compare it to the newest version available on your motherboard’s support page, on your computer manufacturer website.
If you decide to update BIOS of your Windows 10 ASUS/HP/Dell/Lenovo computer, check how to update BIOS below.
Step 1. Check Your Computer’s Model Name
Aside from the current BIOS version, you need to know the computer model name or the motherboard model.
You can press Windows + R, type msinfo32, and hit Enter to open System Information window.
You can find your System Model in the right window. You should record it since you will need it to search for the BIOS update file later.
If you are using an assembled computer, you need to find the motherboard model.
Step 2. Find the Latest BIOS Update from Manufacturer Website
Next, you can open your computer manufacturer official website, and find the Downloads or Support page for your specific computer model.
You should see a list of available BIOS versions incl. release date, archive zip file size, download button, and update description.
Step 3. Download and Unzip the BIOS File
Then you can check the description of BIOS update versions to determine which one you want to download. It’s probable that you may want to download the latest BIOS version.
Download the BIOS update file to your computer. Most of the BIOS update files are Zip folders. You can unzip and extract the Zip file on Windows 10 with WinZip/WinRAR/7-Zip.
After you successfully extract the zip folder, you should see a readme.txt file in it. Read this file carefully before you continue to update BIOS since it offers detailed instructions for updating your BIOS.
Step 4. Copy the BIOS File to a USB Flash Drive
Then you need to plug in a blank USB to your computer and transfer the BIOS update file to the USB flash drive, since your BIOS can’t access your computer files.
Leave the USB plugged into your computer for later BIOS update operation.
Step 5. Restart Your Computer to Boot into BIOS Screen
Next you can click Start -> Power -> Restart to reboot your computer, and press the required key in startup process, to access the BIOS or UEFI screen.
Step 6. Back up Your Computer’s Current BIOS File
In case something goes wrong in BIOS update process, you can tap Main tab, and click the Backup or Save option to back up current BIOS settings. You can plug in another blank USB to your computer and back up BIOS to the USB flash drive. This can help you restore your BIOS settings if the BIOS update fails.
Step 7. Update BIOS in Windows 10
At last, you can launch the BIOS/UEFI firmware update or flashing tool, and select the new BIOS update file you copied to the USB flash drive to start the BIOS update process.
To run the BIOS update tool, normally you can select Boot tab (use the arrow buttons on the keyboard to choose it), enable any “Flash” options in the menu, and select Start Flash in Advanced tab to start to update BIOS in Windows 10.
After the BIOS update process is finished, your computer will automatically restart with the new BIOS firmware version.
How to Recover Data After a BIOS Update Failure in Windows 10
In case you may lose some data on your Windows 10 computer because of the BIOS update, here we provide an easy way to help you recover lost data from Windows 10 computer. It works even if your Windows 10 computer won’t boot after BIOS update.
MiniTool Power Data Recovery, best data recovery software for Windows, enables you to recover lost data or deleted files from computer hard drive, external hard drive, SSD, USB drive (pen drive data recovery), SD card, etc. Extremely easy-to-use and 100% clean.
This program is also capable of recover data when PC won’t boot. You can use its Bootable Media Builder function to create a bootable drive to boot your computer and open MiniTool Power Data Recovery in WinPE to recover data from the unbootable PC. Please be noted that this function is only for advanced versions. (MiniTool Power Data Recovery Editions Comparison)
Get MiniTool Power Data Recovery and install it on your Windows 10 computer (also support Windows 8/8.1/7/Vista), and check the steps below to help you recover lost data on PC.
MiniTool Power Data Recovery TrialClick to Download100%Clean & Safe
Step 1 (Optional). If your computer can’t boot because of the BIOS update, you can download MiniTool Power Data Recovery on a normal-working computer to use it to create a bootable USB drive at first. Then you can plug in the bootable USB to your computer and boot computer from the bootable USB and launch MiniTool Power Data Recovery.
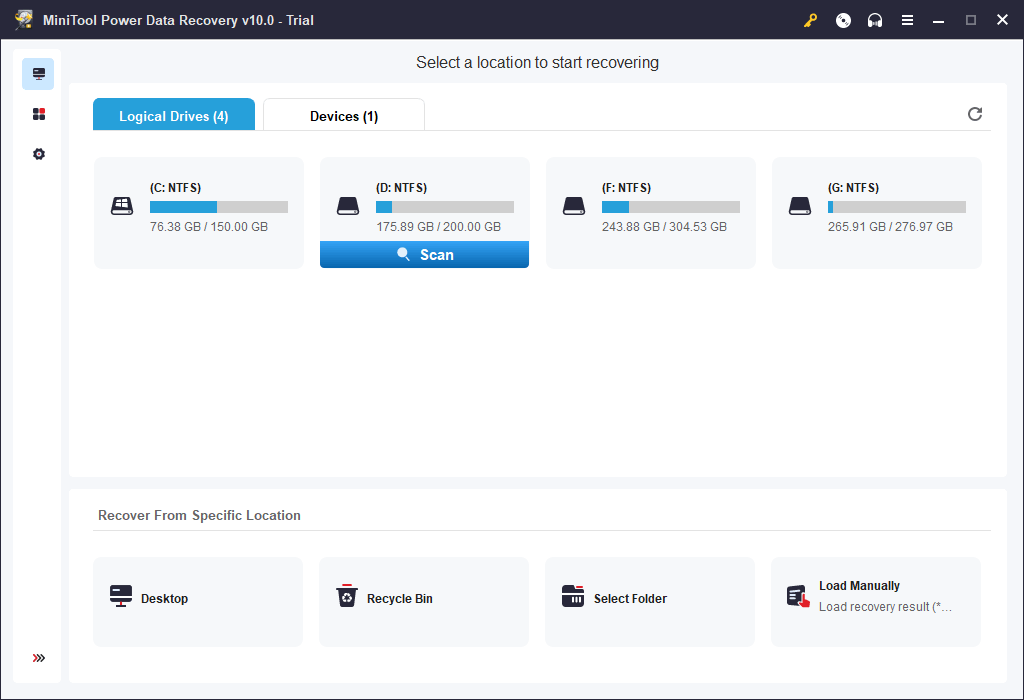
Step 2. After you launch MiniTool Power Data Recovery, you can choose a partition under Logical Drives and click Scan button to start scanning data on your PC. Or you can click Devices tab and select the whole disk to scan.
Step 3. After the scan process is finished, you can check the scan result to find needed files and folders, and click Save button to specify a new destination path to store the recovered files.
Conclusion
To sum up, it’s not necessary to update BIOS unless you really have to. If you really need to update BIOS in Windows 10 ASUS, HP, Dell, Lenovo, Acer computers, hope this tutorial gives you some clues.
Besides, it’s highly recommended that you make a backup of your Windows 10 system, files and folders before you perform a BIOS update. If you lost some important data after a BIOS update, you should use professional data recovery tools to immediately recover the lost data to avoid data overwriting and cause permanent data loss.
Still have problems with how to use MiniTool ShadowMaker and MiniTool Power Data Recovery, please contact [email protected].