If you have any questions about how to boot Windows Server 2019 in Safe Mode, read this comprehensive post. Under the guidance of MiniTool, you can successfully boot into the recovery environment for system restoration in the event of system crashes.
What Is Safe Mode?
Safe Mode is a special mode in Windows which commonly used for troubleshooting. Under this mode, your computer can only load into a basic state, and only a few software, drivers, and services can work in normal. And Why boot into Windows Server 2019 Safe Mode?
Sometimes virus infections or system crashes may cause Windows to be unable to boot correctly. In this case, you can start Windows 2019 in Safe Mode to work it out. With the help of Safe Mode, you can narrow down the problems and help resolve them.
In the following part, we will walk you through each step of how to boot Windows Server 2019 in Safe Mode. Get the details now!
How to Boot Windows 2019 into Safe Mode
When you boot into Windows Server 2019 Safe Mode, there are two usual cases: one is Windows can boot and the other Windows fails to load. According to this, the booting ways are different.
To start in Safe Mode, if your server can boot properly, use methods 1 and 2 below.
1. Use System Configuration
Step 1: Press Win + R simultaneously to launch the Run command.
Step 2: Type MSConfig in the dialog box, press Enter or click OK.
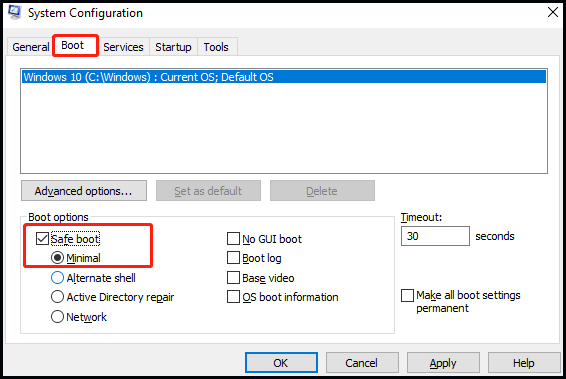
Step 3: In the System Configuration window, select the Boot tab, tick the Safe boot checkbox, and choose Minimal (default) under Boot options. After that, click Apply and OK to continue.

Step 4: Then you’ll get a confirmation notice, click Restart. When your computer lights up again, you are already in Windows Server 2019 Safe Mode.
2. Via Settings
Step 1: Go to Start, choose the Power option, and press the Shift key while clicking Restart.
Step 2: When your Server restarts, follow the on-screen introductions to choose options: go to Troubleshoot > Advanced options > Startup Settings > Restart.
Step 3: Then the Server will restart again, and its screen will show you the startup Settings screen. Now you can choose a safe mode you want to use.
To start in safe mode, if the server can’t boot, take methods 3 and 4.
3. Enter Windows Recovery Environment
Step 1: You need to shut down your PC completely. Then hit the Power button while you see the Windows Server 2019 logo appear on the screen and repeat this process two or three times until your system starts a diagnostic. Afterward, your computer will automatically enter the Windows Recovery Environment.
Step 2: In the Choose an option window, choose Troubleshoot > Advanced options > Startup Settings > Restart.
Step 3: Next, your Server will restart and display the Startup Settings interface. Then you can start Windows 2019 in Safe Mode.
4. Use a Windows Installation Media
Step 1: Boot your computer from a USB or DVD installation media.
Step 2: Click the Next button, choose Repair your computer, and then go to Troubleshoot.
Step 3: Under the Advanced Options window, select Command Prompt.
Step 4: Then type the two commands: bcdedit /set {bootmgr} displaybootmenu yes and bcdedit /set {bootmgr} timeout 15 in turn. The first command is very important so as to manage data related to the system startup configuration.
Step 5: When done, close all windows and restart your PC. Then you will see the Windows Boot Manager. Choose Windows Server to continue.
Step 6: Hit F8 to access Advanced Boot Options and select Safe Mode to boot Windows Server 2019 in Safe Mode.
Pertinent Suggestion
As a matter of fact, it’s difficult to guarantee that the computer will not malfunction during the above steps. Therefore, in order to keep your data safe, you’d better back up your computer regularly. It is highly recommended that you try to use our MiniTool ShadowMaker.
This tool is a professional backup software. No matter file backup, system backup, Server backup, or whatever, it is worth trying out the program.
MiniTool ShadowMaker TrialClick to Download100%Clean & Safe
You can follow the brief tutorial below to make a system backup for your Windows Server 2019.
Step 1: Download and install MiniTool ShadowMaker.
Step 2: Open this software and click Keep Trial.
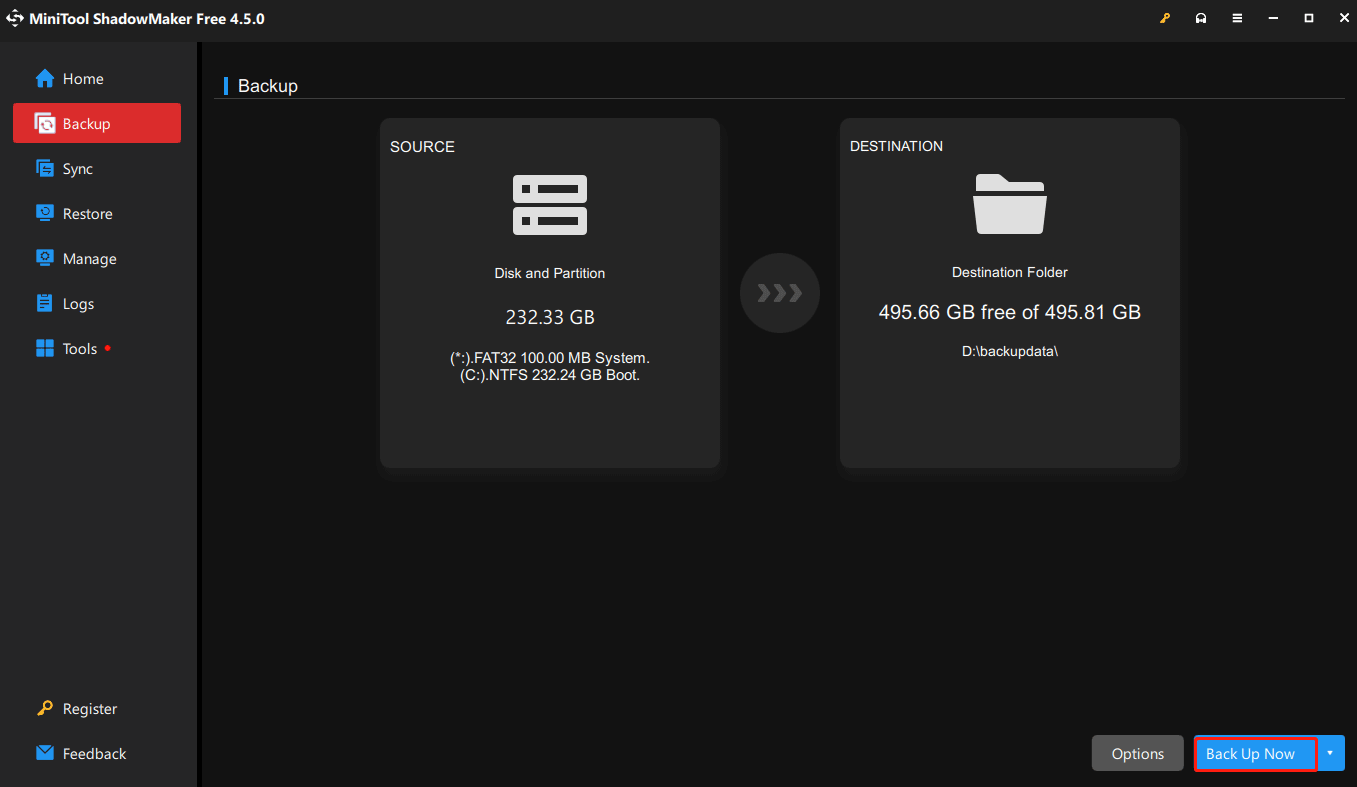
Step 3: Go to Backup. As you can see, the SOURCE module has selected all the system-related partitions as the default. Thus, you just need to click the DESTINATION module to select a destination path to store the Server system image. Then click OK to continue.
Step 4: Click Back Up Now to immediately perform the system backup task.

Additionally, MiniTool ShadowMaker also allows you to configure some advanced parameters.
- Schedule Settings: This feature helps you make an automatic backup because you can choose a specific time point in daily, weekly, monthly, or on event (automatically starts a backup task when logging on or off the PC) to back up. Go to Options > Schedule Settings (off by default) > schedule your backup.
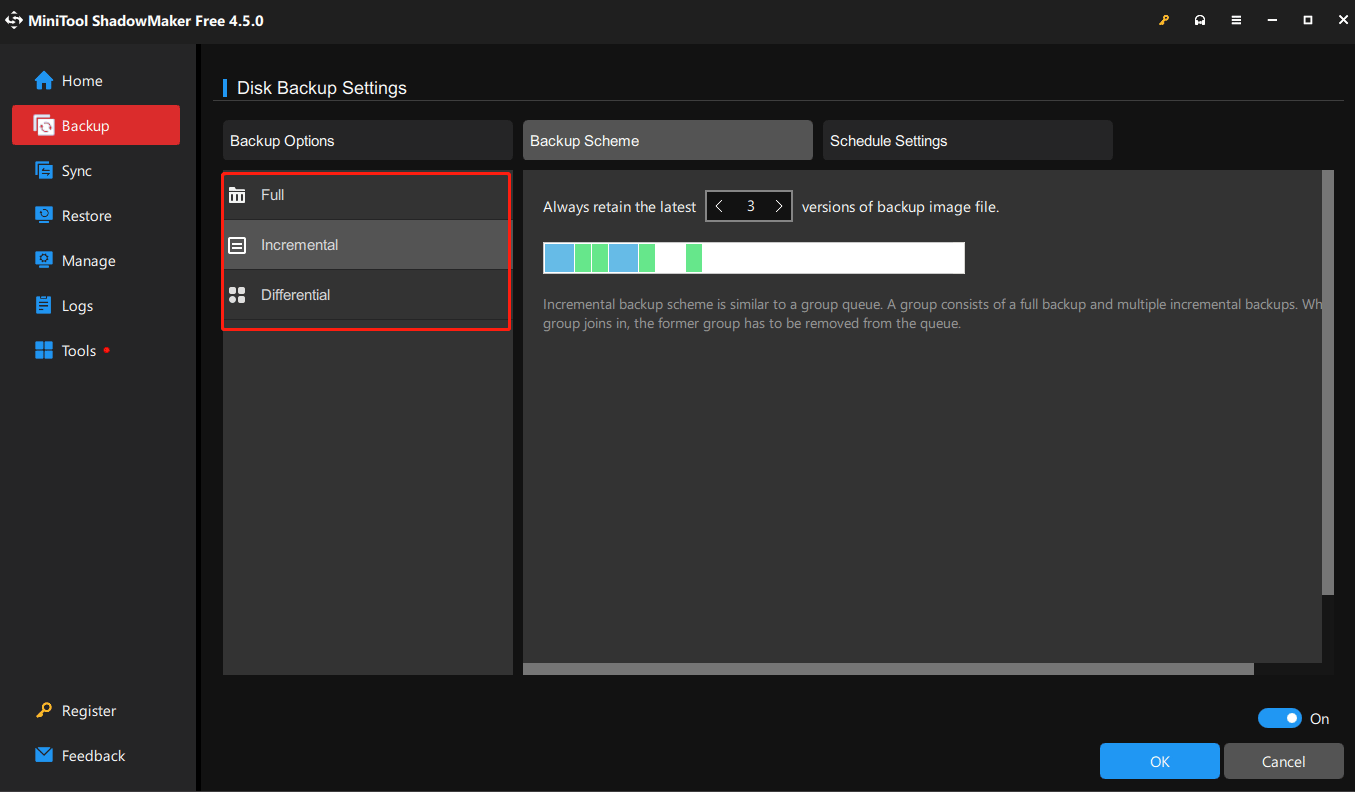
- Backup Scheme: This feature enables you to customize the backup scheme based on your needs, including full, incremental, as well as differential. Go to Options > Backup Scheme (off by default) > choose a desired backup mode.

For more information, please refer to this guide – Backup Settings (Options/Schedule/Scheme) in MiniTool ShadowMaker.
Bottom Line
In conclusion, this guide may be beneficial for you when you have difficulties with how to boot Windows Server 2019 in Safe Mode. Beyond that, we also suggest you back up your Server regularly with the help of MiniTool ShadowMaker. If you have any questions about MiniTool ShadowMaker, please contact us via [email protected] and we’ll reply to you as early as possible.


