If you see a process called Service Host Local System is taking much of your disk, CPU and memory usage in the Task Manager in Windows 10, it’s time to read this post to pick up one way to address this issue. In addition, you can visit MiniTool to find more Windows solutions and tips.
Service Host Local System High CPU Windows 10/11
Service Host Local System is a vital system that operates automatically. Its processes include Windows Auto Updates, Background Task Management, IP Configuration, and many others which occupy some disk space, memory and CPU.
Many Windows users have suffered from the problem that up to 95% of their CPU and disk have been used by Service Host Local System and Service Host: Network Service. These two processes often lead to 99% or 100% disk and CPU usage. If you’re facing a similar issue, you will find a method in this post.
How to Solve the Service Host Local System High Disk Issue?
This post presents you eight methods to solve the Service Host Local System high memory usage problem. Hope these approaches could be helpful for you.
Solution 1: Disable Superfetch Service
Superfetch, also called SysMain, is a technology that allows the operating system to manage random memory. With the Superfetch, the apps open quickly, but it can cause Service Host Local System high CPU usage. Therefore, to fix this issue, you need to disable Superfetch. Here are steps you need to follow.
Step 1: Press Win + R to open Run box.
Step 2: Type services.msc command and hit Enter to open Service.
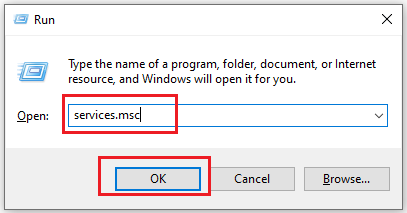
Step 3: Locate and double-click Superfetch to edit its properties.
Step 4: Under the General tab, change its Startup type to Disabled, and Service status to Stopped.
Step 5: Click Apply > OK.
Step 6: Restart your computer to check if the Service Host Local System high disk issue is gone.
Solution 2: Disable Service Host Local System Task
When Service Host results in high memory usage, it might be related to processes that are running in the background. To fix the problem, you need to end the processes from Task Manager by doing the following steps:
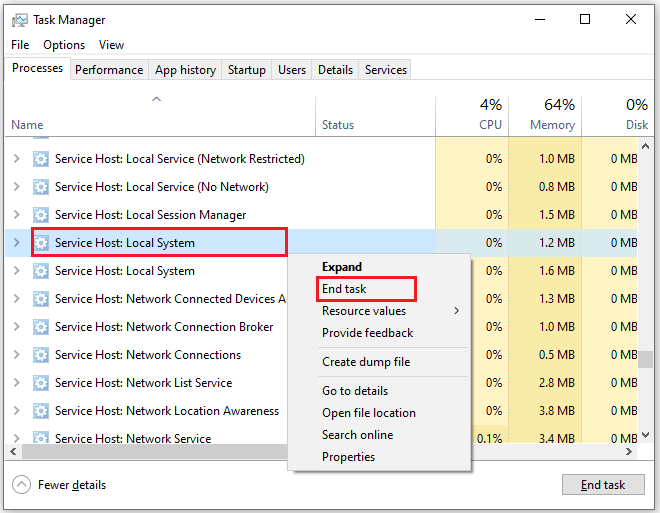
Step 1: Press Ctrl + Shift + Esc together to open Task Manager.
Step 2: Under the Processes tab, find out the Service Host Local System. You can also expand it to see what items are eating your CPU, disk and memory usage.
Step 3: After you know the specific items, you can right-click on them and select End task one after another.
Solution 3: Disable Automatic Updates
Service Host high CPU usage can be related to Windows Update, so the third method is to stop Windows update manually. To do this, follow these steps.
Step 1: Hit Win + R to open the Run box.
Step 2: Type services.msc and hit OK to open Service.
Step 3: Find Windows Update and double-click it.
Step 4: Change the Startup type to Disabled under the General tab.
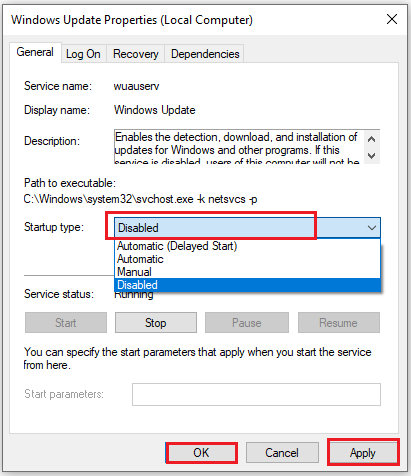
Step 5: Click Apply and OK to save the changes.
Step 6: Next, follow solution 2 to disable Service Host Local System.
Solution 4: Run System File Checker
Sometimes, Service Host high CPU might be caused by corrupted system files. If that happens, you need to check and repair them by running System File Checker. To do that, follow these steps:
Step 1: Type cmd in the search box to locate Command Prompt and select Run as administrator.
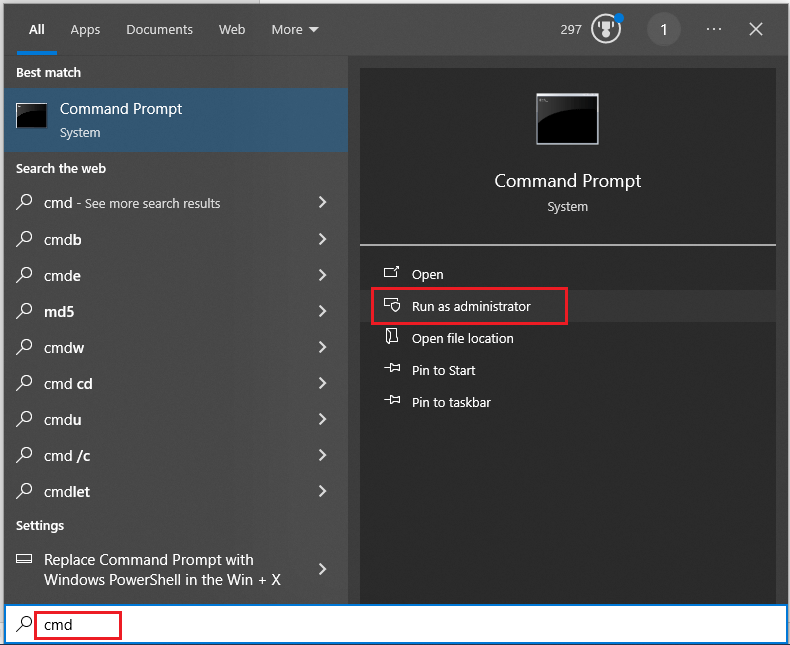
Step 2: In the popup window, type sfc /scannow and hit Enter.
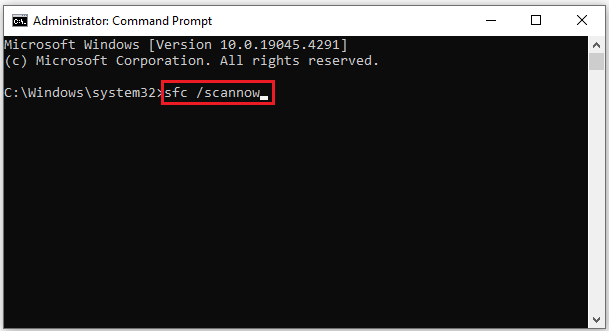
Step 3: Wait patiently until the scan finished.
Solution 5: Disable Background Intelligent Transfer Service
Background Intelligent Transfer Service (BITS) plays an important role in ensuring the system and application work normally. It is a system component in the Windows 10/11 operating system that helps download files and install updates from the Microsoft servers.
In this part, we will show you the fifth method to resolve the Service Host Local System high CPU issue. You can try to disable the Background Intelligent Transfer Service.
Step 1: Hit Win + R to open Run box.
Step 2: Type msconfig and click OK to open System Configuration.
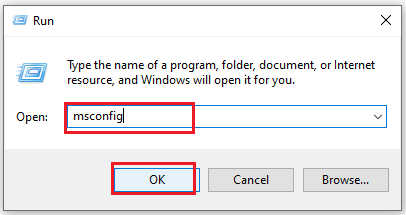
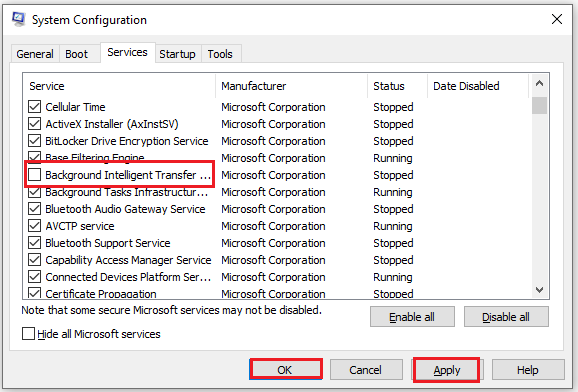
Step 3: Navigate to Background Intelligent Transfer Service and uncheck it under Service tab.
Step 4: Click Apply > OK to save your settings and restart your PC to check whether Service Host Local System high CPU issue is gone.
Solution 6: Modify Windows Registry
You can try to change the related registry value data to address the issue, but note that changing registry data is a risky thing. So, it is recommended to back up your Windows 10 before proceeding. Here’s how to change registry value data.
Step 1: Press Win + R to open Run dialog.
Step 2: Type regedit in the box to open Registry Editor.
Step 3: Navigate to the folder according to the following path, you can copy and paste it: HKEY_LOCAL_MACHINE\SYSTEM\ControlSet001\Services\Ndu
Step 4: In the right side of the window, double-click the Start key and change its value data to 4.
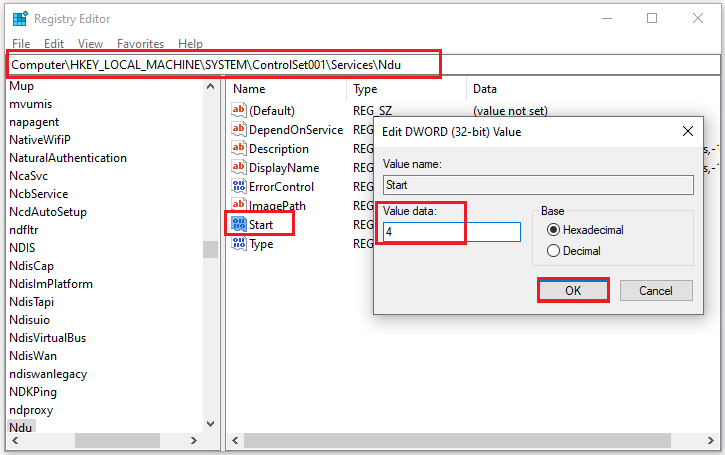
Step 5: Then click OK and restart your computer.
Solution 7: Perform a Clean Boot
On top that, the culprit of Service Host Local System high disk issue may be the third-party software. Thus, in order to address the high CPU problem, you can perform a clean boot to exclude their influence.
Step 1: Press Win + R together to open Run.
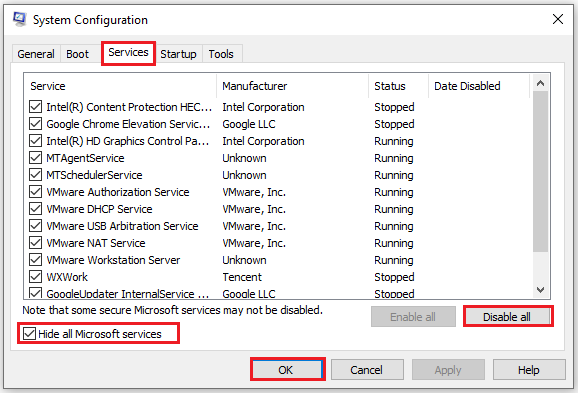
Step 2: Input msconfig and hit Enter to open System Configuration.
Step 3: In the popup window, switch to Service tab, check Hide all Microsoft services and click Disable all > OK.
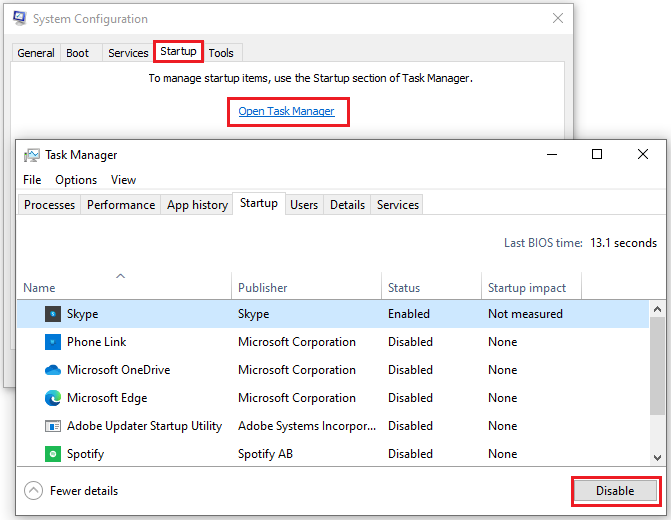
Step 4: Go to Startup tab and hit Open Task Manager.
Step 5: Select enabled applications and click Disable button.
Step 6: Restart your computer to check if Service Host Local System high memory usage problem disappears.
Solution 8: Upgrade CPU
If none of the above methods works for you, you can try to upgrade CPU. It is a very important component in your PC that acts as the human brain, and an old CPU might lead to the Service Host Local System high disk issue. Therefore, you can try to upgrade CPU.
However, before upgrading CPU, you would better backup data to protect it. That’s because upgrading CPU is always risky that your computer may fail to boot due to some incompatibility problems.
Back up Your Data Before Upgrading CPU
To back up your data, the professional backup software – MiniTool ShadowMaker is recommended. It allows you to backup files, folders, disks, partitions and even the operating system. When your computer fails to boot, you can restore the system to a normal state by using the system image created before.
In order to upgrade CPU without reinstalling Windows 10/11 and losing any data, you can backup system immediately. Thus, try MiniTool ShadowMaker Trial at once or you can choose to get an advanced edition.
MiniTool ShadowMaker TrialClick to Download100%Clean & Safe
Step 1: Install MiniTool ShadowMaker and launch it.
Step 2: Click Keep Trial to enter its main interface and click Backup.
Step 3: In the SOURCE section, the system required partitions are checked by default. Thus, just click DESTINATION to choose a destination path to store the system image. It is recommended to choose an external hard drive or a USB flash drive as the destination.
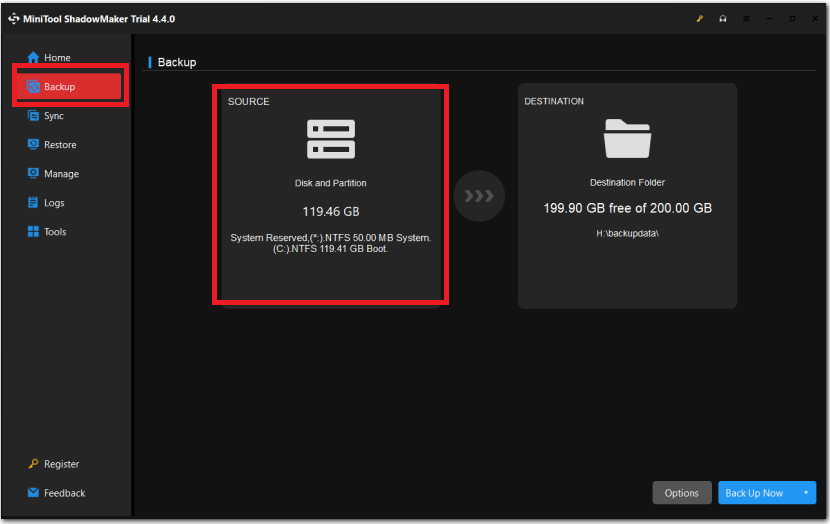
Step 4: Go back to the Backup tab, and select Back Up Now or Back Up Later.
In addition, MiniTool ShadowMaker is also a clone tool which can help you to clone HDD to SSD for better system performance.
Bottom Line
It is a step-by-step guide on the Service Host Local System occupying high disk issue. You can follow these solutions to solve it if you have the same issue.
If you have any problem of using MiniTool ShadowMaker, you can contact us via [email protected] and we will reply to you as soon as possible.
Service Host Local System High Memory Usage FAQ
Step 1: Open Task Manager by pressing Ctrl + Shift + Esc together.
Step 2: Next navigate to Service Host Local System under Processes.
Step 3: Right-click to select End task.
2. Disable Service Host Local System Task
3. Disable Automatic Updates
4. Run System File Checker
5. Disable Background Intelligent Transfer Service
6. Change Registry Value Data
7. Perform a Clean Boot
8. Upgrade CPU