Shadow Copy Windows 10/11 can help you back up your data and protect it from loss. You must be curious about what it is and how to enable/disable Shadow Copy in Windows 10/11. Read this stepwise article from MiniTool to follow a comprehensive tutorial on how this tool works and an all-around way for backup.
What Is a Shadow Copy
Shadow Copy is a technology available in Windows 11/10/8/7 that can create backup copies or snapshots of computer volumes/files on a local disk, external hard drive, or network drive, whether you are in use or not. It is implemented as a Windows service called the Volume Shadow Copy service, also known as Volume Snapshots Service or VSS.
Shadow Copy requires the NTFS or ReFS file system to create and restore shadow copies. Any Windows component using this technology can create Shadow Copies on local or external volumes (creating a Windows backup or system restore point, for example).
In addition, you can use the Shadow Copy feature to restore lost files. In Windows 10/11, you can choose to use Windows Previous Versions, which are copies of files and folders and sometimes serve as Shadow Copies. With it, you can first look through your old Shadow Copies and restore your lost files.
At the same time, Shadow Copy can also be able to restore the system. As long as a system point is created, you will have a valid Shadow Copy. When the Windows 10/11 system does not work normally, you can restore Windows 10/11 to the previous normal state with a system restore point.
To learn more information about Shadow Copy, you can click on Shadow Copy from Wiki.
From the above information, now you may understand Shadow Copy is such a handy tool. Therefore, it’s necessary for you to know how to use it. Follow the next part to learn more details.
How to Configure a Shadow Copy in Windows 10/11
If you want to set up a Shadow Copy, first you should enable Shadow Copy in Windows 10/11. This process is very easy. Meanwhile, if you need to delete Shadow Copies, all these operations are straightforward with several simple steps as well. The Shadow Copy feature ensures the continuity of data backup and restorability. Read this part carefully, it will show you how to enable Shadow Copy in Windows 10/11 with the following methods.
1. Enable Volume Shadow Copy Service Using System Restore Points
Setting restore points is an optional way to enable Shadow Copy in Windows 10/11. Here’s how to do it.
Step 1: Input Create a restore point into the search box of Windows and choose it.
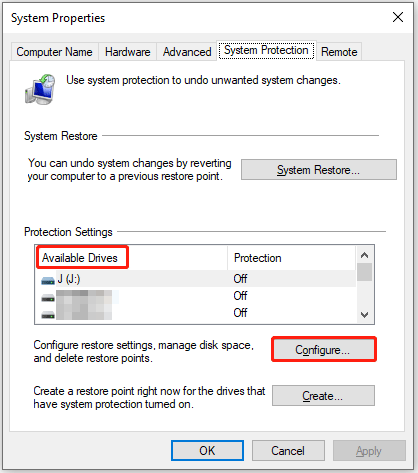
Step 2: Choose a drive from the Available Drives menu and then click on the Configure button.
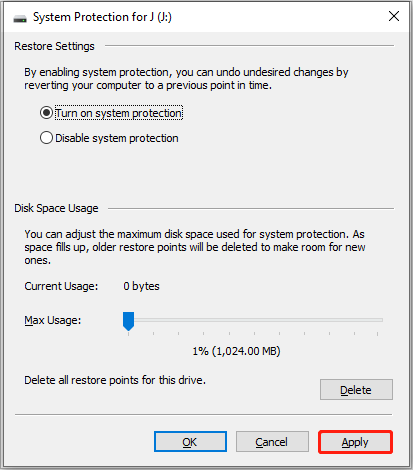
Step 3: Check the option for Turn on system protection, click the Apply button to enable the setting, and then click OK.
Step 4: Click the Create option to create a restore point to turn on the volume Shadow Copy service. Then you can type a description to help you identify the restore point in the pop-up window.
2. Use Task Scheduler to Turn on Shadow Copy Windows 10/11
Utilizing Task Scheduler is a more accurate way to turn on Shadow Copy Windows 10/11. With it, you can set up a specific time to create a Shadow Copy.
Here’s how to enable Shadow Copy in Windows 10/11 using Task Scheduler.
Step 1: Locate the search bar, go ahead by typing Task Scheduler, and click on it to enter its interface.
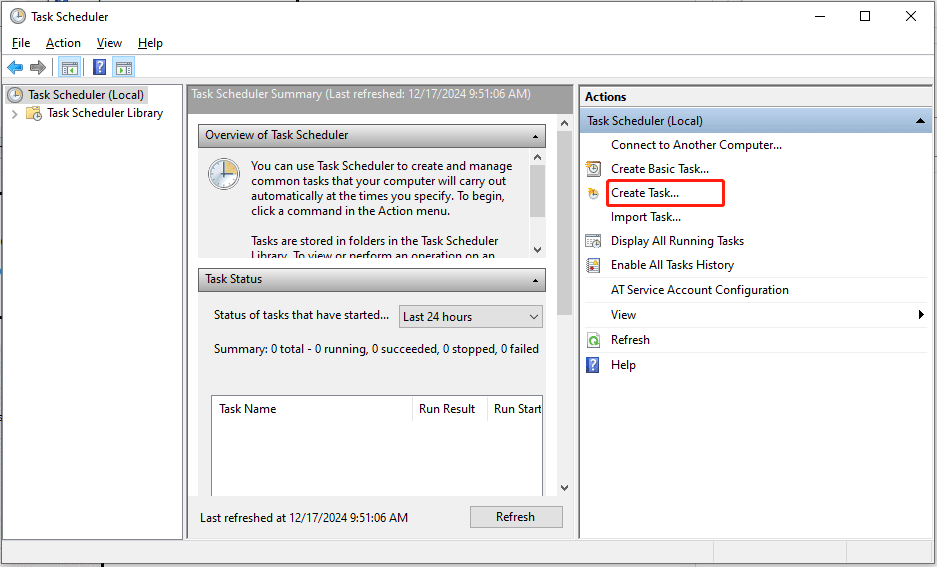
Step 2: Choose Create Task… from the right panel and name this task under the General section.
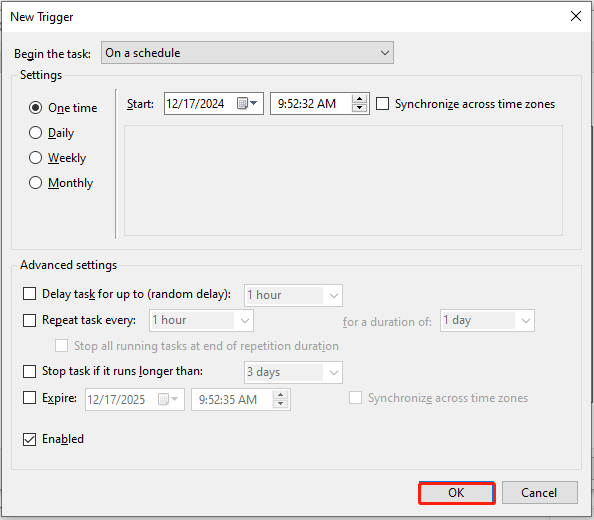
Step 3: Click Trigger and then click the New… button to create a new trigger. Now in the popup window, you can make settings as per your needs. When done, click OK to go on.
Step 4: Click the Actions button and choose New… to specify what actions this task will perform.
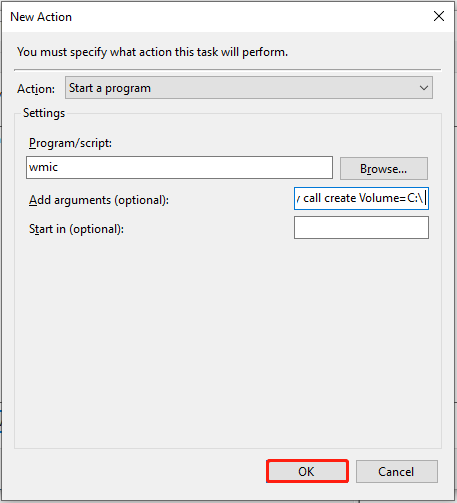
Step 5: Next type wmic under the Program/script: section and then input shadowcopy call create Volume=C:\ at the right side of the Add arguments (optional): section. Click OK to back to the Actions interface and then click OK to finish the settings.
Disable Shadow Copy in Windows 10/11 for System Restore
In case you would not like to use Shadow Copy Windows 10/11, you can follow the introductions below to turn off it. Here’s how to do it.
Step 1: Type Control Panel in the search bar of Windows and click it to enter its interface.
Step 2: Select System and Security, locate the System option, and click it. Alternatively, you can select System with the way View by Small icons.
Step 3: Choose Advanced system settings to continue.
Step 4: Enter the System Properties section and select System Protection.
Step 5: Choose the drive that you have turned on system protection and click Configure… to go on.
Step 6: Check the option of Disable system protection and click on Apply.
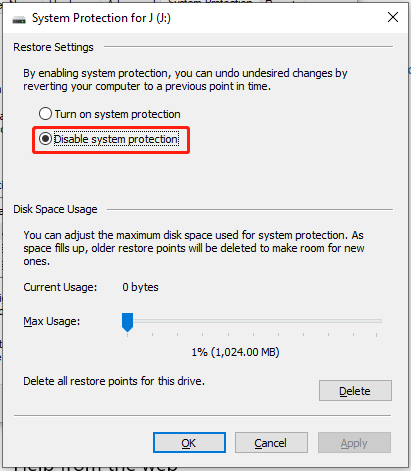
Step 7: You will receive a warning message. Read it carefully and click Yes. After that, click the OK button to exit this window.
Now you have disabled Shadow Copy in Windows 10/11 successfully. Besides, if you encounter some issues when using the Volume Shadow Copy Service, refer to this post for solutions: Quick Fix Volume Shadow Copy Service Errors (for Windows 10/8/7).
Backup Files Using Volume Shadow Copy Windows 10/11
After enabling Volume Shadow Copy, run the built-in tools such as Backup and Restore to backup files. But if you want to know more details about it, you can follow the steps below to check.
Step 1: Type Control Panel in the search box on Windows 10/11 and click it. View all the items by Category, choose the System and Security option, and click Backup and Restore (Window 7).
Step 2: Locate Set up backup and tap on it.
Step 3: Select where you want to have your backup saved and click Next.
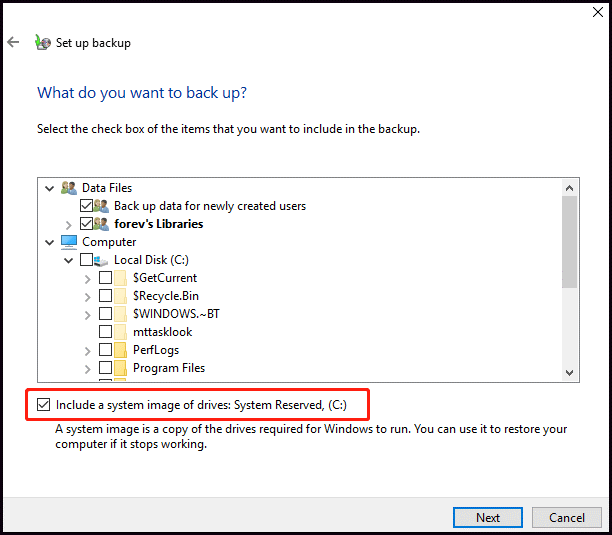
Step 4: Select Let Windows choose. Orcheck Let me choose tochoosethe items that you want to include in the backup. Check the checkbox – Include a system image of drives if necessary and click Next to continue.
Step 5: Review your backup settings and confirm the same. Finally, click Save settings and run backup.
How to Use Shadow Copies to Restore Files
Under the condition of having shadow copies available on the drive, you can easily use the Previous Versions feature to restore deleted files and earlier specific copies from the snapshot of Shadow Copy. Take certain files that were saved on the Desktop as an example. Here’s how to restore shadow copies.
Step 1: Locate the Desktop folder in the File Explorer. Right-click it and choose Properties.
Step 2: Select the Previous Versions tab, click the right version you want to restore, and click the Restore option.
Versatile Backup Software for Windows 10/11
When it comes to data backup, MiniTool ShadowMaker cannot be ignored. MiniTool ShadowMaker is a professional backup software that helps you do this work to protect your system and data. With this tool, you are allowed to back up files, folders, partitions, and disks as well as the operating system.
The copy of the backup enables you to restore data if a disaster occurs, while also providing the capability to create bootable media. When your computer fails to boot correctly, you can restore your system to the previous state via the created media.
MiniTool ShadowMaker TrialClick to Download100%Clean & Safe
Take backing up Windows 10/11 system as an example.
Step 1: Launch MiniTool Shadowmaker and choose the Backup section.
Step 2: Choose the SOURCE module. There are two source types you can select including Disk and Partition and Folders and Files. Select one you need to back up and click OK to continue.
Step 3: Click the DESTINATION module and choose the destination path where you want to save the image files. Click the OK button.
MiniTool ShadowMaker lets you back up your items to multiple places (User, Computer, Libraries, Shared). Among these places, Shared allows you to back up your files to the shared folder via a network path. You need to:
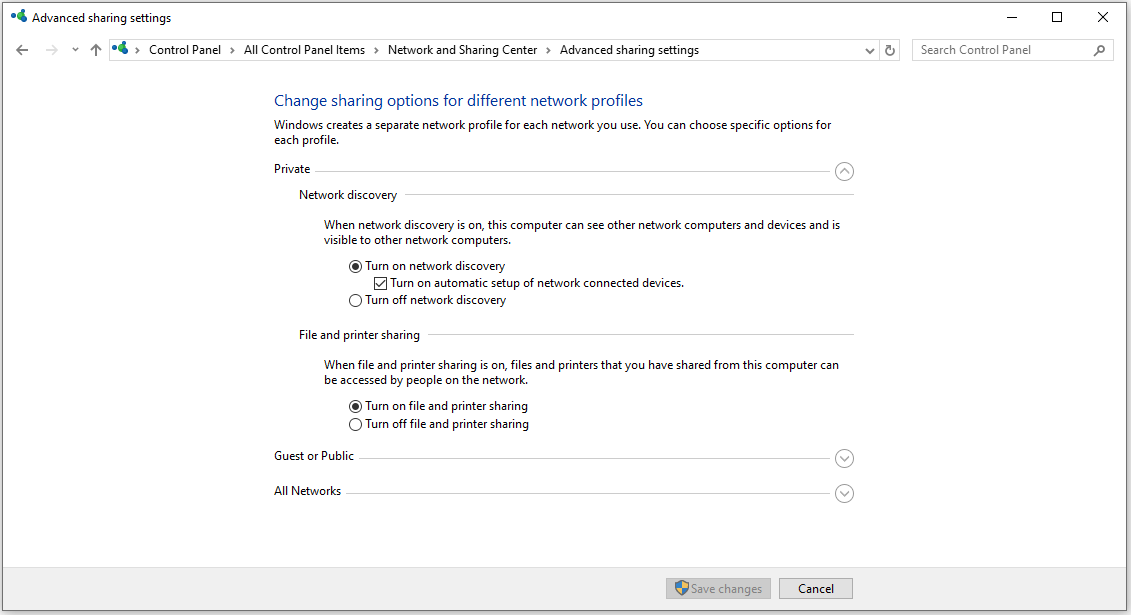
Turn on the network discovery and file sharing.
- Go to Control Panel > Network and Sharing Center > Change advanced sharing settings.
- Turn on network discovery and file sharing under Private, Guest or Public, and All Networks.
Create the shared folder
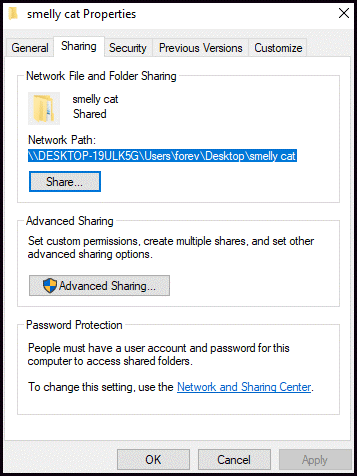
- Create a shared folder called smelly cat, and create a subfolder called cats (examples).
- Right-click the shared folder and click Properties.
- Choose Sharing and click Share. Then, choose Everyone from the pull-down menu and click Add, choose Read/Write under Permission Level, and click Share.
- Return to the Sharing tab. Click Advanced Sharing… and check the Share this folder in the same window, tap on the Permission button, and check the Allow box next to the Full Control option.
- After creation, go back to the Sharing section and note down the network path.
Choose a network path
Go to the Shared tab and click the Add button.
Type the network path, user name, and password, and click OK.
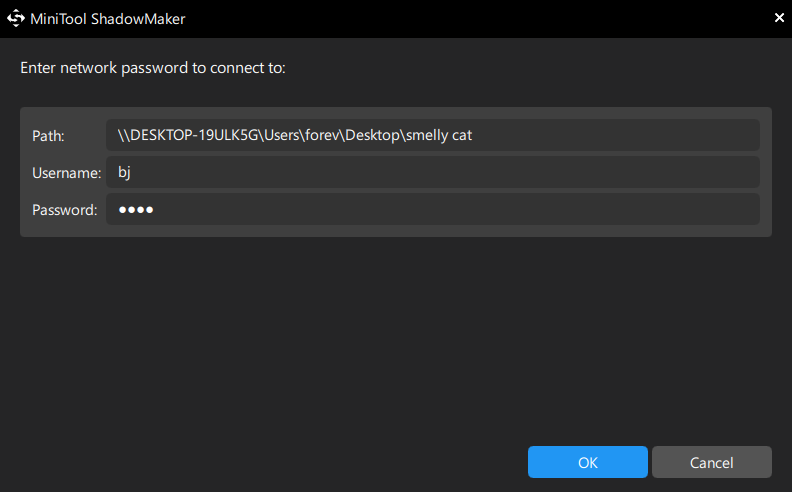
Open the shared folder (smelly cat) and choose the subfolder (cats) as the destination.
Step 4: Before backing up, you can go to Options > Backup options to customize some specific settings according to your needs. Go to the Backup Scheme section to set up the backup type or manage disk space occupied by the backup image files. Make a schedule to automatically back up the item in Schedule Settings.
Step 5: Click Back Up Now to perform the backup process immediately. Or you can choose Back Up Later to delay the operation. It will finish based on your schedule or restart in the Manage window.
Bottom Line
In conclusion, this article does not just show you much introduction about what Shadow Copy Windows 10/11 is but also shares the methods on how to create a Shadow Copy in Windows 10/11. Meanwhile, it also introduces you to how to perform backups to keep your system and data safe with MiniTool ShadowMaker.
If you have any questions about MiniTool ShadowMaker, please contact us via the email [email protected].