If you encounter the “Windows Security Alert” fake error message, try to close your browser and remove the pop-up as soon as possible. If you don’t know how to do these jobs, you can read this post written by MiniTool. It will show you some feasible Windows Security Alert popup removal approaches.
About the “Windows Security Alert” Pop-up
Overview of the “Windows Security Alert” Pop-up
What does Windows Security Alert mean? This fake error message is nothing more than a tech support scam.
Do not dial the number in the pop-up window. Microsoft error and warning messages never contain phone numbers. Microsoft also does not send you unsolicited emails or make unsolicited calls to get personal or financial information or repair your computer.
Just remember not to give any personal information to the Windows Security Alert phone call or pop-up.
This fake error message tricks you into thinking your computer has crashed or is infected with a virus. If you call these scammers, they will offer you fake solutions and ask for a one-time fee or subscription to a so-called support service.
The scammer will usually try to get you to allow remote access to your computer. After gaining remote access, the scammer often use tools built into Windows and other software to gain trust to pay for so-called “support” services. In effect, they steal your credit card account information.
Speaking of adware, these malicious programs are bundled with other free software. When you try to download the free software, adware will also be installed without your knowledge.
This following part will show you how to remove malware from your devices.
Close Your Browser When the Malicious “Windows Security Alert” Pops up
If the malicious “Windows Security Alert” pop-up don’t allow you to close your browser, follow the instructions below to do this work.
1.Right-click the taskbar and then click Task Manager to open it.
2.In the Processes tab, find your web browser’s process, right-click it and then select End task.
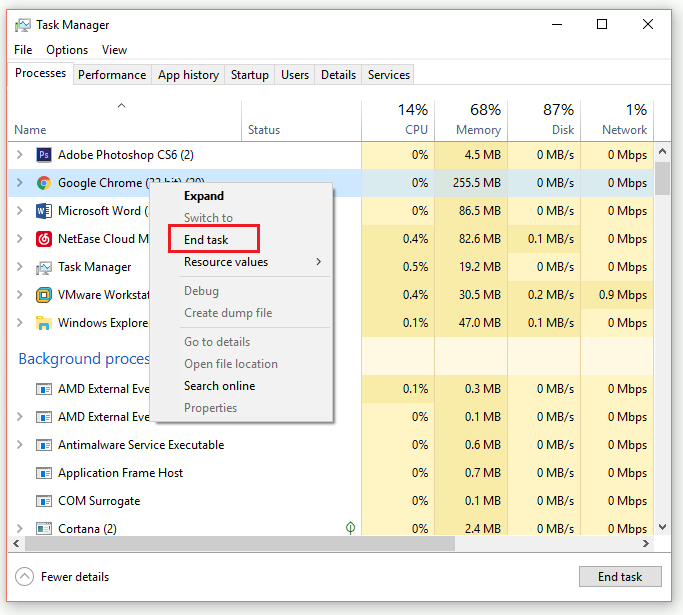
3.The browser window should be closed right now. The next time you want to open the browser, don’t allow the browser to open the latest page you opened.
How to Remove the “Windows Security Alert” Pop-up
- Uninstall the Malicious Programs in Windows
- Remove “Windows Security Alert” Adware with Malwarebytes
- Scan for Malware and Unwanted Programs with HitmanPro
- Double-Check for Malicious Programs with Zemana AntiMalware Free
- Reset the Browser Settings to Remove “Windows Security Alert” Pop-up
Steps to Remove the “Windows Security Alert” Pop-up
If Windows Security Alert won’t go away, right now, you can follow the steps below to remove the “Windows Security Alert” pop-up scam.
Step 1: Uninstall the Malicious Programs in Windows
Firstly, you need to try to identify and remove any malicious programs that may be installed on your computer.
1.Type control panel in the search box and click Control Panel to open it.
2.Choose View by: Category and then click Uninstall a program under the Programs section.
3.In the Programs and Features screen, find the malicious program, left-click it and then click the Uninstall button on the top toolbar.
4.Click Yes to confirm the uninstall process and then follow the prompts on the screen to uninstall the program.
Step 2: Remove “Windows Security Alert” Adware with Malwarebytes
Malwarebytes is a popular and useful anti-malware software for Windows. It can destroy a lot of malware that is easily ignored by other software. If you are planning to clean up infected devices, you are advised to use Malwarebytes.
1.Click this link to download Malwarebytes.
2.Double-click the installation file to install Malwarebytes on your PC. Downloaded files are usually saved to the Downloads folder.
3.Follow the installation guide on the screen to perform the installation process. Finally, click Agree and Install to install Malwarebytes on your PC and then click Finish to exit Setup.
5.When Malwarebytes starts to work, click Scan to perform a system scan. Then wait for the scan to complete.
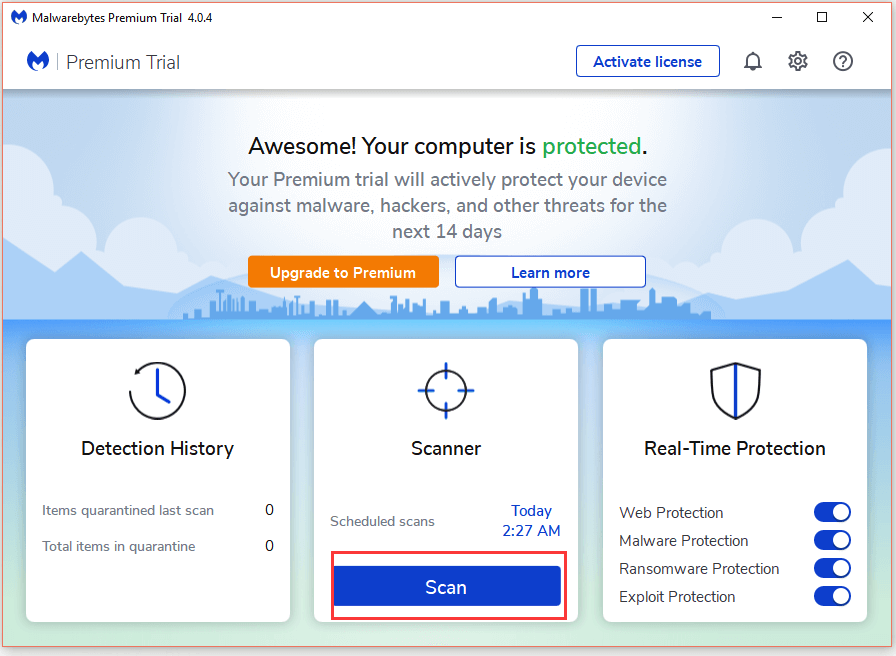
6.Click Quarantine to remove the malicious programs found by Malwarebytes.
7.All the selected items have been removed successfully. Click Yes to restart your computer to complete the removal process.
Step 3: Scan for Malware and Unwanted Programs with HitmanPro
Here is another scanner you can try: HitmanPro. It adopts a unique cloud-based way to perform malware scanning and then it will send a suspicious file to the cloud for scanning by Bitdefender and Kaspersky, two of today’s best antivirus engines.
Here is a quick guide on how to use HitmanPro to scan for malware and unwanted programs.
1.Click this link to download HitmanPro. Choose the right installation type for your Windows version.
2.Double-click the installation file to install HitmanPro on your PC. Downloaded files are usually saved to the Downloads folder.
3.Follow the installation guide on the screen to perform the installation process.
4.When HitmanPro starts, make some choices depending on your needs and click the Next button to perform a system scan.
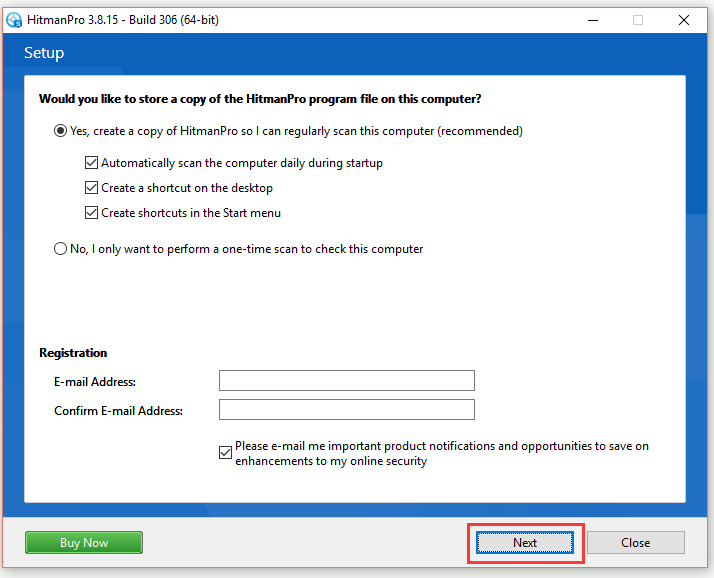
5.Wait for the scan to complete. Click Next to remove the malicious programs.
6.Click Activate free license to continue.
7.Enter your e-mail address and then click Activate to start the free 30-days trial and remove all the malicious files from your PC.
Step 4: Double-Check for Malicious Programs with Zemana AntiMalware Free
Zemana AntiMalware is a free on-demand antivirus scanner. It can detect and remove malware that even the most famous antivirus and anti-malware applications cannot find.
Although Malwarebytes and HitmanPro scanners are more than enough to check malicious programs, it is recommended that you continue to use Zemana AntiMalware Free. If your computer still has problems with malware or you just want to make sure your computer is 100% clean, try it.
1.Click this link to download Zemana AntiMalware Free.
2.Double-click the installation file to install Zemana AntiMalware on your PC. Downloaded files are usually saved to the Downloads folder.
3.Follow the instructions on the screen to finish the installation process.
4.When Zemana AntiMalware starts, click Scan Now to perform a system scan.
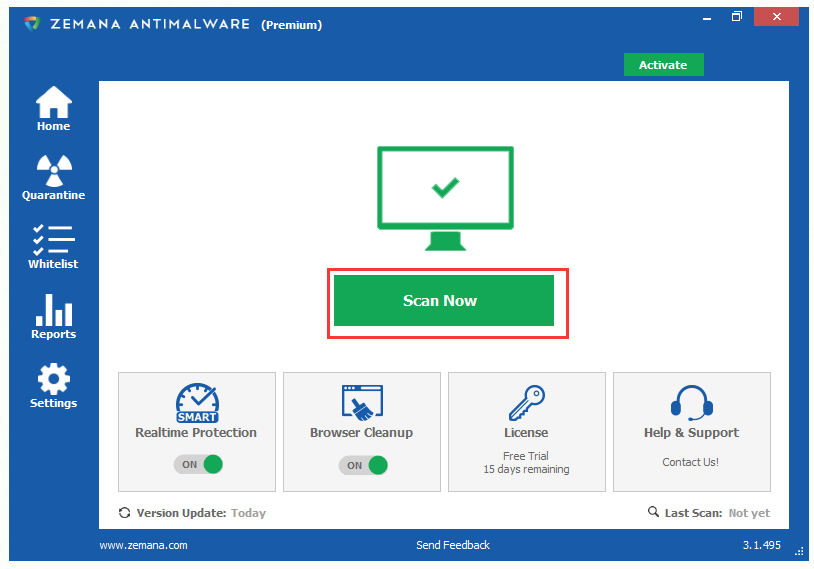
5.Wait for the scan to complete. Click Apply Action to remove the malicious files from your computer.
6.In order to complete the malware removal process, Zemana AntiMalware will need to restart your computer. Click Reboot to restart your computer.
Step 5: Reset the Browser Settings to Remove “Windows Security Alert” Pop-up
If your PC is being redirected to the Windows Security Alert site, you need to reset your web browser settings to their original defaults. Perform this step only if your problem has not been resolved by the previous steps.
Resetting your browser settings will reset some unwanted changes due to the installation of other programs and your bookmarks, history and saved passwords will not be cleared. Take Google Chrome as an example.
1.Open Google Chrome, click the three dots button to open the main menu and then choose Settings.
2.Click the Advanced link at the bottom of the page to open Chrome’s advanced settings.
3.Under the Reset and clean up section, click the Reset settings to their original defaults option.
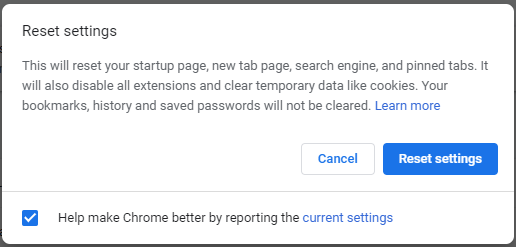
4.A confirmation dialog will pop up. Click the Reset settings button to complete the restoration process.
Protect Your PC with MiniTool ShadowMaker
- Choose a Backup Mode
- Choose Backup Source
- Select a Destination Path to Save Your Backup Files
- Start to Back up
Keep Your PC Safe with MiniTool ShadowMaker
The “Windows Security Alert” pop-up may just be trying to trick you into giving your personal or financial information, but there are so many dangerous things that are bad for your computer every day, such as virus and malware.
Virus attacks and malware may cause a system crash and your important data loss. Thus, it is recommended that you make a backup to keep your PC safe.
Do you know how to back up your data on Windows? It’s highly recommended that you try a piece of free backup software – MiniTool ShadowMaker to do this job. It supports Windows 10/8/7 and you can use it to back up files, folders, partitions, your OS and disk in simple steps.
MiniTool ShadowMaker offers you more other functions to protect your PC. You can try to synchronize your important files or folders and you are also allowed to clone disk. It is a useful data protection and disaster recovery solution for PCs.
If you have a need, right now, you can click the following button to free get the MiniTool ShadowMaker Trial Edition. The Trial Edition gives you a 30-day free trial for all the backup features. If you want to continue to use MiniTool ShadowMaker, purchase its Pro Edition by clicking this link.
MiniTool ShadowMaker TrialClick to Download100%Clean & Safe
The following part will show you how to back up data with the Backup function of MiniTool ShadowMaker step by step.
Step 1: Choose a Backup Mode
1.After installation, run MiniTool ShadowMaker.
2.Click Keep Trail to use the Trial Edition.
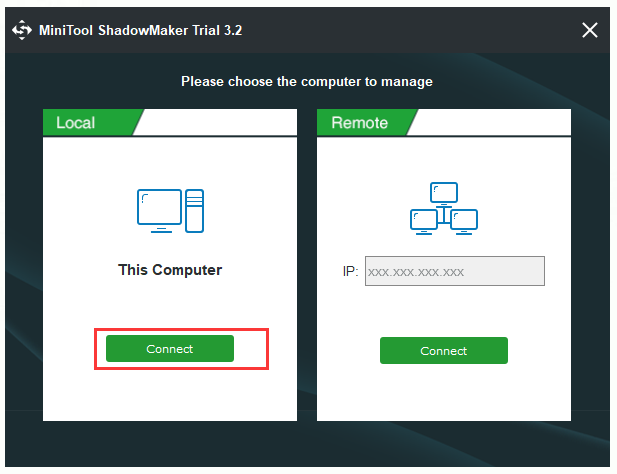
3.Then click Connect in the Local section to manage the local computer.
Step 2: Choose Backup Source
1.Click the Backup option to enter its interface.
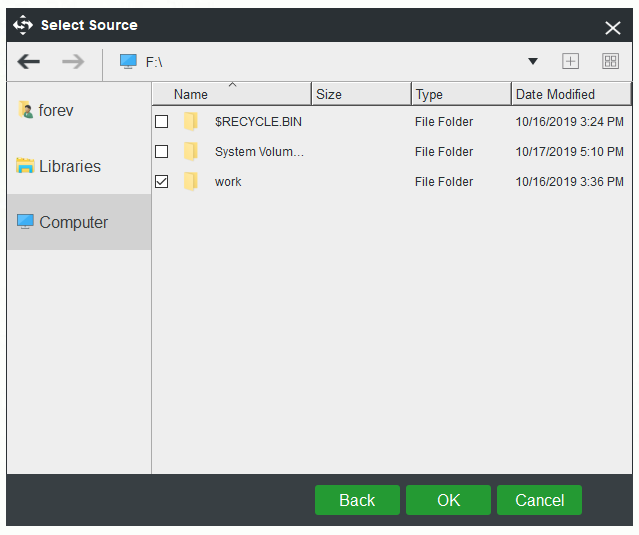
2.Then click the Source tab, choose the Folder and Files option, then choose the files that you want to back up. Finally, click the OK button to back to the Backup page. If you want to back up your disks or partitions, you are also allowed to choose the other option: Disk and Partitions.
Step 3: Select a Destination Path to Save Your Backup Files
1.When you return to the Backup page, click the Destination tab.
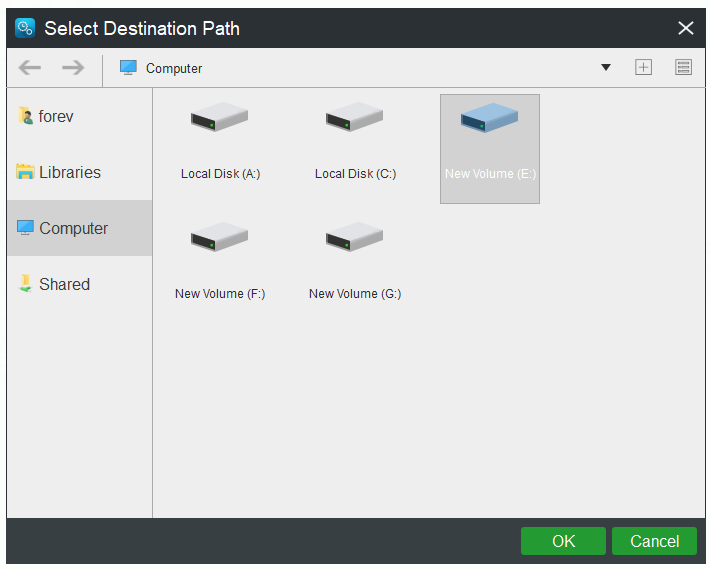
2.There are four available destination paths for you to choose. Select one suitable destination path to save your files and then click OK to back to the main interface.
Step 4: Start to Back up
1.Click Back up Now to start the process immediately. You can also choose Back up Later to delay the process, and then you need to click Back up Now on the Manage page to perform the pending operation.
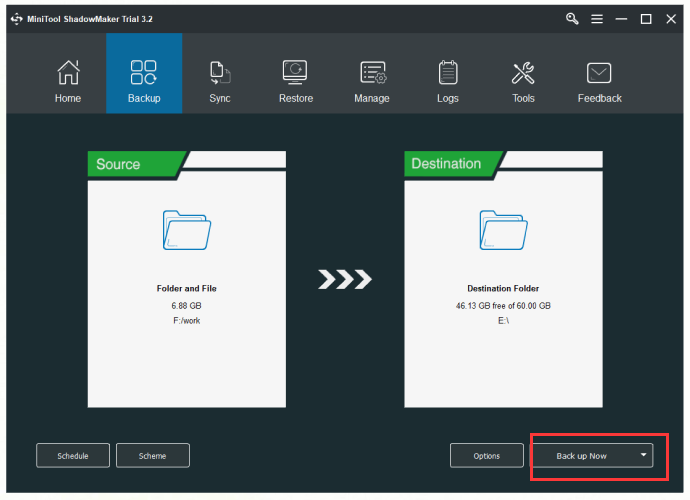
2.A confirmation message window will show up. If you decide to perform the backup operation right now, just click Yes to continue. Meanwhile, you can also choose whether to check the option: Shut down the computer when all the running backup tasks are finished or not.
After you finish all the steps above, you should back up your data with MiniTool ShadowMaker successfully.
Conclusion
To sum up, you should learn how to close your browser if the malicious “Windows Security Alert” pop-up don’t allow you to do this. Meanwhile, this post offers you some useful Windows Security Alert popup removal methods. It also introduces you to a useful backup tool – MiniTool ShadowMaker to protect your PC.
MiniTool ShadowMaker TrialClick to Download100%Clean & Safe
With MiniTool ShadowMaker, you can back up your data in advance in case you lose data. If you encounter any problems when you are using MiniTool ShadowMaker, please feel free to contact us by sending an email to [email protected].

